Sales Quote Types
You can create four types of sales quotes:
Equipment Sales Quotes: Use this type to create a sales quote for new equipment, items related to that equipment, and other items the customer wants to purchase.
Managed Print Services (MPS) Sales Quotes: Use this type to create a sales quote for the customer's current equipment cost situation; you cannot add any new equipment or items to the quote.
Bundled Sales Quotes: Use this type to create a sales quote for new equipment, items related to that equipment, and other items the customer wants to purchase as well as for the customer's current equipment cost situation.
Supply Sales Quotes: Use this type to create a sales quote for new non-configured supply items and new non-configured supply items associated with a contract.
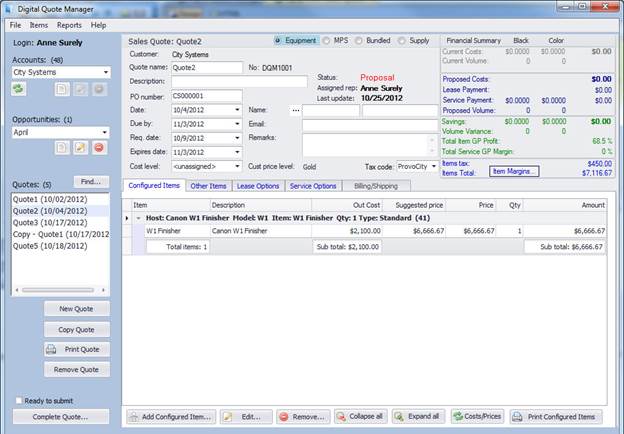
Equipment Sales QuoteEquipment Sales Quote
The Digital Quote Manager window has four main parts: a blue sales quote action bar on the left side of the window, a general information region in the top center of the window, a financial summary region in the top right of the window, and a tabbed region below the general information and financial summary regions.
You use the blue sales quote action bar to create, find, copy, print, submit, complete, and/or remove quotes. When creating a quote, you identify the customer or prospect for whom you are creating the quote. You select an existing customer from an Accounts list your administrator has configured for you, or you create a new prospect that can be made an active customer once the quote is completed and submitted to e-automate.
Using the blue sales quote action bar, you also create and select Opportunities under which you organize your quotes. For each customer, you can associate one or more opportunities with one or more sales quotes. For example, you can use an opportunity named Demo if the sales quote is for equipment to be used for demo purposes and another opportunity named Special if the sales quote is created for a special sale your company is holding.
You use the general information region to view and provide data about the sales quote, such as the name of the quote, the contact information, and the status of the quote.
The Financial Summary region displays the tax and total amount of items on the sales quote. The system updates this information as you add items to and/or remove items from the sales quote. For more information on the Financial Summary region, see the Using the Financial Summary topic.
For Equipment Sales Quotes, additional information is arranged on Configured Items, Other Items , Lease Options, Service Options, and Billing/Shipping tabs in the tabbed region.
On the Configured Items tab, you add equipment and items related to that equipment to the sales quote. To assist with sales quote preparation, your administrator determines the equipment and items from which you can select and defines the actions you can take based on selections made (e.g., you can select one item but not another, you can select the quantity of an item to add to the sales quote, you can select the quantity of an item to add to the sales quote up to a certain limit, you can use only the preselected items and item quantities).
You must first select host equipment. Once you select host equipment, the system displays in the Configuration details region all items related to the host equipment along with the description, quantity in stock, out cost, and a suggested price for each item. If the item is assigned to a cost level, the group cost replaces the out cost value when the cost level is selected.
As you add items to the quote, a subtotal for the out cost and suggested price of the selected items displays at the bottom right of the Digital Quote Manager window. Once you save the items to the Configured Items tab, the tab shows all configured items added under their host equipment. You can view all host equipment and their related items at once, or you can collapse groupings to only view a specific host with its related items. The Configured Items tab lists the following information on each related item:
Item number
Description
Out cost
Suggested price
Price
Quantity
Amount
Item out cost subtotal by host equipment
Dollar amount subtotal by host equipment
You can change the price of a related item once the item is added to the configuration. If you change the price of a related item, the total price, out cost, and quote margin adjust accordingly in the summary region.
On the Other Items tab, you add any extra items the customer wants to place on the quote that are not related to the host equipment. You can add one item at a time or add several items at once.
On the Lease Options tab, you identify and enable lease options and terms for the sales quotes. Your administrator configures the lease options from which you may select. When you select a lease option, Digital Quote Manager automatically calculates the monthly lease payment. The monthly lease payment consists of the item prices and service costs. When selecting the lease option, you may choose to have all items on the sales quote under the selected lease option or choose to have only certain items on the sales quotes under the selected lease option. The monthly lease payment calculation automatically updates as you select or deselect items. If you need to adjust the monthly lease payment to meet the customer's needs, you may do so in the Lease Payment field of the Lease Options tab. When you modify the monthly lease payment, the item prices equally adjust for all items. The service costs are not affected when the monthly lease payment is adjusted. You can add up to three different lease options to a sales quote. Doing so allows you to compare the different lease options to determine which option will best fit your customer's needs.
You use the Service Options tab to determine and view a summary of service costs for the equipment on a sales quote. Your administrator identifies the service settings you may use to calculate service and may allow you the ability to modify these settings.
On the Billing/Shipping tab, you specify the bill-to and ship-to information. If necessary, you can identify multiple ship-to addresses and delivery options for different items on the sales quote. For example, if you have several pieces of equipment on the quote that are all going to different locations, you can specify the location to which you want each of those items shipped or delivered. The multiple ship-to options function also allows you to identify very specific shipping information, including delivery contacts, delivery methods, equipment type, equipment contact, equipment bill-to address, decision maker contact, meter reading contact, equipment remarks, and additional checks such as "location is residential" and "delivery involves stairs."
The following steps provide a linear process for creating an Equipment Sales Quote. If you need to modify an existing Equipment Sales Quote, use the steps applicable to the change(s) you need to make.
Select a customer or prospect for whom you want to create an Equipment Sales Quote. Do one of the following:
To create a quote for an existing customer, in the Accounts field, use the drop-down menu to select the customer from the list configured by your administrator.
To create a quote for a prospective customer, see the Creating a Prospect section of the Managing Prospects topic.
Select an opportunity under which you want to categorize this sales quote. Do one of the following:
To create a quote under an existing opportunity, in the Opportunities field, use the drop-down menu to select an opportunity.
To create a new opportunity, see the Managing Opportunities topic.
Click [New Quote]. The system activates applicable buttons on the blue sales quote action region and populates applicable fields in the general information region, such as the default Quote Name and Date.
Select the Equipment radio button at the top of the general information region.
Verify and/or complete information in the following fields as appropriate:
Customer: Displays the customer you selected or the prospect you created.
Quote name: Displays the default name (e.g., Quote1). You can override this name.
No: Displays the quote number the system assigned to this sales quote. You cannot override this field.
Description: Brief description of the quote.
Status: Displays the status of the quote. Before the quote is submitted, the field displays Proposal. After the quote is submitted, the field displays the status of the sales order as it is in e-automate along with the sales order number in red above the field. You cannot override this field.
Assigned rep: Displays the sales rep assigned to this sales quote. You cannot override this field.
PO number: PO number associated with this proposal, if any.
Last update: Displays the date this sales quote was last updated.
Date: Date you want this proposal dated. Select the appropriate date from the drop-down menu calendar or click in the field and enter the appropriate date.
Due by: Date by which the signed proposal is due. This field is automatically populated using the defaults set in e-automate. For more information on setting these defaults, see the Setting Sales Options subtopic under the Setting All e-automate Options topic in e-automate online help.
Req. date: Date by which the customer needs the completed proposal. This field is automatically populated with the defaults set in e-automate. For more information on setting these defaults, see the Setting Sales Options subtopic under the Setting All e-automate Options topic in e-automate online help.
Expires Date: Date on which the proposal is no longer valid. This field is automatically populated with the defaults set in e-automate. For more information on setting these defaults, see the Setting Sales Options subtopic under the Setting All e-automate Options topic in e-automate online help.
Cost Level: Cost level you want to assign this sales quote.
Name: Use the [...] button to select a contact or enter the first and last name in the provided fields.
Email: Contact email for this proposal.
Remarks: Enter any remarks you want to add to this sales quote.
Customer price level: Price level assigned to this customer in e-automate. You cannot override this field.
Tax code: Tax code you want to assign to this customer. If this is an existing customer, the field is populated with the tax code assigned in e-automate. If this is a prospective customer, use the down arrow to select the appropriate tax code. In e-automate, you may want to set up a tax code specifically for prospects with a preceding underscore or asterisk as this tax code list is sorted alphabetically. That way the prospect tax code will be preselected for prospects.
Add configured items to the sales quote. See the Using the Configured Items Tab topic.
Add other items to the sales quote. See the Using the Other Items Tab topic.
Specify lease options for the sales quote. See the Using the Lease Options Tab topic.
Determine a summary of service costs for the equipment on the sales quote. See the Using the Service Option Tab topic.
Specify billing and shipping information. See the Using the Billing/Shipping Tab topic.
When the sales quote is complete and you are ready to submit it, check the Ready to submit checkbox to indicate to your administrator that this sales quote is ready to submit to e-automate.
Complete and submit the quote to e-automate for sales order creation. See the Completing Quotes topic.
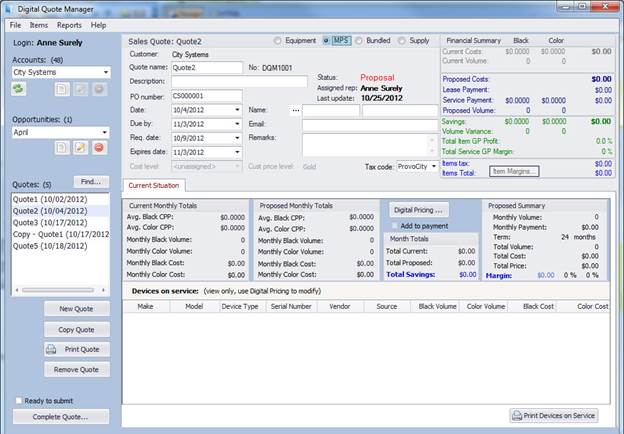
MPS Sales QuoteMPS Sales Quote
The Digital Quote Manager window has four main parts: a blue sales quote action bar on the left side of the window, a general information region in the top center of the window, a financial summary region in the top right of the window, and a tabbed region below the general information and financial summary regions.
You use the blue sales quote action bar to create, find, copy, print, submit, complete, and/or remove quotes. When creating a quote, you identify the customer or prospect for whom you are creating the quote. You select an existing customer from an Accounts list your administrator has configured for you, or you create a new prospect that can be made an active customer once the quote is completed and submitted to e-automate.
Using the blue sales quote action bar, you also create and select Opportunities under which you organize your quotes. For each customer, you can associate one or more opportunities with one or more sales quotes. For example, you can use an opportunity named Demo if the sales quote is for equipment to be used for demo purposes and another opportunity named Special if the sales quote is created for a special sale your company is holding.
You use the general information region to view and provide data about the sales quote, such as the name of the quote, the contact information, and the status of the quote.
The Financial Summary region displays the customer's current costs, your proposed costs, and savings information for managed print services broken down by black and color meters using data collected via the Digital Pricing application. For more information on the Financial Summary region, see the Using the Financial Summary topic.
The tabbed region for MPS Sales Quotes includes only the Current Situation tab with access to the Digital Pricing application. The Current Situation tab provides you with a snapshot of the customer's current equipment cost situation and a snapshot of the proposed equipment cost you can offer your customer. This tab allows you to view this information side by side so that you can compare the difference between the customer's current and proposed costs. The cost information pulls from the data you enter via the Digital Pricing application. Information provided on the Current Situation tab includes the overall monthly totals for the current costs, the overall totals for proposed costs offered, and the overall total savings per month the customer will get upon accepting the sales quote.
The following steps provide a linear process for creating an MPS Sales Quote. If you need to modify an existing MPS Sales Quote, use the steps applicable to the change(s) you need to make.
Select a customer or prospect for whom you want to create an MPS Sales Quote. Do one of the following:
To create a quote for an existing customer, in the Accounts field, use the drop-down menu to select the customer from the list configured by your administrator.
To create a quote for a prospective customer, see the Creating a Prospect section of the Managing Prospects topic.
Select an opportunity under which you want to categorize this sales quote. Do one of the following:
To create a quote under an existing opportunity, in the Opportunities field, use the drop-down menu to select an opportunity.
To create a new opportunity, see the Managing Opportunities topic.
Click [New Quote]. The system activates applicable buttons on the blue sales quote action region and populates applicable fields in the general information region, such as the default Quote Name and Date.
Select the MPS radio button at the top of the general information region.
Verify and/or complete information in the following fields as appropriate:
Customer: Displays the customer you selected or the prospect you created.
Quote name: Displays the default name (e.g., Quote1). You can override this name.
No: Displays the quote number the system assigned to this sales quote. You cannot override this field.
Description: Brief description of the quote.
Status: Displays the status of the quote. Before the quote is submitted, the field displays Proposal. After the quote is submitted, the field displays the status of the sales order as it is in e-automate along with the sales order number in red above the field. You cannot override this field.
Assigned rep: Displays the sales rep assigned to this sales quote. You cannot override this field.
PO number: PO number associated with this proposal, if any.
Last update: Displays the date this sales quote was last updated.
Date: Date you want this proposal dated. Select the appropriate date from the drop-down menu calendar or click in the field and enter the appropriate date.
Due by: Date by which the signed proposal is due. This field is automatically populated using the defaults set in e-automate. For more information on setting these defaults, see the Setting Sales Options subtopic under the Setting All e-automate Options topic in e-automate online help.
Req. date: Date by which the customer needs the completed proposal. This field is automatically populated with the defaults set in e-automate. For more information on setting these defaults, see the Setting Sales Options subtopic under the Setting All e-automate Options topic in e-automate online help.
Expires Date: Date on which the proposal is no longer valid. This field is automatically populated with the defaults set in e-automate. For more information on setting these defaults, see the Setting Sales Options subtopic under the Setting All e-automate Options topic in e-automate online help.
Cost Level: Cost level you want to assign this sales quote.
Name: Use the [...] button to select a contact or enter the first and last name in the provided fields.
Email: Contact email for this proposal.
Remarks: Enter any remarks you want to add to this sales quote.
Customer price level: Price level assigned to this customer in e-automate. You cannot override this field.
Tax code: Tax code you want to assign to this customer. If this is an existing customer, the field is populated with the tax code assigned in e-automate. If this is a prospective customer, use the down arrow to select the appropriate tax code. In e-automate, you may want to set up a tax code specifically for prospects with a preceding underscore or asterisk as this tax code list is sorted alphabetically. That way the prospect tax code will be preselected for prospects.
Calculate the customer’s current equipment cost situation and calculate a cost savings proposal using the Digital Pricing application. See the Using the Current Situation Tab and the Digital Pricer help topics.
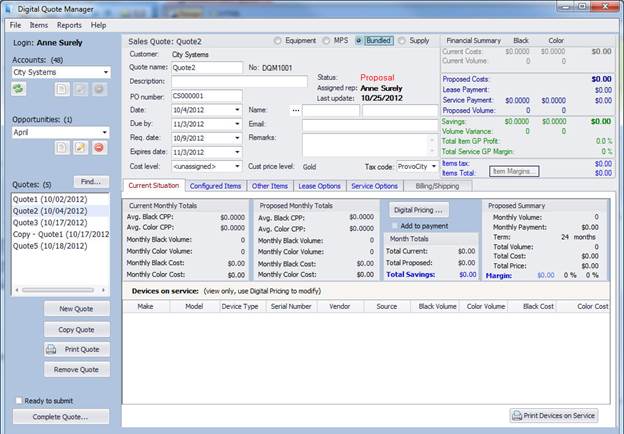
Bundled Sales QuoteBundled Sales Quote
The Digital Quote Manager window has four main parts: a blue sales quote action bar on the left side of the window, a general information region in the top center of the window, a financial summary region in the top right of the window, and a tabbed region below the general information and financial summary regions.
You use the blue sales quote action bar to create, find, copy, print, submit, complete, and/or remove quotes. When creating a quote, you identify the customer or prospect for whom you are creating the quote. You select an existing customer from an Accounts list your administrator has configured for you, or you create a new prospect that can be made an active customer once the quote is completed and submitted to e-automate.
Using the blue sales quote action bar, you also create and select Opportunities under which you organize your quotes. For each customer, you can associate one or more opportunities with one or more sales quotes. For example, you can use an opportunity named Demo if the sales quote is for equipment to be used for demo purposes and another opportunity named Special if the sales quote is created for a special sale your company is holding.
You use the general information region to view and provide data about the sales quote, such as the name of the quote, the contact information, and the status of the quote.
The Financial Summary region displays the customer's current costs, your proposed costs, and savings information for managed print services broken down by black and color meters using data collected via the Digital Pricing application. This region also displays the tax and total amount of items on the sales quote. The system updates this information as you add items to and/or remove items from the sales quote. For more information on the Financial Summary region, see the Using the Financial Summary topic.
For Bundled Sales Quotes, additional information is arranged on Current Situation, Configured Items, Other Items , Lease Options, Service Options, and Billing/Shipping tabs in the tabbed region.
The Current Situation tab provides you with a snapshot of the customer's current equipment cost situation and a snapshot of the proposed equipment cost you can offer your customer. This tab allows you to view this information side by side so that you can compare the difference between the customer's current and proposed costs. The cost information pulls from the data you enter via the Digital Pricing application. Information provided on the Current Situation tab includes the overall monthly totals for the current costs, the overall totals for proposed costs offered, and the overall total savings per month the customer will get upon accepting the sales quote.
On the Configured Items tab, you add equipment and items related to that equipment to the sales quote. To assist with sales quote preparation, your administrator determines the equipment and items from which you can select and defines the actions you can take based on selections made (e.g., you can select one item but not another, you can select the quantity of an item to add to the sales quote, you can select the quantity of an item to add to the sales quote up to a certain limit, you can use only the preselected items and item quantities).
You must first select host equipment. Once you select host equipment, the system displays in the Configuration details region all items related to the host equipment along with the description, quantity in stock, out cost, and a suggested price for each item. If the item is assigned to a cost level, the group cost replaces the out cost value when the cost level is selected.
As you add items to the quote, a subtotal for the out cost and suggested price of the selected items displays at the bottom right of the Digital Quote Manager window. Once you save the items to the Configured Items tab, the tab shows all configured items added under their host equipment. You can view all host equipment and their related items at once, or you can collapse groupings to only view a specific host with its related items. The Configured Items tab lists the following information on each related item:
Item number
Description
Out cost
Suggested price
Price
Quantity
Amount
Item out cost subtotal by host equipment
Dollar amount subtotal by host equipment
You can change the price of a related item once the item is added to the configuration. If you change the price of a related item, the total price, out cost, and quote margin adjust accordingly in the summary region.
On the Other Items tab, you add any extra items the customer wants to place on the quote that are not related to the host equipment. You can add one item at a time or add several items at once.
On the Lease Options tab, you identify and enable lease options and terms for the sales quotes. Your administrator configures the lease options from which you may select. When you select a lease option, Digital Quote Manager automatically calculates the monthly lease payment. The monthly lease payment consists of the item prices and service costs. When selecting the lease option, you may choose to have all items on the sales quote under the selected lease option or choose to have only certain items on the sales quotes under the selected lease option. The monthly lease payment calculation automatically updates as you select or deselect items. If you need to adjust the monthly lease payment to meet the customer's needs, you may do so in the Lease Payment field of the Lease Options tab. When you modify the monthly lease payment, the item prices equally adjust for all items. The service costs are not affected when the monthly lease payment is adjusted. You can add up to three different lease options to a sales quote. Doing so allows you to compare the different lease options to determine which option will best fit your customer's needs.
You use the Service Options tab to determine and view a summary of service costs for the equipment on a sales quote. Your administrator identifies the service settings you may use to calculate service and may allow you the ability to modify these settings.
On the Billing/Shipping tab, you specify the bill-to and ship-to information. If necessary, you can identify multiple ship-to addresses and delivery options for different items on the sales quote. For example, if you have several pieces of equipment on the quote that are all going to different locations, you can specify to which locations you want those items shipped or delivered. The multiple ship-to options function also allows you to identify very specific shipping information, including delivery contacts, delivery methods, equipment type, equipment contact, equipment bill to address, decision maker contact, meter reading contact, equipment remarks, and additional checks such as "location is residential" and "delivery involves stairs."
The following steps provide a linear process for creating a Bundled Sales Quote. If you need to modify an existing Bundled Sales Quote, use the steps applicable to the change(s) you need to make.
Select a customer or prospect for whom you want to create a Bundled Sales Quote. Do one of the following:
To create a quote for an existing customer, in the Accounts field, use the drop-down menu to select the customer from the list configured by your administrator.
To create a quote for a prospective customer, see the Creating a Prospect section of the Managing Prospects topic.
Select an opportunity under which you want to categorize this sales quote. Do one of the following:
To create a quote under an existing opportunity, in the Opportunities field, use the drop-down menu to select an opportunity.
To create a new opportunity, see the Managing Opportunities topic.
Click [New Quote]. The system activates applicable buttons on the blue sales quote action region and populates applicable fields in the general information region, such as the default Quote Name and Date.
Select the Bundled radio button at the top of the general information region.
Verify and/or complete information in the following fields as appropriate:
Customer: Displays the customer you selected or the prospect you created.
Quote name: Displays the default name (e.g., Quote1). You can override this name.
No: Displays the quote number the system assigned to this sales quote. You cannot override this field.
Description: Brief description of the quote.
Status: Displays the status of the quote. Before the quote is submitted, the field displays Proposal. After the quote is submitted, the field displays the status of the sales order as it is in e-automate along with the sales order number in red above the field. You cannot override this field.
Assigned rep: Displays the sales rep assigned to this sales quote. You cannot override this field.
PO number: PO number associated with this proposal, if any.
Last update: Displays the date this sales quote was last updated.
Date: Date you want this proposal dated. Select the appropriate date from the drop-down menu calendar or click in the field and enter the appropriate date.
Due by: Date by which the signed proposal is due. This field is automatically populated using the defaults set in e-automate. For more information on setting these defaults, see the Setting Sales Options subtopic under the Setting All e-automate Options topic in e-automate online help.
Req. date: Date by which the customer needs the completed proposal. This field is automatically populated with the defaults set in e-automate. For more information on setting these defaults, see the Setting Sales Options subtopic under the Setting All e-automate Options topic in e-automate online help.
Expires Date: Date on which the proposal is no longer valid. This field is automatically populated with the defaults set in e-automate. For more information on setting these defaults, see the Setting Sales Options subtopic under the Setting All e-automate Options topic in e-automate online help.
Cost Level: Cost level you want to assign this sales quote.
Name: Use the [...] button to select a contact or enter the first and last name in the provided fields.
Email: Contact email for this proposal.
Remarks: Enter any remarks you want to add to this sales quote.
Customer price level: Price level assigned to this customer in e-automate. You cannot override this field.
Tax code: Tax code you want to assign to this customer. If this is an existing customer, the field is populated with the tax code assigned in e-automate. If this is a prospective customer, use the down arrow to select the appropriate tax code. In e-automate, you may want to set up a tax code specifically for prospects with a preceding underscore or asterisk as this tax code list is sorted alphabetically. That way the prospect tax code will be preselected for prospects.
Calculate the customer’s current equipment cost situation and calculate a cost savings proposal using the Digital Pricing application. See the Using the Current Situation Tab and the Digital Pricer help topics.
Add configured items to the sales quote. See the Using the Configured Items Tab topic.
Add other items to the sales quote. See the Using the Other Items Tab topic.
Specify lease options for the sales quote. See the Using the Lease Options Tab topic.
Determine a summary of service costs for the equipment on the sales quote. See the Using the Service Option Tab topic.
Specify billing and shipping information. See the Using the Billing/Shipping Tab topic.
When the sales quote is complete and you are ready to submit it, check the Ready to submit checkbox to indicate to your administrator that this sales quote is ready to submit to e-automate.
Complete and submit the quote to e-automate for sales order creation. See the Completing Quotes topic.
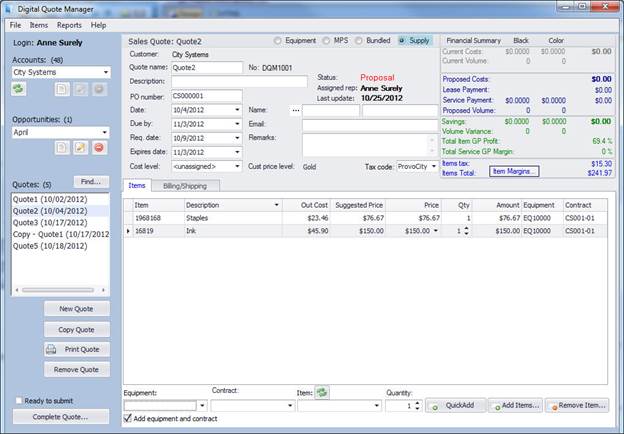
Supply Sales QuoteSupply Sales Quote
There are four main areas that make up an Supply Sales Quote. The blue area that runs along the left side of the quote is where you begin the Equipment sales quote creation process as well as prepare the quote for submission and complete the sales quote. In this blue area you identify the customer or prospect for which you want to create an equipment sales quote, create the categories for the customer/prospect under which you want to categorize their quotes, and complete the sales quote.
The top half of an Supply sales quote provides the general information area and the financial summary area. The general information area is where you are provided and enter general equipment sales quote information such as a name for the quote, contact information, and sales quote status. The Financial Summary area gives you a financial summary of the quote broken down by black copies and color copies. The financial summary numbers update as information is added to or deleted from the sales quote. Because Supply type sales quotes do not have equipment cost information, the gray and blue regions of the financial summary display zeros. For more information on the Financial Summary area see the Using the Financial Summary topic.
To create a new Sales Quote you can select a customer from a list of existing customers that your administrator has configured to appear in your list or create a new prospective customer that can be made an active customer once the quote is completed and submitted to e-automate.
You must categorize each quote under an opportunity. Opportunities help you to better organize your quotes under each customer. Each customer can have one or more opportunities associated with one or more sales quotes. For example, you can have an opportunity named Demo if the sales quote is for equipment to be used for demo purposes and another opportunity named Special if the sales quote is created for a special sale your company is holding. You must create new opportunities for the customer before creating a new quote.
The following steps provide a linear process for creating a Supply Sales Quote. If you need to modify an existing Supply Sales Quote, use the steps applicable to the change(s) you need to make.
Select a customer or prospect for whom you want to create a Supply Sales Quote. Do one of the following:
To create a quote for an existing customer, in the Accounts field, use the drop-down menu to select the customer from the list configured by your administrator.
To create a quote for a prospective customer, see the Creating a Prospect section of the Managing Prospects topic.
Select an opportunity under which you want to categorize this sales quote. Do one of the following:
To create a quote under an existing opportunity, in the Opportunities field, use the drop-down menu to select an opportunity.
To create a new opportunity, see the Managing Opportunities topic.
Click [New Quote]. The system activates applicable buttons on the blue sales quote action region and populates applicable fields in the general information region, such as the default Quote Name and Date.
Select the Supply radio button at the top of the general information region.
Verify and/or complete information in the following fields as appropriate:
Customer: Displays the customer you selected or the prospect you created.
Quote name: Displays the default name (e.g., Quote1). You can override this name.
No: Displays the quote number the system assigned to this sales quote. You cannot override this field.
Description: Brief description of the quote.
Status: Displays the status of the quote. Before the quote is submitted, the field displays Proposal. After the quote is submitted, the field displays the status of the sales order as it is in e-automate along with the sales order number in red above the field. You cannot override this field.
Assigned rep: Displays the sales rep assigned to this sales quote. You cannot override this field.
PO number: PO number associated with this proposal, if any.
Last update: Displays the date this sales quote was last updated.
Date: Date you want this proposal dated. Select the appropriate date from the drop-down menu calendar or click in the field and enter the appropriate date.
Due by: Date by which the signed proposal is due. This field is automatically populated using the defaults set in e-automate. For more information on setting these defaults, see the Setting Sales Options subtopic under the Setting All e-automate Options topic in e-automate online help.
Req. date: Date by which the customer needs the completed proposal. This field is automatically populated with the defaults set in e-automate. For more information on setting these defaults, see the Setting Sales Options subtopic under the Setting All e-automate Options topic in e-automate online help.
Expires Date: Date on which the proposal is no longer valid. This field is automatically populated with the defaults set in e-automate. For more information on setting these defaults, see the Setting Sales Options subtopic under the Setting All e-automate Options topic in e-automate online help.
Cost Level: Cost level you want to assign this sales quote.
Name: Use the [...] button to select a contact or enter the first and last name in the provided fields.
Email: Contact email for this proposal.
Remarks: Enter any remarks you want to add to this sales quote.
Customer price level: Price level assigned to this customer in e-automate. You cannot override this field.
Tax code: Tax code you want to assign to this customer. If this is an existing customer, the field is populated with the tax code assigned in e-automate. If this is a prospective customer, use the down arrow to select the appropriate tax code. In e-automate, you may want to set up a tax code specifically for prospects with a preceding underscore or asterisk as this tax code list is sorted alphabetically. That way the prospect tax code will be preselected for prospects.
If you want to add items to the sales quote without crediting them to a contract, do one of the following:
To add items one at a time, do the following:
Click the [Loads/Refreshes Items] button to refresh the list of items to make sure you can choose from the most current items available.
In the Item field, use the down arrow to select the item you want to add to the sales quote.
In the Quantity field, use the arrows or click in the field to enter the quantity of the item you want to add to the sales quote.
To add multiple items, do the following:
Click the [Loads/Refreshes Items] button to refresh the list of items to make sure you can choose from the most current items available.
Click [Add Items...] to open the Add Items window.
Check the checkbox in the Selected column next to each item you want to add to the sales quote.
Click [Add Selected Items] to add the items to the Items tab. You may edit any of the following columns of the added items:
Out Cost
Price
Qty
If you want to add items to the sales quote and credit them to the contract to which they are associated, do one of the following.
To add items one at a time, do the following:
Click the [Loads/Refreshes Items] button to refresh the list of items to make sure you can choose from the most current items available.
Check the Add equipment and contract checkbox to credit the items you add to the contracts to which they are associated. The Contract field displays.
In the Equipment field, use the down arrow to select the equipment you want to add to the sales quote.
In the Contract field, use the down arrow to select the contract to which the equipment is associated.
In the Quantity field, enter the quantity of the equipment you want to add to the sales quote.
Click [QuickAdd] to add the equipment to the Items tab.
To add multiple items, do the following:
Click the [Loads/Refreshes Items] button to refresh the list of items to make sure you can choose from the most current items available.
Click [Add Items...] to open the Add Items window.
Check the checkbox in the Selected column next to each item you want to add to the sales quote.
Check the checkbox in the Selected column next to each item you want to add to the sales quote.
Check the Add equipment and contract checkbox to credit the items you add to the contracts to which they are associated. The Contract field displays and the Contract column displays on the Items tab.
In the Contracts column, enter the contract number for each item you want to credit to that contract.
You may edit any of the following columns of the added items:
Out Cost
Price
Qty
Equipment
Contract
If you want to remove items from the Items tab, do the following:
From the Items tab select the item you want to remove.
Click [Remove Item...] to remove the item from the list.
Specify billing and shipping information. See the Using the Billing/Shipping Tab topic.
©2025 ECI and the ECI logo are registered trademarks of ECI Software Solutions, Inc. All rights reserved.