Completing Quotes
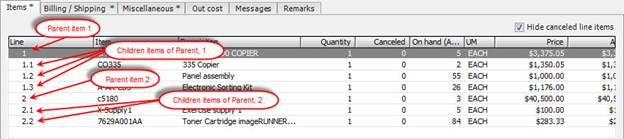
When you complete a sales quote, the sales quote is submitted to e-automate where a sales order is created for those quotes that have items included. The parent/child relationships of the items on the sales quote are transferred to the sales quote that is created in e-automate. The relationship is indicated in the Line column on the Items tab of the sales order in e-automate. The parent item is indicated by a whole number (1, 2, etc). Each child is indicated by decimal beginning with the decimal. For example, the first host equipment on the sales order will be indicated with a 1. The first child item will be indicated with 1.01, the second child item will be indicated with 1.02, the third child item will be indicated with 1.03, etc.
Once the sales quote is complete the e-automate sales order number appears in red in the sales order field and the word Submitted appears in red letters across the Price Summary region and no changes can be made. You must have the appropriate rights to complete a sales quote. When completing sales quotes for a prospect you must determine whether or not you want the system to create a customer record in e-automate for the prospect once the quote is submitted.
If you do not have any items added to the sales quote and you try to complete the quote the Complete Quote window displays a warning informing you There are no items for a Sales Order. There may be cases in which you will not have items on the sales quote such as an MPS only quote, for example. In these cases you may ignore the warning and complete the quote. The status on the sales quote will update to Proposal, and the word Submitted does not display on the quote. If the sales quote is for a prospect, you still have the option to create a customer record in e-automate for the prospect. A sales order will not be created in e-automate for these types of sales quotes.
In the Accounts region, use the drop-down menu to select the customer or prospect whose sales quote you want to push to e-automate.
In the Opportunities field, use the drop-down menu to select the opportunity under which the sales quote is categorized.
In the Quotes region, select the sales quote you want to submit to e-automate.
When the sales quote is complete and you are ready for it to be submitted, check the Ready to submit checkbox to indicate to your Admin that this quote is ready to submit to e-automate. This is especially important in instances where the sales rep does not have the rights to submit quotes to e-automate.
Click [Complete Quote...] to open the Complete Quote window.
If this quote is for a prospect, and you want the prospect to be added to e-automate as a customer, check the Create customer record checkbox.
The following fields display, but cannot be edited in this window:
Customer name: Customer with which this sales quote is associated.
Address: Customer address.
City: City in which the customer is located.
State: State in which the customer is located.
Zip: Zip code in which the customer is located.
Sales rep: Sales rep assigned to this sales quote.
PO number: PO number associated with this sales quote, if any.
In the Tax code field, use the drop-down menu to select the appropriate tax code for this customer.
In the Date field, use the drop-down menu to select the date you want this sales order to use at the SO submittal date.
In the Description field, enter a brief description of the sales quote.
In the Order type field, use the drop-down menu to select the order type you want for this sales quote.
In the On hold code field, if necessary, use the drop-down menu to select an on hold code you want associated with this sales quote.
In the Department field, use the drop-down menu to select the department you want assigned to the sales rep. If a department is already assigned in e-automate, that department will be preselected in this field.
In the Warehouse field, enter the warehouse from which you want the items on the sales quote to be taken. If a warehouse is assigned to the rep in e-automate, that warehouse is preselected in this field. If the sales rep has more than one warehouse Digital Quote Manager selects the first one in alphabetical order. If the sales rep does not have a warehouse assigned the default dealer's warehouse is selected.
In the Whse Bin field, use the drop-down menu to select the bin from which you want the items on the sales quote to be taken. If this quote is for a customer and not a prospect, Digital Quote Manager will automatically choose the dealer’s default warehouse and relative bin.
In the Remarks field, enter any remarks regarding this sales quote.
If you want to create only a sales order header, rather than create the entire sales order check the Create sales order header (Only) checkbox.
Click [OK] to submit the sales quote. After the quote is sent to e-automate, Submitted appears in red letters across the Summary region, the status field updates to Sales Order and display the SO number, and no changes can be made to the sales quote.
©2025 ECI and the ECI logo are registered trademarks of ECI Software Solutions, Inc. All rights reserved.