Enabling SMTP Auth for the Mailboxes E-automate and Related Programs Are Using to Send Email
Beginning October 1, 2022, Microsoft plans to begin disabling Basic authentication for Outlook, EWS, RPS, POP, IMAP, and EAS protocols. When this change occurs, automatic e-mail functionality found within e-automate, e-agent, e-info, Digital Analytics, Digital Taskforce, FMAudit, MobileTech, Printanista, Remote Service Manager, and RemoteTech may stop working if you are using Microsoft Office 365 unless you enable SMTP Auth for each mailbox your system is using to send email from these programs. These changes should allow automatic emailing from these programs to continue to function through the end of the year, allowing time for exploring alternate solutions.
If you are using Microsoft Office 365, do the following:
Make a List of the Sender Email Address(es) You Are Using with Microsoft Office 365 in Each of These Programs:Make a List of the Sender Email Address(es) You Are Using with Microsoft Office 365 in Each of These Programs:
E-adminE-admin
The system displays the DG Server Email Settings window after you log in to e-admin. From e-admin, you can also access this window by going to File > Settings > DGServer Email Settings. The sender address is in the Sender address field.
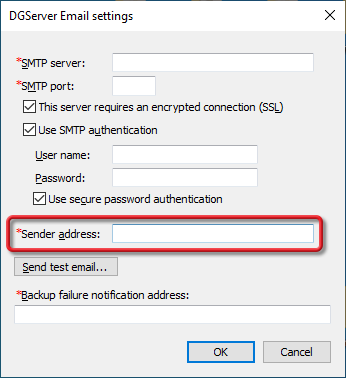
If the email address in this field is powered by MS Office 365, add it to your list of mailboxes to update using the Microsoft 365 Admin Center.
Note: If you are uncertain if this email address is powered by MS Office 365, check to see if the SMTP server field includes a reference to Microsoft Office 365 (e.g., smtp.office365.com) or verify this information with your IT person.
Note: If the value in the Sender address field does not appear to be a valid email address, check the User name field to see if it contains an email address. The mailbox you need to update using the Microsoft 365 Admin Center is the mailbox associated with this account.
Note: For more information on accessing and using this window, see the DGServer Email Settings topic.
E-agent (On Premise)E-agent (On Premise)
From e-agent, go to Tools > Options > Email Settings tab. The sender address is in the Sender address field.
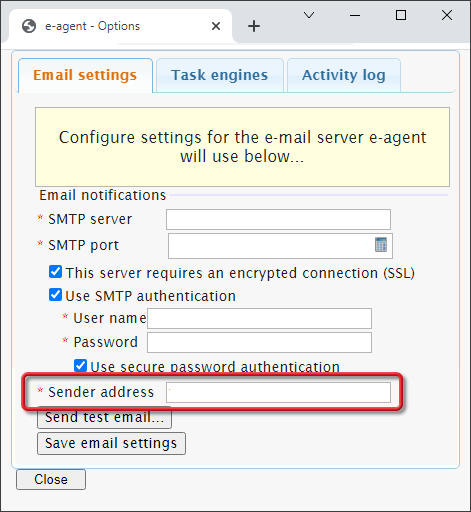
If the email address in this field is powered by MS Office 365, add it to your list of mailboxes to update using the Microsoft 365 Admin Center.
Note: If you are uncertain if this email address is powered by MS Office 365, check to see if the SMTP server field includes a reference to Microsoft Office 365 (e.g., smtp.office365.com) or verify this information with your IT person.
Note: If the value in the Sender address field does not appear to be a valid email address, check the User name field to see if it contains an email address. The mailbox you need to update using the Microsoft 365 Admin Center is the mailbox associated with this account.
Note: For more information on accessing and using this window, see the Configuring E-agent (On Premise) topic.
E-automate ClientE-automate Client
From e-automate, go to Tools > Client Settings > Email settings. The sender address is in the Sender address field.
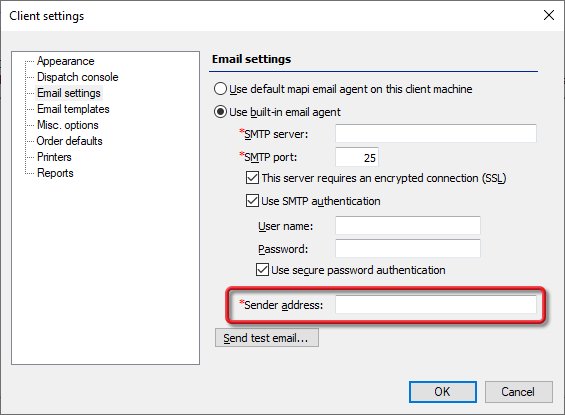
If the email address in this field is powered by MS Office 365, add it to your list of mailboxes to update using the Microsoft 365 Admin Center.
Note: If you are uncertain if this email address is powered by MS Office 365, check to see if the SMTP server field includes a reference to Microsoft Office 365 (e.g., smtp.office365.com) or verify this information with your IT person.
Note: If the value in the Sender address field does not appear to be a valid email address, check the User name field to see if it contains an email address. The mailbox you need to update using the Microsoft 365 Admin Center is the mailbox associated with this account.
Note: For more information on accessing and using this window, see the Setting Personal Client Settings topic.
E-infoE-info
From the e-info web site, click the [Configure Gateway] button to access the Customer Gateway Configuration page. The sender address is listed in the Server SMTP authorized user field.
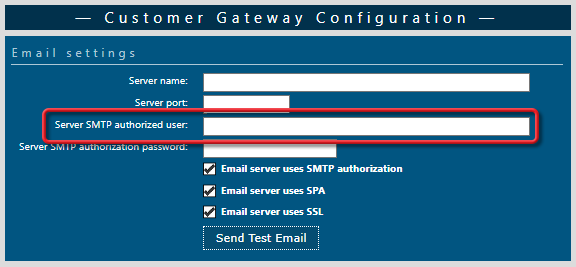
If the email address in this field is powered by MS Office 365, add it to your list of mailboxes to update using the Microsoft 365 Admin Center.
Note: If you are uncertain if this email address is powered by MS Office 365, check to see if the Server name field includes a reference to Microsoft Office 365 (e.g., smtp.office365.com) or verify this information with your IT person.
Note: For more information on accessing and using this window, see the Configuring e-info End User Options topic.
Digital AnalyticsDigital Analytics
From the folder where you installed Digital Analytics, open the da_DataProcessService.exe.config file. The sender address is the value on the line containing the EmailFrom key.
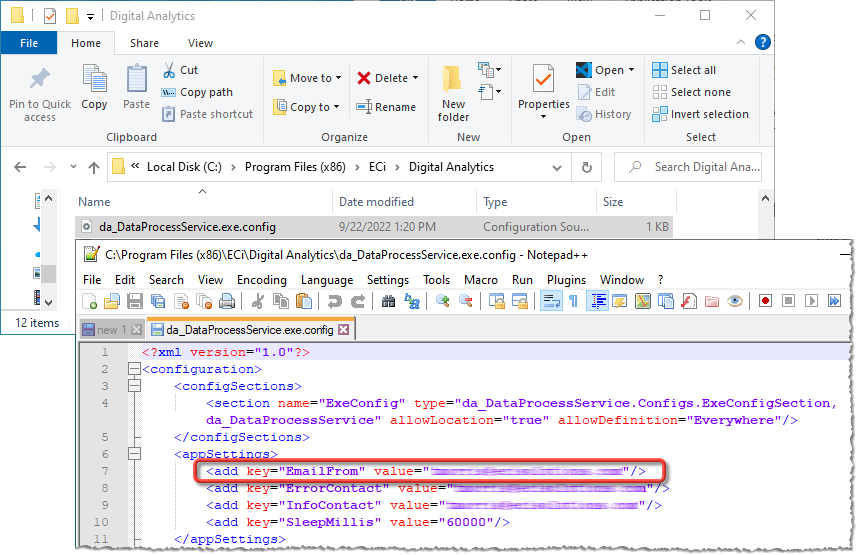
If the email address in this field is powered by MS Office 365, add it to your list of mailboxes to update using the Microsoft 365 Admin Center.
Note: For more information on accessing and using this window, see the Digital Analytics Installation and Configuration topic.
Note: As explained in the linked topic, if you add SMTP configuration values to the da_DataProcessService.exe.config file, the value you enter as the SMTP userName should typically match the value on the line containing the EmailFrom key.
Note: If you are uncertain if this email address is powered by MS Office 365, check to see if the value in the on the host line of the mailSettings region includes a reference to Microsoft Office 365 (e.g., smtp.office365.com).
Digital TaskforceDigital Taskforce
From Digital Taskforce Administrator, go to Software Setup > Email Accounts and double-click each defined email account (e.g., Ksync Alerts). The sender address is in the SMTP From Name (required for INTERNET) field.
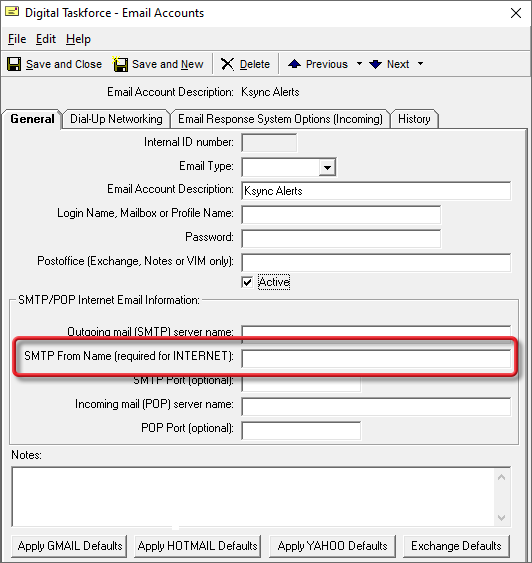
If the email address in this field is powered by MS Office 365, add it to your list of mailboxes to update using the Microsoft 365 Admin Center.
Note: If you are uncertain if this email address is powered by MS Office 365, check to see if the Outgoing mail (SMTP) server name field includes a reference to Microsoft Office 365 (e.g., smtp.office365.com) or verify this information with your IT person.
Note: For more information on accessing and using this window, see the Digital Taskforce Installation, Configuration, and User Guide topic.
FMAuditFMAudit
From FMAudit, go to Admin tab > Server tab > Email Server tab. The sender address is listed in the Default Sender Address field.
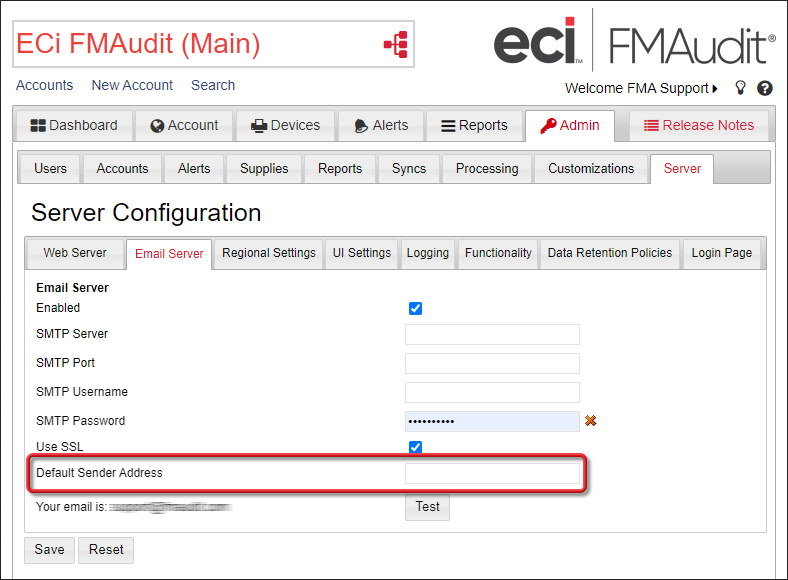
If the email address in this field is powered by MS Office 365, add it to your list of mailboxes to update using the Microsoft 365 Admin Center.
Note: If you are uncertain if this email address is powered by MS Office 365, check to see if the SMTP Server field includes a reference to Microsoft Office 365 (e.g., smtp.office365.com) or verify this information with your IT person.
Note: If the value in the Default Sender Address field does not appear to be a valid email address, check the SMTP Username field to see if it contains an email address. The mailbox you need to update using the Microsoft 365 Admin Center is the mailbox associated with this account.
MobileTech Dispatch PortalMobileTech Dispatch Portal
From the MobileTech Dispatch Portal, go to Settings and Help > Settings tab > Email Settings. The sender address is listed in the Sender Address field.
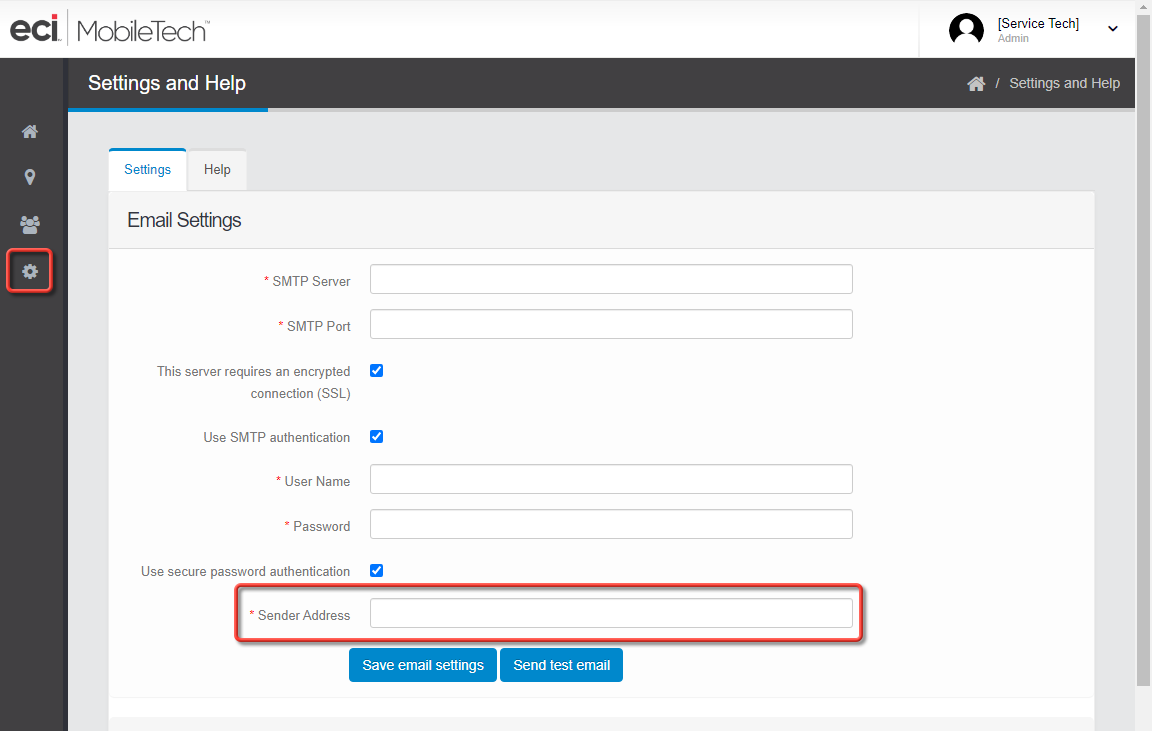
If the email address in this field is powered by MS Office 365, add it to your list of mailboxes to update using the Microsoft 365 Admin Center.
Note: If you are uncertain if this email address is powered by MS Office 365, check to see if the SMTP server field includes a reference to Microsoft Office 365 (e.g., smtp.office365.com) or verify this information with your IT person.
Note: If the value in the Sender address field does not appear to be a valid email address, check the User name field to see if it contains an email address. The mailbox you need to update using the Microsoft 365 Admin Center is the mailbox associated with this account.
Note: For more information on accessing and using this page, see the Settings and Help topic in the MobileTech Dispatch Portal online help.
PrintanistaPrintanista
From Printanista, go to Administartion > Server > Server Configuration > Email Server tab. The sender address is listed in the Default Sender Address field.
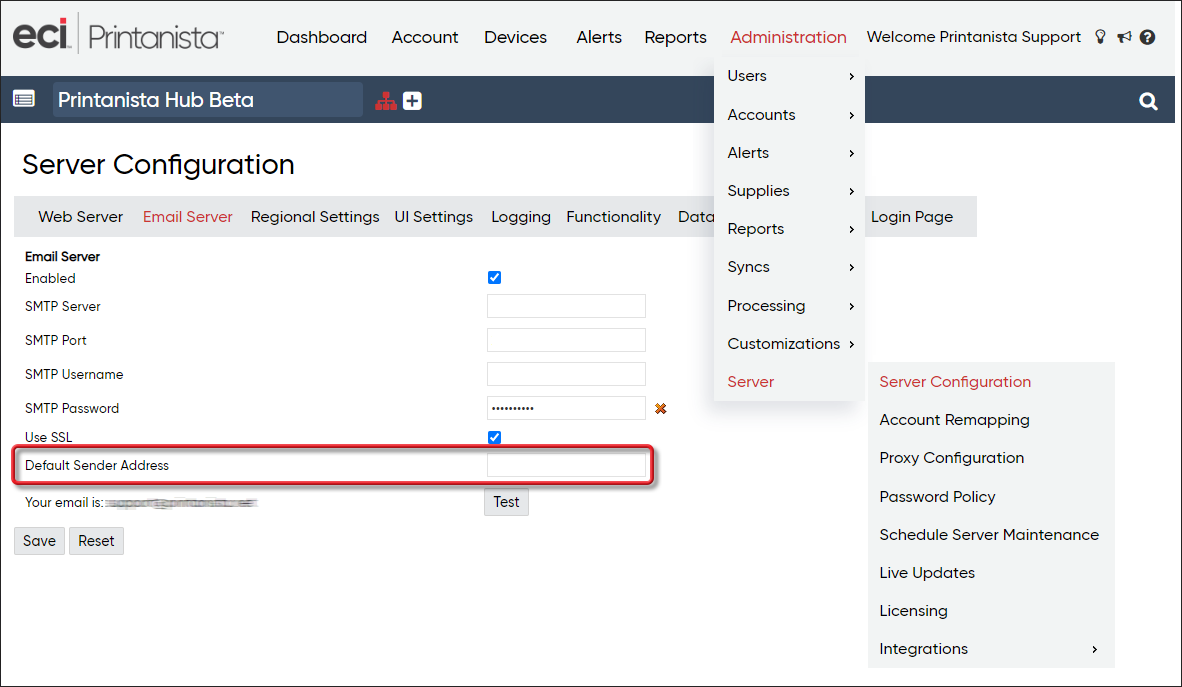
If the email address in this field is powered by MS Office 365, add it to your list of mailboxes to update using the Microsoft 365 Admin Center.
Note: If you are uncertain if this email address is powered by MS Office 365, check to see if the SMTP Server field includes a reference to Microsoft Office 365 (e.g., smtp.office365.com) or verify this information with your IT person.
Note: If the value in the Default Sender Address field does not appear to be a valid email address, check the SMTP Username field to see if it contains an email address. The mailbox you need to update using the Microsoft 365 Admin Center is the mailbox associated with this account
Remote Service Manager (RSM)Remote Service Manager (RSM)
Using IIS, navigate to the RSM web site. On the /RSM Home screen, verify the [Features View] button is selected. Click the SMTP E-mail icon to open the SMTP E-mail page. The sender address is in the E-mail address field.
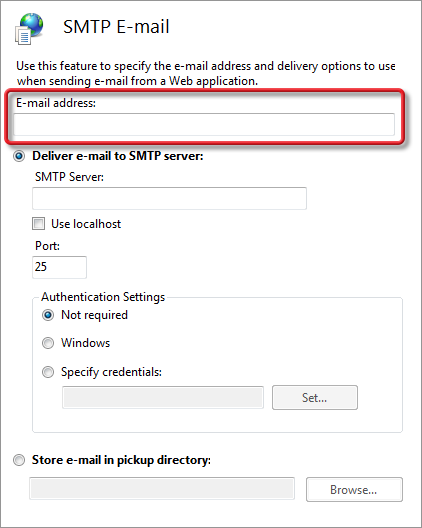
If the email address in this field is powered by MS Office 365, add it to your list of mailboxes to update using the Microsoft 365 Admin Center.
Note: If you are uncertain if this email address is powered by MS Office 365, check to see if the SMTP Server field includes a reference to Microsoft Office 365 (e.g., smtp.office365.com) or verify this information with your IT person.
Note: For more information on accessing and using this page, see the applicable "RSM Installation and Configuration Guide" topic in the Remote Service Manager online help.
RemoteTechRemoteTech
From the RemoteTech Admin page, click Features. Under Administration, click the Email Settings link. The sender address is in the Send email from field.
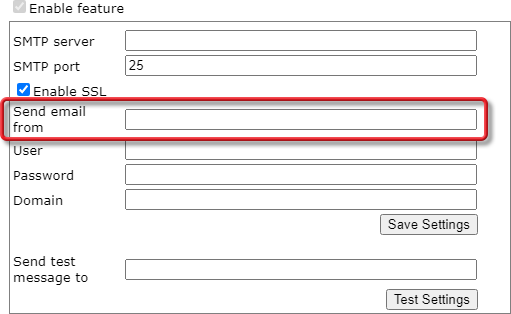
If the email address in this field is powered by MS Office 365, add it to your list of mailboxes to update using the Microsoft 365 Admin Center.
Note: If you are uncertain if this email address is powered by MS Office 365, check to see if the SMTP server field includes a reference to Microsoft Office 365 (e.g., smtp.office365.com) or verify this information with your IT person.
Note: For more information on accessing and using this page, see the "Administration Section" topic in the RemoteTech online help.
Use Microsoft 365 Admin Center To Enable SMTP Auth for These MailboxesUse Microsoft 365 Admin Center To Enable SMTP Auth for These Mailboxes
Using the Microsoft 365 Admin Center, navigate to the list of active users and check the Authenticated SMTP checkbox for the mailbox associated with each sender address you are using with the ECI e-automate and related programs listed above.
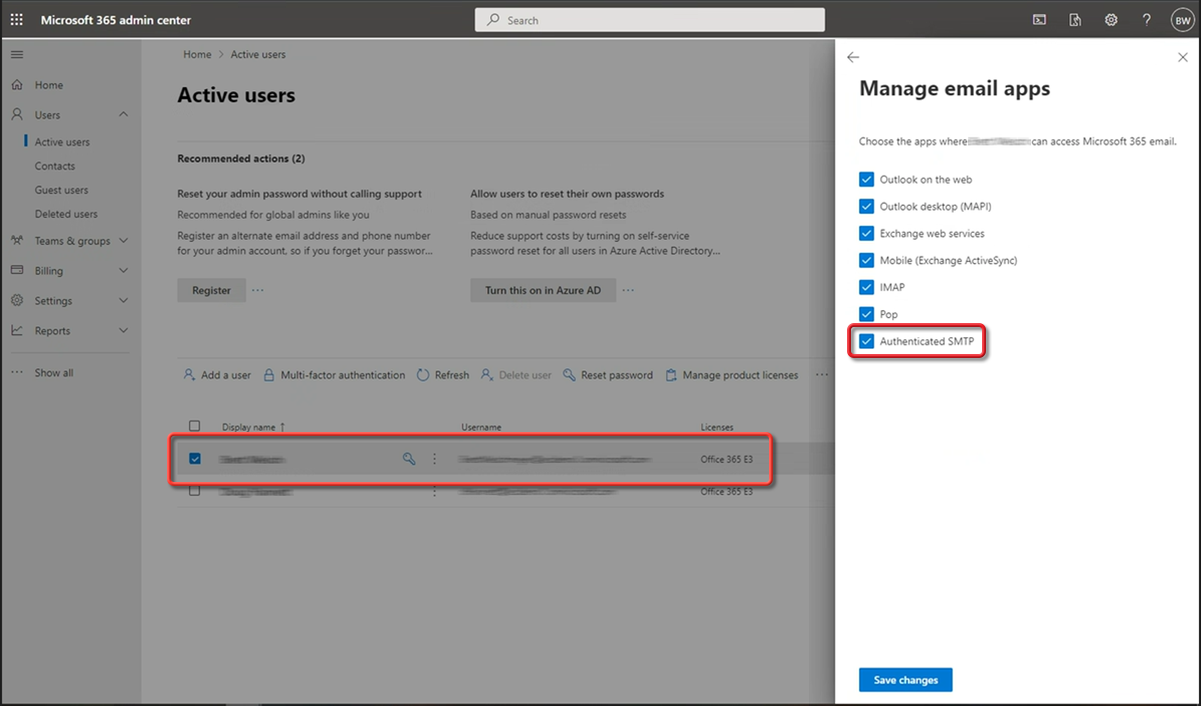
Note: For more information, access https://learn.microsoft.com/en-us/exchange/clients-and-mobile-in-exchange-online/authenticated-client-smtp-submission and see the “Enable SMTP Auth for specific mailboxes” section.
Non-supported ReleaseNon-supported Release
©2022 ECI and the ECI logo are registered trademarks of ECI Software Solutions, Inc. All rights reserved.