Configuring E-info End User Options
In the configuration area of e-info your e-info admin configures certain e-info settings. For example, the configurations area is where you provide your e-info e-mail settings, provide the contact email addresses for where you want notifications sent, identify how you want new user accounts created, and configure whether or not you want your users to have certain abilities in the different areas of e-info.
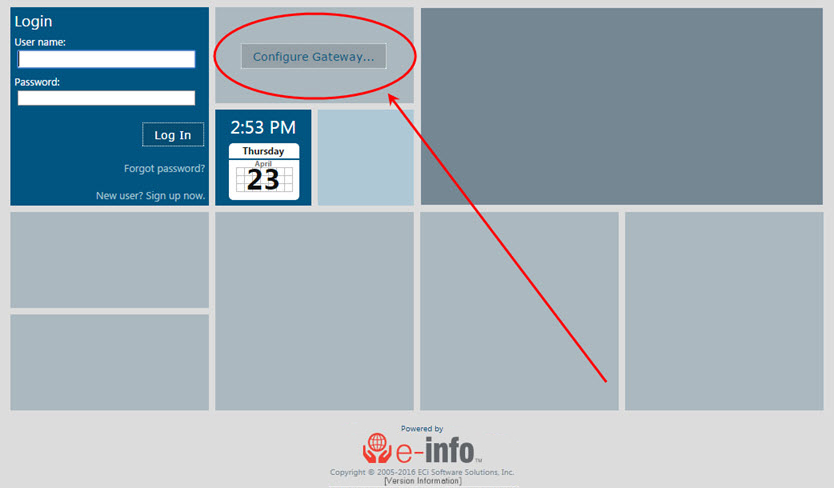
To access the configuration settings you must open the e-info website from the server. When opened from the server the [Configure Gateway] button displays on the e-info Login page as seen in the image below. When you click the [Configure Gateway] button you will be redirected to the page where you may identify your e-info website settings. The [Configure Gateway] button is only available when the e-info Login page is accessed from the webserver. If e-info is accessed from any other computer, the [Configure Gateway] button does not display.
Once you have set these options, they are stored in your database and will not need reconfigured when you upgrade to a newer version.

Accessing the Configuration SettingsAccessing the Configuration Settings
From your webserver open the e-info website.
Click [Configure Gateway] located in the lower left corner of the page to be redirected to the configurations window.
Email SettingsEmail Settings
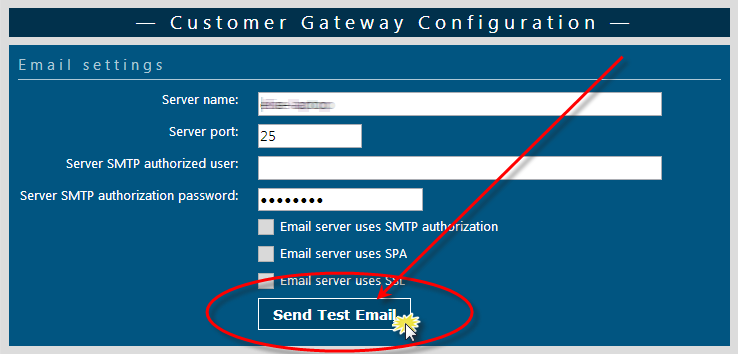
In the Email settings region, you provide the email settings necessary for e-info to be able to send notification emails.
In the Server name field, enter the name of your company’s email server. If you do not know the name of the email server contact your IT professional.
In the Server port field, enter your email server’s port. If it is an encrypted connection (SSL) the port is usually 25 if it is not encrypted. If you do not know the name of the server you may reference the email settings in e-automate. Go to Tools>Client settings to open the Client settings window. In the left pane, select Email settings to display the settings options in the right pane.
In the Server SMTP authorized user field, enter the username if you are requiring a username and password be entered before the server can send emails. This username must be a valid user for the email server. This field is valid only when the Email server uses SMTP authorization box is checked.
Note: If you are using Microsoft Office 365, see the Enabling SMTP Auth for Specific Mailboxes topic.
In the Server SMTP authorization password field, enter the password if you are requiring a username and password to be entered before the server can send emails. This password must be one that is associated with a valid user for the email server. This field is valid only when the Email server uses SMTP authorization box is checked.
Specify which email protocol your email server users, by checking one of the following checkboxes.
Email server uses SMTP authorization: When checked, a username and password is required before the server can send emails.
Email server uses SPA: When checked, your email server will use Microsoft ® SPA to help you diagnose problems the email server.
Email server uses SSL: When checked, you are indicating your email server has an encrypted connection between the webserver and the browser.
To send a test email to ensure you have the proper settings, do the following:
Click [Send Test Email].

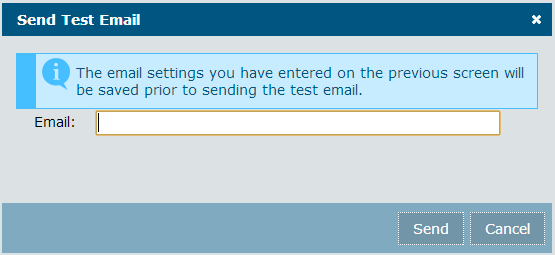
The Send Test Email window opens.

In the Email field, enter the email address to which you want the test email sent.
Click [Send]. A window opens that tells you whether or not the email was sent successfully.
Click the [X] to close the window.
Dealer Signup SettingsDealer Signup Settings
In the Dealer signup settings region, you configure how you want e-info to handle the creation of new e-info user accounts.
If you want to allow users to create a new account from the e-info home page, check the Allow signup checkbox.
If you want the new users to be able to log in to e-info immediately after they have created their account online, check the Enable immediate signup. If you leave this box unchecked new users created online, must contact their admin to activate their account. If the customer does not have an e-info admin, they must contact your company to activate the new user account(s).
If you would like to receive an email each time a new user is created, do the following:
Check the Send notifications for all signups checkbox.
In the Signup notification email field, enter the email address to which you want notification to be sent each time a new e-info user account is created.
General SettingsGeneral Settings
In the General settings region, you configure certain miscellaneous settings, set the default language, enter notification email addresses, and provide locations for your banner file and site html page.
Under the Miscellaneous heading, check any of the following checkboxes.
Enable client validation: When checked, the users will be able to see non-applicable java errors that may occur.
Enforce contact identity: When checked, the user cannot change the customer name, phone number, and email address associated with the user when submitting a service call or sales order. If, however, there is no phone number associated with the user, the user can enter a phone number in the provided blank field.
Automatically format phone numbers: When checked, the system formats and validates the phone numbers.
Note: For 2020-09-25+ releases, this setting has been temporarily disabled and removed from this page because it required phone numbers to be formatted based on US phone number formatting and prevented entry of phone numbers based on UK phone number formatting.
Language SettingsLanguage Settings
Under the Language Settings heading, you specify settings for determining the language in which the system should display your e-info web site to your customers. If you enable language switching and your e-info customer accesses your e-info web site via a browser set to use any of e-info's supported languages, the system will display your e-info web site using your customer's browser's language. If you enable language switching and your e-info customer accesses your e-info web site via a browser set to use a language that is not supported, then the system will display your e-info web using the default language you specify here. If you enable language switching but do not specify a default language, e-info will use English as the default language. If you do not enable language switching, then the system should display your e-info web site using the default language you specify.
To specify default language settings for your e-info web site, do the following:
When the Enable language switching box is checked, the system displays your e-info web site in your customer's browser's language setting if e-info provides support for that language. If e-info does not provide support for that language, the system will display your e-info web site using the default language you specify. If you do not specify a default language, the system will display your e-info web site in English.
If you want to change the default language, do the following:
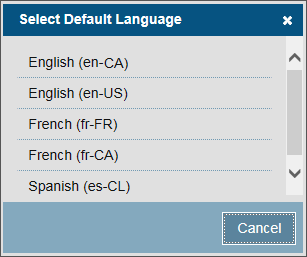
Click the […] button to the right of the Default language label. The system displays the Select Default Language window.

Select the language in which you want the system to display your e-info web site by default. The system closes this window when you make a selection.
Notification Email SettingsNotification Email Settings
Under the Notification Email Settings heading, enter the appropriate information in the following fields:
Return email address: email address you want as the return email address for notification emails that are sent from e-info.
Sales order notification email: email address of your sales order contact.
Service call notification email: email address of your service call contact.
Site administrator email: email address of your e-info admin.
File Locations/NamesFile Locations/Names
Under the File Locations/Names heading, you provide locations for your banner file and site html page. Enter the appropriate information in the following fields:
Site banner: Location of the logo you want displayed on the e-info website.
Site Html page: If you want to provide certain information to your customers through an HTML page, you enter the path to the HTML page here. The path you enter here displays in the top left corner tile of the e-info website.
Master Mode SettingsMaster Mode Settings
The Master Mode Settings apply to only e-info 15.2. In the Master mode settings region, you determine whether or not you want to allow users to create sales orders for all locations while logged into e-info in Master location mode.
When the Enable sales orders creation checkbox is checked, users have the ability to create sales orders for all locations when logged into e-automate in Master location mode.
When the Enable sales order creation checkbox is unchecked, users do not have the ability to create sales orders for all locations when logged into e-automate in Master location mode.
Module SettingsModule Settings
In the Module settings region you configure what you want the end user to be able to see in the different areas of e-info. The Module settings region is divided into four sections: Accounts Receivable, Equipment, Service Calls, and Sales Orders. You check the boxes for each option you want available to the end user on your e-info website.
In the Accounts Receivables region, check the following box as appropriate:
Enable credit card functions: When checked, the e-info end user has the ability to schedule invoices to be paid with a credit card or ACH account.
Note: Before you check the Enable credit card functions checkbox, you must do the following:
Have an account set up and configured with NET1 Payment Solutions. When you set up your account with NET1 Payment Solutions, you can set up your account for processing credit card transactions only OR for processing both credit card and ACH transactions. If you set up your account for processing credit card transactions only, then you can check the Enable credit card functions checkbox. When your e-info user needs to enter credit card information via your e-info web site, the system will display a secure (https) NET1 Payment Solutions web page for entering the information. You do not need to take any further action to secure credit card transaction processing via NET1 Payment Solutions.
If you sign up for an account that allows processing of ACH transactions, then you must also do the following to secure the processing of ACH transactions via your e-info web site:
Secure your e-info web server. Your web server must have a Secure Socket Layer (SSL) certificate.
ECI recommends you contact your IT team, consultant, or your web hosting provider to secure an SSL certificate.
Once you receive confirmation that your e-info web server is secure, have your e-info users access your e-info web site using https (e.g., https://www.youreinfosite.com) instead of http (without the s).
Caution: Do not check this box if your e-info web site is not set up as a secure web site. If you do, any ACH account information your customers enter via your e-info web site will not be secured by encryption.
In the Equipment region, check the following boxes as appropriate:
Show location remarks: When checked, the location remarks from the Location tab of equipment record displays in e-info.
Show equipment move: When checked, any equipment moves that have been performed on the equipment displays in e-info.
In the Meters region, update the following field as appropriate:
Limit of previous days for meter readings: Enter the number of days for which to summarize meter history via the Meters tile.
In the Service Calls region, check the following boxes as appropriate:
Show cleared calls: When checked, service calls that have been assigned a cleared status will display in e-info.
Show invoiced calls: When checked, service calls that have been invoiced will display in e-info.
Show labor on calls: When checked, labor information on service calls will display in e-info.
Show remarks with labor records: When checked, remarks entered in the labor record of a service call will display in e-info.
Show material on calls: When checked, material entered on service calls will display in e-info.
Show problem on calls: When checked, the problem codes entered on service calls will display in e-info.
Show repair on calls: When checked, the repair codes entered on service calls will display in e-info.
Show response hours on calls: When checked, e-info will display the amount of time that elapsed between when the service call was placed and when the technician arrived to the call location.
Create service call as ticket in DeskTech: When checked, service tickets that are created in e-info by a customer are also automatically created as service tickets in DeskTech.
Show history for placed equipment/items only: When checked, e-info only provides history for equipment and items that are placed in the field. When unchecked, e-info provides history for all equipment whether or not they are currently placed in the field.
Show on hold calls: When checked, service calls with the selected on hold codes display in e-info as On Hold.
Select which on hold codes you want to display for service calls that are on hold. For example, if you have a service call that is set to On Hold in e-automate with the On Hold Code ‘Parts Available’ and you do not want it to show up as On Hold in e-info to your customer, you would uncheck the On Hold Code Parts Available checkbox. Unchecking this box causes this service call to show as Pending instead of On Hold.
Note: Services calls that have been assigned on hold codes that you did not select display in e-automate as pending.
In the Sales Orders (Select types users may view) region, check the following boxes as appropriate:
Equipment Order: When checked, equipment orders will display in e-info.
Other Order: When checked, other orders will display in e-info.
Supply Order: When checked, supply orders will display in e-info.
Item yield warning based on actual and expected usage : When checked, the system will display an item yield information ![]() icon if a user adds to an order a consumable item tied to an equipment item for which meter history indicates the applicable meter type's actual usage is below the expected usage. The icon will display when applicable on the New Sales Order window, in the Items included in order region, to the left of each line item on the order. Additionally, when this icon is displayed for any line item, this region will also display the message: "Items in your order will be reviewed based on actual usage and expected usage." The informational message will not prevent the user from entering the order.
icon if a user adds to an order a consumable item tied to an equipment item for which meter history indicates the applicable meter type's actual usage is below the expected usage. The icon will display when applicable on the New Sales Order window, in the Items included in order region, to the left of each line item on the order. Additionally, when this icon is displayed for any line item, this region will also display the message: "Items in your order will be reviewed based on actual usage and expected usage." The informational message will not prevent the user from entering the order.
Note: Item yield information messages are only displayed when applicable if your e-automate system is configured to displays item yield warnings. For more information, see the "Configuring, Accumulating History for, and Understanding Item Yield Warnings" section of the Configuring and Using Equipment Supply Order Entry topic.
Mobile Access SettingsMobile Access Settings
In the Mobile accessing settings region you configure which activities you want your end users to be able to perform from their mobile devices. There are two sections in the Mobile access settings region: Equipment QR Codes and Mobile Authentication Requirements. In the Equipment QR Codes sections you can allow or disallow the e-info end user the abilities to print QR codes for equipment and submit meter reads, service calls, and sales orders from QR codes. In the Mobile Authentication Requirements section you decide whether or not you want to require authentication from the e-info end user when submitting meter reads and services calls from a mobile device. Authentication is always required to enter sales orders from a mobile device.
Under the Equipment QR Codes heading, check any of the following checkboxes as appropriate:
Allow customers to print QR codes for equipment: When checked, your customers have the ability to print QR codes for equipment from e-info.
Allow users to submit meter reads from QR codes: When checked, your customers have the ability to submit meter readings through e-info by scanning the QR codes on their equipment.
Allows users to submit service calls from QR codes: When checked, your customers have the ability to enter a service call through e-info by scanning the equipment.
Allow users to submit sales orders from QR codes: When checked, your customers have the ability to submit a sales order through e-info by scanning the QR code of the equipment on the sales order.
When printing QR codes from e-info, users can adjust the top margin. Select one of the following to determine the method of measure you want to use for margin adjustment.
Inches
Millimeters
Under the Mobile Authentication Requirements heading, you configure whether or not you want to require authentication when a user submits meter reads or service calls.
Note: Authentication is always required when submitting sales orders from a mobile device.
Check either or both of the following checkboxes as appropriate:
Require user authentication for submitting meter reads from a mobile device: When checked, the e-info user must enter credentials to submit meter reads using their mobile device.
Require user authentication for submitting service calls from a mobile device: When checked, the e-info user must enter credentials to submit a service call using their mobile device.
Non-supported ReleaseNon-supported Release
©2022 ECI and the ECI logo are registered trademarks of ECI Software Solutions, Inc. All rights reserved.