ScanIt Import Utility and ScanIT Barcode Labels Reports
* The ScanIt Import utility and ScanIT Barcode Labels reports are provided as a separate, purchased companion product to e-automate. Please contact your Account Manager for purchase and support details.
The ScanIt Import utility is an e-automate add-in product that provides users with the following functions:
Import Staged Shipping Receipt Data from the ScanIT app
Review and Edit the Staged Shipping Receipt Data
Create PO Receipts in e-automate from the Staged Shipping Receipt Data
The ScanIT Barcode Labels reports are for generating barcode labels for use with the ScanIT app for counting inventory.
Both the ScanIt Import utility and the ScanIT Barcode Labels reports require e-automate 20.1.13+.
Copying Installation FilesCopying Installation Files
Your Account Manager will provide a zip file containing the files necessary to install both the ScanIt Import Utility and the ScanIT Barcode Label reports.
The following three folders are for the ScanIt Import Utility installation:
AddIn
APIExtension
DBComponent
The following folder contains the report files for the ScanIT Barcode Label report installation:
ScanITBarcodeReports
Do the following:
Copy the zip file to a temporary location on your e-automate server.
Extract the zip file's contents.
From the unzipped AddIn folder, copy the ScanItImportAddin.dll file into the e-automate\Addins folder on your e-automate server AND into the e-automate\Addins folder on each client machine where you plan to use the ScanIt Import Utility.
Note: For server-and-client installations, the default location is: C:\Program Files (x86)\ECI\e-automate\Addins. If you did not install the e-automate client in the default location, navigate to the location where you installed e-automate and locate the AddIns directory. For per-user, client-only installations, the default location is: C:\Users\MyUserName\AppData\Local\ECI\e-automate\Addins (where MyUserName is the name of the Windows user account from which you are accessing e-automate). This folder location may be hidden by default. To access a hidden folder, see Unhide Files and Folders in Windows.
From the APIExtension folder, copy the following files into the e-automate\web\bin folder on your e-automate DG Server machine(s) if they are not already present:
Caution: If any of these files already exist, do NOT overwrite the existing files; only copy the files which are not already present.
ApiHost.DGSWeb.dll
eci.stg.api.foundation.dll
eci.stg.api.host.dll
eci.stg.authentication.dll
Newtonsoft.Json.dll
scanit.apiextensions.dll
scanit.standard.dll
System.Data.SqlClient.dll
System.Runtime.CompilerServices.Unsafe.dll
Unity.Abstractions.dll
Unity.Container.dll
From the DBComponent folder, copy the ScanIt Import folder into the e-automate\sql\CompanyDb\_components folder on your e-automate DG Server machine(s).
From the ScanITBarcodeReports folder, copy the following files into your Reports folder (by default, C:\Program Files (x86)\ECi\e-automate\ Custom Reports):
Note: If you have not previously set up the Custom Reports folder using the Tools > Options... > Reports, see the Setting Report Options topic.
ScanITBarcodeLabelAvery2X5.rpt
ScanITBarcodeLabelZebra4X2.rpt
ScanITQRLabelAvery2X5.rpt
ScanITQRLabelZebra4X2.rpt
Installing the ScanIt Import DB Component Using E-adminInstalling the ScanIt Import DB Component Using E-admin
Install the ScanIt Import database component on each e-automate DG Server machine as follows:
Log in to e-admin.
From the list of companies, select the company for which you want to install this database component.
From the Company menu, select Maintenance > Database Components.... If you have your e-admin toolbar visible, you can use the drop-down menu on [Maintenance] and select Database Components.... You can also use the right-click menu and select Maintenance > Database Components....
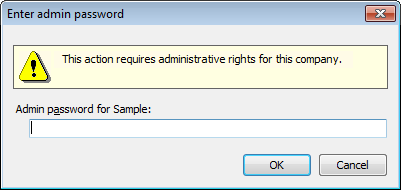
The system displays the Enter Admin Password window.

In the Admin password for [Company ID] field, enter your admin password.
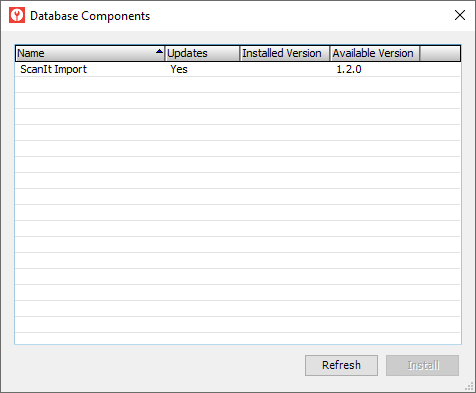
Click [OK]. If the system verifies your admin password for the company you selected, the system displays the Database Components window.

Select the ScanIt Import row.
Note: If you do not see a ScanIt Import row, return to the "Copying Installation Files" section of this topic.
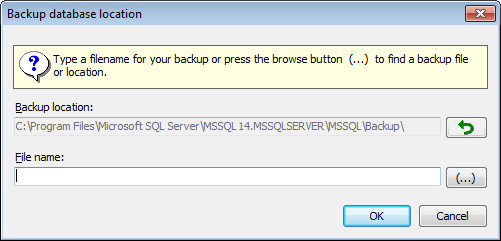
Click the [Install] button. The system displays the Backup Database Location window. Prior to installing a database component, e-admin requires a backup of the database so that you can restore the backup if the database component installation does not complete as expected.

Enter a name for this backup in the File name field.
Note: Your backup name must be unique.
E-admin always displays the last navigated path in the Backup location field. If you want to browse your network for a different backup location, click [(...)] to open the Browse for Backup File... window.
Select the backup location you want to use and click [OK] to return to the Backup database location window. The filename you selected displays in the File name field.
Click [OK]. If you opted to use a file name that has already been used in e-admin, e-admin notifies you that you cannot use the file name identified. Enter a different name.
After the database is backed up, the system attempts to install the database component.
If the installation is successful, the system displays the message, "Installation complete." Click [OK] to acknowledge the message. When you click [OK], the system removes the Yes from the Updates column, updates the Installed Version column to the new version (e.g., 1.2.0), and clears the Available Version column.
Note: As long as the Database Components window remains open, the system will not prompt you to create a new backup each time you install a new component; if you close this window, you will be prompted to create a new backup the next time you open this window, select a component, and click [Install]. For this reason, you may want to keep this window open until you have finished updating database components (or until an error occurs).
If the installation is not successful, the system displays an Unexpected Error Information window. Review the Description field.
If the Description field reports only that one or more exceptions occurred, then the system was able to restore the backup you created before trying to install the update; you do not need to manually restore your database.
If the Description field—in addition to reporting that one or more exceptions occurred—includes a NOTICE letting you know you need to manually restore your backup, then the system was not able to automatically restore your backup. You need to restore your backup manually, and the NOTICE lists the name of the backup you created prior to trying to install the update. For information on restoring a backup, see the Restoring a Database topic.
Note: If an error occurs and a database backup is restored, automatically or manually, you will need to re-install any database components you installed after you created the backup.
To have the system check for additional updates, click [Refresh].
Note: If e-automate Customer Care instructs you to copy an additional file with updates to your system while the Database Components window is still open, you can copy the file and then click the [Refresh] button to have the system locate and display the additional updates.
Restarting DGServerRestarting DGServer
To restart DGServer on each DG Server machine, do the following:
In the Windows Type here to search field on your e-automate client server, enter Services.msc to locate the Services app.

Open the Services app to display the Services window.
Locate and select the DGServer service.

Click the Restart link to start the service.
Adding ScanIt Import to the Tools MenuAdding ScanIt Import to the Tools Menu
To access the ScanIt Import Tool functionality from within e-automate, you can use the Add-in Manager to add a ScanIt Import option to the main e-automate window's Tools menu. To add this option to the Tools menu, do the following:
Log in to e-automate.
From the Tools menu in e-automate, select Add-in Manager... to open the Add-in Manager window.
In the Menu text field, enter ScanIt Import (or similar text such as ScanIt Receipt Import) to identify this menu option.
Do one of the following:
Hosted Installations: You cannot edit the Command line or web URL field. Additionally, any add-in utility that does not use the default value specified is no longer supported, and non-supported add-in utilities should be removed from the Add-in Manager so that the system no longer displays the option in e-automate's Tools menu.
On-premise Installations:
To populate the Command line or web URL field, click the Browse for program (folder) icon to the right of the field to open the Open window.
![]()
Populate the File name field by browsing to the location of the eAddins.exe file on your computer.
Note: For server-and-client installations, the default location is: C:\Program Files (x86)\ECI\e-automate\Addins. If you did not install the e-automate client in the default location, navigate to the location where you installed e-automate and locate the AddIns directory. For per-user, client-only installations, the default location is: C:\Users\MyUserName\AppData\Local\ECI\e-automate\Addins (where MyUserName is the name of the Windows user account from which you are accessing e-automate). This folder location may be hidden by default. To access a hidden folder, see the Unhide Files and Folders in Windows topic.
Click [Open] to close the Open window and populate the Command line or web URL field on the Add-in Manager window.
In the Command arguments field, type the following, exactly as it appears below. Be sure to match upper and lower case letters.
ScanItImport
Check the Include user info checkbox.
Important: If you do not check the Include user info checkbox, this utility will not work.
Click [QuickAdd] to add the entry to the list.
Click [Close] to close the Add In Manager window. The e-automate Tools menu now displays the ScanIt Import menu option (or similar option based on what you entered in Step 3 above. Use this option to access the ScanIt Import Tool.
Using the ScanIt Import ToolUsing the ScanIt Import Tool
Before using the ScanIt Import Tool, observe the following:
You need to have a purchase order in e-automate for which you plan to receive items.
You need to have a CSV file generated via the ScanIt app (or a similarly structured file to use for testing purposes).
If the name of the CSV file is a case-sensitive match for the existing PO number, ScanIt Import will locate and display information for the matching PO number in e-automate when you import the CSV file. If the name of the CSV file is a not case-sensitive match for the existing PO number, you will need to select the existing PO to match to the CSV file.
To use the ScanIt Import Tool, do the following:
From the e-automate Tools menu, select ScanIt Import to open the ScanIt Receipt Import window.
To import a CSV file in preparation for receiving one or more items against a purchase order, do the following:
Click the [Import CSV] icon. The system opens the Open screen.
In the File name field, enter the name of the CSV file you want to import. Use the screen's navigation and/or search functionality if necessary to locate the file.
Click the [Open] button. One of two things will happen:
If the name of the CSV file is a case-sensitive match for an existing open PO number (e.g., PO1023.CSV and PO1023) and if the system can completely map the received items and quantities in the CSV file to the items and quantities on the PO, then the system adds a row to the table on the ScanIt Receipt Import window. This row includes a checkbox for selecting the row for processing and the following columns: Source (scanit), Number (the PO Number plus a date/time stamp), Date, PO number, Unreceived (the number of line items on the purchase order), Unmapped (the number of line items for which the system could not match a scanned item to an existing item in e-automate), Order date, Order req date, Vendor name, Description, Order Type, Purchaser, Ship to name. Additionally, the system updates the Number of staged shipping receipts count below the table. If the Unmapped column lists a value of 0, all items are mapped. You can proceed to Step 4 to try to create the receipt, or you can go to Step 3 to review the items on the staged receipt. If the Unmapped column lists a value other than 0, the system opens the Staged Receipt window. Proceed to Step 3.
Note: If you have multiple CSV files to import, you can repeat Step 2 to import additional CSV files before proceeding to the next step.
If the name of the CSV file is not a case-sensitive match for an existing open PO number (e.g., PO1023.CSV and PO1023) and/or if the system cannot completely map the received items and quantities in the CSV file to the items and quantities on the PO, then the system opens a Staged Receipt window that you can use for reviewing and mapping data from the imported CSV file to an existing open PO in e-automate. If the system opens a Staged Receipt window, proceed to Step 3 below.
To view and/or edit details for a staged receipt, do the following:
If the system opened the Staged Receipt window when you imported the CSV file, proceed to step 3.b; otherwise, to open the Staged Receipt window, on the ScanIt Receipt Import window, double-click the row of the staged receipt you want to open. The system opens the Staged Receipt window.
In the Purchase Order field, make no change to use the purchase order number displayed (indicating the system was able to match the name of the imported CSV file to an existing open purchase order in e-automate), or use the drop-down menu to select the purchase order associated with the CSV file for which you are receiving items.
If you want to view and/or edit the purchase order in e-automate, click the [Edit purchase order] button. If the Purchase Order field on the Staged Receipt window is populated when you click this button, the system will open the Edit Purchase Order window for that purchase order in e-automate. If the Purchase Order field on the Staged Receipt window is not populated when you click this button, the system will open the Purchase Orders list window in e-automate.
The table on the Staged Receipt window lists the following columns: Submitted (the value from the scanned bar code), E-automate Item (the matching e-automate item number), Quantity, Is Serial Number, and Action. For each row, do the following:
In the E-automate Item column, do one of the following:
Make no change to use the value displayed.
Note: If the value in the Submitted column is an e-automate Item number, a Vendor item number, or a previously matched value AND if the value represents an item on the purchase order, the system automatically populates the E-automate Item column with the matching value.
If the value displayed is not the correct value or is blank and a suitable match is available from the column's drop-down menu, use the column's drop-down menu to select the e-automate item number from the PO that you want to map to the value in the Submitted column.
Note: If you match a value in the Submitted column to an e-automate item number in the E-automate Item column and successfully create a purchase order receipt from the purchase order, the system remembers the most recent match of the Submitted column's value to the E-automate Item column's value and will automatically use this match the next time the utility is used to import a ScanIt CSV file.
If the value displayed is not the correct value or is blank and a suitable match is not available from the column's drop-down menu, do one of the following:
Click the Delete icon in the Action column to remove the row from the staged receipt.
Edit the purchase order in e-automate to provide a suitable match for this row by doing the following:
Click the [Edit purchase order] button.
Edit the purchase order to include a suitable match for this row. For information on editing purchase orders in e-automate, see the Editing Purchase Orders topic.
Save the purchase order.
Note: The following steps are necessary to reload the edited purchase order's data into the ScanIt Receipt Import Utility.
On the Staged Receipt window, click [OK] to save your changes to the staged receipt and to close the Staged Receipt window.
On the ScanIt Receipt Import window, double-click the row of the staged receipt for which you edited the purchase order.
On the Staged Receipt window, in the E-automate Item column, use the drop-down menu to select the e-automate item number from the PO that you want to map to the value in the Submitted column.
If the quantity received matches the Quantity column's value and matches the unreceived quantity for this PO (displayed in the E-automate Item column), then make no change to the use value displayed in the Quantity column; if the quantity received does not match the value in the Quantity column, edit the value in Quantity column to indicate the quantity of the line item received against this PO.
Note: You cannot receive a quantity for this PO that is greater than the quantity listed on the PO. If you do, the system will display an error when you try to create the receipt for this PO. If you need to increase the quantity listed for this item on the PO, do the following:
Click the [Edit purchase order] button.
Edit the purchase order to include a suitable match for this row. For information on editing purchase orders in e-automate, see the Editing Purchase Orders topic.
Save the purchase order.
On the Staged Receipt window, click [OK] to save your changes to the staged receipt and to close the Staged Receipt window.
On the ScanIt Receipt Import window, double-click the row of the staged receipt for which you edited the purchase order.
On the Staged Receipt window, in the Quantity column, enter the quantity of the line item received against this PO.
If the value in the Submitted column represents a serial number and not an item number, check the Is Serial Number checkbox.
Note: If the CSV file includes both a row containing a serialized item's Item Number and one or more rows containing the Serial Number for each serialized item, then delete the row containing the serialized item's Item Number and keep each row containing a Serial Number for that item.
If the value in the Submitted column represents a serialized item's item number, do not check the Is Serial Number checkbox and note the following: You can only import a serialized item's Item number if your system is set up for auto serial number assignment. If your system is not set up for auto serial number assignment, any row representing a serialized item must include the item's serial number in the Submitted column, a quantity of 1 in the Quantity column, and a checked Is Serial Number checkbox.
To add a row, click the [Add] button. The Submitted column for the new row will be blank. For the new row, repeat Step 3.d above.
To apply any changes, click the [Apply] button.
To close the Staged Receipts window without saving changes, click the [Cancel] button.
To accept the changes and to close the Staged Receipts window, click the [OK] button. When you click the [OK] button, the system adds a row to the table on the ScanIt Receipt Import window. This row includes the following columns: a checkbox for selecting the row for processing, Source (scanit), Number (the PO Number plus a date/time stamp), Date, PO number, Unreceived (the number of line items on the purchase order), Unmapped (the number of line items for which the system could not match a scanned item to an existing item in e-automate), Order date, Order req date, Vendor name, Description, Order Type, Purchaser, Ship to name. Additionally, the system updates the Number of staged shipping receipts count below the table. If the Unmapped column lists a value of 0, all items are mapped. You can proceed to Step 4 to try to create the receipt, or you can double-click the record to review the data on the Staged Receipt window. If the Unmapped column lists a value other than 0, double-click the record to review the data on the Staged Receipt window and review Step 3.
To create a receipt for a staged shipping receipt, do the following:
Check the checkbox to the left of each row in the table for which you want to create a receipt.
Note: If you imported multiple CSV files, you can do one or more of the following:
Click the [Check all] icon to check the box at the beginning of each row in the table.
Click the [Uncheck all] icon to uncheck the box at the beginning of each row in the table.
Click the [Create receipts] icon.
Note: If the system displays a spinning circle icon indicating that processing is occurring, wait until the processing completes and the icon disappears before proceeding.
Do one of the following:
If the import is successful, the system displays the message, "Successfully created 1 PO receipt(s)." Click [OK] to acknowledge the message.
Note: For each row for which a PO receipt was successfully created:
The system removes the staged receipt row from the table on the ScanIt Receipt Import window.
The Purchase Order list window's Status column now lists Completed for that purchase order.
You can right-click that row in the Purchase Order list window and select Go to > Purchase receipts and returns... to have the system open the Purchase Receipts and Returns list window and display the receipt information the system generated when you clicked the [Create receipts] icon.
If the import is not successful, the system displays a message indicating why the PO receipt(s) could not be created. Review the information in the message, and then return to Step 3 above to resolve any issues that may exist.
Using the ScanIT Barcode Label ReportsUsing the ScanIT Barcode Label Reports
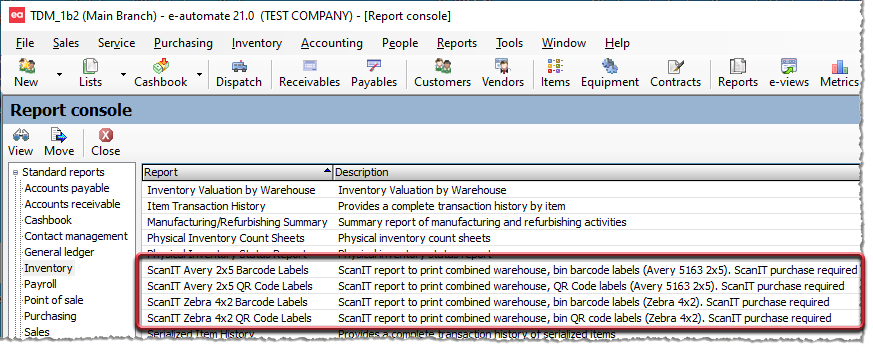
If you copied the four ScanIT report files from the ScanITBarcodeReports folder to your Custom Reports folder, restarted DGServer, and have your system set up in Tools > Options > Reports to use report files in your Custom Reports folder as directed in the previous steps, you should now see the four new ScanIT reports in your Report Console's Inventory section.

These reports are for generating barcode labels for use with the ScanIT app for counting inventory. For more information on using these reports, see the following ScanIT report topics (which you can also access from the E-automate > Inventory > Functional > Reports book of the online help):
ScanIT Avery 2x5 Barcode Labels
ScanIT Avery 2x5 QR Code Labels
Non-supported ReleaseNon-supported Release
©2022 ECI and the ECI logo are registered trademarks of ECI Software Solutions, Inc. All rights reserved.