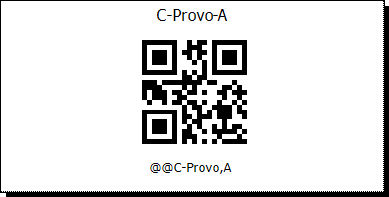
ScanIT Zebra 4x2 QR Code Labels
If you have purchased ScanIT, plan to use the ScanIT app's Count Inventory functionality, and have installed the ScanIT Import Utility (which adds the ScanIT app's reports to your Report Console's Inventory section), you can process a ScanIT Zebra 4x2 QR Code Labels report to generate combined warehouse-and-bin QR code labels in the @@warehouse,bin format that the ScanIT app requires for counting inventory in multiple bins within the same warehouse at one time.
You can filter the report for a specific warehouse and for specific bins within that warehouse.
Note: These QR code labels use the value in the Inventory Warehouse record's Warehouse field and the Inventory Bin record's Bin field.
Before printing a lot of labels using one of the four ScanIT label reports, ECI recommends printing a limited set of labels using the different report options available, verifying the print quality of the printed labels is good, and testing the labels using your phone's camera or Bluetooth connected scanner to determine which will perform best for your configuration. Our testing showed that when using a phone's camera, Android devices resolved the scanned QR codes more quickly than iOS devices did.
Getting to the ReportGetting to the Report
Log in to e-automate with appropriate permissions.
Click [Reports] to open the Report Console window.
In the left pane, click Inventory.
In the right pane, double-click ScanIT Zebra 4x2 QR Code Labels to open the ScanIT Zebra 4x2 QR Code Labels window.
Setting Report ParametersSetting Report Parameters
When setting report parameters, each parameter you have selected displays in the upper portion of the right pane. The parameters do not reset. The report displays with the parameters that were set the last time you ran the report. You can use the following parameters:
WarehouseWarehouse
You can only run this report for one warehouse at a time. To select the warehouse for which you want to generate QR code labels using this report, do the following:
In the left pane of the ScanIT Zebra 4x2 QR Code Labels window, select Warehouse to display the Warehouse region in the right pane.
In the Warehouse field, use the lookup to select a warehouse.
BinsBins
To filter by bin, do the following:
In the left pane of the ScanIT Zebra 4x2 QR Code Labels window, select Bins to display the Bins region in the right pane.
Do one of the following:
If you want to include all bins, in the Bins region, check the Include all Bins checkbox.
If you want to select a range of bins, do the following:
Uncheck the Include all Bins checkbox.
In the From field, enter the beginning bin or use the lookup to select a bin.
In the To field, enter the ending bin or use the lookup to select a bin.
If you want to select bins using the advanced filter, do the following:
Uncheck the Include all Bins checkbox.
Check the Use advanced filter box.
Click the [Advanced filter] button to open the Bins window.
Use the QuickSearch functionality to filter for the bin(s) you want to include in the report. For information on using QuickSearch functionality, see the Using the QuickSearch topic.
When the Bins window displays the bin(s) you want to include in the report, click [OK] to return to the ScanIT Zebra 4x2 QR Code Labels window.
Processing the ReportProcessing the Report
On the ScanIT Zebra 4x2 QR Code Labels window, click [OK] to process the report.
Note: This report depends on a web-based API and—depending on how many labels you are producing—may take some time to process and display. Please be patient when producing a significant quantity of labels.
Printing the ReportPrinting the Report
The report is designed to be printed on a Zebra printer on 4x2 labels. The report will show one label per page.

For each label, the system prints:
The heading [Warehouse]-[Bin] (e.g., C-Provo-A, where C-Provo is the Warehouse field's value and A is the Bin field's value)
The QR Code
The QR Code's value in the @@[Warehouse],[Bin] format (e.g., @@C-Provo,A, where C-Provo is the Warehouse field's value and A is the Bin field's value)
Non-supported ReleaseNon-supported Release
©2022 ECI and the ECI logo are registered trademarks of ECI Software Solutions, Inc. All rights reserved.