Physical Inventory Count Process Page
After you transfer bar code data from the ScanIt app to your system or from your AML scanner to your system via the DC Console, you use this process to match the scanned data to a count sheet defined in your e-automate software.
From the ScanIt home page, click the Count Physical Inventory icon. The system displays the Physical Inventory Count Process page.

Verify the Step 1 SELECT/REVIEW tab is forward.
From the physical inventory list grid, click the [Select] button to the left of the physical inventory list you want to update. ScanIt displays the selected list.

Once you select a list, this tab displays:
The count sheet name.
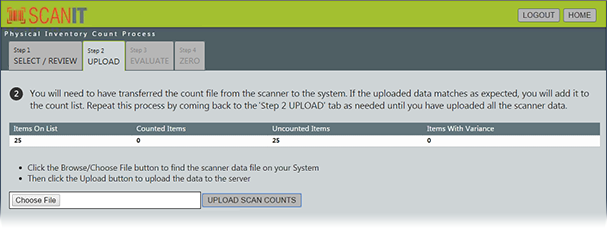
A grid displaying the following counts: Items On List, Counted Items, Uncounted Items, and Items With Variance.
A grid displaying the Tag, Warehouse, Bin, Item, Description, Serial #, On Hand, and Counted data for each item on the list.
Each line on the grid is color-coded as follows:
Light blue: The line is not counted but is ready to count.
Green: The line is counted, and the On Hand and Counted quantities match.
Light red: The line is counted, but the On Hand and Counted quantities do not match.
To the right of the count sheet name, a drop-down selection box lists the following options:
View All Items: Displays all items on the physical inventory list.
View Uncounted Items Only: Displays only items for which the Counted column is blank.
View Items with Variance: Displays only items for which the On Hand quantity does not match the Counted quantity.
View Uncounted Items and Items with Variance: Displays only items for which the Counted column is blank and/or for which the On Hand quantity does not match the Counted quantity.
View All Redirected: Displays all items that were identified in the scanned data by a number other than Item number (e.g., Vendor item number, OEM number, UPC), requiring the system to look up the item number in e-automate to try to match the scanned item to an item on the physical inventory list.
Review the information displayed on this tab. If this list is not the correct list, click the [SELECT DIFFERENT LIST] button to choose a different list. If this list is the correct list, click the Step 2 UPLOAD tab to bring it forward.
If you have not already done so, transfer the data collected via your scanner(s) to your system. For more information, see the Transferring Data from the Scanner to Your System topic. You may transfer multiple data files collected from multiple scanners. When you have transferred the scanned data files to your system, you will be able to select and upload the files from your system to the server using this tab. Proceed to the next step.
On the Step 2 UPLOAD tab, select a data file from the drop-down list and click the [Choose File] button or the [Browse…] button (varies by browser) to navigate to the file you want to upload from your system to the ScanIt server.
Click [UPLOAD SCAN COUNTS] to upload the selected scanned data file from your system to the server.
Once you upload a list, this tab displays the following additional information:
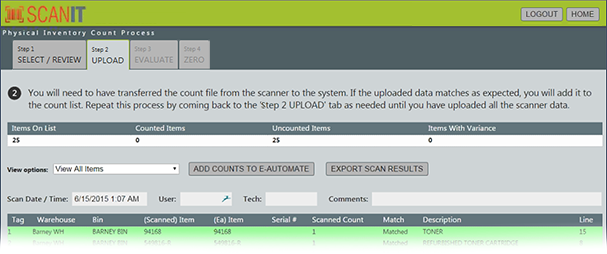
If the system matched all scanned items in the imported file to items on the physical count sheet in e-automate, the system displays the following information:
The following data associated with the scanned data file via the scanner is displayed: Scan Date / Time, User, Tech, and Comments.
The grid now displays the Tag, Warehouse, Bin, [Scanned] Item, [EA] Item, Serial #, Scanned Count, Match, Description, and Line.
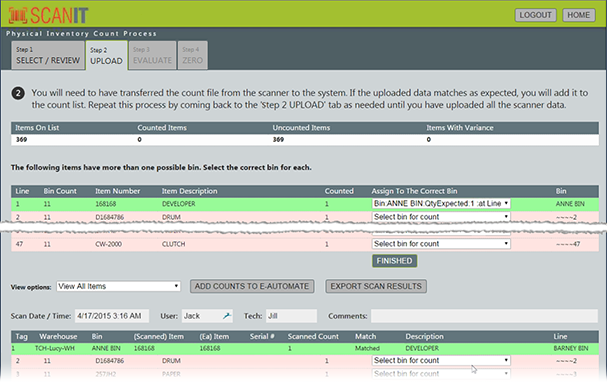
If any of the scanned items could not be matched to the physical inventory count sheet, this tab displays an additional grid with options for correcting the data before importing it into e-automate. For example, if the scanned data did not include the correct bin information, the grid may include the following information: Line, Bin Count, Item Number, Item Description, Counted, Assign To The Correct Bin, Bin. You can select the correct bin from the Assign To The Correct Bin drop-down list.
Each line on the grid is color-coded as follows:
Green: The scanned line is matched to a line on the physical inventory count sheet in e-automate. The Match column may contain one of the following:
Matched: The system matched a non-serialized scanned item identified by Item number to an item on the selected physical inventory count sheet.
Redirected: The system matched a scanned item identified by a number other than an Item number (e.g., Vendor item number, OEM number, UPC) by looking up the item's Item number and matching it to an item on the selected physical inventory count sheet.
Serialized: The system matched a serialized scanned item identified by Serial number to an item on the selected physical inventory count sheet.
~Add Item to Location: The system matched a non-serialized scanned item identified by Item number to an item in e-automate, but did not find the item in the bin listed for the item in the scan file or in any bin on the selected physical inventory count sheet. When you upload data to e-automate, ScanIt will put this item in the bin specified for the item in the scan file.
Light Red: The scanned line is not matched to a line on the physical inventory count sheet in e-automate. The Match column may contain one of the following:
mismatched: The scanned item is listed as being in a different bin than the bin listed for the item on the specified physical inventory count sheet.
unmatched: The system could not identify the scanned item; the item may exist in the specified warehouse-and-bin combination for the selected physical inventory count sheet, but the item's Item number may not be valid in e-automate—in which case, ScanIt will list Invalid in the (Ea) Item column.
Ignored: The item exists on the specified physical inventory count sheet but was not found in the scan file, so the item was skipped.
~Multiple Bins: No bin was listed for the scanned item in the scan file, and the item is listed in multiple bins on the selected physical inventory count sheet.
~No Bin—cannot add: No bin was listed for the scanned item in the scan file, and the item was not found on the selected physical inventory count sheet.
Unexpected Serialized Equipment: The scanned serialized item is not on the selected physical inventory count sheet.
Review the data. When you are ready to import the scanned data from ScanIt into e-automate, click the [ADD COUNTS TO E-AUTOMATE] button. The system adds the counts from ScanIt to e-automate, and you can view the updated data in the Counts and Difference columns of the Inventory count grid for the selected physical inventory count sheet on the Record Physical Inventory Counts window in e-automate.
Click the Step 3 EVALUATE tab to bring it forward. This tab displays a grid showing only the imported scan count lines where a discrepancy exists between the EA On Hand count (the count in the e-automate software) and the Physical Count (the scanned count).
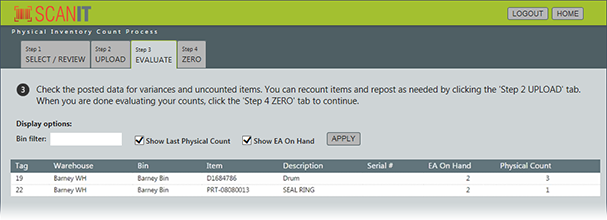
To assist with evaluating data on this tab, the following display options are available:
To filter by the Bin column, do the following:
In the Bin filter field, enter the bin number (or part of a bin number) by which to filter the results.
Click the [APPLY] button.
To include/exclude the Physical Count column:
Check/uncheck the Show Last Physical Count checkbox.
Click the [APPLY] button.
To include/exclude the EA On Hand column:
Check/uncheck the Show EA On Hand checkbox.
Click the [APPLY] button.
If you identify discrepancies in the scanned data that need to be corrected, you can correct the discrepancies by modifying the data via the AML scanner, by modifying the data in the CSV file generated by the scanner, and/or by changing the data in e-automate. To avoid unintentionally overwriting changes you have made, observe these cautions and recommendations:
If you are using AML scanners with the AML DC Console, ECi recommends editing data via the AML scanner if possible. When a record is selected for edit from the scanner, the record is re-displayed in the template (making it easy to identify the data each field contains) and data can be updated by re-scanning bar codes if necessary (minimizing data entry keystroke errors). The data file can then be re-uploaded via ScanIt.
For information on editing data via the scanner, see the Scanning Bar Code Data topic's "Scanning Bar Code Data via an AML Scanner > Editing Existing Records" section.
If you choose to edit a CSV file created by an AML scanner, consider removing the file from the AML scanner. If you edit the CSV file, upload your changes, and then upload the same data file from the AML scanner again (which may include additional data if the scanner was used to append data to the same file), the data from the file taken from the AML scanner (which does not include your edits) will overwrite the changes you made to the CSV file.
If you choose to edit a CSV file created via the ScanIt app or an AML scanner, note that the CSV file should have the following structure:
One comma-delimited header record: Warehouse,Bin,Item,Quantity,TimeStamp,Inventoried by
Comma-delimited detail records with this record structure:
|
Column Name |
Data Type |
e-automate Max Length |
|
Warehouse |
Text |
15 |
|
Bin |
Text |
15 |
|
Item |
Text |
255 for ICItems.Item (30 for Item number or Serial number) |
|
Quantity |
Number |
12 |
|
TimeStamp |
Date/Time (e.g., 2/26/2021 8:05) |
Date/Time |
|
Inventoried by |
Text |
50 |
For serialized items, the Item column should contain the serial number that identifies this item.
During processing, ScanIt compares the value in this field to the following e-automate fields in this order to attempt to match the item:
1) Item number
2) Vendor item number
3) OEM number
4) UPC
5) Serial number
If you choose to edit data directly in e-automate, be aware that your changes will be overwritten if you subsequently make changes to the same data for the same count sheet via the scanner and/or the CSV file generated by the scanner and then re-upload the data via the ScanIt web site.
For more information on editing data via e-automate, see the e-automate help documentation.
If you upload two or more counts for the same item for the same count sheet, the count uploaded last overwrites any count(s) previously uploaded.
When you finish evaluating the data, click the Step 4 ZERO tab to bring it forward. If you have imported scanned counts for all the items on the physical inventory count sheet, the system displays a [CLICK TO COMPLETE] button. Click this button and proceed to Step 9. If you have not imported scanned counts for all the items, the Step 4 ZERO tab displays a grid you can use to set to zero the inventory counts for uncounted, non-serialized items.
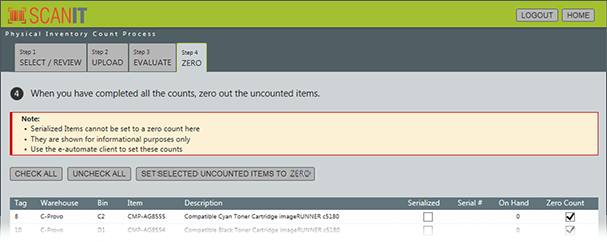
To use this grid to set to zero the inventory count for uncounted items on this physical inventory count sheet, do the following:
To manually set a line’s count to zero, check the Zero Count checkbox for that line.
To leave an uncounted line’s on-hand count unchanged, do not check the Zero Count checkbox for that line.
To set to zero the line count for all non-serialized items (which checks the Zero Count checkbox for all applicable lines), click the [CHECK ALL] button.
To uncheck the Zero Count checkbox for all lines (which leaves each uncounted line’s on-hand count unchanged), click the [UNCHECK ALL] button.
When you are finished checking/unchecking the Zero Count checkboxes, click the [SET SELECTED UNCOUNTED ITEMS TO ZERO] button to set the On hand column on the Record Physical Inventory Counts window in e-automate to zero (0) for each line for which the Zero Count checkbox is checked in this grid.
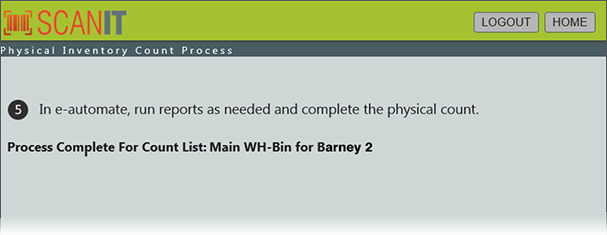
When you click the [CLICK TO COMPLETE] button on the Step 4 ZERO tab, ScanIt displays a reminder window. This window indicates the physical inventory count sheet for which ScanIt processing is now complete and reminds you to process any necessary reports and to complete and post the physical count in your e-automate software.
©2025 ECI and the ECI logo are registered trademarks of ECI Software Solutions, Inc. All rights reserved.