Scanning Bar Code Data
Scanning Bar Code Data via the ScanIt AppScanning Bar Code Data via the ScanIt App
To scan bar code data via the ScanIt app, see the topics in the ScanIt App online help's "Count Inventory Screens" book.
Scanning Bar Code Data via an AML ScannerScanning Bar Code Data via an AML Scanner
Once you have transferred the configuration file from the ScanIt web site to your AML scanner via the DC Console, you are ready to begin scanning bar codes to collect data.
Accessing the Template on an AML ScannerAccessing the Template on an AML Scanner
To access the template on an AML scanner, do the following:
From the AML scanner, double-tap on the DC Suite icon to run the software.
Tap on the ECI ScanIt icon to open the scan template. The system displays the Select Data File list.
Do one of the following:
To create a new data file, do the following:
From the Select Data File list, select Create New Data File.
With Create New Data File selected in the Select Data File list, tap [OPEN]. The system displays the New Data File window, and the windows' Create New Data File field displays the default file name.
In the Create New Data File field, make no change to accept the default name (e.g., ECi_Scan_[increment number]) or enter a customized file name.
Tap [OK]. The system displays the scanner template, and you are now ready to begin using the AML scanner to take inventory.
To update an existing data file, do the following:
From the Select Data File list, select the file you wish to update.
With the file selected in the Select Data File list, tap [OPEN]. The system displays the prompt, "Append or clear the current data?"
Do one of the following:
To clear the data from the existing file, do the following:
Tap [CLEAR]. The system displays the prompt, "Clear all data in the selected file?"
Tap [YES] to clear the data from the selected file. The system then displays the scanner template, and you are now ready to begin using the AML scanner to take inventory.
To add new records to the end of existing records in the data file, tap [APPEND]. The system displays the scanner template, and you are now ready to begin using the AML scanner to take inventory.
To return to the previous window without changing the existing file, tap [BACK].
To delete an existing data file, do the following:
From the Select Data File list, select the file you wish to delete.
With the file selected in the Select Data File list, tap [DELETE]. The system displays the prompt, "Are you sure you want to delete data file '[NAME]'?"
To delete the file, tap [YES].
Understanding Template BasicsUnderstanding Template Basics
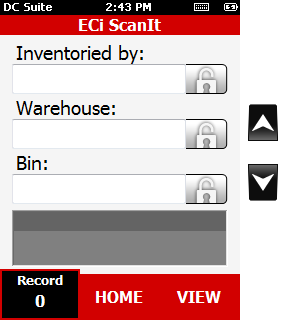
Template Overview: The black bar at the top of the template displays the software name (DC Suite), the time, an icon for accessing a keyboard for data entry, and a battery-level indicator. The red bar below the black bar displays the file name you assigned to this file. The template fields display below the title bar. In the dark gray area below the fields, the system displays a table listing in Warehouse, Bin, Item, and Quantity columns the data from the most recently scanned records. At the lower left of the template, the Record field displays the count of scanned bar codes. Tapping the [HOME] button closes the current file. Tapping the [VIEW] button accesses the View window. Tapping the arrow keys scrolls through the fields in the template.
The View window displays the template file data in table format with the following columns: Warehouse, Bin, Item, Quantity, Timestamp, and Inventoried By. Below the table, the View window includes the Record count, a [BACK] button for returning to the template, and an [EDIT] button for editing the record selected in the display. When a record is selected for edit, the system displays the selected record using the template.
Verifying a Scanned Bar Code: When you successfully scan a bar code, the system beeps and flashes a green light. When a bar code is not scanned successfully, the system flashes a red light and the scanner vibrates.
Scanning Bar Codes Versus Manually Entering Data: If you scan a bar code for a field, the system automatically enters the data and positions the cursor in the next field that is not locked. If you manually enter data in a field, you need to click [ENTER] to accept the data and then tap the next field in which you wish to enter data.
Locking and Unlocking Fields: Locking a field prevents data from accidentally being changed and allows the same data to be used for each item scanned. The system automatically locks and unlocks some fields. For example, if you scan a warehouse bar code, the system populates the Warehouse field, locks the Warehouse field, unlocks the Bin field, and positions the cursor in the Bin field in preparation for specifying the bin for this warehouse. You can also manually lock or unlock a field by clicking the padlock icon to the right of the field.
Saving a Record: If you scan a bar code in the last unlocked field for a record OR if you manually enter data in the last unlocked field for a record and then tap [ENTER] to accept the data, the system saves the record, updates the data in the table near the bottom of the template, updates the Record count, and positions the cursor in the first available unlocked field.
Editing a Record: If you detect an error in a scanned record, ECi recommends editing the record from the scanner (ideally, as soon as you detect the error). While the data can be corrected by editing the CSV file generated by the scanner or by editing data after it is imported via ScanIt into e-automate, editing the data via the scanner by re-displaying a record in the template may make it easiest to identify the field(s) that need to be updated and—where new data can be scanned to replace the incorrect data—to minimize the possibility of data entry errors.
Adding New RecordsAdding New Records
To add a new record when the template is displayed on an AML scanner, do the following:
Tap the Inventoried by field.
In the Inventoried by field, enter your name.
Tap [ENTER].
Tap the Warehouse field.
In the Warehouse field, scan the warehouse bar code to populate this field or enter the name of the warehouse you are inventorying.
In the Bin field, scan the bin bar code to populate this field or enter the name of the bin you are inventorying.
In the Item field, do one of the following:
For serialized items, scan the bar code for—or manually enter—the serial number of the item you are inventorying. When ScanIt processes this record, ScanIt will look up the item's item number in e-automate and will display both the item number and serial number for this item.
For non-serialized items, scan the bar code for—or manually enter—any one of the following numbers to identify the item you are inventorying:
Item number
Vendor item number
OEM number
UPC
Item number
Vendor item number
OEM number
UPC
Serial number
For the Quantity field, enter the quantity of this item in this warehouse-and-bin location.
If you scan a bar code for the last unlocked field in the template, the system automatically records the record information along with the TimeStamp. If you manually enter data in the last unlocked field in the template, tap [ENTER] to have the system record the information along with the TimeStamp.
Repeat the previous steps as necessary to add additional records, locking and/or unlocking fields as appropriate (for example, when switching bins), until you are finished collecting data.
When you are finished, tap [HOME] to close this file.
Editing Existing RecordsEditing Existing Records
To edit an existing record when the template is displayed on an AML scanner, do the following:
Tap the [VIEW] button at the lower right corner of the template. The View window opens and displays the template file data in table format.
Scroll to and select the record you want to edit.
With the record to edit selected in the display, tap the [EDIT] button. The system re-displays the selected record in the ECi ScanIt template.
Tap a field you want to edit.
With the field to edit selected and unlocked, scan or enter the appropriate data for the field.
Repeat Steps 4 and 5 as necessary to update additional fields.
When you finish editing this record, tap [SAVE]. The system re-displays the View window.
To edit another record, repeat Steps 2 - 7.
To return to the template to enter additional data, tap the [BACK] button.
Deleting Existing RecordsDeleting Existing Records
To delete an existing record when the template is displayed on an AML scanner, do the following:
Tap the [VIEW] button at the lower right corner of the template. The View window opens and displays the template file in table format.
Scroll to and select the record you want to delete.
With the record to delete selected in the display, tap the [DELETE] button. The system automatically deletes the selected record, re-displays the View window, and updates the Record count.
To delete another record, repeat Steps 2 - 3.
To return to the template to enter additional data, tap the [BACK] button.
©2025 ECI and the ECI logo are registered trademarks of ECI Software Solutions, Inc. All rights reserved.