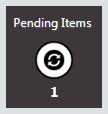
Pending Items Tile
If any pending actions exist for your business via Dealer Gateway, the system displays a Pending Items tile on the home page.

This tile lists the number of pending actions and provides access to the Pending Actions page, which displays all pending actions for your business via Dealer Gateway.

You can add items to the Pending Actions page during Item Sync processing by clicking the Confirm icon on the Sync With System page. The Sync With System page also displays a Pending icon that lists the current count of pending actions.
![]()
If an error occurs during any item sync process that prevents the system from syncing an item with your business software database, the system will list the pending action on the Pending Actions page along with an error message explaining why the pending action could not be completed.
From the Pending Actions page, you can review and update pending actions, check error messages, remove pending actions without processing them, and apply pending actions.
When you click [Save] on the Pending Actions page to apply the pending actions, the system removes the applied actions from the Pending Actions page and updates the pending action count. If no pending actions remain, the Pending icon on the Sync With System page will show a count of zero (0) and the Pending Item tile will not be displayed on the home page.
For more information on adding and managing pending actions, see the Supplies Tile, Equipment Tile, and Parts Tile topics. For troubleshooting information, see the "Troubleshooting Errors Listed on the Pending Actions Page" below.
Troubleshooting Errors Listed on the Pending Actions PageTroubleshooting Errors Listed on the Pending Actions Page
If an error occurs during any item sync process, the system displays a Pending Items tile on the home page (if the tile is not already displayed), updates the pending action count on the Pending Items tile, and lists the pending action along with an error message on the Pending Actions page.
To review and resolve any errors, do the following:
Click the Pending Items tile displayed on the home page.
The system opens the Pending Actions page. Check the Error column to see if an ![]() Error icon is present.
Error icon is present.
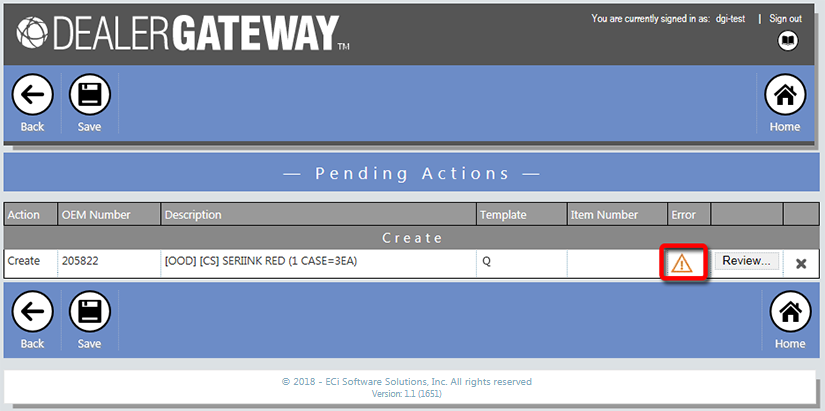
If an Error icon is present, click the ![]() Error icon to display the error message...
Error icon to display the error message...
...or click the [Review...] button in the column to the right of the error icon to display the Review Pending Action page, which will display the error message below the pending action table.
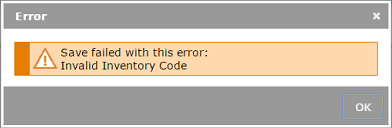
Use the error code provided in the message, the Action listed for the item in the table on the Pending Actions page, and the following table to determine where and how to resolve the error. If the error you received is not listed below, contact support for assistance.
|
Error Codes |
||
|
Error Name |
Pending Action |
Resolution |
|
Category Code is required. |
Create |
In Dealer Gateway, access the Templates page for the selected vendor partner. In the Item templates region, select the Template listed in the Template column of the grid on the Pending Actions page for this item. Select a valid Item category code for this template. |
|
Link |
In e-automate, click [Items] on the tool bar to open the Items window. Double-click the item in the grid to open the Edit Inventory Item window. In the Category field, enter a valid category code. |
|
|
Invalid Category Code |
Create |
In Dealer Gateway, access the Templates page for the selected vendor partner. In the Item templates region, select the Template listed in the Template column of the grid on the Pending Actions page for this item. Select a valid Item category code for this template. |
|
Link |
In e-automate, click [Items] on the tool bar to open the Items window. Double-click the item in the grid to open the Edit Inventory Item window. In the Category field, enter a valid category code. |
|
|
Invalid Equipment Code |
Create |
In Dealer Gateway, access the Templates page for the selected vendor partner. In the Item templates region, select the Template listed in the Template column of the grid on the Pending Actions page for this item. Select a valid Equipment code for this template. |
|
Link |
In e-automate, click [Items] on the tool bar to open the Items window. Double-click the item in the grid to open the Edit Inventory Item window. Click the Codes and Settings tab to bring it forward. In the Equipment code field, enter a valid equipment code. |
|
|
Invalid Inventory Code |
Create |
In Dealer Gateway, access the Templates page for the selected vendor partner. In the Item templates region, select the Template listed in the Template column of the grid on the Pending Actions page for this item. Select a valid Inventory code for this template. |
|
Invalid Sales Code |
Create |
In Dealer Gateway, access the Templates page for the selected vendor partner. In the Item templates region, select the Template listed in the Template column of the grid on the Pending Actions page for this item. Select a valid Sales code for this template. |
|
Link |
In e-automate, click [Items] on the tool bar to open the Items window. Double-click the item in the grid to open the Edit Inventory Item window. Click the Codes and Settings tab to bring it forward. In the Sales code - GL field, enter a valid sales code. |
|
|
Invalid Service Code |
Create |
In Dealer Gateway, access the Templates page for the selected vendor partner. In the Item templates region, select the Template listed in the Template column of the grid on the Pending Actions page for this item. Select a valid Service code for this template. |
|
Link |
In e-automate, click [Items] on the tool bar to open the Items window. Double-click the item in the grid to open the Edit Inventory Item window. Click the Codes and Settings tab to bring it forward. In the Service code - GL field, enter a valid service code. |
|
|
Invalid Tracking Config |
Create |
In Dealer Gateway, access the Templates page for the selected vendor partner. In the Item templates region, select the Template listed in the Template column of the grid on the Pending Actions page for this item. Select a valid Tracking configuration for this template. Note: The tracking configuration field is only displayed when an Equipment code is selected. For more information, see the Templates help topic.
|
|
Invalid Unit of Measure |
Create |
In Dealer Gateway, access the Partner Mappings page for the selected vendor partner. In the Units mapping region, select a valid Inventory unit to map to each Gateway unit of measure. For more information, see the Partner Mappings help topic. |
|
Link |
In e-automate, click [Items] on the tool bar to open the Items window. Double-click the item in the grid to open the Edit Inventory Item window. In the Unit of measure field, enter a valid unit of measure. |
|
|
Invalid Weight Unit of Measure |
Link |
In e-automate, click [Items] on the tool bar to open the Items window. Double-click the item in the grid to open the Edit Inventory Item window. In the Unit of weight field, enter a valid unit of weight. |
|
Item has equipment. Equipment Code is required. |
Link |
In e-automate, click [Items] on the tool bar to open the Items window. Double-click the item in the grid to open the Edit Inventory Item window. Click the Codes and Settings tab to bring it forward. In the Equipment code field, enter a valid equipment code. |
|
Model is required when there is an Equipment Code. |
Link |
In e-automate, click [Items] on the tool bar to open the Items window. Double-click the item in the grid to open the Edit Inventory Item window. Click the Codes and Settings tab to bring it forward. In the Model field, enter a valid model number. |
|
Model specified does not exist. Cannot create a new Model because make is invalid. |
Link |
In e-automate, click [Items] on the tool bar to open the Items window. Double-click the item in the grid to open the Edit Inventory Item window. Click the Codes and Settings tab to bring it forward. In the Model field, use the Drop-down Menu icon to select Edit to open the Edit Model window. Click the Details tab to bring it forward. In the Make field, enter a valid make. |
|
Model specified does not exist. Cannot create a new Model because model Category is invalid. |
Link |
In e-automate, click [Items] on the tool bar to open the Items window. Double-click the item in the grid to open the Edit Inventory Item window. Click the Codes and Settings tab to bring it forward. In the Model field, use the Drop-down Menu icon to select Edit to open the Edit Model window. Click the Details tab to bring it forward. In the Category field, enter a valid category. |
|
Model specified does not exist. Cannot create a new Model without "make" and "model Category". |
Link |
In e-automate, click [Items] on the tool bar to open the Items window. Double-click the item in the grid to open the Edit Inventory Item window. Click the Codes and Settings tab to bring it forward. In the Model field, use the Drop-down Menu icon to select Edit to open the Edit Model window. Click the Details tab to bring it forward. In the Make field, enter a valid make. In the Category field, enter a valid category. |
|
No Item Price record found to update. |
Create |
In e-automate, click [Items] on the tool bar to open the Items window. Double-click the item in the grid to open the Edit Inventory Item window. Click the Prices tab to bring it forward. Verify a price level exists for determining the price of the item. |
|
Tracking Config is required when there is an Equipment Code. |
Create |
In Dealer Gateway, access the Templates page for the selected vendor partner. In the Item templates region, select the Template listed in the Template column of the grid on the Pending Actions page for this item. Select a valid Tracking configuration for this template. Note: The tracking configuration field is only displayed when an Equipment code is selected. For more information, see the Templates help topic.
|
|
Unit of Measure is required. |
Create |
In Dealer Gateway, access the Partner Mappings page for the selected vendor partner. In the Units mapping region, select a valid Inventory unit to map to each Gateway unit of measure. For more information, see the Partner Mappings help topic. |
|
Link |
In e-automate, click [Items] on the tool bar to open the Items window. Double-click the item in the grid to open the Edit Inventory Item window. In the Unit of measure field, enter a valid unit of measure. |
|
|
Vendor Number is required. |
Create |
In Dealer Gateway, access the Vendors page. In the Categories region, map the category for the item to the selected vendor partner. |
©2025 ECI and the ECI logo are registered trademarks of ECI Software Solutions, Inc. All rights reserved.