Supplies Tile
If the system displays a Supplies tile on the home page for the vendor partner you selected, you will be able to view and manage the new and updated supply items received from the specified vendor partner via Dealer Gateway.
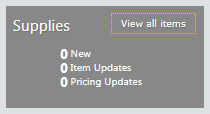
The Supplies tile includes three links—New, Item Updates, and Pricing Updates—and a [View all items] button. Each link identifies the number of supply item changes in each area. If you click a link or the button, you can indicate if, how, and when the system is to use the information to update your business software database.
Using the New link, indicate for each new supply item if the system should create a new item in your business software, link the new item to an existing item in your business software, ignore the item (removing the item from the Supplies List page), or take no action at this time (leaving the item on the Supplies List page).
Using the Item Updates link, indicate for each updated supply item if the system should update the existing item in your business software, unlink the item from the existing item in your business software, ignore the item (removing the item from the Supplies List page), or take no action at this time (leaving the item on the Supplies List page).
Using the Pricing Updates link, indicate for each updated supply item's pricing if the system should update the existing item's pricing information in your business software, unlink the item from the existing item in your business software, ignore the item pricing change (removing the item pricing change from the Supplies List page), or take no action at this time (leaving the item pricing change on the Supplies List page).
Using the [View all items] button, access and edit all supply item information. Use this option if you want to change the status of an item you have previously marked to ignore.
Once you have set and reviewed the action for each supply item, save your selections and have the system update your business software accordingly.
Managing New SuppliesManaging New Supplies
The New link on the Supplies tile identifies the number of new supply items received from the specified vendor partner via Dealer Gateway. To manage these new supply items, do the following:
From the Supplies tile, click the New link. The system displays the new supply items received from the specified vendor partner via Dealer Gateway in a table on the Supplies List page.
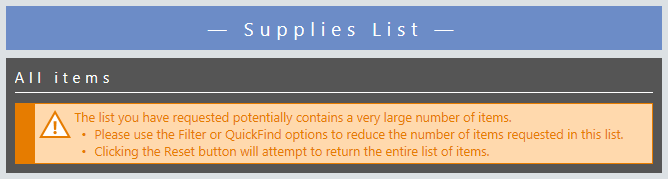
To reduce the number of items displayed in the Supplies List, use the Filter or QuickFind options. See the Filter and QuickFind options in the Tool Bar Features section of the List Pages topic.
To reset the list, click the Reset icon or press ENTER.
To reduce the number of items displayed in the Supplies List, use the Filter or QuickFind options. See the Filter and QuickFind options in the Tool Bar Features section of the List Pages topic.
For each new item, the New items table on the Supplies List page displays the following information: OEM Number, Make, Model, Description, and Category.
To view additional information for any item, do the following:
Click the item's OEM number link in the OEM Number column. The system displays an Item page. The Item page indicates if the item has been processed and includes Item identification, Item information, Vendor details, Item interactions, Meter descriptions, Related items, and Remarks areas.
To return to the Supplies List page, click the Back icon.
To set an item to sync with your system (which you can do for all items in the list from the Supplies List page or for an individual item from the Item page), click the Sync icon. The system displays the Sync With System page.
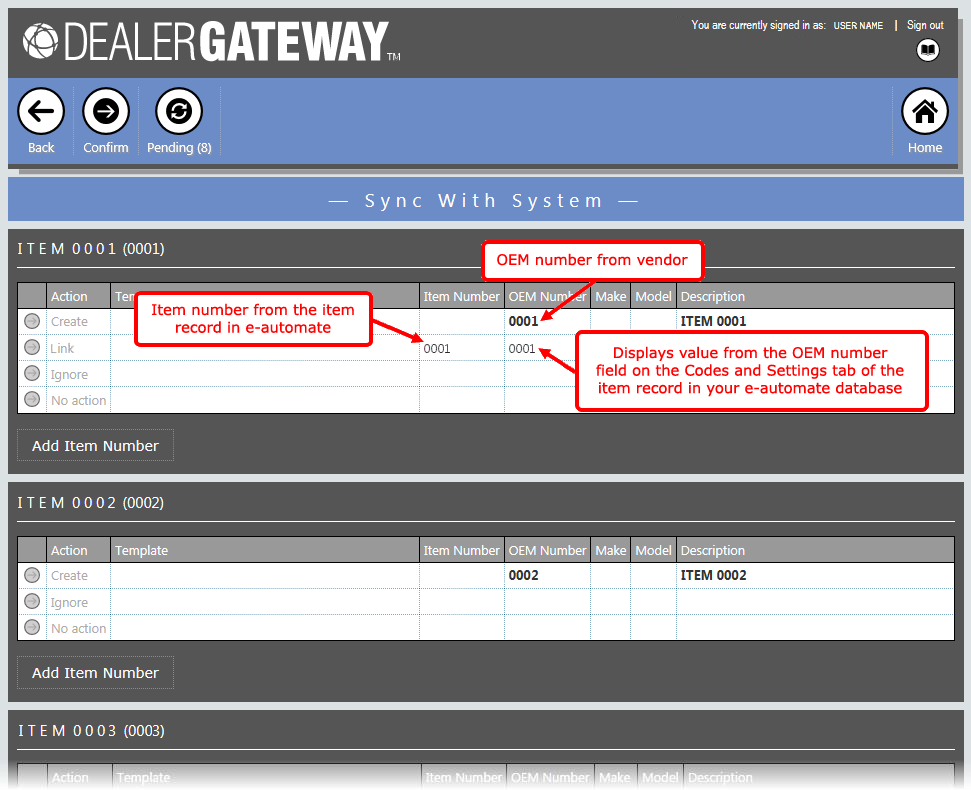
For each new item, the system displays item identification information, a table listing the sync options, and an [Add Item Number] button. The table includes the following fields:
Action: Displays the actions (Create, Link, Ignore, No action) from which you can select to indicate how the system is to process this item.
Template: Displays a drop-down list containing the templates defined on the Templates page for indicating the options and settings the system should use when creating a new item in your business software system based on the vendor's item. This option only displays for the row where Action is set to Create.
Item Number: Displays the item number for the item from your business software database. The data only displays for the Link row.
OEM Number: The OEM Number on the Create row displays the OEM number from the vendor. The OEM Number on the row where Action is set to Link displays the value from the OEM number field on the Codes and Settings tab in e-automate.
Make: Make of the item from the vendor record.
Model: Model of the item from the vendor record.
Description: The Description of the item from the vendor record.
To assign an action to the item, do one of the following:
To indicate the system is to create the item in your business software database, do the following:
Select the arrow to the left of Create in the Action column.

In the Template column, use the Drop-down Template menu to select the template you want the system to use for creating this item in your business software database. The system will create this item in your business software database using the options and settings defined for this template on the Templates page.
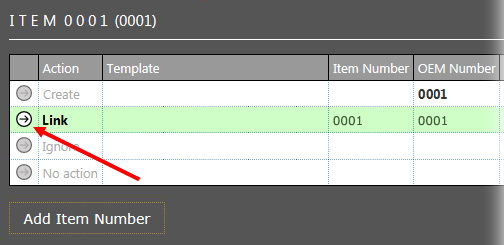
To indicate the system is to link the item to an existing item in your business software, click the arrow to the left of Link in the Action column.
If you are using e-automate, Dealer Gateway first searchers the Vendor item number field available on the Vendors tab of the item record and when editing the vendor. If there is not a match in this field, Dealer Gateway searches the History of vendor item numbers region available when editing the vendor on the Vendors tab of the item record.

To indicate the system is to link a new supply item to an existing item in your business software database that Dealer Gateway does not recognize as a match, do the following:
Click [Add Item Number]. The Add Item Number window opens.
In the Item number field, enter the item number assigned to the item in your business software database that you want to link to the vendor item.
Click [OK]. The Link action now displays and is selected, and the item number assigned in your business software database displays in the Item Number column.
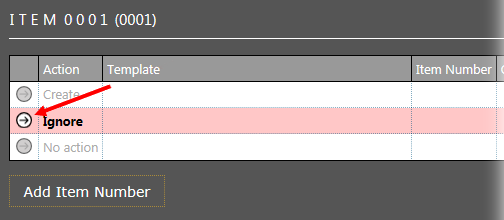
To indicate the system is to exclude this supply item from the Supplies List page, select the arrow to the left of Ignore in the Action column.
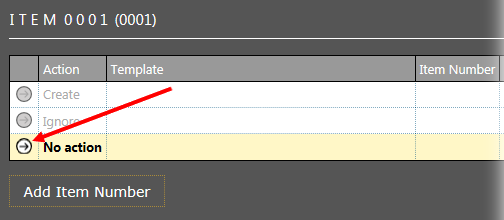
If you are not sure what you want to do with this supply item or do not want to make a decision at this time, click the arrow to the left of No action in the Action column to indicate the system is to continue including this item on the Supplies List page.
To confirm the changes you have made, click the Confirm icon. The system removes the item(s) with actions assigned from the Sync With System page and moves the item(s) to the Pending Actions list.
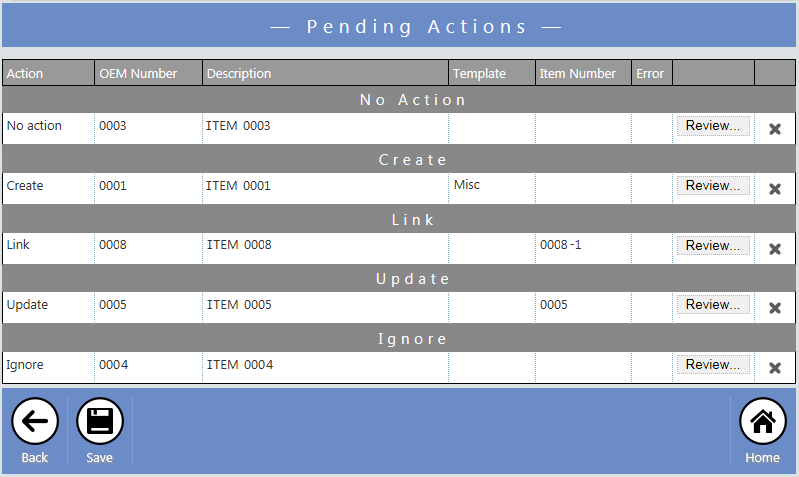
Click the Pending icon located at the top of the page on the tool bar. The Pending Actions page displays.
If necessary, you may do either of the following:
If you want to change or review the status of a pending item, do the following:
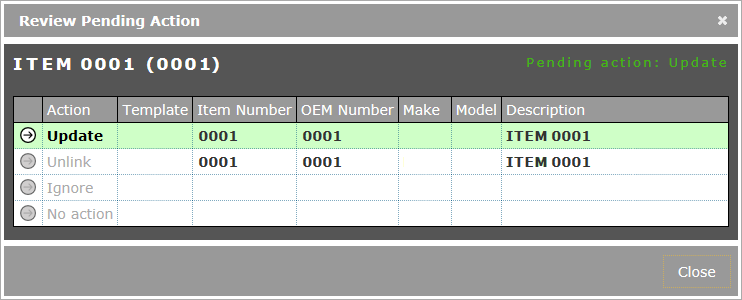
Click [Review…] in the row of the item you want to change or review. The Review Pending Action window opens.
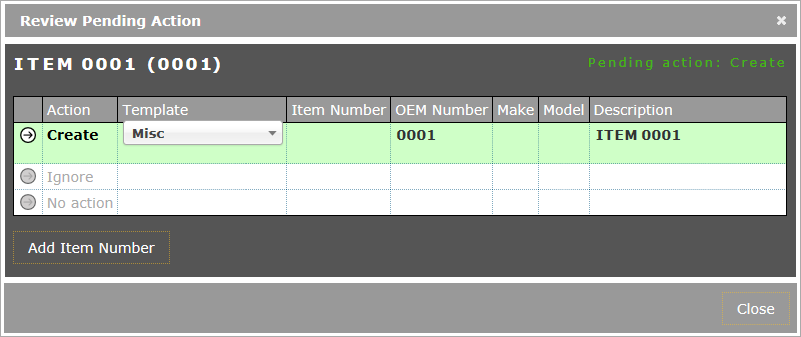
Make any necessary changes.
Click [Close] to return to the Pending Actions page.
If you want to cancel an action assigned to an item, do the following:
Click the X at the end of the item row. A verification dialogue displays.
Click [Yes] to remove the item from the Pending Actions page.
To apply the pending actions, click [Save]. Items assigned an Action of Create are automatically entered into your business software database and linked to the Dealer Gateway item. Items assigned an Action of Link are linked to existing items in your database. Items assigned an Action of Ignore are no longer displayed in the list of New items on the Supplies List page. Items assigned an Action of No action continue to display in the list of new items on the Supplies List page.
Managing Item UpdatesManaging Item Updates
The Item Updates link on the Supplies tile identifies the number of updated supply items received from the specified vendor partner via Dealer Gateway. To manage these updated supply items, do the following:
From the Supplies tile, click the Item Updates link. The system displays the updated supply items received from the specified vendor partner via Dealer Gateway in a table on the Supplies List page.
To reduce the number of items displayed in the Supplies List, use the Filter or QuickFind options. See the Filter and QuickFind options in the Tool Bar Features section of the List Pages topic.
To reset the list, click the Reset icon or press ENTER.
To reduce the number of items displayed in the Supplies List, use the Filter or QuickFind options. See the Filter and QuickFind options in the Tool Bar Features section of the List Pages topic.
For each new item, the Updated items table on the Supplies List page displays the following information: OEM Number, Item Number, Make, Model, Description, Category, and Remarks.
To view additional information for any item—including the item details that have changed, do the following:
Click the item's OEM number link in the OEM Number column. The system displays the Item Compare page.
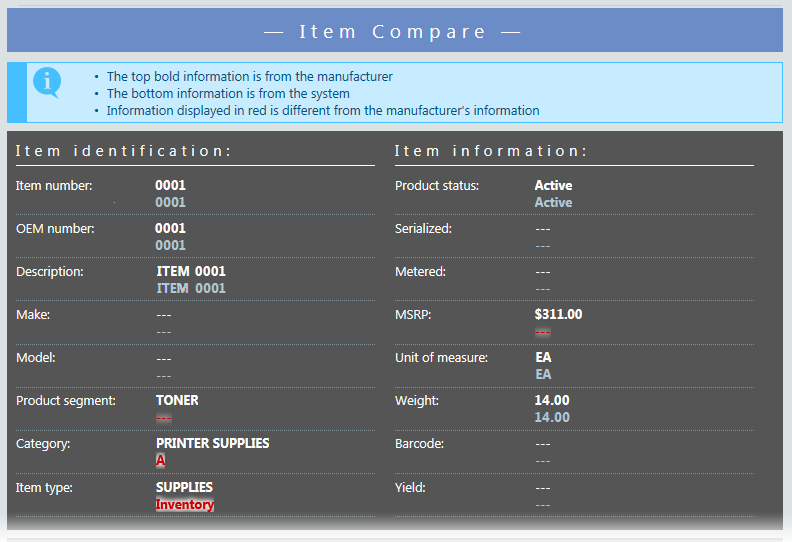
The Item Compare page includes Item identification, Item information, Vendor details, Item interactions, Meter descriptions, Related items, and Remarks areas. For each item in each area, the system displays two rows. The top row displays the updated item data received from the vendor partner. The bottom row displays the corresponding data from your business software database. The system displays in red font in the bottom row the data in your business software database that is different from the updated item data received from the vendor partner. If you update this item, the system will check the Update settings area of the Templates page to verify the fields that should be updated. For each field you have selected for update on that page, the system will replace the information in red with the vendor partner's updated information.
 in the Remarks column of the table on the Supplies List page indicates the vendor partner has provided additional information regarding this item. The system displays this information at the bottom of the Item page in the Remarks area.
To return to the Supplies List page, click the Back icon.
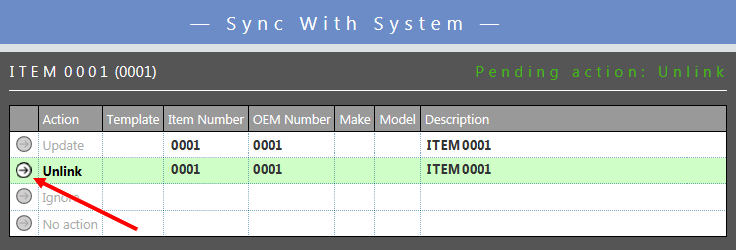
To set an item to sync with your system (which you can do for all items in the list from the Supplies List page or for an individual item from the Item Compare page), click the Sync icon. The system displays the Sync With System page.
To assign an action to an item, do one of the following:
To indicate the system is to update the item in your business software database, select the arrow to the right of Update in the Action column for the item if it is not already selected by default.
To break the link between the vendor item and the business software item, select the arrow to the left of Unlink in the Action column for the item. When the action is saved, the item is unlinked and moved back to the New items list. Breaking a link does not remove the item from your business software database.
To indicate the system is to exclude this supply item from the Supplies List page, select the arrow to the left of Ignore in the Action column.

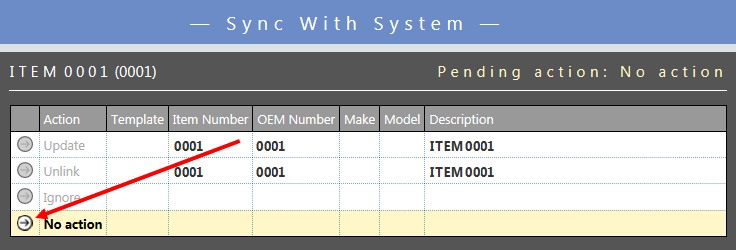
If you are not sure what you want to do with the item or do not want to make a decision at this time, select the arrow to the left of No action in the Action column for the item to indicate the system is to continue including this item on the Supplies List page.
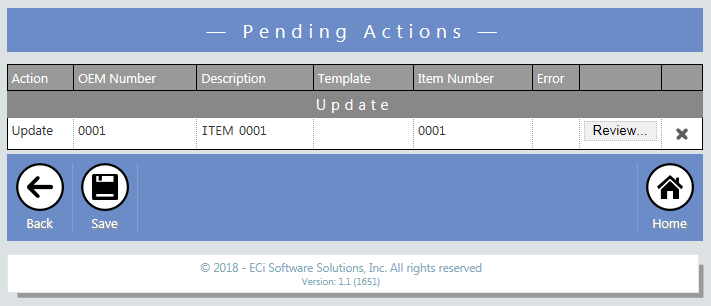
To confirm the changes you have made, click the Confirm icon. The system removes the item(s) with actions assigned from the Sync With System page and moves the item(s) to the Pending Actions page.
Click the Pending icon located at the top of the page on the tool bar. The Pending Actions page displays.
If necessary, you may do either of the following:
If you want to change or review the status of a pending item, do the following:
Click [Review…] in the row of the item you want to change or review. The Review Pending Action window opens.
Make any necessary changes.
Click [Close] to return to the Pending Actions page.
If you want to cancel an action assigned to an item, do the following:
Click the X at the end of the item row. A verification dialogue displays.
Click [Yes] to remove the item from the Pending Actions page.
To apply the pending actions, click [Save]. Items assigned an Action of Update are automatically updated in your business software database using the settings specified in the Update settings area of the Templates page. Items assigned an Action of Unlink are unlinked from the existing items in your database and are moved to the New item list. Items assigned an Action of Ignore are no longer displayed in the list of Item Updates on the Supplies List page; if these items were linked to items in your business software database, the links are broken at this time. Items assigned an Action of No action continue to display in the list of Updated items on the Supplies List page.
Managing Pricing UpdatesManaging Pricing Updates
The Pricing Updates link on the Supplies tile identifies the number of supply item pricing changes received from the specified vendor partner via Dealer Gateway. To manage these supply item pricing changes, do the following:
From the Supplies tile, click Pricing Updates. The system displays the supply item pricing changes received from the specified vendor partner via Dealer Gateway in a table on the Supplies List page.
To reduce the number of items displayed in the Supplies List, use the Filter or QuickFind options. See the Filter and QuickFind options in the Tool Bar Features section of the List Pages topic.
To reset the list, click the Reset icon or press ENTER.
To reduce the number of items displayed in the Supplies List, use the Filter or QuickFind options. See the Filter and QuickFind options in the Tool Bar Features section of the List Pages topic.
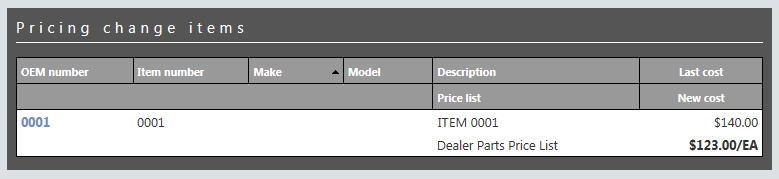
For each pricing update item, the Pricing change items table on the Supplies List page displays the following information: OEM Number, Item number, Make, Model, Description, Price list, Last cost, and New cost.
To view additional information for any item—including the price change, do the following:
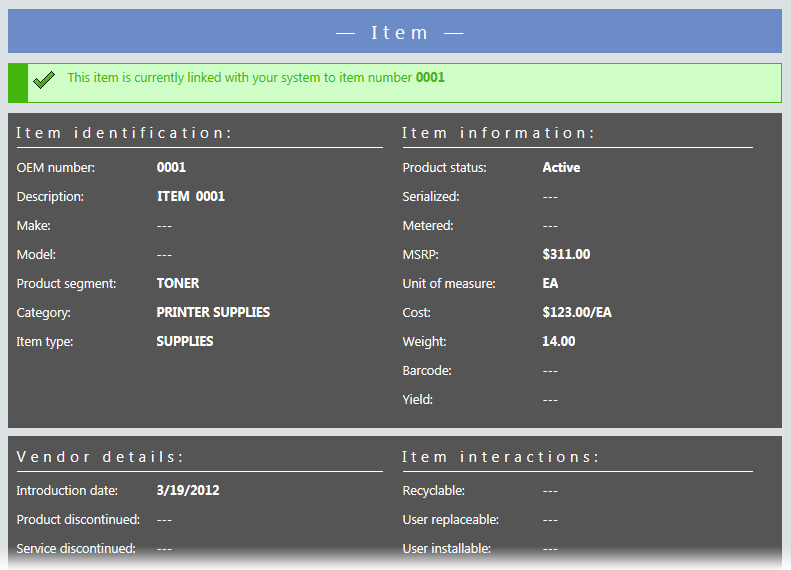
Click the item's OEM number link in the OEM number column. The system displays an Item page. The Item page indicates if the vendor partner item is currently linked to an item in your system and includes Item identification, Item information, Vendor details, Item interactions, Meter descriptions, Related items, and Remarks areas.
in the Remarks column of the table on the Supplies List page indicates the vendor partner has provided additional information regarding this item. The system displays this information at the bottom of the Item page in the Remarks area.To return to the Supplies List page, click the Back icon.
To set an item to sync with your system (which you can do for all items in the list from the Supplies List page or for an individual item from the Item page), click the Sync icon. The system displays the Sync With System page
You may click [Sync] on this page, or click [Back] to return to the list of items and click [Sync] on the list page to sync all items at the same time. The Sync With System page displays.
Do one of the following:
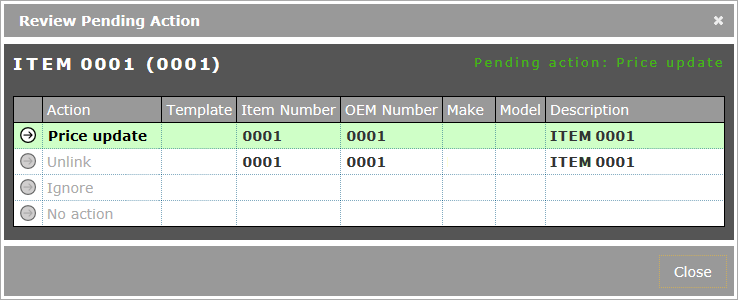
To indicate the system is to update an item's price in your business software database, select the arrow to the left of Price update in the Action column for the item if it is not already selected by default.
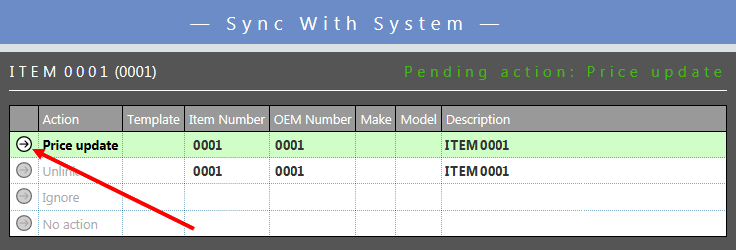
To break the link between the vendor item and the business software item, select the arrow to the left of Unlink in the Action column for the item.
To indicate the system is to exclude this supply item from the Supplies List page, select the arrow to the left of Ignore in the Action column.
If you are not sure what you want to do with the item or do not want to make a decision at this time, select the arrow to the left of No action in the Action column for the item to indicate the system is to continue including this item on the Supplies List page.
To confirm the changes you have made, click the Confirm icon. The system removes the item(s) with actions assigned from the Sync With System page and moves the item(s) to the Pending Actions page.
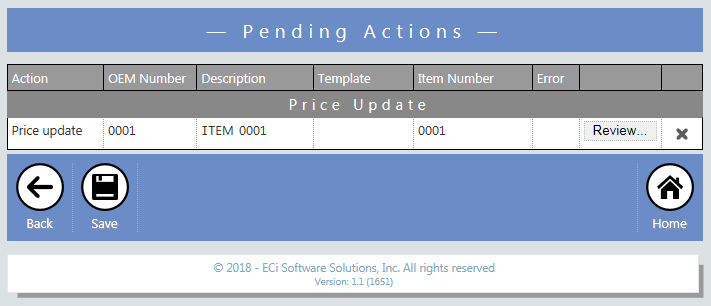
Click the Pending icon located at the top of the page on the tool bar. The Pending Actions page displays.
If necessary, you may do either of the following:
If you want to change or review the status of a pending item, do the following:
Click [Review…] in the row of the item you want to change or review. The Review Pending Action window opens.
Make any necessary changes.
Click [Close] to return to the Pending Actions page.
If you want to cancel an action assigned to an item, do the following:
Click the X at the end of the item row. A verification dialogue displays.
Click [Yes] to remove the item from the Pending Actions page.
To apply the pending actions, click [Save]. Pricing for Items assigned an Action of Update are automatically updated in your business software database. Items assigned an Action of Unlink are unlinked from the existing items in your database and are moved to the New item list. Items assigned an Action of Ignore are no longer displayed in the list of Item Updates on the Supplies List page; if these items were linked to items in your business software database, the links are broken at this time. Items assigned an Action of No action continue to display in the list of Pricing change items on the Supplies List page.
Viewing All ItemsViewing All Items
The [View all items] button on the Supplies tile gives you access to a list of all vendor supply items that are currently linked to supply items in your business software or a list of all vendor supply items that have been assigned an Ignore action. From the All items table on the Supplies List page, you can select an item for which to change the item's Linked or Ignored action. If you have ignored an item in the past but have now decided you want it to show up on the vendor’s list of items, you can use this option to move the item back to the vendor's list of items.
Accessing and Editing the Status of a Linked ItemAccessing and Editing the Status of a Linked Item
To access and edit the status of a linked supply item, do the following:
From the Supplies tile, click [View all items]. The Supplies List page displays. In the Item type showing area, the [Linked] button is selected by default and the page displays linked items.
To reduce the number of items displayed in the All items table on the Supplies List page, use the Filter or QuickFind options. See the Filter and QuickFind options in the Tool Bar Features section of the List Pages topic.
To reset the list, click the Reset icon or press ENTER.
To reduce the number of items displayed in the All items table on the Supplies List page, use the Filter or QuickFind options. See the Filter and QuickFind options in the Tool Bar Features section of the List Pages topic.
For each linked item, the All items table on the Supplies List page displays the following information: OEM Number, Item Number, Make, Model, Description, and Category.
To view additional information and edit the status of an item, do the following:
Click the item's OEM number link in the OEM Number column. The system displays an Item page. The Item page indicates if the vendor item is currently linked to an item in your business software database and includes Item identification, Item information, Vendor details, Item interactions, Meter descriptions, Related items, and Remarks areas.
To edit the status of the item, click the Sync icon. The system displays the Sync With System page.
To assign a different action to the linked item, do the following:
To indicate the system is to update the item in your business software database, select the arrow to the right of Update in the Action column for the item.
To break the link between the vendor item and the business software item, select the arrow to the left of Unlink in the Action column for the item. When the action is saved, the item is unlinked and moved back to the New items list. Breaking a link does not remove the item from your business software database.
To indicate the system is to exclude this supply item from the Supplies List page, select the arrow to the left of Ignore in the Action column.
If you are not sure what you want to do with the item or do not want to make a decision at this time, select the arrow to the left of No action in the Action column for the item to indicate the system is to continue including this item on the Supplies List page.
To confirm the changes you have made, click the Confirm icon. The system removes the item from the Sync With System page and moves the item to the Pending Actions page.
Click the Pending icon located at the top of the page on the tool bar. The Pending Actions page displays.
If necessary, you may do either of the following:
If you want to change or review the status of a pending item, do the following:
Click [Review…] in the row of the item you want to change or review. The Review Pending Action window opens.
Make any necessary changes.
Click [Close] to return to the Pending Actions page.
If you want to cancel an action assigned to an item, do the following:
Click the X at the end of the item row. A verification dialogue displays.
Click [Yes] to remove the item from the Pending Actions page.
To apply the pending actions, click [Save]. Items assigned an Action of Update are automatically updated in your business software database using the settings specified in the Update settings area of the Templates page. Items assigned an Action of Unlink are unlinked from the existing items in your database and are moved to the New item list. Items assigned an Action of Ignore are no longer displayed in the list of Item Updates on the Supplies List page; if these items were linked to items in your business software database, the links are broken at this time. Items assigned an Action of No action continue to display in the list of Updated items on the Supplies List page.
To return to the Supplies List page, click the Back icon.
Accessing and Editing the Status of an Ignored ItemAccessing and Editing the Status of an Ignored Item
To access and edit the status of an ignored supply item, do the following:
From the Supply tile, click [View all items]. The Supplies List page displays.
In the Item type showing area, click the [Ignored] button.
To reduce the number of items displayed in the Ignored items table on the Supplies List page, use the Filter or QuickFind options. See the Filter and QuickFind options in the Tool Bar Features section of the List Pages topic.
To reset the list, click the Reset icon or press ENTER.
To reduce the number of items displayed in the Ignored items table on the Supplies List page, use the Filter or QuickFind options. See the Filter and QuickFind options in the Tool Bar Features section of the List Pages topic.
For each ignored item, the Ignored items table on the Supplies List page displays the following information: OEM Number, Item Number, Make, Model, Description, and Category.
To view additional information and edit the status of an item, do the following:
Click the item's OEM number link in the OEM Number column. The system displays an Item page. The Item page indicates if the vendor item is currently linked to an item in your business software database and includes Item identification, Item information, Vendor details, Item interactions, Meter descriptions, Related items, and Remarks areas.
To return to the Supplies List page, click the Back icon.
To assign a different action to the linked item, do the following:
To indicate the system is to update the item in your business software database, select the arrow to the right of Update in the Action column for the item.
To break the link between the vendor item and the business software item, select the arrow to the left of Unlink in the Action column for the item. When the action is saved, the item is unlinked and moved back to the New items list. Breaking a link does not remove the item from your business software database.
To indicate the system is to exclude this supply item from the Supplies List page, select the arrow to the left of Ignore in the Action column.
If you are not sure what you want to do with the item or do not want to make a decision at this time, select the arrow to the left of No action in the Action column for the item to indicate the system is to continue including this item on the Supplies List page.
To confirm the changes you have made, click the Confirm icon. The system removes the item from the Sync With System page and moves the item to the Pending Actions page.
Click the Pending icon located at the top of the page on the tool bar. The Pending Actions page displays.
If necessary, you may do either of the following:
If you want to change or review the status of a pending item, do the following:
Click [Review…] in the row of the item you want to change or review. The Review Pending Action window opens.
Make any necessary changes.
Click [Close] to return to the Pending Actions page.
If you want to cancel an action assigned to an item, do the following:
Click the X at the end of the item row. A verification dialogue displays.
Click [Yes] to remove the item from the Pending Actions page.
To apply the pending actions, click [Save]. Items assigned an Action of Update are automatically updated in your business software database using the settings specified in the Update settings area of the Templates page. Items assigned an Action of Unlink are unlinked from the existing items in your database and are moved to the New item list. Items assigned an Action of Ignore are no longer displayed in the list of Item Updates on the Supplies List page; if these items were linked to items in your business software database, the links are broken at this time. Items assigned an Action of No action continue to display in the list of Updated items on the Supplies List page.
©2025 ECI and the ECI logo are registered trademarks of ECI Software Solutions, Inc. All rights reserved.