Printing, E-mailing, and Exporting
ExportingExporting
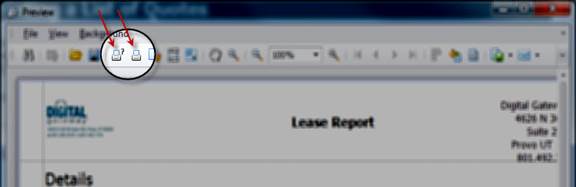
Digital Quote Manager gives you the ability to export a list of sales quotes, and a list of items you have put on a lease. The ability to print a list of your sales quotes is accessed through the Find Quote function. The ability to print a list of items from an individual sales quote that are on the lease is accessed through the Lease Options tab. The topics for those areas of Digital Quote Manager instruct you on how to access the print preview window from which you can print, email, and export. This topic explains how to use the Preview window.
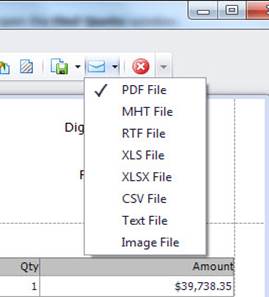
When exporting a list, Digital Quote Manager offers you several output format options to select from including PDF, HTML, MHT, RTF, Excel, CSV, Text, and Image.
If you need information on accessing MS Excel in that environment, see the Logging In to Digital Quote Manager Resources in the Hosted (Cloud) Environment topic's "Accessing MS Excel" section.
If you need information on accessing a location to save templates in that environment, see the Logging In to Digital Quote Manager Resources in the Hosted (Cloud) Environment topic's "Accessing the DQM Templates" section.
To export a list from Digital Quote Manager, do the following once you have opened the print preview window.
Click the [Export Document...] icon. An Options window displays that corresponds to the default output format. If you want to select a different output format, click the down arrow to the right of the [Export Document...] icon to display a list of export formats.

Select the output format you want. An Options window displays that corresponds to the output option you selected.
Enter the appropriate information for the selected format type. Use the following directions listed under the format you selected.
PDF File: When selected, the PDF Export Options window displays. Do the following:
In the Page range field, enter the pages you want included. Separate nonconsecutive pages with a comma. Use a dash to set a range of consecutive pages, for example, 1-3.
In the Don't embed these fonts field, to reduce the file size, define the fonts that you do not want embedded in the complete file. Separate the fonts with a semicolon.
In the Images quality field use the drop-down menu to select the desired image quality level. The higher the quality, the bigger the file, and vice versa.
If you want to compress the file, check the Compressed checkbox.
If you want the print dialog box to display, click the Show print dialog on open checkbox.
In the Application field, enter Digital Quote Manager, if necessary.
In the Author field, enter your name, if necessary.
In the Keywords field, enter keywords that would identify this document, if necessary.
In the Subject field, enter a subject name for this file, if necessary.
In the Title field, enter a title name for this file, if necessary.
HTML File: When selected, the HTML Export Options window displays. This option is for export only; it is not available for email. Do the following:
In the Export mode field, use the drop-down menu to select one of the following:
Single file: Exports all pages of the list into one file. If you have selected Sing file, skip to step e.
Single file page-by-page: Allows export of a document to a single file, while preserving page-by-page breakdown. In this mode, the Page range, Page border color, and Page border width options are available.
Different files: Exports each page into its own file. In this mode, the Page range, Page border color, and Page border width options are available.
In the Page range field, enter the pages you want included. Separate nonconsecutive pages with a comma. Use a dash to set a range of consecutive pages, for example, 1-3.
In the Page border color, use the drop-down menu to choose the color for the page border. When the drop-down menu displays click on the appropriate tab, Custom, Web, or System, and then select a border color from the available palettes.
In the Page border width field, use the up and down arrows to select the width of the page border on the document. You may also enter the desired width in the field.
In the Title field, enter a title name for this file, if necessary.
In the Character set field, use the drop-down menu to select the character set for your HTML document.
If you do not want carriage return symbols to be include din the exported file, check the Remove carriage returns checkbox.
MHT File: When selected, the MHT Export Options window displays. Do the following:
In the Export mode field, use the drop-down menu to select one of the following:
Single file: Exports all pages of the list into one file. If you have selected Sing file, skip to step e.
Single file page-by-page: Allows export of a document to a single file, while preserving page-by-page breakdown. In this mode, the Page range, Page border color, and Page border width options are available.
Different files: Exports each page into its own file. In this mode, the Page range, Page border color, and Page border width options are available.
In the Page range field, enter the pages you want included. Separate nonconsecutive pages with a comma. Use a dash to set a range of consecutive pages, for example, 1-3.
In the Page border color, use the drop-down menu to first select Custom, Web, or System, and then select the color you want the border on the exported document.
In the Page border width field, use the up and down arrows to select the width of the page border on the document. You may also enter the desired width in the field.
In the Title field, enter a title name for this file, if necessary.
In the Character set field, use the drop-down menu to select the character set for your HTML document.
If you do not want carriage return symbols to be included in the exported file, check the Remove carriage returns checkbox.
RTF File: When selected the RTF Export Options window displays. Do the following:
In the Export mode field, use the drop-down menu to select one of the following:
Single file: Allows export of a document to a single file, without preserving the page-by-page breakdown. If you have selected Single file, skip to step e.
Single file page-by-page: Allows export of a document to a single file, while preserving page-by-page breakdown. In this mode, the Page range, Page border color, and Page border width options are available.
In the Page range field, enter the pages you want included. Separate nonconsecutive pages with a comma. Use a dash to set a range of consecutive pages, for example, 1-3.
If you want the watermarks included in the exported file, check the Export watermarks checkbox.
XLS and XLSX File: When selected, the XLS/XLSX Export Options window displays. Do the following:
If you want the grid lines to display in the exported document, check the Show grid lines checkbox.
If you want the values to display in the exported Excel document in the same format as they display in the Find Quote list, check the Export values using their format checkbox. Otherwise they will display in the General format.
If you want the hyperlinks to display on the exported documented, check the Export hyperlinks checkbox.
In the Sheet name field, enter a name for the Excel sheet to which this list is exported.
CSV File: When selected, the CSV Export Options window displays. Do the following:
In the Text separator field, leave the default value, a comma, or enter the value you want as the text separator in the CSV document.
In the Encoding field, use the drop-down menu to select the encoding process you want to use to transfer the data from the Find Quote list to the CSV document.
If you want to separate coding strings in the CSV document using the separator specified in step a., check the Quote strings with separators checkbox.
Text File: When selected, the Text Export Options window displays. Do the following:
In the Text separator field, leave the default value, TAB, or enter the value you want as the text separator in the Text document.
In the Encoding field, use the drop-down menu to select the encoding process you want to use to transfer the data from the Find Quote list to the Text document.
If you want to separate coding strings in the Text document using the separator specified in step a., check the Quote strings with separators checkbox.
Image File: When selected, the Image Export Options window displays. Do the following:
In the Image format field, use the drop-down menu to select the image format in which you want to export the image file. You can select from BMP, EMF, WMF, GIF, JPEG, PNG, or TIFF.
In the Resolution (dpi) field, use the drop-down menu to select the resolution you want for the exported image.
In the Export mode field, use the drop-down menu to select one of the following:
Single file: Allows export of a document to a single file, without preserving the page-by-page breakdown. If you have selected Single file, skip to step e.
Single file page-by-page: Allows export of a document to a single file, while preserving page-by-page breakdown. In this mode, the Page range, Page border color, and Page border width options are available.
Different files: Exports each page into its own file. In this mode, the Page range, Page border color, and Page border width options are available.
In the Page range field, enter the pages you want included. Separate nonconsecutive pages with a comma. Use a dash to set a range of consecutive pages, for example, 1-3.
In the Page border color, use the drop-down menu to choose the color for the page border. When the drop-down menu displays click on the appropriate tab, Custom, Web, or System, and then select a border color from the available palettes.
In the Page border width field, use the up and down arrows to select the width of the page border on the document. You may also enter the desired width in the field.
Click [OK] to open the Save as window.
Save the file to an easily accessible location.
E-mailingE-mailing
Digital Quote Manager gives you the ability to email sales quotes, a list of sales quotes, and a list of items you have put on a lease. The ability to print a list of your sales quotes is accessed through the Find Quote function. The ability to print a least of items from an individual sales quote that are on the lease is accessed through the Lease Options tab. The topics for those areas of Digital Quote Manager instruct you on how to access the preview window from which you can print, email, and export from that area. This topic explains how to use the Preview window.
To email a list from Digital Quote Manager, do the following once you have opened the print preview window.
Click the [Send via E-MAIL...] icon. An Options window displays that corresponds to the default output format. If you want to select a different output format, click the down arrow to the right of the [Send via E-MAIL...] icon to display a list of export formats.
Select the output format you want. An Options window displays that corresponds to the output option you selected.
Enter the appropriate information for the selected format type. Use the following directions listed under the format you selected.
PDF File: When selected, the PDF Export Options window displays. Do the following:
In the Page range field, enter the pages you want included. Separate nonconsecutive pages with a comma. Use a dash to set a range of consecutive pages, for example, 1-3.
In the Don't embed these fonts field, to reduce the file size, define the fonts that you do not want embedded in the complete file. Separate the fonts with a semicolon.
In the Images quality field use the drop-down menu to select the desired image quality level. The higher the quality, the bigger the file, and vice versa.
If you want to compress the file, check the Compressed checkbox.
If you want the print dialog box to display, click the Show print dialog on open checkbox.
In the Application field, enter Digital Quote Manager, if necessary.
In the Author field, enter your name, if necessary.
In the Keywords field, enter keywords that would identify this document, if necessary.
In the Subject field, enter a subject name for this document, if necessary.
In the Title field, enter a title name for this document, if necessary.
MHT File: When selected, the MHT Export Options window displays. Do the following:
In the Export mode field, use the drop-down menu to select one of the following:
Single file: Exports all pages of the list into one file. If you have selected Sing file, skip to step e.
Single file page-by-page: Allows export of a document to a single file, while preserving page-by-page breakdown. In this mode, the Page range, Page border color, and Page border width options are available.
Different files: Exports each page into its own file.
In the Page range field, enter the pages you want included. Separate nonconsecutive pages with a comma. Use a dash to set a range of consecutive pages, for example, 1-3.
In the Page border color, use the drop-down menu to first select Custom, Web, or System, and then select the color you want the border on the exported document.
In the Page border width field, use the up and down arrows to select the width of the page border on the document. You may also enter the desired width in the field.
In the Title field, enter a title name for this file, if necessary.
In the Character set field, use the drop-down menu to select the character set for your HTML document.
If you do not want carriage return symbols to be include din the exported file, check the Remove carriage returns checkbox.
RTF File: When selected, the RTF Export Options window displays. Do the following:
In the Export mode field, use the drop-down menu to select one of the following:
Single file: Allows export of a document to a single file, without preserving the page-by-page breakdown. If you have selected Single file, skip to step e.
Single file page-by-page: Allows export of a document to a single file, while preserving page-by-page breakdown. In this mode, the Page range, Page border color, and Page border width options are available.
In the Page range field, enter the pages you want included. Separate nonconsecutive pages with a comma. Use a dash to set a range of consecutive pages, for example, 1-3.
If you want the watermarks included in the exported file, check the Export watermarks checkbox.
Excel File: When selected, the XLS Export Options window displays. Do the following:
If you want the grid lines to display in the exported document, check the Show grid lines checkbox.
If you want the values to display in the exported Excel document in the same format as they display in the Find Quote list, check the Export values using their format checkbox. Otherwise they will display in the General format.
If you want the hyperlinks to display on the exported documented, check the Export hyperlinks checkbox.
In the Sheet name field, enter a name for the Excel sheet to which this list is exported.
CSV File: When selected, the CSV Export Options window displays. Do the following:
In the Text separator field, leave the default value, a comma, or enter the value you want as the text separator in the CSV document.
In the Encoding field, use the drop-down menu to select the encoding process you want to use to transfer the data from the Find Quote list to the CSV document.
If you want to separate coding strings in the CSV document using the separator specified in step a., check the Quote strings with separators checkbox.
Text File: When selected, the Text Export Options window displays. Do the following:
In the Text separator field, leave the default value, TAB, or enter the value you want as the text separator in the Text document.
In the Encoding field, use the drop-down menu to select the encoding process you want to use to transfer the data from the Find Quote list to the Text document.
If you want to separate coding strings in the Text document using the separator specified in step a., check the Quote strings with separators checkbox.
Image File: When selected, the Image Export Options window displays. Do the following:
In the Image format field, use the drop-down menu to select the image format in which you want to export the image file. You can select from BMP, EMF, WMF, GIF, JPEG, PNG, or TIFF.
In the Resolution (dpi) field, use the drop-down menu to select the resolution you want for the exported image.
In the Export mode field, use the drop-down menu to select one of the following:
Single file: Allows export of a document to a single file, without preserving the page-by-page breakdown. If you have selected Single file, skip to step e.
Single file page-by-page: Allows export of a document to a single file, while preserving page-by-page breakdown. In this mode, the Page range, Page border color, and Page border width options are available.
Different files: Exports each page into its own file. In this mode, the Page range, Page border color, and Page border width options are available.
In the Page range field, enter the pages you want included. Separate nonconsecutive pages with a comma. Use a dash to set a range of consecutive pages, for example, 1-3.
In the Page border color, use the drop-down menu to choose the color for the page border. When the drop-down menu displays click on the appropriate tab, Custom, Web, or System, and then select a border color from the available palettes.
In the Page border width field, use the up and down arrows to select the width of the page border on the document. You may also enter the desired width in the field.
Click [OK] to open the Save as window.
Save the file to an easily accessible location.
Send the file using your email application.
Printing Sales QuotesPrinting Sales Quotes
To print your sales quotes, you can select from different predefined sales quote templates that come with Digital Quote Manager or you can select a template that you have created yourself. Digital Quote Manager is equipped with bookmarks that allow the Microsoft Word or Excel sales quote templates to pull pertinent pieces of information from Digital Quote Manager into the MS Word or Excel sales quote, respectively. You must have MS Word/Excel installed on the same system as Digital Quote Manager for the system to populate the applicable template(s) using the sales quote data.
If you have password-protected your MS Word and/or Excel templates, Digital Quote Manager must be configured to have the ability to access your templates in order to be able to populate those templates. Your Admin must configure Digital Quote Manager to access password-protected templates in the Manage Settings area of Digital Quote Manager Admin.
To ensure that the total monetary amount displayed on a sales quote generated from a template matches the total monetary amount displayed for the sales quote in Digital Quote Manager, be sure to configure each numeric field in the template to have the same number of decimal positions as the corresponding field in Digital Quote Manager. If a numeric field in a template contains fewer decimal positions than the corresponding field in Digital Quote Manager, the system will round the field's value in the template. This rounding may influence the value displayed in that field of the template and may potentially cause the total monetary amount displayed on the sales quote generated from the template to differ from the total monetary amount displayed for the sales quote in Digital Quote Manager.
For a list of bookmarks see Bookmarks. Before selecting a template, you must identify the following options:
If you want the host equipment and all its accessories to appear on the printed sales quote or if you want only the host equipment to appear without its accessories.
Whether or not you want individual accessory prices to appear on the sales quote.
If you have both a lease option and a purchase option on your quote you can choose if you want both options or just the lease option to appear on the printed sales quote.
To print a sales quote, do the following:
In the Accounts region, use the drop-down menu to select the customer or prospect for whom the quote was created.
In the Opportunity field, use the drop-down menu to select the opportunity under which the quote was categorized.
In the Quotes region, select the quote you want to print.
Click the [Print Quote] button to open the Print Quote window.
Do one of the following:
If the Digital Quote Manager Template File field already displays the path and file name of the template you want to use, proceed to Step 6.
If the Digital Quote Manager Template File field is blank or does not display the path and file name of the template you want to use, click the [Browse Templates] button to open the Browse Digital Quote Manager Templates window. Using this window, do any of the following:
Navigate to the folder containing the template you want to use for printing the sales quote.
Filter the list of templates displayed by selecting the Word Template... or Excel Template... option from the drop-down menu to the right of the File name field.
Select the template you want to use by doing any of the following:
If you see the template you want to use in the display, double-click the template to close the Browse Digital Quote Manager Templates window and to populate the Print Quote window's Digital Quote Manager Template File field with the selected template's path and file name.
To use the File name field, do the following:
In the File name field, begin entering the template's name. As you type, the system displays a list of matching template names from which to select. Complete the File name field's entry by typing the rest of the file name or by selecting the file name from the list of options displayed.
Click the [Open] button to close the Browse Digital Quote Manager Templates window and to populate the Print Quote window's Digital Quote Manager Template File field with the selected template's path and file name.
browse your directory and select the appropriate Sales Quote template. Once selected, the path and file name of the template display in the Digital Quote Manager Template File field.
In the Print options regions, do any of the following:
Check the Rollup Accessories checkbox if accessories should not appear on the printed sales quote; otherwise, leave this checkbox unchecked.
Check the Hide line-item pricing checkbox if prices for accessories should not appear on the printed sales quote; otherwise, leave this checkbox unchecked.
Click the [Print Quote] button. The system opens MS Word or MS Excel (depending upon the template you selected) and populates the selected template.
Using MS Word or MS Excel, print the sales quote.
Printing ListsPrinting Lists
Digital Quote Manager gives you the ability to print sales quotes, a list of sales quotes, and a list of items you have put on a lease. The ability to print a list of your sales quotes is accessed through the Find Quote function. The ability to print a list of items from an individual sales quote that are on the lease is accessed through the Lease Options tab. The topics for those areas of Digital Quote Manager instruct you on how to access the preview window from which you can print, email, and export from that area. This topic explains how to use the Preview window. You may either quick print or choose print options.
To print a list from Digital Quote Manager, do the following once you have opened the print preview window.
To print the list, click one of the two print icons.
If you select the Print... option, you must specify appropriate printing options in the window that displays and click [OK]. If you select the Print (Quick Print) option, the list will begin printing with options that had been previously specified.
©2025 ECI and the ECI logo are registered trademarks of ECI Software Solutions, Inc. All rights reserved.