Canon SnapShot Setup
To integrate Canon SnapShot functionality with RemoteTech, you need to:
Have the necessary ECI software versions installed
Know your Dealer Gateway Credentials
Verify your ESN user has I/C Makes view rights
Add your Dealer Gateway Dealer Number to RemoteTech's web.config file
Enable Canon's SnapShot Functionality
Verifying You Have the Necessary ECI Software Versions InstalledVerifying You Have the Necessary ECI Software Versions Installed
To integrate Canon SnapShot functionality with RemoteTech, you need the following minimum ECI software versions installed:
E-automate 17.2+
RemoteTech 17.2.31+
ESN Client Software 948+
Note: If you are using ECI's PIP software, it includes a license to use ESN.
You can download the software from the Customer Support Center web site: https://customersupport.ecisolutions.com. For more information, see the following links:
To install/upgrade e-automate: https://webhelp.e-automate.com/172/Installation_Guides/Install_Guide_files/E-automate_Installation_Overview.htm
To install/upgrade RemoteTech: Installing and Configuring RT 17.2.20 (On Premise)
To install/upgrade ESN: https://webhelp.e-automate.com/172/ESN/Equipment_Solutions_Network_(ESN).htm
Knowing Your Dealer Gateway CredentialsKnowing Your Dealer Gateway Credentials
During your Dealer Gateway connection setup, your implementation team consultant provided you with Dealer Gateway login credentials. These are the credentials you use to log in to the Dealer Gateway (https://dealer.digitalgateway.com/). They include your Dealer number, User name, and Password. You will need this information to complete the Canon SnapShot functionality integration with RemoteTech. If you do not know your Dealer Gateway login credentials, contact support.
Verifying Your ESN User Has I/C Makes View RightsVerifying Your ESN User Has I/C Makes View Rights
During the ESN setup process, an ESN user is created in e-automate. For the Canon SnapShot functionality to work with RemoteTech, the ESN user must have view rights to I/C Makes. To verify your ESN user has view rights to I/C Makes, do the following:
Access e-admin.
From the main e-admin window, select the company that you are using with RemoteTech.
From the Company menu, click Edit security to open the Enter Admin Password window.
In the Admin password for [Company ID] field, enter the appropriate password.
Click [OK] to open the Security window.
On the Security window, do the following:
On the Users tab, locate your ESN user.
Click the [Edit…] button to open the User Properties window.
On the User Properties window, do the following:
Click the Permissions tab to bring it forward.
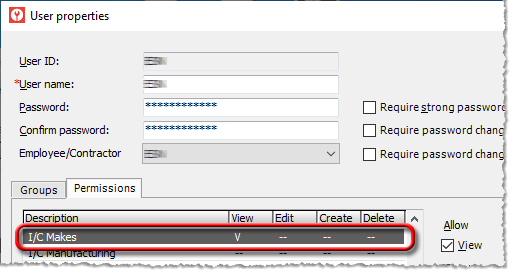
On the Permission tab, scroll down to the I/C Makes permissions:
Verify
the View column for this row
contains a "V" for view rights; if it does not, check the
View checkbox to the right of the permissions list so that a "V"
appears in this column for this row.
If you added view rights to this row, click the [OK] button to save your change and close this window.
The system displays a message, reminding you that all e-automate users and Task Engines (DGServer) must restart for the changes to take effect. Click the [OK] button to acknowledge and close this message.
Click
[Close] to close the Security
window.
Note:
For more information about assigning permissions, see the Security
topic in the e-admin help.
Adding Your Dealer Gateway Number to RemoteTech's Web.config FileAdding Your Dealer Gateway Number to RemoteTech's Web.config File
Support for Canon SnapShot requires communicating your Dealer Gateway Dealer number to Canon via RemoteTech’s web.config file. Update your web.config file as follows:
Locate
your RemoteTech web.config
file.
Note: By default, this file
is stored at C:\inetpub\wwwroot\RTS.
Using a text editor such as NotePad, open the file for edit.
Locate
the following line:
<add key="DealerNumber" value=""/>
Enter your Dealer Gateway Number as the value for the DealerNumber key (e.g., <add key="DealerNumber" value="YourDealerGatewayNumber"/>).
Save the file.
Note: If you do not have (or do not know if you have) dealer access to Dealer Gateway, contact your account manager.
Enabling Canon's SnapShot FunctionalityEnabling Canon's SnapShot Functionality
To enable integration with Canon SnapShot, do the following:
Using
your Canon Remote Services Suite software, enable ECi integration
with SnapShot.
Note: For more information,
refer to your Canon software instructions.
When
you enable ECi integration with SnapShot via your Canon Remote Services
Suite software, the system displays ECi's Service Registration page.
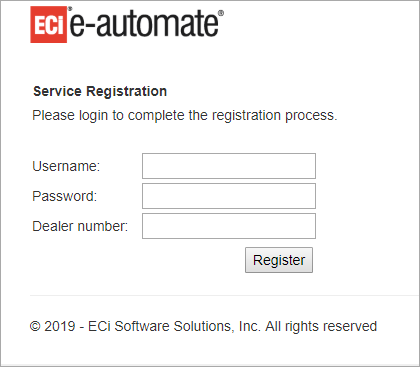
On ECi's Service Registration page, do the following:
In the Username field, enter your Dealer Gateway user name.
In the Password field, enter the password associated with your Dealer Gateway user name.
In the Dealer number field, enter your Dealer Gateway dealer number.
Click
the [Register] button.
The
system displays the Service Registration Details page.
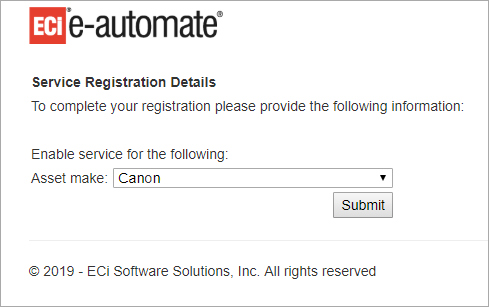
On ECi's Service Registration Details page, do the following:
In the Asset make field, use the drop-down menu to select Canon.
Click
the [Submit] button.
The
system displays a Thank You page.
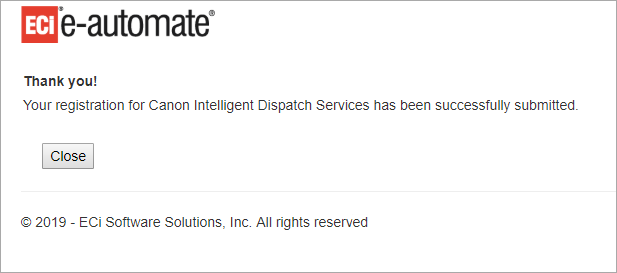
On the Thank You page, click the [Close]
button to close the Thank You page and to return to the Canon Remote
Services Suite software.
Disabling Canon's SnapShot FunctionalityDisabling Canon's SnapShot Functionality
If you need to disable ECi integration with Canon SnapShot, refer to your Canon Remote Services Suite software for instructions.
Non-supported ReleaseNon-supported Release
©2022 ECI and the ECI logo are registered trademarks of ECI Software Solutions, Inc. All rights reserved.