Using the Data Import/Export Spreadsheet
You use the Data Import/Export spreadsheet utility (DataImportExport.xls) to easily and quickly bulk import your data into e-automate and export your data from e-automate. With this utility, you can import and export the following information:
Vendors
Makes
Models
Meters associated with models
Inventory items
Customers
Contacts
Service equipment
On-hand inventory quantities
Open accounts receivable invoices
Open accounts payable invoices
Unearned contract balances at the contract level
Unearned contract balances at the equipment/item level
Unearned contract balances at the meter level
Fixed assets and their associated values
Contract equipment sub leases
Each worksheet in the spreadsheet has three buttons, [Export from e-automate], [Import into e-automate], and [Clear Data]. You use [Export from e-automate] to export data from the respective data fields in your e-automate database to the spreadsheet. You use [Import into e-automate] to import large amounts of data into e-automate from the spreadsheet, usually when converting from an old system. You use [Clear Data] to clear the worksheet of all entered data.
The Data Import/Export Spreadsheet is only for importing information to and/or exporting information from e-automate. You cannot edit data in e-automate by exporting the data into this tool, making changes, and then importing the edited data back into e-automate. Any changes you need to make to your data must be done in e-automate or modified with the Inventory Item Utility Spreadsheet.
Each worksheet is pre-configured to work in conjunction with e-automate. You can use the spreadsheet only on a computer which e-automate is installed. You cannot change the spreadsheet column names, rearrange the column order, insert columns, remove columns, or change the spelling of the columns. When populating the Data Import/Export Spreadsheet, heed field lengths and validated field requirements. You can use the copy, paste, auto-fill, or any Excel features necessary to transfer information into the worksheets. If you choose to hide columns you should unhide them before attempting the insert. You do not have to populate fields that are not required. However, you should populate as much data as you can because once the data is inserted into e-automate from the Data Import/Export Spreadsheet, any updates or changes must be made within e-automate.
Each worksheet, except the Settings worksheet, contains three columns on the left (A, B, and C) labeled Status, Error Message, and Post Action. Do not enter any information into these columns. The rows in these columns are automatically populated by e-automate when the import or export is completed or attempted. The Status column tells you if your import was successful or unsuccessful. If an import was unsuccessful, the Error Message column displays an error explaining the problem. You must resolve the errors reported in the Error Message column to import the information in those rows into e-automate. You may need to log in to e-automate and determine acceptable values for some of the fields. You can sort your spreadsheet by the Status column if it is more convenient for you to see the rows with errors. Be sure to select all the rows and columns of data when you sort. Once you have made your changes to the rows with errors, you are ready to try inserting the failed records into the e-automate database again by clicking [Import to e-automate]. The Data Import/Export spreadsheet skips all rows that were previously imported successfully and re-validates the rows that produced errors. If the records now meet the e-automate database requirements, they are imported. Repeat the above process, reviewing the Error Messages column and making appropriate changes, until you have imported all of your information.
To begin importing or exporting information with the spreadsheet, you must first complete the Settings tab and identify your go-live transitional transaction date and opening balance clearing account number. The Data Import/Export Spreadsheet does not encrypt your password, so you may want to place a password on your Excel file using Excel functionality. You might also consider changing your password once you have completed your imports or exports.
The Data Import/Export Spreadsheet has two types of fields or cells you will populate on the spreadsheet before importing your data into the e-automate database. These field types are validated and non-validated. Validated cells are validated in one of two ways. Some cells are validated against a list of acceptable values in the current e-automate database. The spreadsheet checks the values in your cells against the existing values in e-automate. If the value from the spreadsheet exists in e-automate, the spreadsheet will import the record into your e-automate database. If the value on the spreadsheet is not in the e-automate list of acceptable values, the record will not be imported and the spreadsheet will report an error. An example of this type of validated field on the Data Import/Export Spreadsheet is the Term column on the APVendors worksheet. The following are examples of acceptable term codes followed by their descriptions:
10 – Net 10
2/10 – 2% 10, Net30
30 – Net 30
COD – COD
If any value other than 10, 2/10, 30 or COD is entered in the Term column, that value is rejected when you import and the spreadsheet will report an error. Other cells are validated against a specified format where you can enter only a specific value. An example is when the cells require either True or False. If you enter any value other than True or False, the import will produce an error.
With non-validated cells, the spreadsheet does not validate or check to see if the value in the spreadsheet is a legitimate value. It exports the exact value you enter provided the length is appropriate. You can enter any combination of letters or number in these cells. You can verify lists of values that the Data Import/Export Spreadsheet will validate in e-automate.
Remember to continually save your spreadsheet as you enter data. Doing so avoids loss of data due to circumstances beyond your control, such as your system freezing or a power outage.
Getting to the TransactionGetting to the Transaction
If you installed e-automate on the server or on a per-machine basis in the default location, the DataImportExport.xls file should be located at: C:\Program Files (x86)\ECI\e-automate\Utilities.
If you installed e-automate on a per-user basis in the default location, the DataImportExport.xls file should be located at: C:\Users\UserName\AppData\Local\ECI\e-automate\Utilities.
If you did not install e-automate in the default location, locate the e-automate directory. The DataImportExport.xls file should be located in the Utilities directory found within the e-automate directory.
Using Excel, open the DataImportExport.xls spreadsheet utility.
Enabling MacrosEnabling Macros
To process data using this spreadsheet utility, you must enable the spreadsheet utility's macros in Excel.
If you have macros disabled in Excel, a security warning appears below the Excel ribbon (or below the menu bar if the ribbon is hidden), indicating active content/macros have been disabled.
ECI has digitally signed the spreadsheet utilities on this release, and you can mark ECI as a trusted publisher of Excel files. If you mark ECI as a trusted publisher of Excel files, you will no longer see the macro security warning. For more information, see the Trusting Excel File Macros from ECI topic.
Use a process similar to the following (based on your version of Excel) to enable active content/macros for this spreadsheet utility:
In Excel, click [Enable Content] to allow the active content/macros to run when you process this spreadsheet utility.
If the system displays a security warning,...
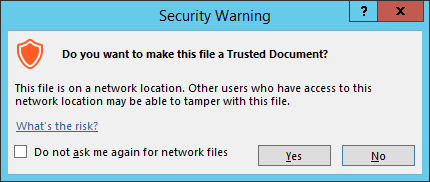
... click [Yes] to prevent the system from displaying the [Enable Content] message in the future when opening this document or click [No] to have the system redisplay the [Enable Content] message each time you open this document.
In Excel, active content/macros are typically disabled as a security precaution. If you do not see a security warning below the Excel ribbon (or below the menu bar if the ribbon is hidden), you can use the following process to set a "disable all macros with notification" option, allowing you to indicate when you want to allow active content/macros to run:
Open Excel.
Click File > Options to open the Excel Options window.
In the left pane of the Excel Options window, click [Trust Center] to reveal the appropriate options in the right pane.
In the right pane of the Excel Options window, click [Trust Center Settings] to open the Trust Center window.
In the left pane of the Trust Center window, click [Macro Settings] to display the Macro Settings options in the right pane.
In the Trust Center window, select the Disable all macros with notification radio button.
Click [OK] to close the Trust Center window.
Click [OK] to close the Excel Options window.
Close and reopen Excel in order for the new settings to take effect. A security dialog box should appear beneath the Office ribbon the next time you attempt to run a spreadsheet that contains macros.
Settings Worksheet TabSettings Worksheet Tab
If you are using this utility to import beginning balance data or data related to beginning balances such as beginning inventory quantities, do the following:
Click the Settings tab to bring it forward.
In cell D10, enter the Opening Balance Equity Account Number. When transitioning from any system to e-automate, you must identify the account to which transitional accounting entries are to be made. For acceptable values in this cell, log into e-automate and go to Accounting > General Ledger Accounts. A list of all GL accounts is displayed by e-automate. Locate the account named Opening Balance Clearing. Acceptable values are displayed in the Account Number column. If you have named the account differently, identify the appropriate account and its account number. You can create an account as necessary. The account type should be Retained Earnings.
In cell D11, enter the Go-live Transitional Transaction Date. Determine the date you are going to 'go live' with e-automate, and enter the date just prior to your go-live date in this cell. Typically, the date is the last day of the previous month. For example, if your go-live date is 5/1/2020, enter 4/30/2020. E-automate will use this date when posting transitional transactions to the General Ledger.
Importing VendorsImporting Vendors
A vendor is an individual or organization from which you purchase inventory, goods, or services. Ultimately, you pay for these goods or services using accounts payable invoices. With your vendors imported into e-automate, you can track your purchases and payments throughout the duration of your relationship with the vendors. You use the APVendors worksheet to import your vendors in bulk into e-automate.
Exporting Vendor Data from e-automateExporting Vendor Data from e-automate
Click the APVendors tab to bring it forward.
Click the [Clear] button to remove any rows of data remaining from a previous export/import process that you no longer need.
Click [Export from e-automate] to export the Vendor record data from your e-automate database.
The system displays the E-automate login window. Log in to e-automate.
The system displays the Confirm Database window. Do one of the following:
Click [Yes] to confirm the database selected for spreadsheet utility processing.
Click [No] to cancel and return to the spreadsheet utility.
Click [Change database] to select a different database. The system re-displays the e-automate login window.
If you clicked [Yes] in the previous step, the system populates the columns with the appropriate information from the records that meet your filter parameters.
Entering Vendor DataEntering Vendor Data
Using the following information, enter data as appropriate:
Status: Leave this field blank. The system updates this column during processing.
Error message: Leave this field blank. The system updates this column during processing.
Post Action: Leave this field blank. The system does not use this column on this tab.
Vendor Number: Alphanumeric code (up to 15 characters) assigned to this specific vendor. This code must be unique, and the system will compare this value against other vendor numbers on this spreadsheet and in e-automate to verify the number is unique. For a list of existing values, log in to e-automate. Go to People > Vendors to open the Vendors list window. Existing values are displayed in the Number column.
Vendor Name: The name (up to 50 characters) of the vendor. This field is required.
Address: Address (up to 60 characters) where vendor is located.
City: City (up to 30 characters) in which the vendor is located.
State: State (up to 15 characters) or province in which the vendor is located.
Zip: Zip code or postal code (up to 10 characters) in which vendor is located.
Country: Country (up to 15 characters) in which the vendor is located.
Contact: Billing contact (up to 50 characters) for the vendor.
Phone: Billing contact phone number (up to 30 characters).
Fax: Billing contact fax number (up to 30 characters).
Email: Billing contact email address (up to 50 characters).
Website: Vendor’s web site (up to 50 characters).
Purchase Contact: Purchase contact (up to 50 characters) for this vendor.
Purchase Phone: Purchase contact’s phone number (up to 30 characters).
Purchase Fax: Purchase contact’s fax number (up to 30 characters).
Term: Term code for the billing terms assigned to you by the vendor. For acceptable values, log in to e-automate. Go to Tools > Lists and Codes to open the List and Codes window. In the Select a list or code type field, use the drop-down menu to select Terms. Acceptable values are displayed in the Term column.
Ship Method: Ship method code for the shipping method the vendor generally uses to ship items to you. For acceptable values, log into e-automate. Go to Tools > Lists and Codes to open the List and Codes window. In the Select a list or code type field, use the drop-down menu to select Shipping Methods. Acceptable values are displayed in the Shipping Method column.
EIN: The Vendor’s Employer Identification Number (up to 15 characters).
Credit Limit: The maximum monetary amount of credit the vendor is extending to you, or the amount to which you want to limit your purchases from the vendor.
Require 1099: Enter TRUE if this vendor requires a 1099, or enter FALSE if this vendor does not require a 1099. This field is required. TRUE and FALSE are the only acceptable values.
Hold: Enter TRUE if you want the vendor on hold, or enter FALSE if you want the vendor not on hold when imported into your e-automate database. TRUE and FALSE are the only acceptable values.
Active: Enter TRUE if you want this Vendor record to be active, or enter FALSE if you do not want this Vendor record to be active when imported into your e-automate database. TRUE and FALSE are the only acceptable values.
Vendor Account Number: The account number (up to 30 characters) assigned to you by the vendor.
TaxCode: The VAT group that contains this VAT authority (Vendor). Upon import, the system populates the VAT group field on the Miscellaneous tab of the Vendor record with this value. For acceptable values, log in to e-automate. Go to Tools > Lists and Codes to open the List and Codes window. In the Select a list or code type field, use the drop-down menu to select VAT authority groups. Acceptable values are displayed in the VAT group column.
Taxable: Enter TRUE to indicate VAT is to be assessed on transactions with this vendor, or enter FALSE to indicate VAT is not to be assessed on transactions with this vendor. Upon import, this selection determines if the VATable checkbox on the Miscellaneous of the Vendor record is checked/unchecked. TRUE and FALSE are the only acceptable values.
TaxExemptCode: The code that indicates why VAT is not assessed on transactions with this vendor. Upon import, the system populates the Exempt code field on the Miscellaneous tab of the Vendor record with this value. For acceptable values, log in to e-automate. Go to Tools > Lists and Codes to open the List and Codes window. In the Select a list or code type field, use the drop-down menu to select VAT exempt codes. Acceptable values are displayed in the VAT exempt code column.
Completing the ImportCompleting the Import
To import the data, do the following:
Click the [Import to e-automate] button.
The system displays the E-automate login window. Log in to e-automate.
The system displays the Confirm Database window. Do one of the following:
Click [Yes] to confirm the database selected for spreadsheet utility processing.
Click [No] to cancel and return to the spreadsheet utility.
Click [Change database] to select a different database. The system re-displays the e-automate login window.
If you clicked [Yes] in the previous step, the system begins the import process. When the import process completes, view the information in the following columns of the spreadsheet utility:
Status column:
Inserted: The system inserted a new Vendor record.
Not inserted: The system did not have sufficient, valid data to insert a new Vendor record. See the Error message column for more information.
Error message column: Check to see if any errors are present. Use the information provided to make any corrections that may be necessary before attempting to re-import the data. See below for example messages:
[Blank]: The system did not detect any errors with inserting the data on this row.
***Duplicate: The value listed in the VendorNumber column matches a vendor Number in e-automate and/or a value listed in this column for a previous row. To review existing values in e-automate, log in to e-automate. Go to People > Vendors to open the Vendors list window. Existing values are displayed in the Number column.
***Invalid [Active/Hold/Require_1099/Taxable] value: Not true or false: The value listed in the specified column can only be TRUE or FALSE. Review the information for the column, and enter the appropriate value.
***Invalid CreditLimit value: Not numeric: The value listed in the CreditLimit column must contain only digits, which Excel will format as currency. Remove any non-numeric data from this column.
***Invalid shipmethod code: The value listed in the ShipMethod column is not a valid Shipping Method in e-automate, or the column is blank. For acceptable values, log in to e-automate. Go to Tools > Lists and Codes to open the List and Codes window. In the Select a list or code type field, use the drop-down menu to select Shipping methods. Acceptable values are displayed in the Shipping method column.
***Invalid tax code: The value listed in the TaxCode column is not a valid Tax Code / VAT Group in e-automate. For acceptable values, log in to e-automate. Go to Tools > Lists and Codes to open the List and Codes window. In the Select a list or code type field, use the drop-down menu to select VAT authority groups. Acceptable values are displayed in the VAT group column.
***Invalid tax exempt code: The value listed in the TaxExempt column is not a valid VAT Exempt Code in e-automate. For acceptable values, log in to e-automate. Go to Tools > Lists and Codes to open the List and Codes window. In the Select a list or code type field, use the drop-down menu to select VAT exempt codes. Acceptable values are displayed in the VAT exempt code column.
***Invalid terms code: The value listed in the Term column is not a valid Term in e-automate. For acceptable values, log in to e-automate. Go to Tools > Lists and Codes to open the List and Codes window. In the Select a list or code type field, use the drop-down menu to select Terms. Acceptable values are displayed in the Term column.
Post Action column: The system does not use this column on this tab.
Importing MakesImporting Makes
You use make and model to classify equipment in e-automate by manufacturer. You can assign makes only to inventory items with equipment codes. When you create an equipment record, e-automate knows which model the equipment is associated because the equipment-coded item is linked to a make and model on the inventory item profile. You use the ICMakes worksheet to import your manufacturers in bulk into e-automate.
Exporting Makes from e-automateExporting Makes from e-automate
Click the ICMakes tab to bring it forward.
Click the [Clear] button to remove any rows of data remaining from a previous export/import process that you no longer need.
Click [Export from e-automate] to export the Make record data from your e-automate database.
The system displays the E-automate login window. Log in to e-automate.
The system displays the Confirm Database window. Do one of the following:
Click [Yes] to confirm the database selected for spreadsheet utility processing.
Click [No] to cancel and return to the spreadsheet utility.
Click [Change database] to select a different database. The system re-displays the e-automate login window.
If you clicked [Yes] in the previous step, the system populates the columns with the appropriate information from the records that meet your filter parameters.
Entering MakesEntering Makes
Using the following information, enter data as appropriate:
Status: Leave this field blank. The system updates this column during processing.
Error message: Leave this field blank. The system updates this column during processing.
Post Action: Leave this field blank. The system does not use this column on this tab.
Make: A code identifying a specific make or manufacturer of an equipment item. Makes can only be assigned to inventory items with equipment codes. This code must be unique, and the system will compare this value against other Makes on this spreadsheet and in e-automate to verify the number is unique. For a list of existing values, log in to e-automate. Go to Inventory > Makes to open the Makes window. Existing values are displayed in the Make column.
Description: Brief description of the make, up to 64 characters. This can be the same as the make.
Active: Enter TRUE if you want this Make record to be active, or enter FALSE if you do not want this Make record to be active when imported into your e-automate database. TRUE and FALSE are the only acceptable values.
Completing the ImportCompleting the Import
To import the data, do the following:
Click the [Import to e-automate] button.
The system displays the E-automate login window. Log in to e-automate.
The system displays the Confirm Database window. Do one of the following:
Click [Yes] to confirm the database selected for spreadsheet utility processing.
Click [No] to cancel and return to the spreadsheet utility.
Click [Change database] to select a different database. The system re-displays the e-automate login window.
If you clicked [Yes] in the previous step, the system begins the import process. When the import process completes, view the information in the following columns of the spreadsheet utility:
Status column:
Inserted: The system inserted a new Make record.
Not inserted: The system did not have sufficient, valid data to insert a new Make record. See the Error message column for more information.
Error message column: Check to see if any errors are present. Use the information provided to make any corrections that may be necessary before attempting to re-import the data. See below for example messages:
[Blank]: The system did not detect any errors with inserting the data on this row.
***Duplicate: The value listed in the Make column matches an existing Make in e-automate and/or a value listed in this column for a previous row. To review existing values in e-automate, log in to e-automate. Go to Inventory > Makes to open the Makes list window. Existing values are displayed in the Make column.
***Invalid Active value: Not true or false: The value listed in the Active column can only be TRUE or FALSE. Review the information for the column, and enter the appropriate value.
Post Action column: The system does not use this column on this tab.
Importing ModelsImporting Models
You use make and model to classify equipment in e-automate by manufacturer. You can assign makes only to inventory items with equipment codes. When you create an equipment record, e-automate knows which model the equipment is associated because the equipment-coded item is linked to a make and model on the inventory item profile. You use the ICModels worksheet to import your models in bulk into e-automate.
Exporting Models from e-automateExporting Models from e-automate
Click the ICModels tab to bring it forward.
Click the [Clear] button to remove any rows of data remaining from a previous export/import process that you no longer need.
Click [Export from e-automate] to export the Model record data from your e-automate database.
The system displays the E-automate login window. Log in to e-automate.
The system displays the Confirm Database window. Do one of the following:
Click [Yes] to confirm the database selected for spreadsheet utility processing.
Click [No] to cancel and return to the spreadsheet utility.
Click [Change database] to select a different database. The system re-displays the e-automate login window.
If you clicked [Yes] in the previous step, the system populates the columns with the appropriate information from the records that meet your filter parameters.
Entering ModelsEntering Models
Using the following information, enter data as appropriate:
Status: Leave this field blank. The system updates this column during processing.
Error message: Leave this field blank. The system updates this column during processing.
Post Action: Leave this field blank. The system does not use this column on this tab.
Model: Specific model number (up to 32 characters) for a machine. This code must be unique, and the system will compare this value against other Models on this spreadsheet and in e-automate to verify the number is unique. For a list of existing values, log in to e-automate. Go to Inventory > Models to open the Models window. Existing values are displayed in the Model column.
Description: Brief description (up to 64 characters) of the model.
Make: A code identifying a specific make or manufacturer of an equipment item. Makes can only be assigned to inventory items with equipment codes. For a list of acceptable values, log in to e-automate. Go to Inventory > Makes to open the Makes window. Existing values are displayed in the Makes column.
ModelCategory: Model category associated with this model. For acceptable values, log in to e-automate. Go to Tools > Lists and Codes to open the List and Codes window. In the Select a list or code type field, use the drop-down menu to select Model categories. Acceptable values are displayed in the Category column.
IsHost: Enter TRUE if this machine is a host to which accessories can be attached, or enter FALSE if it is not a host and accessories cannot be attached to this machine. TRUE and FALSE are the only acceptable values.
IsAccessory: Enter TRUE if this machine is an accessory that can be attached to a host, or enter FALSE if this machine is not an accessory that can be attached to a host. TRUE and FALSE are the only acceptable values.
Active: Enter TRUE if you want this Model record to be active, or enter FALSE if you do not want this Model record to be active when imported into your e-automate database. TRUE and FALSE are the only acceptable values.
Completing the ImportCompleting the Import
To import the data, do the following:
Click the [Import to e-automate] button.
The system displays the E-automate login window. Log in to e-automate.
The system displays the Confirm Database window. Do one of the following:
Click [Yes] to confirm the database selected for spreadsheet utility processing.
Click [No] to cancel and return to the spreadsheet utility.
Click [Change database] to select a different database. The system re-displays the e-automate login window.
If you clicked [Yes] in the previous step, the system begins the import process. When the import process completes, view the information in the following columns of the spreadsheet utility:
Status column:
Inserted: The system inserted a new Model record.
Not inserted: The system did not have sufficient, valid data to insert a new Model record. See the Error message column for more information.
Error message column: Check to see if any errors are present. Use the information provided to make any corrections that may be necessary before attempting to re-import the data. See below for example messages:
[Blank]: The system did not detect any errors with inserting the data on this row.
***Duplicate: The value listed in the Model column matches an existing Model in e-automate and/or a value listed in this column for a previous row. To review existing values in e-automate, log in to e-automate. Go to Inventory > Model to open the Models list window. Existing values are displayed in the Model column.
***Invalid [Active/IsAccessory/IsHost] value: Not true or false: The value listed in the specified column can only be TRUE or FALSE. Review the information for the column, and enter the appropriate value.
***Invalid make: The value listed in the Make column is not a valid Make in e-automate, or the column is blank. For acceptable values, log in to e-automate. Go to Inventory > Makes to open the Makes window. Acceptable values are displayed in the Makes column.
***Invalid model category code: The value listed in the ModelCategory column is not a valid model category in e-automate, or the column is blank. For acceptable values, log in to e-automate. Go to Tools > Lists and Codes to open the List and Codes window. In the Select a list or code type field, use the drop-down menu to select Model categories. Acceptable values are displayed in the Category column.
Post Action column: The system does not use this column on this tab.
Importing Model MetersImporting Model Meters
You use the MTModelMeters worksheet to import meters for all metered equipment in bulk into e-automate. All fields except Status, Error Message, and Post Action, are validated against a list of acceptable values currently available in your e-automate database.
Exporting Model Meters from e-automateExporting Model Meters from e-automate
Click the MTModelMeters tab to bring it forward.
Click the [Clear] button to remove any rows of data remaining from a previous export/import process that you no longer need.
Click [Export from e-automate] to export the item record data from your e-automate database.
The system displays the E-automate login window. Log in to e-automate.
The system displays the Confirm Database window. Do one of the following:
Click [Yes] to confirm the database selected for spreadsheet utility processing.
Click [No] to cancel and return to the spreadsheet utility.
Click [Change database] to select a different database. The system re-displays the e-automate login window.
If you clicked [Yes] in the previous step, the system populates the columns with the appropriate information from the records that meet your filter parameters.
Entering Model MetersEntering Model Meters
Using the following information, enter data as appropriate:
Status: Leave this field blank. The system updates this column during processing.
Error message: Leave this field blank. The system updates this column during processing.
Post Action: Leave this field blank. The system does not use this column on this tab.
Model: Model number of the equipment for which you are specifying meter information. For a list of acceptable values, log in to e-automate. Go to Inventory > Models to open the Models window. Existing values are displayed in the Model column.
Make: A code identifying the specific make or manufacturer of the equipment for which you are specifying meter information. For a list of acceptable values, log in to e-automate. Go to Inventory > Makes to open the Makes window. Existing values are displayed in the Make column.
Meter Type: Code identifying a type of meter (e.g., Black, Color) associated with this equipment. For a list of acceptable values, log in to e-automate. Go to Tools > Lists and Codes to open the List and Codes window. In the Select a list or code type field, use the drop-down menu to select Meter Types. Acceptable values are displayed in the Meter Type column.
Active: Enter TRUE if you want this Model Meter record to be active, or enter FALSE if you do not want this Model Meter record to be active when imported into your e-automate database. TRUE and FALSE are the only acceptable values.
Meter Digits: Number of digits in this meter. This field is not required, so you may leave it blank if you have all digital equipment that does not have a fixed number of digits.
Warranty Clicks: Number that identifies the warranty click amount given by a manufacturer for a specific model.
PM Interval: Number that identifies the preventive maintenance click interval specifications for a specific model.
MfgMonthly Volume: Number that identifies the monthly click capability of this meter on this model. E-automate uses this number to help catch erroneous meter readings.
Completing the ImportCompleting the Import
To import the data, do the following:
Click the [Import to e-automate] button.
The system displays the E-automate login window. Log in to e-automate.
The system displays the Confirm Database window. Do one of the following:
Click [Yes] to confirm the database selected for spreadsheet utility processing.
Click [No] to cancel and return to the spreadsheet utility.
Click [Change database] to select a different database. The system re-displays the e-automate login window.
If you clicked [Yes] in the previous step, the system begins the import process. When the import process completes, view the information in the following columns of the spreadsheet utility:
Status column:
Inserted: The system inserted a new Model Meter record or updated an existing Model Meter record.
Not inserted: The system did not have sufficient, valid data to insert a new Model Meter record or updated an existing Model Meter record. See the Error message column for more information.
Error message column: Check to see if any errors are present. Use the information provided to make any corrections that may be necessary before attempting to re-import the data. See below for example messages:
[Blank]: The system did not detect any errors with inserting the data on this row.
***Invalid [MfgMonthlyVolume/MeterDigits/PMInterval/WarrantyClicks] value. Not numeric: The value listed in the specified column must contain only digits; it cannot contain non-numeric data. Review the information for the column, and enter the appropriate value using only numeric data.
***Invalid Active value: Not true or false: The value listed in the Active column can only be TRUE or FALSE. Review the information for the column, and enter the appropriate value.
***Invalid make: The value listed in the Make column is not a valid Make in e-automate, or the column is blank. For acceptable values, log in to e-automate. Go to Inventory > Makes to open the Makes window. Acceptable values are displayed in the Makes column.
***Invalid make/model combination -- does not exist: The value listed in the Make column is not associated in e-automate with the value listed in the Model column. For acceptable values, log in to e-automate. Go to Inventory > Models to open the Models window. For the values in the spreadsheet utility's Make and Model columns to form a valid combination, the Models window in e-automate must include a row with the same combination of values in the Make and Model columns, respectively.
***Invalid meter type: The value listed in the MeterType column is not a valid Meter Type in e-automate, or the column is blank. For a list of acceptable values, log in to e-automate. Go to Tools > Lists and Codes to open the List and Codes window. In the Select a list or code type field, use the drop-down menu to select Meter Types. Acceptable values are displayed in the Meter Type column.
***Invalid model: The value listed in the Model column is not a valid model in e-automate. For acceptable values, log in to e-automate. Go to Inventory > Models to open the Models window. Acceptable values are displayed in the Model column.
Post Action column: The system does not use this column on this tab.
Importing Inventory ItemsImporting Inventory Items
Items are defined as both inventory and non-stock items. An item must be on your item list to purchase, count, sell, or service it. You use the ICItems worksheet to import inventory items in bulk into e-automate.
Exporting Inventory Items from e-automateExporting Inventory Items from e-automate
Click the ICItems tab to bring it forward.
Click the [Clear] button to remove any rows of data remaining from a previous export/import process that you no longer need.
Click [Export from e-automate] to export the Item record data from your e-automate database.
The system displays the E-automate login window. Log in to e-automate.
The system displays the Confirm Database window. Do one of the following:
Click [Yes] to confirm the database selected for spreadsheet utility processing.
Click [No] to cancel and return to the spreadsheet utility.
Click [Change database] to select a different database. The system re-displays the e-automate login window.
If you clicked [Yes] in the previous step, the system populates the columns with the appropriate information from the records that meet your filter parameters.
Entering Inventory ItemsEntering Inventory Items
Using the following information, enter data as appropriate:
Status: Leave this field blank. The system updates this column during processing.
Error message: Leave this field blank. The system updates this column during processing.
Post Action: Leave this field blank. The system does not use this column on this tab.
Item: The number (up to 255 characters) used to identify the specific item. This number does not have to be the manufacturer’s number; this number is your number for identifying the item. This code must be unique, and the system will compare this value against other Items on this spreadsheet and in e-automate to verify the number is unique. For a list of existing values, log in to e-automate. Go to Inventory > Items to open the Items window. Existing values are displayed in the Item column.
Description: Alphanumeric text (up to 255 characters) that further identifies this item.
UPC: If you are using bar coding, enter the barcode number for this item (up to 255 characters). When imported, the UPC field in e-automate is populated with the barcode number you enter here.
Serialized: Enter TRUE if you use serial numbers with this item number to track each specific item, or enter FALSE if you do not use serial numbers to track this item. TRUE and FALSE are the only acceptable values.
Stocking Unit: Code for the unit of measure in which you generally sell this item. For acceptable values, log in to e-automate. Go to Tools > Lists and Codes to open the List and Codes window. In the Select a list or code type field, use the drop-down menu to select Inventory Units of Measure. Acceptable values are displayed in the Unit column. This field is required.
Category: Item category code associated with this item, up to 15 characters. For acceptable values, log in to e-automate. Go to Tools > Lists and Codes to open the List and Codes window. In the Select a list or code type field, use the drop-down menu to select Item Category. Acceptable values are displayed in the Category column. This field is required.
Inventory Code: Inventory code associated with this item. Any item you intend to value as an inventory asset must have an inventory code. Items need inventory codes to be counted, transferred, stocked, or purchased. For acceptable values, log in to e-automate. Go to Tools > Lists and Codes to open the List and Codes window. In the Select a list or code type field, use the drop-down menu to select Inventory Code. Acceptable values are displayed in the Inventory Code column.
Initial Cost: Monetary amount you were charged when you last purchased the item. Once the item is received, the system will use the purchase cost as the cost basis for the item.
Expense Code: Expense code associated with this item. An expense code is a code assigned with an inventory item that was not purchased for stock or resale. This allows accurate reflection of your inventory worth without including overhead (or expenses) cost. Office supplies, sales brochures, or shop tools are examples of typical expense items. For acceptable values, log in to e-automate. Go to Tools > Lists and Codes to open the List and Codes window. In the Select a list or code type field, use the drop-down menu to select Expense Codes. Acceptable values are displayed in the Expense Code column.
Sales Code: Sales code associated with this item. Sales codes define which revenue, cost of goods sold and unearned revenue accounts to associate with an inventory item. For acceptable values, log in to e-automate. Go to Tools > Lists and Codes to open the List and Codes window. In the Select a list or code type field, use the drop-down menu to select Sales Code. Acceptable values are displayed in the Sales Code column.
Service Code: Service code associated with this item. Service codes link the revenue and cost of goods sold accounts to an inventory item when items are sold using the service process. Service codes are also used to classify groups of items that are categorically included or excluded on a contract. For acceptable values, log in to e-automate. Go to Tools > Lists and Codes to open the List and Codes window. In the Select a list or code type field, use the drop-down menu to select Service Code. Acceptable values are displayed in the Service Code column.
Equipment Code: Equipment code associated with this item. An equipment code must be assigned to an item if the item is a piece of equipment for which you intend to service and track service history. Items do not usually have a service code and an equipment code. For acceptable values, log in to e-automate. Go to Tools > Lists and Codes to open the List and Codes window. In the Select a list or code type field, use the drop-down menu to select Equipment Code. Acceptable values are displayed in the Equipment Code column.
Tax Flag: A code that indicates how the inventory item is to be taxed. For acceptable values, log in to e-automate. Go to Tools > Lists and Codes to open the List and Codes window. In the Select a list or code type field, use the drop-down menu to select Tax flags. Acceptable values are displayed in the Tax flag column.
Enable Default Price: Enter TRUE to use default pricing on this item, or enter FALSE to not use default pricing on this item. TRUE and FALSE are the only acceptable values.
Default Price: If you entered TRUE in the above field, enter as a monetary amount the default price you charge for this item.
Model: Model code associated with this item. You use a model to classify items with equipment codes, define equipment records and to identify service call priority as well as callback number of days and call alert parameters. Models are a subset of makes. For acceptable values, log in to e-automate. Go to Inventory > Models to open the Models window. Acceptable values are displayed in the Model column. Because Makes and Models are already associated, you do not have to enter the make. The make is determined by e-automate by the Make-Model association.
OutCostGroup: Out cost group to which this item is assigned. Using out cost allows dealers to create a burden cost on items by adding a certain percentage to their actual cost, thus enabling them to protect their margin. For acceptable values, log in to e-automate. Go to Tools > Lists and Codes to open the List and Codes window. In the Select a list or code type field, use the drop-down menu to select Out Cost Groups. Acceptable values are displayed in the Out Cost Group column.
TrackingConfigName: The equipment history tracking configuration associated with the item. If the item has an equipment code associated with it, the tracking configuration field is required. If the item does not have an equipment code associated with it, you are not required or allowed to enter a tracking configuration for the item. For acceptable values, log in to e-automate. Go to Tools > Lists and Codes to open the List and Codes window. In the Select a list or code type field, use the drop-down menu to select Configurations (Equipment history tracking). Acceptable values are displayed in the Configuration column.
ServiceableAsItem: Enter TRUE if the item can be listed as a serviceable item on a service ticket, or enter FALSE if the item cannot be listed as a serviceable item on a service ticket. TRUE and FALSE are the only acceptable values.
ContractBaseDistributionCode: The code used to default deferred and contract revenue distribution to the contract item. For acceptable values, log in to e-automate. Go to Tools > Lists and Codes to open the List and Codes window. In the Select a list or code type field, use the drop-down menu to select Contract distribution codes - base. Acceptable values are displayed in the Base Distribution Code column.
Active: Enter TRUE if you want this Item record to be active, or enter FALSE if you do not want this Item record to be active when imported into your e-automate database. TRUE and FALSE are the only acceptable values.
Completing the ImportCompleting the Import
To import the data, do the following:
Click the [Import to e-automate] button.
The system displays the E-automate login window. Log in to e-automate.
The system displays the Confirm Database window. Do one of the following:
Click [Yes] to confirm the database selected for spreadsheet utility processing.
Click [No] to cancel and return to the spreadsheet utility.
Click [Change database] to select a different database. The system re-displays the e-automate login window.
If you clicked [Yes] in the previous step, the system begins the import process. When the import process completes, view the information in the following columns of the spreadsheet utility:
Status column:
Inserted: The system inserted a new Item record.
Not inserted: The system did not have sufficient, valid data to insert a new Item record. See the Error message column for more information.
Error message column: Check to see if any errors are present. Use the information provided to make any corrections that may be necessary before attempting to re-import the data. See below for example messages:
[Blank]: The system did not detect any errors with inserting the data on this row.
***Contract base distribution code cannot be set on non-serviceable items: You can only enter a value in the ContractBaseDistributionCode column if you enter TRUE in the ServiceableAsItem column for the row. If the item on this row is serviceable as an item, enter TRUE in the ServiceableAsItem ; otherwise, enter FALSE in the ServiceableAsItem and remove the value from the ContractBaseDistributionCode column.
***Duplicate: The value listed in the Item column matches an existing Item in e-automate and/or a value listed in this column for a previous row. To review existing values in e-automate, log in to e-automate. Go to Inventory > Items to open the Items list window. Existing values are displayed in the Item column.
***Invalid [Active/EnableDefaultPrice/Serialized/ServiceableAsItem] value: Not true or false: The value listed in the specified column can only be TRUE or FALSE. Review the information for the column, and enter the appropriate value.
***Invalid [DefaultPrice/InitialCost] value. Not numeric: The value listed in the specified column must contain only digits; it cannot contain non-numeric data. Review the information for the column, and enter the appropriate value using only numeric data.
***Invalid category code: The value listed in the Category column is not a valid item category in e-automate. For acceptable values, log in to e-automate. Go to Tools > Lists and Codes to open the List and Codes window. In the Select a list or code type field, use the drop-down menu to select Item Category. Acceptable values are displayed in the Category column.
***Invalid contract base distribution code: The value listed in the ContractBaseDistributionCode column is not a valid item contract base distribution code in e-automate. For acceptable values, log in to e-automate. Go to Tools > Lists and Codes to open the List and Codes window. In the Select a list or code type field, use the drop-down menu to select Contract distribution codes - base. Acceptable values are displayed in the Base distribution code column.
***Invalid equipment code: The value listed in the EquipmentCode column is not a valid equipment code in e-automate. For acceptable values, log in to e-automate. Go to Tools > Lists and Codes to open the List and Codes window. In the Select a list or code type field, use the drop-down menu to select Equipment Code. Acceptable values are displayed in the Equipment Code column.
***Invalid expense code: The value listed in the ExpenseCode column is not a valid expense code in e-automate. For acceptable values, log in to e-automate. Go to Tools > Lists and Codes to open the List and Codes window. In the Select a list or code type field, use the drop-down menu to select Expense codes. Acceptable values are displayed in the Expense code column.
***Invalid inventory code: The value listed in the InventoryCode column is not a valid inventory code in e-automate. For acceptable values, log in to e-automate. Go to Tools > Lists and Codes to open the List and Codes window. In the Select a list or code type field, use the drop-down menu to select Inventory Code. Acceptable values are displayed in the Inventory Code column.
***Invalid model: The value listed in the Model column is not a valid model in e-automate. For acceptable values, log in to e-automate. Go to Inventory > Models to open the Models window. Acceptable values are displayed in the Model column.
***Invalid outcost group: The value listed in the OutCostGroup column is not a valid out cost group in e-automate. For acceptable values, log in to e-automate. Go to Tools > Lists and Codes to open the List and Codes window. In the Select a list or code type field, use the drop-down menu to select Out Cost Groups. Acceptable values are displayed in the Out Cost Group column.
***Invalid sales code: The value listed in the SalesCode column is not a valid inventory code in e-automate. For acceptable values, log in to e-automate. Go to Tools > Lists and Codes to open the List and Codes window. In the Select a list or code type field, use the drop-down menu to select Sales Code. Acceptable values are displayed in the Sales Code column.
***Invalid service code: The value listed in the ServiceCode column is not a valid service code in e-automate. For acceptable values, log in to e-automate. Go to Tools > Lists and Codes to open the List and Codes window. In the Select a list or code type field, use the drop-down menu to select Service Code. Acceptable values are displayed in the Service Code column.
***Invalid tax flag: The value listed in the TaxFlag column is not a valid tax flag in e-automate. For acceptable values, log in to e-automate. Go to Tools > Lists and Codes to open the List and Codes window. In the Select a list or code type field, use the drop-down menu to select Tax flags. Acceptable values are displayed in the Tax flag column.
***Invalid tracking configuration: The value listed in the TrackingConfigName column is not a valid tracking configuration in e-automate. For acceptable values, log in to e-automate. Go to Tools > Lists and Codes to open the List and Codes window. In the Select a list or code type field, use the drop-down menu to select Configurations (Equipment history tracking). Acceptable values are displayed in the Configuration column.
***Invalid unit of measure: The value listed in the StockingUnit column is not a valid unit of measure in e-automate. For acceptable values, log in to e-automate. Go to Tools > Lists and Codes to open the List and Codes window. In the Select a list or code type field, use the drop-down menu to select Inventory Units of Measure. Acceptable values are displayed in the Unit column.
Post Action column: The system does not use this column on this tab.
Importing CustomersImporting Customers
You use the ARCustomers worksheet to import your customers in bulk into e-automate. When entering customers on the spreadsheet, each customer occupies one row. The parent customer occupies one row and each child customer occupies one row. There is a separate customer record for the parent and each of the children. You identify a parent customer by entering the same number in the CustomerNumber cell and the ParentLocationCustomer cell on the same row. When identifying children or location customers, each child occupies its own row in the spreadsheet with their own customer number. It is a good idea to assign a customer number to a child (location customer) that obviously links the parent and the child. For example, if the parent’s customer number is BA00, consider assigning BA00-001 to the first child, BA00-002 to the second child, etc.
Exporting Customers from e-automateExporting Customers from e-automate
Click the ARCustomers tab to bring it forward.
Click the [Clear] button to remove any rows of data remaining from a previous export/import process that you no longer need.
Click [Export from e-automate] to export the Customer record data from your e-automate database.
The system displays the E-automate login window. Log in to e-automate.
The system displays the Confirm Database window. Do one of the following:
Click [Yes] to confirm the database selected for spreadsheet utility processing.
Click [No] to cancel and return to the spreadsheet utility.
Click [Change database] to select a different database. The system re-displays the e-automate login window.
If you clicked [Yes] in the previous step, the system populates the columns with the appropriate information from the records that meet your filter parameters.
Entering CustomersEntering Customers
Using the following information, enter data as appropriate:
Status: Leave this field blank. The system updates this column during processing.
Error message: Leave this field blank. The system updates this column during processing.
Post Action: Leave this field blank. The system does not use this column on this tab.
CustomerNumber: Customer number (up to 32 characters) assigned to this customer. This code must be unique, and the system will compare this value against other Customer numbers on this spreadsheet and in e-automate to verify the number is unique. For a list of existing values, log in to e-automate. Go to People > Customers to open the Customers list window. Acceptable values are displayed in the Number column.
CustomerName: The full company name of the customer. This field is required.
BillToCustomer: Customer number assigned to the customer where billing information is sent. This field is required. If you have not imported customers into e-automate, acceptable values are located in the CustomerNumber column on this worksheet. If you have already imported customers, for a list of existing customers, log in to e-automate. Go to People > Customers to open the Customers list window. Acceptable values are displayed in the Number column.
ParentLocationCustomer: If this customer is a child customer (customer that has a separate location from its main office), enter the customer number assigned to its parent (main office). If this customer is a parent, enter the same number as you entered in the CustomerNumber column. A parent customer can have multiple locations (children), but children can only have one parent. This field is required. If you have not imported customers into e-automate, acceptable values are located in the CustomerNumber column on this worksheet. If you have imported, log in to e-automate and go to People > Customers. In the Customer list, acceptable values are displayed in the Number column.
Attn: Specific person or department to which you send correspondence.
Address: Address where the customer is located.
City: City in which the customer is located.
County: County in which the customer is located.
State: State in which the customer is located.
Zip: Zip code in which the customer is located.
Country: Country in which the customer is located.
BillToAttn: Specific person or department to which you send billing correspondence.
BillToAddress: Address to which you send billing information for this customer.
BillToCity: City to which you send billing information for this customer.
BillToCounty: County to which you send billing information for this customer.
BillToState: State to which you send billing information for this customer.
BillToZip: Zip code to which you send billing information for this customer.
BillToCountry: Country to which you send billing information for this customer.
Phone1: Customer’s primary phone number.
Phone2: Customer’s secondary phone number.
Fax: Customer’s fax number.
Email: Customer’s main email address.
Website: Customer’s website address.
Term: Term code for the billing terms assigned to this customer. For acceptable values, log in to e-automate. Go to Tools > Lists and Codes to open the List and Codes window. In the Select a list or code type field, use the drop-down menu to select Terms. Acceptable values are displayed in the Term column.
ShipMethod: Ship method code for the shipping method you generally use to ship items to this customer. For acceptable values in the Ship Method column, log in to e-automate and go to Tools > Lists and Codes. Go to Tools > Lists and Codes to open the List and Codes window. In the Select a list or code type field, use the drop-down menu to select Shipping Methods. Acceptable values are displayed in the Shipping Method column.
EIN: Employer Identification Number for this customer.
SalesRep: Sales rep code for the sales rep assigned to this customer. For acceptable values, log in to e-automate. Go to People > Employees/Contractors. Acceptable values are displayed in the Number column where the Sales Rep column displays Yes.
CreditLimit: The maximum monetary amount of the credit you are extending to this customer.
PriceLevel: Price level assigned to this customer. For acceptable values, log in to e-automate. Go to Tools > Lists and Codes to open the List and Codes window. In the Select a list or code type field, use the drop-down menu to select Price Levels. Acceptable values are displayed in the Price Level column.
AssessFinanceCharges: Enter TRUE to assess finance charges for this customer, or enter FALSE to not assess finance charges for this customer. TRUE and FALSE are the only acceptable values.
Taxable: Enter TRUE if this customer is taxable, or enter FALSE if the customer is not taxable. TRUE and FALSE are the only acceptable values.
TaxCode: Tax code assigned to this customer. For acceptable values, log in to e-automate. Go to Tools > Lists and Codes to open the List and Codes window. In the Select a list or code type field, use the drop-down menu to select Tax Codes. Acceptable values are displayed in the Tax Code column.
TaxExemptCode: Tax exempt code, if applicable, for this customer. For acceptable values, log in to e-automate. Go to Tools > Lists and Codes to open the List and Codes window. In the Select a list or code type field, use the drop-down menu to select Tax exempt codes. Acceptable values are displayed in the Tax exempt code column.
TaxNumber: Tax exempt number, if applicable, for this customer.
CustomerType: Customer type assigned to this customer. A customer type is a categorization such as Wholesale or Retail that may be assigned to a customer. For acceptable values, log in to e-automate. Go to Tools > Lists and Codes to open the List and Codes window. In the Select a list or code type field, use the drop-down menu to select Customer types. Acceptable values are displayed in the Customer type column.
Blanket PO: Blanket PO number if applicable. A blanket PO is one purchase order to which items are continually added over a specified period of time.
Technician: Technician code for the technician generally assigned to this customer. For acceptable values, log in to e-automate. Go to People > Employees/Contractors. Acceptable values are displayed in the Number column where the Technician column displays Yes.
Territory: Assigned territory for this customer. For acceptable values, log in to e-automate. Go to Tools > Lists and Codes to open the List and Codes window. In the Select a list or code type field, use the drop-down menu to select Territories. Acceptable values are displayed in the Territory column.
Branch: The company branch with which to associate this customer. If your company does not use branches, enter Main in this cell. For acceptable values if your company does use branches, log in to e-automate. Go to Accounting > Branches to open the Branches list window. Acceptable values are displayed in the Branch number column.
Active: Enter TRUE if you want this Customer record to be active, or enter FALSE if you do not want this Customer record to be active when imported into your e-automate database. TRUE and FALSE are the only acceptable values.
ARRep: The AR rep to display in the A/R Rep field on the Billing tab of the Customer record. For acceptable values, log in to e-automate. Go to People > Employees/Contractors. E-automate displays the Employees/Contractors window. Acceptable values are displayed in the Number column where the Active column has a value of Yes.
Time Zone: The time zone in standard format to display in the Time zone field on the Account tab of the Customer record. The available options are: Hawaiian Standard Time, Alaskan Standard Time, Pacific Standard Time, US Mountain Standard Time, Mountain Standard Time, Central Standard Time, Canada Central Standard Time, Eastern Standard Time, US Eastern Standard Time, Atlantic Standard Time, Newfoundland Standard Time.
ChargeMethod: The charge method (e.g., On Account ) to display in the Charge method field on the Billing tab in the customer record.
EnablingCustomPricing: Enter TRUE if the Use customer pricing box should be checked on the Billing tab in the Customer record; enter FALSE if the Use customer pricing box should not be checked on the Billing tab in the Customer record. TRUE and FALSE are the only acceptable values.
InheritParentCustomPrices: Enter TRUE if the Use master customer pricing box should be checked on the Billing tab in the Customer record; enter FALSE if the Use master customer pricing box should not be checked on the Billing tab in the Customer record. TRUE and FALSE are the only acceptable values.
TrackingConfigName: The name of a configuration to display in the Configuration field on the Custom Properties tab of the customer record.
Completing the ImportCompleting the Import
To import the data, do the following:
Click the [Import to e-automate] button.
The system displays the E-automate login window. Log in to e-automate.
The system displays the Confirm Database window. Do one of the following:
Click [Yes] to confirm the database selected for spreadsheet utility processing.
Click [No] to cancel and return to the spreadsheet utility.
Click [Change database] to select a different database. The system re-displays the e-automate login window.
If you clicked [Yes] in the previous step, the system begins the import process. When the import process completes, view the information in the following columns of the spreadsheet utility:
Status column:
Inserted: The system inserted a new Customer record.
Not inserted: The system did not have sufficient, valid data to insert a new Customer record. See the Error message column for more information.
Error message column: Check to see if any errors are present. Use the information provided to make any corrections that may be necessary before attempting to re-import the data. See below for example messages:
[Blank]: The system did not detect any errors with inserting the data on this row.
***Duplicate: The value listed in the CustomerNumber column matches an existing Customer Number in e-automate and/or a value listed in this column for a previous row. To review existing values in e-automate, log in to e-automate. Go to People > Customers to open the Customers list window. Acceptable values are displayed in the Number column.
***Invalid [Active/AssessFinanceCharges/EnableCustomPricing/InheritParentCustomPrices/Taxable] value: Not true or false: The value listed in the specified column can only be TRUE or FALSE. Review the information for the column, and enter the appropriate value.
***Invalid agent number: The value listed in the SalesRep column is not a valid Sales Rep in e-automate. For acceptable values, log in to e-automate. Go to People > Employees/Contractors to open the Employees/Contractors window. Acceptable values are displayed in the Number column where the Sales rep and Active columns have a value of Yes.
***Invalid AR rep: The value listed in the ARRep column is not a valid Rep in e-automate. For acceptable values, log in to e-automate. Go to People > Employees/Contractors to open the Employees/Contractors window. Acceptable values are displayed in the Number column where the Active column's value is Yes.
***Invalid bill to. This bill to might have not been inserted yet: The value listed in the BillToCustomer column is not a valid Customer in e-automate. For acceptable values that already exist in e-automate, log in to e-automate. Go to People > Customers to open the Customers window. Acceptable values are displayed in the Number column. If you are adding the Bill-to Customer using this utility, the row containing the Bill-to Customer must be inserted into e-automate before the system will recognize the value in this field as a valid Customer in e-automate.
***Invalid branch: The value listed in the Branch column is not a valid Branch in e-automate. If your company does not use branches, enter Main in this cell. If your company does use branches, enter the company branch with which to associate this customer. For acceptable values, log in to e-automate. Go to Accounting > Branches to open the Branches list window. Acceptable values are displayed in the Branch number column.
***Invalid charge method: The value listed in the ChargeMethod column is not a valid Charge Method in e-automate. Verify this column is blank or lists a valid e-automate charge method (e.g., On Account).
***Invalid CreditLimit value. Not numeric: The value listed in the CreditLimit column must contain only digits; it cannot contain non-numeric data. Review the information for the column, and enter the appropriate value using only numeric data.
***Invalid customer type: The value listed in the CustomerType column is not a valid Customer Type in e-automate. For acceptable values, log in to e-automate. Go to Tools > Lists and Codes to open the List and Codes window. In the Select a list or code type field, use the drop-down menu to select Customer types. Acceptable values are displayed in the Customer type column.
***Invalid make: The value listed in the Make column is not a valid Make in e-automate, or the column is blank. For acceptable values, log in to e-automate. Go to Inventory > Makes to open the Makes window. Acceptable values are displayed in the Makes column.
***Invalid model category code: The value listed in the ModelCategory column is not a valid model category in e-automate, or the column is blank. For acceptable values, log in to e-automate. Go to Tools > Lists and Codes to open the List and Codes window. In the Select a list or code type field, use the drop-down menu to select Model categories. Acceptable values are displayed in the Category column.
***Invalid parent location. This parent location might have not been inserted yet.: The value listed in the ParentLocationCustomer column is not a valid Customer in e-automate. For acceptable values that already exist in e-automate, log in to e-automate. Go to People > Customers to open the Customers window. Acceptable values are displayed in the Number column. If you are adding the Parent Location Customer using this utility, the row containing the Parent Location Customer must be inserted into e-automate before the system will recognize the value in this field as a valid Customer in e-automate.
***Invalid price level: The value listed in the Price Level cell, B3, is not a valid price level in e-automate. For acceptable values, log in to e-automate. Go to Tools > Lists and Codes to open the List and Codes window. In the Select a list or code type field, use the drop-down menu to select Price Levels. Acceptable values are displayed in the Price Levels column.
***Invalid shipmethod code: The value listed in the ModelCategory column is not a valid model category in e-automate, or the column is blank. For acceptable values, log in to e-automate. Go to Tools > Lists and Codes to open the List and Codes window. In the Select a list or code type field, use the drop-down menu to select Shipping methods. Acceptable values are displayed in the Shipping method column.
***Invalid tax code: The value listed in the ModelCategory column is not a valid model category in e-automate, or the column is blank. For acceptable values, log in to e-automate. Go to Tools > Lists and Codes to open the List and Codes window. In the Select a list or code type field, use the drop-down menu to select Tax codes. Acceptable values are displayed in the Tax Code column.
***Invalid tax exempt code: The value listed in the ModelCategory column is not a valid model category in e-automate, or the column is blank. For acceptable values, log in to e-automate. Go to Tools > Lists and Codes to open the List and Codes window. In the Select a list or code type field, use the drop-down menu to select Tax exempt codes. Acceptable values are displayed in the Tax exempt code column.
***Invalid technician: The value specified in the Tech Number column is not a valid tech number in e-automate. For acceptable values, log in to e-automate and go to People > Employees/Contractors. Acceptable values are displayed in the Number column where the Technician column displays Yes.
***Invalid terms code: The value listed in the ModelCategory column is not a valid model category in e-automate, or the column is blank. For acceptable values, log in to e-automate. Go to Tools > Lists and Codes to open the List and Codes window. In the Select a list or code type field, use the drop-down menu to select Terms. Acceptable values are displayed in the Term column.
***Invalid territory: The value specified in the Territory column is not a valid territory in e-automate. For acceptable values, log in to e-automate. Go to Tools > Lists and Codes to open the List and Codes window. In the Select a list or code type field, use the drop-down menu to select Territories. Acceptable values are displayed in the Territory column.
***Invalid time zone: The value in the TimeZone column must be blank or one of the following: Hawaiian Standard Time, Alaskan Standard Time, Pacific Standard Time, US Mountain Standard Time, Mountain Standard Time, Central Standard Time, Canada Central Standard Time, Eastern Standard Time, US Eastern Standard Time, Atlantic Standard Time, Newfoundland Standard Time.
***Invalid tracking configuration: The value listed in the TrackingConfigName column is not a valid tracking configuration in e-automate. For acceptable values, log in to e-automate. Go to Tools > Lists and Codes to open the List and Codes window. In the Select a list or code type field, use the drop-down menu to select Configurations (Equipment history tracking). Acceptable values are displayed in the Configuration column.
Post Action column: The system does not use this column on this tab.
Importing ContactsImporting Contacts
You use the CMContacts worksheet to import your contacts in bulk into e-automate. A contact is a person with whom you have interactions that can be documented in e-automate. Typically, contacts are personnel employed at your customers' locations with whom you work on a regular basis.
Exporting Contacts from e-automateExporting Contacts from e-automate
Click the CMContacts tab to bring it forward.
Click the [Clear] button to remove any rows of data remaining from a previous export/import process that you no longer need.
Click [Export from e-automate] to export the Contact record data from your e-automate database.
The system displays the E-automate login window. Log in to e-automate.
The system displays the Confirm Database window. Do one of the following:
Click [Yes] to confirm the database selected for spreadsheet utility processing.
Click [No] to cancel and return to the spreadsheet utility.
Click [Change database] to select a different database. The system re-displays the e-automate login window.
If you clicked [Yes] in the previous step, the system populates the columns with the appropriate information from the records that meet your filter parameters.
Entering ContactsEntering Contacts
Using the following information, enter data as appropriate:
Status: Leave this field blank. The system updates this column during processing.
Error message: Leave this field blank. The system updates this column during processing.
Post Action: Leave this field blank. The system does not use this column on this tab.
ContactNumber: Number (up to 15 characters) that identifies a specific contact. This number must be unique, and the system will compare this value against other Contact numbers on this spreadsheet and in e-automate to verify the number is unique. For a list of existing values, log in to e-automate. Go to People > Contacts. On the Contacts window, the Number column displays the acceptable values.
LastName: Last name of the contact, up to 20 characters.
FirstName: First name of the contact (up to 15 characters).
MiddleName: Middle name of the contact (up to 15 characters).
CustomerNumber: Customer number of the customer to which this contact is assigned. For acceptable values, log in to e-automate. Go to People > Customers to display the Customer list window. Acceptable values are displayed in the Number column.
Job Title: Job title of the contact. For acceptable values, log in to e-automate. Go to Tools > Lists and Codes to open the List and Codes window. In the Select a list or code type field, use the drop-down menu to select Job Titles. Acceptable values are displayed in the Job Title column.
UseCustomerAddress: Enter TRUE to use the customer’s address for this contact, or enter FALSE to not use the customer’s address for this contact. TRUE and FALSE are the only acceptable values.
Preferred_Method: Manner by which this contact prefers to communicate. Enter one of the following: PHONE, FAX, EMAIL, or MAIL.
Address: Address (up to 255 characters) where the contact is located.
City: City (up to 30 characters) in which the contact is located.
State: State (up to 15 characters) in which the contact is located.
Zip: Zip code (up to 10 characters) in which the contact is located.
Country: Country (up to 15 characters) in which the contact is located.
Phone1: Contact’s primary phone number (up to 30 characters).
Phone2: Contact’s secondary phone number (up to 30 characters).
Fax: Contact’s fax number (up to 30 characters).
Email: Contact’s email (up to 50 characters).
Active: Enter TRUE if you want this Contact record to be active, or enter FALSE if you do not want this Contact record to be active when imported into your e-automate database. TRUE and FALSE are the only acceptable values.
EinfoEnabled: Enter TRUE if this item is e-info enabled, or enter FALSE if this item is not e-info enabled. TRUE and FALSE are the only acceptable values.
SalesRep: Sales rep assigned to this contact. For acceptable values, log in to e-automate. Go to People > Employees/Contractors to open the Employees/Contractors window. Acceptable values are displayed in the Number column where the Sales Rep column's value is Yes.
Completing the ImportCompleting the Import
To import the data, do the following:
Click the [Import to e-automate] button.
The system displays the E-automate login window. Log in to e-automate.
The system displays the Confirm Database window. Do one of the following:
Click [Yes] to confirm the database selected for spreadsheet utility processing.
Click [No] to cancel and return to the spreadsheet utility.
Click [Change database] to select a different database. The system re-displays the e-automate login window.
If you clicked [Yes] in the previous step, the system begins the import process. When the import process completes, view the information in the following columns of the spreadsheet utility:
Status column:
Inserted: The system inserted a new Contact record.
Not inserted: The system did not have sufficient, valid data to insert a new Contact record. See the Error message column for more information.
Error message column: Check to see if any errors are present. Use the information provided to make any corrections that may be necessary before attempting to re-import the data. See below for example messages:
[Blank]: The system did not detect any errors with inserting the data on this row.
***Duplicate: The value listed in the ContactNumber column matches an existing Contact Number in e-automate and/or a value listed in this column for a previous row. To review existing values in e-automate, log in to e-automate. Go to People > Contacts. On the Contacts window, the Number column displays the existing values.
***Invalid [Active/EinfoEnabled/UseCustomerAddress] value: Not true or false: The value listed in the specified column can only be TRUE or FALSE. Review the information for the column, and enter the appropriate value.
***Invalid agent number: The value listed in the SalesRep column is not a valid Sales Rep in e-automate. For acceptable values, log in to e-automate. Go to People > Employees/Contractors to open the Employees/Contractors window. Acceptable values are displayed in the Number column where the Sales rep and Active columns have a value of Yes.
***Invalid customer number: The value listed in the CustomerNumber column is not a valid Customer in e-automate. For acceptable values, log in to e-automate: Go to People > Customers to open the Customers window. Acceptable values are displayed in the Number column.
***Invalid first name: The FirstName field cannot be blank. Verify you have entered a name in the FirstName column for this row.
***Invalid job title The value listed in the JobTitle column is not a valid job title in e-automate or is blank. This field is required. For acceptable values, log in to e-automate. Go to Tools > Lists and Codes to open the List and Codes window. In the Select a list or code type field, use the drop-down menu to select Job titles. The Job title column displays the acceptable values.
***Preferred method is [Email/Fax], but no [email address/fax number] specified: The Preferred_Method field's value is Email or Fax, but the Email or Fax field, respectively, is blank, making it impossible to communicate with the contact using the specified preferred method of contact. To resolve this error, enter the appropriate email address in the Email field or fax number in the Fax field, OR select a different Preferred_Method of contact for this customer and supply the information necessary to communicate with the contact using the specified preferred method of contact.
***This contact may be a duplicate of an existing contact due to the following fields: Last Name, Phone1, Email: When you import contact data into e-automate, to minimize the possibility of creating duplicate contacts, the system checks to see if each contact's Last name and Email address match an existing contact's Last name and Email address OR if a contact's Phone1 and Email address match an existing contact's Phone1 and Email address. If a match exists, the system displays a version of this message; the message includes Last Name only if a Last Name and Email match was found and includes Phone1 only if a Phone1 and Email match was found. The message does not prevent the system from importing the contact. If a row with this error has a Status of Inserted, make note of the contact and see the Reviewing Duplicate Contacts topic for information on reviewing these contacts.
Value cannot be null. Parameter name: input: This message indicates the Phone1 field is blank. This field is required.
Post Action column: The system does not use this column on this tab.
Importing EquipmentImporting Equipment
You use the Data Import/Export Spreadsheet’s SCEquipments worksheet to enter your customers’ equipment in bulk into e-automate. This list is for all machines whether they are rentals out at various customer locations and that you have on record to service, or are located at your facility.
Exporting Equipment from e-automateExporting Equipment from e-automate
Click the SCEquipments tab to bring it forward.
Click the [Clear] button to remove any rows of data remaining from a previous export/import process that you no longer need.
Click [Export from e-automate] to export the Equipment record data from your e-automate database.
The system displays the E-automate login window. Log in to e-automate.
The system displays the Confirm Database window. Do one of the following:
Click [Yes] to confirm the database selected for spreadsheet utility processing.
Click [No] to cancel and return to the spreadsheet utility.
Click [Change database] to select a different database. The system re-displays the e-automate login window.
If you clicked [Yes] in the previous step, the system populates the columns with the appropriate information from the records that meet your filter parameters.
Entering EquipmentEntering Equipment
Using the following information, enter data as appropriate:
Status: Leave this field blank. The system updates this column during processing.
Error message: Leave this field blank. The system updates this column during processing.
Post Action: Leave this field blank. The system does not use this column on this tab.
EquipmentNumber: Equipment ID number (up to 32 characters) for this machine. This number must be unique, and the system will compare this value against other Equipment numbers on this spreadsheet and in e-automate to verify the number is unique. For a list of existing values, log in to e-automate. Go to Service > Equipment to open the Equipment window. The Equipment number column displays the existing values.
Item: Item number for this machine. For acceptable values, log in to e-automate. Go to Inventory > Items to open the Items window. Locate the Equipment Code column and click on it to sort by Equipment Codes. Acceptable values are displayed in the Item column where an equipment code is present in the Equipment Code column.
SerialNumber: Serial number (up to 30 characters) assigned to this machine. This field is required only for equipment that is serialized.
CustomerNumber: Customer number assigned to the customer to whom this machine is currently assigned. For acceptable values, log in to e-automate. Go to People > Customers to open the Customers list window. Acceptable values are displayed in the Number column.
BillToCustomerNumber: Customer number assigned to the customer where billing information is sent for this machine. For acceptable values, log in to e-automate. Go to People > Customers to open the Customers list window. Acceptable values are displayed in the Number column.
BillCode: Your chargeable bill code for equipment not on contract.
For acceptable values, log in to e-automate. Go to Tools > Lists and Codes to open the List and Codes window. In the Select a list or code type field, use the drop-down menu to select Bill Codes. Acceptable values are displayed in the Bill Code column.
SLACode: Service Level Agreement (SLA) code associated with the equipment on the contract. For acceptable values, log in to e-automate. Go to Tools > Lists and Codes to open the List and Codes window. In the Select a list or code type field, use the drop-down menu to select SLACodes. Acceptable values are displayed in the SLA Code column.
LocationCustomer: Customer number assigned to the customer where the equipment is located. If the machine is not located at a customer’s site, leave this field blank. For acceptable values, log in to e-automate. Go to People > Customers to open the Customers window. Acceptable values are displayed in the Number column.
Address: Location address of the equipment (up to 64 characters).
City: City (up to 32 characters) in which the equipment is located.
State: State (up to 16 characters) in which the equipment is located.
Zip: Zip code (up to 16 characters) in which the equipment is located.
Country: Country (up to 16 characters) in which the equipment is located.
LocationNotes: Any notes (up to 128 characters) regarding the location of this equipment (e.g., Second floor, Reception desk).
InstallDate: Date this machine was installed at this location.
ContactNumber: Contact number identifying the person to contact regarding this equipment. For acceptable values, log in to e-automate. Go to People > Contacts to open the Contacts window. Acceptable values are displayed in the Number column.
DecisionMakerContactNumber: Contact number identifying the person designated to make financial decisions. For acceptable values, log in to e-automate. Go to People > Contacts to open the Contacts window. Acceptable values are displayed in the Number column.
MeterContactNumber: Contact number identifying the person designated to make meter decisions. For acceptable values, log in to e-automate. Go to People > Contacts to open the Contacts window. Acceptable values are displayed in the Number column.
ShippingContact: Contact number identifying the person designated to make shipping decisions. For acceptable values, log in to e-automate. Go to People > Contacts to open the Contacts window. Acceptable values are displayed in the Number column.
Territory: Territory in which this machine is located. For acceptable values, log in to e-automate. Go to Tools > Lists and Codes to open the List and Codes window. In the Select a list or code type field, use the drop-down menu to select Territories. Acceptable values are displayed in the Territory column.
Technician: Technician assigned to this machine. For acceptable values, log in to e-automate. Go to People > Employees/Contractors to open the Employees/Contractors window. Acceptable values are displayed in the Number column where the Technician column displays Yes.
Status: Status associated with this equipment. For acceptable values, log in to e-automate. Go to Tools > Lists and Codes to open the List and Codes window. In the Select a list or code type field, use the drop-down menu to select Equipment statuses. Acceptable values are displayed in the Status column.
Condition: Condition associated with this equipment. For acceptable values, log in to e-automate. Go to Tools > Lists and Codes to open the List and Codes window. In the Select a list or code type field, use the drop-down menu to select Equipment conditions. Acceptable values are displayed in the Condition column.
WarrantyDate: Date the warranty on this machine expires. The spreadsheet validates the value you enter is a date.
WarrantyMeter: Meter reading at which the warranty on this machine expires. The spreadsheet validates the values you enter are integers.
PMMeterInterval: Meter count interval between preventive maintenance visits. The spreadsheet validates the values you enter are integers.
PMMeterDue: Meter reading when the next preventative maintenance is due. The spreadsheet validates the values you enter are integers.
PMDateInterval: Number of days between preventive maintenance visits. The spreadsheet validates the values you enter are integers.
PMDateDue: Date this machine is due for preventive maintenance. The spreadsheet validates the value you enter is a date.
PMUseMeter: Enter TRUE if you want e-automate to use meter readings to trigger preventive maintenance, or enter FALSE if you do not want e-automate to use meter readings to trigger preventative maintenance. TRUE and FALSE are the only acceptable values.
PMUseDate: Enter TRUE if you want e-automate to use specific dates to trigger preventive maintenance, or enter FALSE if you do not want e-automate to use specific dates to trigger preventative maintenance. TRUE and FALSE are the only acceptable values.
IPAddress: Enter the IP address for this machine, if applicable.
MACAddress: Enter the MAC address for this machine, if applicable.
Branch: The company branch with which to associate this equipment. If your company does not use branches, enter Main in this cell. For acceptable values (if you use branching), log in to e-automate. Go to Accounting > Branches to open the Branches window. Acceptable values are displayed in the Branch number column.
Active: Enter TRUE if you want this Equipment record to be active, or enter FALSE if you do not want this Equipment record to be active when imported into e-automate. TRUE and FALSE are the only acceptable values.
Completing the ImportCompleting the Import
To import the data, do the following:
Click the [Import to e-automate] button.
The system displays the E-automate login window. Log in to e-automate.
The system displays the Confirm Database window. Do one of the following:
Click [Yes] to confirm the database selected for spreadsheet utility processing.
Click [No] to cancel and return to the spreadsheet utility.
Click [Change database] to select a different database. The system re-displays the e-automate login window.
If you clicked [Yes] in the previous step, the system begins the import process. When the import process completes, view the information in the following columns of the spreadsheet utility:
Status column:
Inserted: The system inserted a new Equipment record.
Not inserted: The system did not have sufficient, valid data to insert a new Equipment record. See the Error message column for more information.
Error message column: Check to see if any errors are present. Use the information provided to make any corrections that may be necessary before attempting to re-import the data. See below for example messages:
[Blank]: The system did not detect any errors with inserting the data on this row.
***Duplicate: The value listed in the EquipmentNumber column matches an existing Equipment Number in e-automate and/or a value listed in this column for a previous row. To review existing values in e-automate, log in to e-automate. Go to Service > Equipment to open the Equipment window. The Equipment number column displays the existing values.
***Invalid [Active/PMUseDate/PMUseMeter] value: Not true or false: The value listed in the specified column can only be TRUE or FALSE. Review the information for the column, and enter the appropriate value.
***Invalid [InstallDate/PMDateDue/WarrantyDate] value: Not a date: The value listed in the specified column must be in date format. Review the information for the column, and enter the appropriate value.
***Invalid [PMDateInterval/PMMeterDue/PMMeterInterval/WarrantyMeter] value. Not numeric: The value listed in the specified column must contain only digits; it cannot contain non-numeric data. Review the information for the column, and enter the appropriate value using only numeric data.
***Invalid bill code: The value listed in the BillCode column is not a valid Bill Code in e-automate. For acceptable values, log in to e-automate. Go to Tools > Lists and Codes to open the List and Codes window. In the Select a list or code type field, use the drop-down menu to select Bill Codes. Acceptable values are displayed in the Bill Code column.
***Invalid bill to customer: The value listed in the BillToCustomerNumber column is not a valid Customer in e-automate. For acceptable values, log in to e-automate: Go to People > Customers to open the Customers window. Acceptable values are displayed in the Number column.
***Invalid branch: The value listed in the Branch column is not a valid Branch in e-automate. If you are not using branching, enter Main in this column for each row. If you use branching, enter the number identifying the branch associated with this equipment. For acceptable values (if you use branching), log in to e-automate. Go to Accounting > Branches to open the Branches window. Acceptable values are displayed in the Branch column.
***Invalid condition: The value specified in the Condition column is not a valid Status in e-automate. For acceptable values, log in to e-automate. Go to Tools > Lists and Codes to open the List and Codes window. In the Select a list or code type field, use the drop-down menu to select Equipment conditions. Acceptable values are displayed in the Condition column.
***Invalid contact number: The value listed in the ContactNumber column is not a valid Contact Number in e-automate. For acceptable values, log in to e-automate. Go to People > Contacts. On the Contacts window, the Number column displays the acceptable values.
***Invalid customer: The value listed in the CustomerNumber column is not a valid Customer in e-automate. For acceptable values, log in to e-automate: Go to People > Customers to open the Customers window. Acceptable values are displayed in the Number column.
***Invalid decision maker contact number: The value listed in the DecisionMakerContactNumber column is not a valid Contact Number in e-automate. For acceptable values, log in to e-automate. Go to People > Contacts. On the Contacts window, the Number column displays the acceptable values.
***Invalid IP address: The value in the IPAddress column is not in standard IP Address format (e.g., 255.255.255.255). Review and correct the IP address listed for this row.
***Invalid item: The value listed in the Item column is not a valid Item in e-automate. For acceptable values, log in to e-automate. Go to Inventory > Items to open the Items list window. Acceptable values are displayed in the Item column.
***Invalid MAC address: The value in the MACAddress column is not in standard MAC Address format (e.g., AA-BB-CC-00-00-00). Review and correct the MAC address listed for this row.
***Invalid meter contact number: The value listed in the MeterContactNumber column is not a valid Contact Number in e-automate. For acceptable values, log in to e-automate. Go to People > Contacts. On the Contacts window, the Number column displays the acceptable values.
***Invalid location customer: The value listed in the LocationCustomer column is not a valid Customer in e-automate. For acceptable values, log in to e-automate: Go to People > Customers to open the Customers window. Acceptable values are displayed in the Number column.
***Invalid shipping contact number: The value listed in the ShippingContact column is not a valid Contact Number in e-automate. For acceptable values, log in to e-automate. Go to People > Contacts. On the Contacts window, the Number column displays the acceptable values.
***Invalid SLA Code: The value specified in the SLACode column is not a valid Service Level Agreement (SLA) code in e-automate. For acceptable values, log in to e-automate. Go to Tools > Lists and Codes to open the List and Codes window. In the Select a list or code type field, use the drop-down menu to select SLACodes. Acceptable values are displayed in the SLA Code column.
***Invalid status: The value specified in the Status column is not a valid Status in e-automate. For acceptable values, log in to e-automate. Go to Tools > Lists and Codes to open the List and Codes window. In the Select a list or code type field, use the drop-down menu to select Equipment statuses. Acceptable values are displayed in the Status column.
***Invalid technician: The value specified in the Technician column is not a valid Technician in e-automate. For acceptable values, log in to e-automate. Go to People > Employees/Contractors to open the Employees/Contractors window. Acceptable values are displayed in the Number column where the Technician column displays Yes.
***Invalid territory: The value specified in the Territory column is not a valid territory in e-automate. For acceptable values, log in to e-automate. Go to Tools > Lists and Codes to open the List and Codes window. In the Select a list or code type field, use the drop-down menu to select Territories. Acceptable values are displayed in the Territory column.
Post Action column: The system does not use this column on this tab.
Importing Beginning Inventory BalancesImporting Beginning Inventory Balances
You use the OBInventory worksheet to import your beginning inventory balance detail into e-automate. Your inventory is the stock you have received into your legacy system and that you have on hand. We suggest you perform a complete physical inventory prior to moving your inventory balance detail forward so you will have exact quantities to enter into your new e-automate system. Your inventory balance detail total amount—the sum of the cost * quantity of each item in your inventory—should match the inventory amount on the balance sheet from your legacy system. When you have verified these amounts match (which you can verify using this utility), you are ready to import your beginning inventory balance detail into e-automate.
While you can enter your beginning inventory balance detail manually, using this utility's bulk import functionality will save you time. During this process, the system performs various checks to validate the data. If the system is not able to validate all the data, the system lets you know which lines are ready to be inserted and which lines contain errors. If any errors are present, the Error Message column displays information to assist you with resolving the errors. The system does not import the detail until you resolve the detected errors. If the system is able to validate all the data, the system imports the data and indicates the data has been inserted into e-automate. Once the data is imported, you can run a balance sheet in e-automate to verify the inventory balance in e-automate matches the inventory balance in your legacy system.
Exporting Opening Balance Inventory Data from e-automateExporting Opening Balance Inventory Data from e-automate
Click the OBInventory tab to bring it forward.
Click the [Clear] button to remove any rows of data remaining from a previous export/import process that you no longer need.
Click [Export from e-automate] to export the opening balance inventory record data from your e-automate database.
The system displays the E-automate login window. Log in to e-automate.
The system displays the Confirm Database window. Do one of the following:
Click [Yes] to confirm the database selected for spreadsheet utility processing.
Click [No] to cancel and return to the spreadsheet utility.
Click [Change database] to select a different database. The system re-displays the e-automate login window.
If you clicked [Yes] in the previous step, the system populates the columns with the appropriate information from the records that meet your filter parameters.
Entering Opening Balance Inventory DataEntering Opening Balance Inventory Data
Using the following information, enter data as appropriate:
Status: Leave this field blank. The system updates this column during processing.
Error message: Leave this field blank. The system updates this column during processing.
Post Action: Leave this field blank. The system does not use this column on this tab.
Item: Item number assigned to the specific item. For acceptable values, log in to e-automate. Go to Inventory > Items to open the Items window. Acceptable values are displayed in the Item column.
SerialNumber: Serial number (up to 30 characters) assigned to this inventory item. If the item listed on this row is not serialized, leave this field blank. If the item listed on this row is serialized, this field is required and the import validation process prevents duplicate item-serial number combinations. For each serial number, list a separate row of data and enter a Quantity of 1 for each row.
Quantity: Quantity of the item you have on hand. For non-serialized items, enter the full quantity of the item in one row. For serialized items, enter one row for each serialized item and list a Quantity of 1 for each row. This field is required.
Unit Cost: Your cost on the specified inventory item(s). Be sure you enter a cost for every item on the spreadsheet so your inventory valuation will be correct. This field is required.
Warehouse: Warehouse code for the warehouse where this item is located. For acceptable values, log in to e-automate. Go to Inventory > Warehouses to open the Warehouse list window. Acceptable values are displayed in the Warehouse column. This field is required.
Bin: Bin code for the bin where this item is located. For acceptable values, log in to e-automate. Go to Inventory > Bins to open the Bin list window. Click the Warehouse column to sort the data by warehouse. Acceptable values are displayed in the Bin column where the Warehouse matches the warehouse displayed in the Warehouse field of the spreadsheet utility for this row. This field is required.
Verifying the Opening Balance Inventory Detail Total Amount Matches the Balance Sheet Total Amount from Your Legacy SystemVerifying the Opening Balance Inventory Detail Total Amount Matches the Balance Sheet Total Amount from Your Legacy System
Verify the total amount of the opening balance detail you are importing into e-automate matches the opening balance listed on the balance sheet for the legacy system from which you are importing this detail. You can accomplish this by doing the following:
In Cell J9, to multiply the Quantity value in Column F by the UnitCost value in Column G to calculate the total inventory value for this row, enter: =PRODUCT(F9:G9)
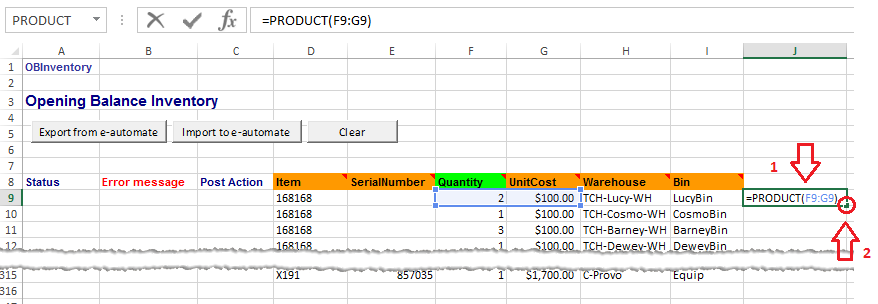
Double-click the lower right corner of Cell J9 to copy the formula to each cell in this column.
With the values in Column J selected, click the Formulas tab and select AutoSum to have Excel enter in the next available cell in the column the formula for adding all the values in the column.
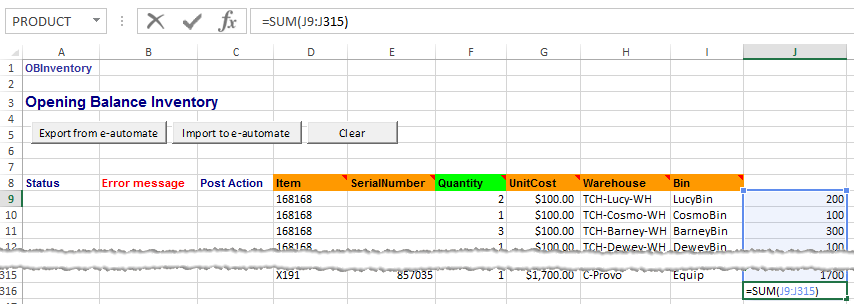
Verify this total amount of the inventory detail you are preparing to import matches the opening balance inventory amount on the balance sheet from your legacy system.
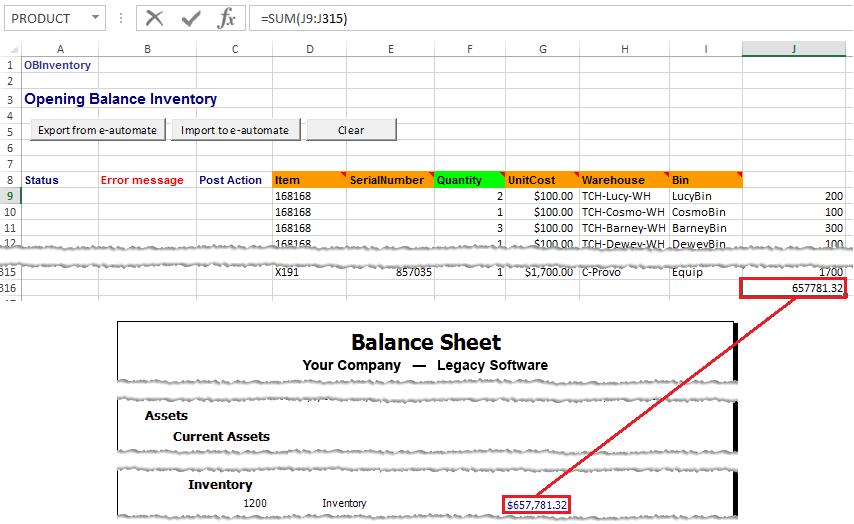
Once you have verified the amounts match, delete the formulas you added to Column J.
Completing the ImportCompleting the Import
To import the data, do the following:
Verify you have entered on the Settings tab the filter settings you want to use for importing data. For more information, see the "Using the Settings Worksheet" section of this topic.
Click the [Import to e-automate] button.
The system displays the E-automate login window. Log in to e-automate.
The system displays the Confirm Database window. Do one of the following:
Click [Yes] to confirm the database selected for spreadsheet utility processing.
Click [No] to cancel and return to the spreadsheet utility.
Click [Change database] to select a different database. The system re-displays the e-automate login window.
If you clicked [Yes] in the previous step, the system begins the import validation process. When the import process completes, view the information in the following columns of the spreadsheet utility:
Status column:
Inserted: All rows of data were validated, and the data was inserted. If you see this status for all rows, the process is complete.
Insertable: This row contains valid data, but no data was imported because one or more errors were detected in the rows of data you are trying to import.
Not inserted: The system did not have sufficient, valid data to insert this row of data. See the Error message column for more information.
Error message column: Check to see if any errors are present. Use the information provided to make any corrections that may be necessary before attempting to re-import the data. See below for example messages:
[Blank]: The system did not detect any errors with inserting the data on this row.
***Invalid [Quantity/UnitCost] value. Not numeric: The value listed in the specified column must contain only digits; it cannot contain non-numeric data. Review the information for the column, and enter the appropriate value using only numeric data.
***Invalid bin: The value listed in the Bin column is not a valid inventory bin in e-automate, or the column is blank. For acceptable values, log in to e-automate. Go to Inventory > Bins. On the Inventory Bins list window, sort the bins by Warehouse by clicking the Warehouse column. Scroll through the list of bins to locate the warehouse you plan to list in the Warehouse cell for this row. Where the Warehouse column matches the warehouse you plan to list in the Warehouse cell, the Bin column displays the acceptable values.
***Invalid item: The value listed in the Item column is not a valid Item in e-automate. For acceptable values, log in to e-automate. Go to Inventory > Items to open the Items list window. Acceptable values are displayed in the Item column.
***Invalid warehouse: The value listed in the Warehouse column is not a valid inventory warehouse in e-automate, or the column is blank. For acceptable values, log in to e-automate. Go to Inventory > Warehouses. In the Inventory Warehouses list, acceptable values are displayed in the Warehouse column.
***Serial numbers not allowed for non-serialized items: The item number listed in the Item column for this row identifies a non-serialized item, but the spreadsheet contains a value in the Serial Number column for this row. To correct this error, remove the value from the SerialNumber column for this row. You cannot specify a serial number for a non-serialized item.
Item [Item Number] Serial Number [Serial Number] is already in inventory. The item-and-serial-number combination you have listed on this row already exists in the e-automate database and cannot be re-imported.
Post Action column: The system does not use this column on this tab.
Running the Balance Sheet in e-automate to Verify Your Beginning Inventory BalanceRunning the Balance Sheet in e-automate to Verify Your Beginning Inventory Balance
To verify your beginning inventory balance in e-automate, do the following:
Log in to e-automate with appropriate permissions.
Click [Reports] to open the Report Console window.
In the left pane, click Standard reports.
In the right pane, double-click Balance Sheet to open the Balance Sheet window.
In the left pane of the Balance Sheet window, select Date/Period to display the Date/Period region in the right pane.
In the right pane, in the Date/Period region, select the Dates radio button.
In the Dates area, use the drop-down menu to select This Month to Date. This option will populate the From field with the first day of the month and the To field with the current date.
Click [OK] to run the report.
Verify the beginning inventory balance in e-automate matches the inventory balance on your legacy system's balance sheet.
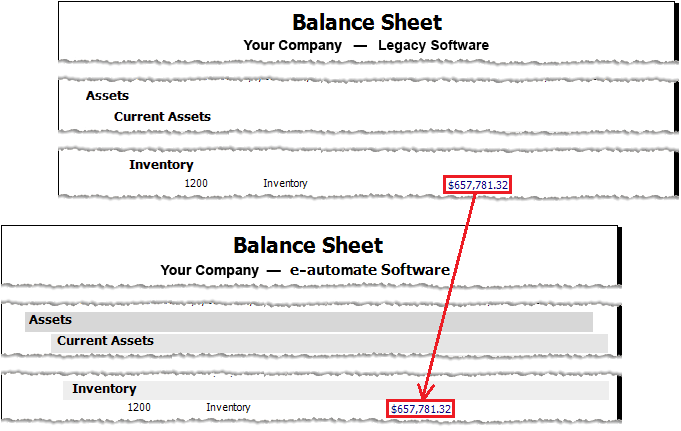
Importing Open Accounts Receivable InvoicesImporting Open Accounts Receivable Invoices
You use the OBAccountsReceivable worksheet to import all your open customer Accounts Receivable transactions into e-automate. These transactions include both invoices for which customers still owe you money and credits that you still owe your customers. The system brings all open invoices into e-automate as miscellaneous charge invoices. You use these miscellaneous charge invoices in e-automate primarily to receive payment; these invoices are not designed to show the itemized detail of the products sold or services rendered. You should have an accurate knowledge of all your open invoices before beginning this process.
While you can enter your open customer Accounts Receivable transactions manually, using this utility's bulk import functionality will save you time. During this process, the system performs various checks to validate the data. If the system is able to validate the data for a row, the system imports the row. If the system is not able to validate the data for a row, the Error Message column displays information to assist you with resolving any errors that were detected. When you resolve the errors, you can reprocess the import until you have imported the necessary data. Once the data is imported, you can run a balance sheet in e-automate to verify the open customer Accounts Receivable balance in e-automate matches the open customer Accounts Receivable balance in your legacy system.
Exporting Open Customer Accounts Receivable Data from e-automateExporting Open Customer Accounts Receivable Data from e-automate
Click the OBAccountsReceivable tab to bring it forward.
Click the [Clear] button to remove any rows of data remaining from a previous export/import process that you no longer need.
Click [Export from e-automate] to export the open customer accounts receivable data from your e-automate database.
The system displays the E-automate login window. Log in to e-automate.
The system displays the Confirm Database window. Do one of the following:
Click [Yes] to confirm the database selected for spreadsheet utility processing.
Click [No] to cancel and return to the spreadsheet utility.
Click [Change database] to select a different database. The system re-displays the e-automate login window.
If you clicked [Yes] in the previous step, the system populates the columns with the appropriate information from the records that meet your filter parameters.
Entering Open Customer Accounts Receivable DataEntering Open Customer Accounts Receivable Data
Using the following information, enter data as appropriate:
Status: Leave this field blank. The system updates this column during processing.
Error message: Leave this field blank. The system updates this column during processing.
Post Action: Leave this field blank. The system does not use this column on this tab.
InvoiceNumber: Your old system-assigned invoice number (up to 15 characters). E-automate copies this number to the transitional invoice’s Description field so you can search for and locate AR invoices by your other software system’s invoice number. The import validation prevents duplicate invoice numbers; e-automate requires each invoice to have a unique invoice number.
Date: Date the invoice was generated. Any date prior to your e-automate go-live date is acceptable. This field is required.
DueDate: Date payment from the customer is due. Any date on or after the invoice date is acceptable. This field is required.
CustomerNumber: Customer number identifying the customer associated with this invoice. For acceptable values, log in to e-automate. Go to People > Customers to open the Customers list window. Acceptable values are displayed in the Number column. This field is required.
BillToCustomerNumber: The e-automate customer to whom this invoice is billed. For acceptable values, log in to e-automate. Go to People > Customers to open the Customers list window. Acceptable values are displayed in the Number column. This field is required.
Term: Term code identifying the payment terms assigned to this invoice. For acceptable values, log in to e-automate. Go to Tools > Lists and Codes to open the List and Codes window. In the Select a list or code type field, use the drop-down menu to select Terms. Acceptable values are displayed in the Term column.
Description: Brief description (up to 255 characters) of the invoice. Typically, invoices are labeled Opening Balance AR Invoice.
Due: Monetary amount due on the identified invoice. This field is required.
Branch: The company branch with which to associate this customer invoice. If your company does not use branches, enter Main in this cell. For acceptable values if your company does use branches, log in to e-automate. Go to Accounting > Branches to open the Branches list window. Acceptable values are displayed in the Branch number column.
Verifying the Open Customer Accounts Receivable Data's Total Amount Matches the Balance Sheet Total Amount from Your Legacy SoftwareVerifying the Open Customer Accounts Receivable Data's Total Amount Matches the Balance Sheet Total Amount from Your Legacy Software
Verify the total amount of the open customer Accounts Receivable detail you are importing into e-automate matches the opening balance listed on the balance sheet for the legacy system from which you are importing this detail. You can accomplish this by doing the following:
Click in the first empty cell below the data in the Due column, Column K (Cell K116 in the example image).
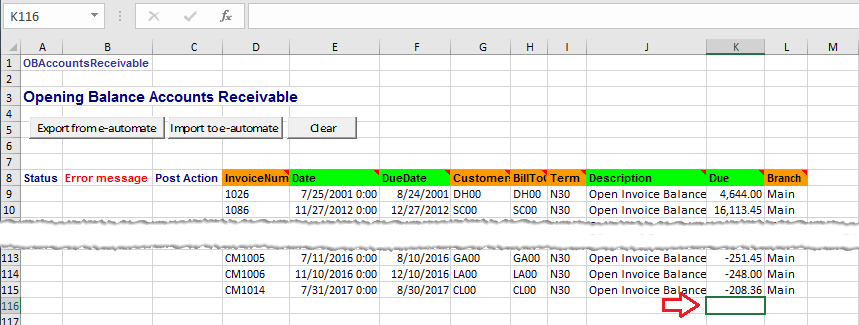
With this field selected, click the Home tab (or the Formulas tab) and select AutoSum to have Excel enter in that cell the formula for adding all the values in the column.

Verify this total amount of the open customer Accounts Receivable detail you are preparing to import matches the open customer Accounts Receivable amount on the balance sheet from your legacy system.
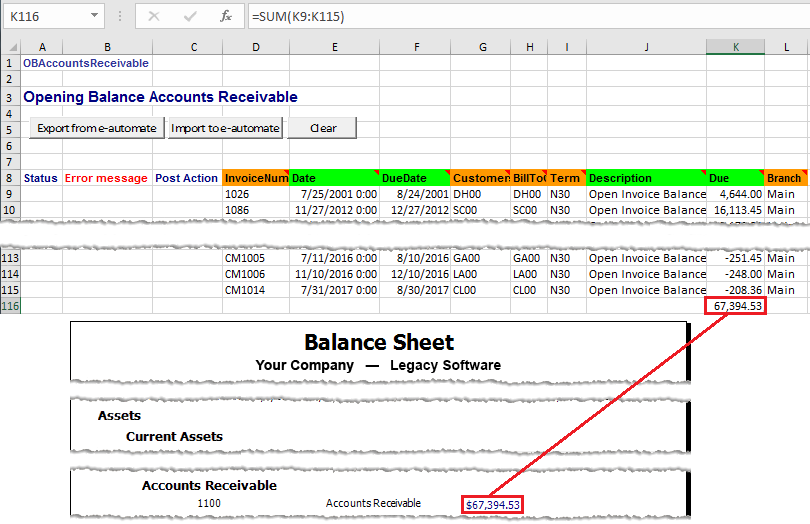
Once you have verified the amounts match, delete the formula you added to Column K.
Completing the ImportCompleting the Import
To import the data, do the following:
Verify you have entered on the Settings tab the filter settings you want to use for importing data. For more information, see the "Using the Settings Worksheet" section of this topic.
Click the [Import to e-automate] button.
The system displays the E-automate login window. Log in to e-automate.
The system displays the Confirm Database window. Do one of the following:
Click [Yes] to confirm the database selected for spreadsheet utility processing.
Click [No] to cancel and return to the spreadsheet utility.
Click [Change database] to select a different database. The system re-displays the e-automate login window.
If you clicked [Yes] in the previous step, the system begins the import validation process. When the import process completes, view the information in the following columns of the spreadsheet utility:
Status column:
Inserted: All rows of data were validated, and the data was inserted.
Not inserted: The system did not have sufficient, valid data to insert this row of data. See the Error message column for more information.
Error message column: Check to see if any errors are present. Use the information provided to make any corrections that may be necessary before attempting to re-import the data. See below for example messages:
[Blank]: The system did not detect any errors with inserting the data on this row.
***Branch number is blank: The Branch column cannot be left blank. If you are not using branching, enter Main in this column for all rows. For acceptable values if you are using branching, log in to e-automate. Go to Accounting > Branches to open the Branches list window. Acceptable values are displayed in the Branch column.
***Duplicate: The value listed in the InvoiceNumber column matches an existing Invoice Number in e-automate and/or a value listed in this column for a previous row. To find the existing invoice in e-automate, log in to e-automate. Go to Accounting > Accounts receivable > Accounts receivable console to open the Accounts Receivable Console window. Near the top left corner of the window, set Find to Invoice. Enter the invoice number. Click [Go]. The system displays data for that invoice.
***Invalid [Date/DueDate] value. Not a date: The value listed in the specified column is not formatted as a date, or the column is blank. Review the information for the column, and enter the appropriate value using a valid date format.
***Invalid bill to customer: The value listed in the BillToCustomerNumber column is not a valid customer in e-automate, or the column is blank. For acceptable values, log in to e-automate. Go to People > Customers. In the Customers list, acceptable values are displayed in the Number column.
***Invalid customer: The value listed in the CustomerNumber column is not a valid customer in e-automate, or the column is blank. For acceptable values, log in to e-automate. Go to People > Customers. In the Customers list, acceptable values are displayed in the Number column.
***Invalid Due value. Not numeric: The value listed in the Due column must contain only digits; it cannot contain non-numeric data, and it cannot be blank. Review the information for the column, and enter the appropriate value using only numeric data.
***Invalid terms code: The value listed in the Term column is not a valid term in e-automate. For acceptable values, log in to e-automate. Go to Tools > Lists and Codes to open the List and Codes window. In the Select a list or code type field, use the drop-down menu to select Terms. Acceptable values are displayed in the Term column.
Error while trying to insert...: Check to see if the Branch column for this row lists a valid branch in e-automate. For acceptable values, enter Main if you are not using branching. If you are using branching, log in to e-automate. Go to Accounting > Branches to open the Branches list window. Acceptable values are displayed in the Branch column.
Post Action column: The system does not use this column on this tab.
Running the Balance Sheet in e-automate to Verify Your Open Customer Accounts Receivable BalanceRunning the Balance Sheet in e-automate to Verify Your Open Customer Accounts Receivable Balance
To verify your open customer AR balance in e-automate, do the following:
Log in to e-automate with appropriate permissions.
Click [Reports] to open the Report Console window.
In the left pane, click Standard reports.
In the right pane, double-click Balance Sheet to open the Balance Sheet window.
In the left pane of the Balance Sheet window, select Date/Period to display the Date/Period region in the right pane.
In the right pane, in the Date/Period region, select the Dates radio button.
In the Dates area, use the drop-down menu to select <All Dates>.
Click [OK] to run the report.
Verify the beginning Accounts Receivable balance in e-automate matches the beginning Accounts Receivable balance on your legacy system's balance sheet.
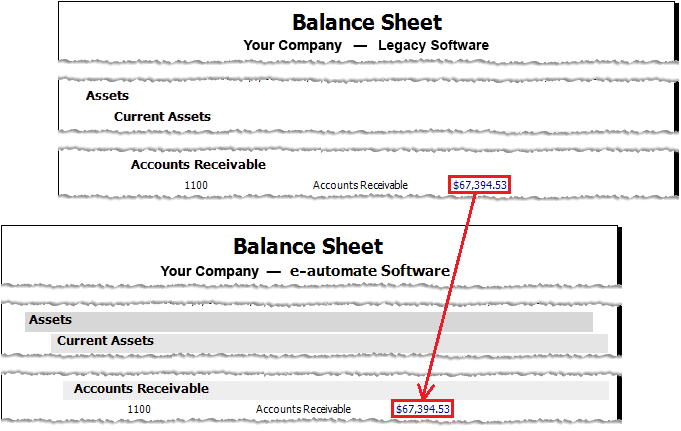
Importing Accounts Payable InvoicesImporting Accounts Payable Invoices
You use the Data Import/Export Spreadsheet’s OBAccountsPayable worksheet to enter all of your open vendor Accounts Payable invoices. Transactions that go into your Accounts Payable module are open vouchers (invoices) that are unpaid. These vouchers (invoices) can be a result of inventory purchases or services. Regardless of the originating transaction, you enter these in e-automate as vendor invoices. Open accounts payable invoices are entered in e-automate so you have a record of whom you owe money and when that money is due to the vendor. You should have an accurate knowledge of all your open payable invoices before beginning this process.
While you can enter your open customer Accounts Payable transactions manually, using this utility's bulk import functionality will save you time. During this process, the system performs various checks to validate the data. If the system is able to validate the data for a row, the system imports the row. If the system is not able to validate the data for a row, the Error Message column displays information to assist you with resolving any errors that were detected. When you resolve the errors, you can reprocess the import until you have imported the necessary data. Once the data is imported, you can run a balance sheet in e-automate to verify the Accounts Payable invoice balance in e-automate matches the Accounts Payable invoice balance in your legacy system.
Exporting Accounts Payable Invoice Data from e-automateExporting Accounts Payable Invoice Data from e-automate
Click the OBAccountsPayable tab to bring it forward.
Click the [Clear] button to remove any rows of data remaining from a previous export/import process that you no longer need.
Click [Export from e-automate] to export the accounts payable invoice data from your e-automate database.
The system displays the E-automate login window. Log in to e-automate.
The system displays the Confirm Database window. Do one of the following:
Click [Yes] to confirm the database selected for spreadsheet utility processing.
Click [No] to cancel and return to the spreadsheet utility.
Click [Change database] to select a different database. The system re-displays the e-automate login window.
If you clicked [Yes] in the previous step, the system populates the columns with the appropriate information from the records that meet your filter parameters.
Entering Accounts Payable Invoice DataEntering Accounts Payable Invoice Data
Using the following information, enter data as appropriate:
Status: Leave this field blank. The system updates this column during processing.
Error message: Leave this field blank. The system updates this column during processing.
Post Action: Leave this field blank. The system does not use this column on this tab.
Number: The internal number you want to use to identify this invoice in e-automate. You can use the number assigned to this invoice in your legacy software system, assign an alternate number using an invoice numbering method that can be as simple as 1,2,3,4, etc., or enter (Next) in this cell to have e-automate assign the next available invoice number. Each invoice must have a unique number. This field is required.
Date: The date the invoice was originally entered. This date must be prior to your e-automate go-live date. This field is required.
Due Date: The date the payment is due to the vendor. This field is required.
Vendor Number: Vendor number for the vendor associated with this invoice. This field is required. For acceptable values, log in to e-automate and go to People > Vendors to open the Vendors list window. Acceptable values are displayed in the Number column.
Term: The term code identifying the payment terms assigned to this invoice. For acceptable values, log in to e-automate. Go to Tools > Lists and Codes to open the Lists and Codes window. In the Select a list or code type field, use the drop-down menu to select Terms. Acceptable values are displayed in the Term column.
Description: Brief description (up to 255 characters) of the invoice (e.g., Opening Balance AP Invoice).
Due: Monetary amount due on the invoice.
Vendor Invoice: The invoice number assigned to the invoice by the vendor.
Branch: The company branch with which to associate this invoice. If your company does not use branches, enter Main in this cell. For acceptable values if your company does use branches, log in to e-automate. Go to Accounting > Branches to open the Branches list window. Acceptable values are displayed in the Branch number column.
Verifying the Accounts Payable Invoice Data's Total Amount Matches the Balance Sheet Total Amount from Your Legacy SoftwareVerifying the Accounts Payable Invoice Data's Total Amount Matches the Balance Sheet Total Amount from Your Legacy Software
Verify the total amount of the open customer Accounts Payable detail you are importing into e-automate matches the opening balance listed on the balance sheet for the legacy system from which you are importing this detail. You can accomplish this by doing the following:
Click in the first empty cell below the data in the Due column, Column J (Cell J25 in the example image).
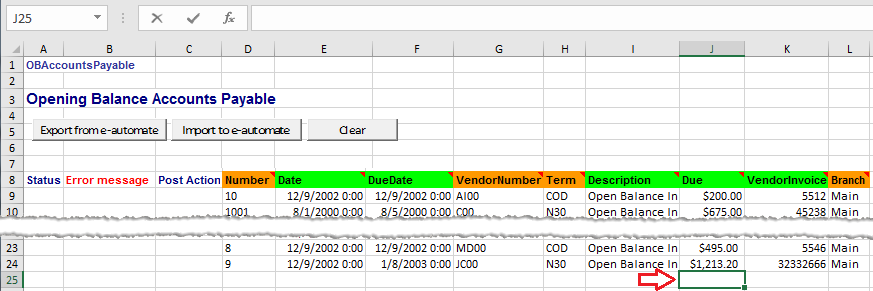
With this field selected, click the Home tab (or the Formulas tab) and select AutoSum to have Excel enter in that cell the formula for adding all the values in the column.
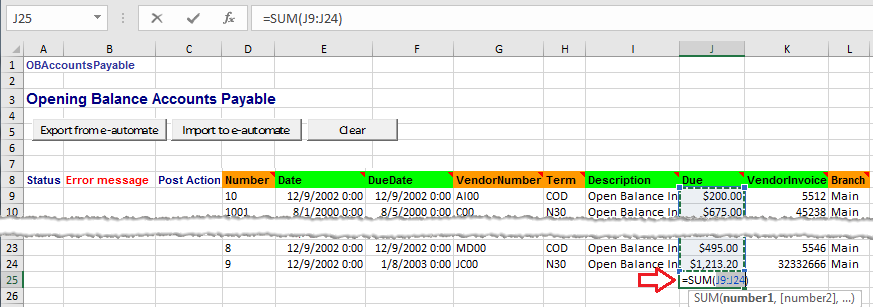
Verify this total amount of the open vendor Accounts Payable detail you are preparing to import matches the open vendor Accounts Payable amount on the balance sheet from your legacy system.
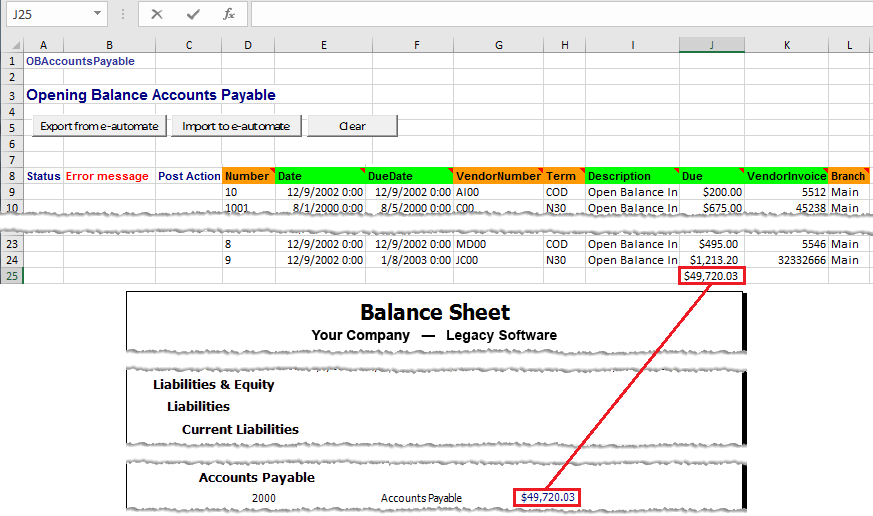
Once you have verified the amounts match, delete the formula you added to Column J.
Completing the ImportCompleting the Import
To import the data, do the following:
Verify you have entered on the Settings tab the filter settings you want to use for importing data. For more information, see the "Using the Settings Worksheet" section of this topic.
Click the [Import to e-automate] button.
The system displays the E-automate login window. Log in to e-automate.
The system displays the Confirm Database window. Do one of the following:
Click [Yes] to confirm the database selected for spreadsheet utility processing.
Click [No] to cancel and return to the spreadsheet utility.
Click [Change database] to select a different database. The system re-displays the e-automate login window.
If you clicked [Yes] in the previous step, the system begins the import validation process. When the import process completes, view the information in the following columns of the spreadsheet utility:
Status column:
Inserted: All rows of data were validated, and the data was inserted. If you see this status for all rows, the process is complete.
Not inserted: The system did not have sufficient, valid data to insert this row of data. See the Error message column for more information.
Error message column: Check to see if any errors are present. Use the information provided to make any corrections that may be necessary before attempting to re-import the data. See below for example messages:
[Blank]: The system did not detect any errors with inserting the data on this row.
***Branch number is blank: The Branch column cannot be left blank. If you are not using branching, enter Main in this column for all rows. For acceptable values if you are using branching, log in to e-automate. Go to Accounting > Branches to open the Branches list window. Acceptable values are displayed in the Branch column.
***Duplicate: The value listed in the InvoiceNumber column matches an existing Invoice Number in e-automate and/or a value listed in this column for a previous row. To find the existing invoice in e-automate, log in to e-automate. Go to Accounting > Accounts receivable > Accounts receivable console to open the Accounts Receivable Console window. Near the top left corner of the window, set Find to Invoice. Enter the invoice number. Click [Go]. The system displays data for that invoice.
***Invalid [Date/DueDate] value. Not a date: The value listed in the specified column is not formatted as a date, or the column is blank. Review the information for the column, and enter the appropriate value using a valid date format.
***Invalid branch account number: The value listed in the Branch column is not a valid branch in e-automate. For acceptable values, enter Main if you are not using branching. If you are using branching, log in to e-automate. Go to Accounting > Branches to open the Branches list window. Acceptable values are displayed in the Branch column.
***Invalid Due value. Not numeric: The value listed in the Due column must contain only digits; it cannot contain non-numeric data, and it cannot be blank. Review the information for the column, and enter the appropriate value using only numeric data.
***Invalid term: The value listed in the Term column is not a valid term in e-automate. For acceptable values, log in to e-automate. Go to Tools > Lists and Codes to open the List and Codes window. In the Select a list or code type field, use the drop-down menu to select Terms. Acceptable values are displayed in the Term column.
***Invalid vendor: The value listed in the VendorNumber column is not a valid vendor number in e-automate, or the column is blank. For acceptable values, log in to e-automate. Go to People > Vendors to open the Vendors list window. Acceptable values are displayed in the Number column.
Post Action column: The system does not use this column on this tab.
Running the Balance Sheet in e-automate to Verify Your Accounts Payable Invoice BalanceRunning the Balance Sheet in e-automate to Verify Your Accounts Payable Invoice Balance
To verify your open vendor Accounts Payable invoice balance in e-automate, do the following:
Log in to e-automate with appropriate permissions.
Click [Reports] to open the Report Console window.
In the left pane, click Standard reports.
In the right pane, double-click Balance Sheet to open the Balance Sheet window.
In the left pane of the Balance Sheet window, select Date/Period to display the Date/Period region in the right pane.
In the right pane, in the Date/Period region, select the Dates radio button.
In the Dates area, use the drop-down menu to select <All Dates>.
Click [OK] to run the report.
Verify the open vendor Accounts Payable invoice balance in e-automate matches the open vendor Accounts Payable invoice balance on your legacy system's balance sheet.
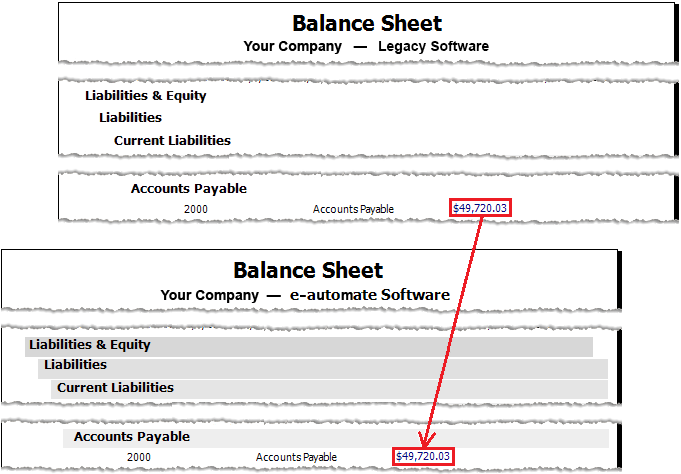
Importing Unearned Balances at the Contract LevelImporting Unearned Balances at the Contract Level
You use the OBUnearnedBalances-Contract worksheet to import unearned balances for contracts set up to track unearned balances at the contract level. On this worksheet, only include contracts that are set up as accrual contracts and that have an unearned balance at the contract level.
Exporting Contract-level Unearned Balance Data from e-automateExporting Contract-level Unearned Balance Data from e-automate
Click the OBUnearnedBalances-Contract tab to bring it forward.
Click the [Clear] button to remove any rows of data remaining from a previous export/import process that you no longer need.
Click [Export from e-automate] to export the contract-level unearned balance data from your e-automate database.
The system displays the E-automate login window. Log in to e-automate.
The system displays the Confirm Database window. Do one of the following:
Click [Yes] to confirm the database selected for spreadsheet utility processing.
Click [No] to cancel and return to the spreadsheet utility.
Click [Change database] to select a different database. The system re-displays the e-automate login window.
If you clicked [Yes] in the previous step, the system populates the columns with the appropriate information from the records that meet your filter parameters.
Entering Contract-level Unearned Balance DataEntering Contract-level Unearned Balance Data
Using the following information, enter data as appropriate:
Status: Leave this field blank. The system updates this column during processing.
Error message: Leave this field blank. The system updates this column during processing.
Post Action: Leave this field blank. The system does not use this column on this tab.
Contract Number: Contract number assigned to an accrual contract for which you are tracking an unearned balance at the contract level. Deferred revenue is posted to the accounts identified on the Contract base distribution code assigned to the Contract type associated with this contract. For acceptable values, log in to e-automate. From the e-automate toolbar, click [Contracts] to open the Service Contracts list window. Acceptable values appear in the Contract column.
Unearned Balance Adjustment: Monetary amount of the unearned balance on this contract.
Verifying the Total Amount of the Unearned Balances Matches the Deferred Contract Revenue Total Amount on the Balance Sheet from Your Legacy SoftwareVerifying the Total Amount of the Unearned Balances Matches the Deferred Contract Revenue Total Amount on the Balance Sheet from Your Legacy Software
Verify the total amount of the Unearned Balances (contract level + equipment level + meter-group level) you are importing into e-automate matches the Deferred Contract Revenue total amount listed on the balance sheet for the legacy system from which you are importing this data. You can accomplish this by doing the following:
Click in the first empty cell below the data in the Unearned Balance Adjustment column, Column E (Cell E14 in the example image).
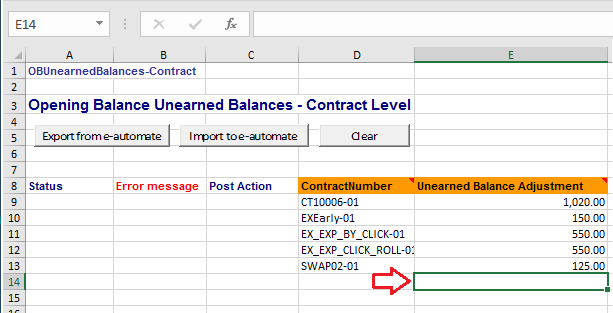
With this cell selected, click the Home tab (or the Formulas tab) and select AutoSum to have Excel enter in that cell the formula for adding all the values in the column.
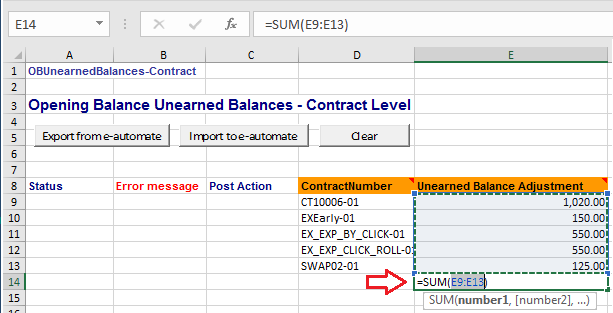
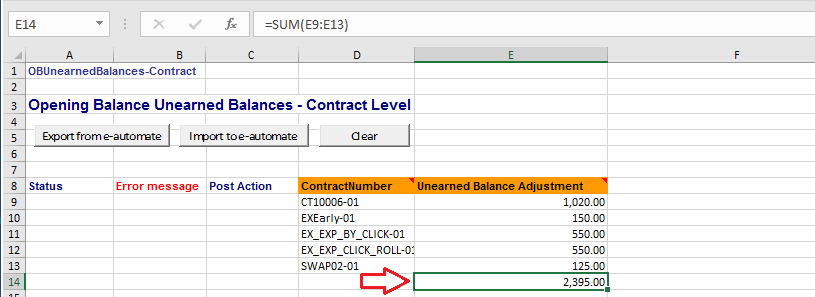
Add the total amount of the Unearned Balances for each level (Contract, Equipment, and/or Meter Group) at which you are deferring revenue.
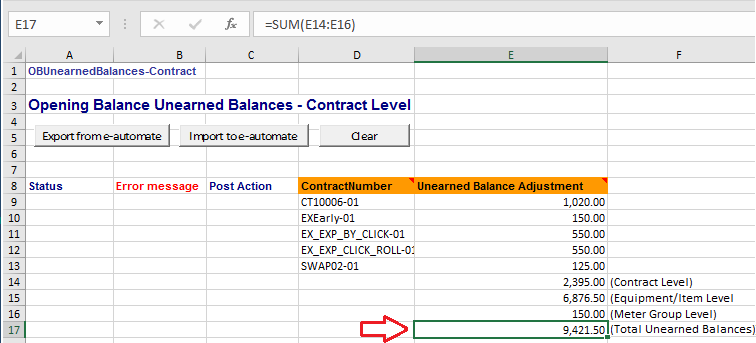
Verify the total amount of the Unearned Balances you are preparing to import, if applicable, on the OBUnearnedBalances-Contract, OBUnearnedBalances-EquipItem, and OBUnearnedBalances-MeterGroup tabs matches the Deferred Contract Revenue amount on the balance sheet from your legacy system.

Once you have verified the amounts match, delete any formulas and text you may have added to Columns E and F for the purpose of verifying balance totals.
Completing the ImportCompleting the Import
To import the data, do the following:
Verify you have entered on the Settings tab the filter settings you want to use for importing data. For more information, see the "Using the Settings Worksheet" section of this topic.
Click the [Import to e-automate] button.
The system displays the E-automate login window. Log in to e-automate.
The system displays the Confirm Database window. Do one of the following:
Click [Yes] to confirm the database selected for spreadsheet utility processing.
Click [No] to cancel and return to the spreadsheet utility.
Click [Change database] to select a different database. The system re-displays the e-automate login window.
If you clicked [Yes] in the previous step, the system begins the import validation process. When the import process completes, view the information in the following columns of the spreadsheet utility:
Status column:
Inserted: All rows of data were validated, and the data was inserted. If you see this status for all rows, the process is complete.
Not inserted: The system did not have sufficient, valid data to insert this row of data. See the Error message column for more information.
Error message column: Check to see if any errors are present. Use the information provided to make any corrections that may be necessary before attempting to re-import the data. See below for example messages:
[Blank]: The system did not detect any errors with inserting the data on this row.
***Contract does not accrue: The value listed in the ContractNumber column identifies a contract that is not set up as an accrual contract (and so there should be no unearned balance to accrue). Remove the row from this tab, or review the contract to see if it should have been set up as an accrual contract.
***Contract uses equipment level accruals: The value listed in the ContractNumber column identifies a contract that is set up to accrue at the equipment/item level, not at the contract level. As a result, the unearned balance adjustment for this contract should be entered using the OBUnearnedBalances-EquipItem tab instead of the OBUnearnedBalances-Contract tab.
***Invalid contract: The value listed in the ContractNumber column is not a valid contract in e-automate. For acceptable values, log in to e-automate. From the e-automate toolbar, click [Contracts] to open the Service Contracts list window. Acceptable values appear in the Contract column.
***Invalid contract code: The value listed in the ContractNumber column is not a valid contract code in e-automate. For acceptable values, log in to e-automate. From the e-automate toolbar, click [Contracts] to open the Service Contracts list window. Acceptable values appear in the Contract column.
***Invalid Unearned Balance Adjustment value. Not numeric: The value listed in the Unearned Balance Adjustment column must contain only digits; it cannot contain non-numeric data, and it cannot be blank. Review the information for the column, and enter the appropriate value using only numeric data.
Post Action column: The system does not use this column on this tab.
Running the Balance Sheet in e-automate to Verify Your Deferred Contract Revenue Opening BalanceRunning the Balance Sheet in e-automate to Verify Your Deferred Contract Revenue Opening Balance
To verify your Deferred Contract Revenue opening balance in e-automate, do the following:
Log in to e-automate with appropriate permissions.
Click [Reports] to open the Report Console window.
In the left pane, click Standard reports.
In the right pane, double-click Balance Sheet to open the Balance Sheet window.
In the left pane of the Balance Sheet window, select Date/Period to display the Date/Period region in the right pane.
In the right pane, in the Date/Period region, select the Dates radio button.
In the Dates area, use the drop-down menu to select <All Dates>.
Click [OK] to run the report.
Verify the Deferred Contract Revenue opening balance in e-automate matches the Deferred Contract Revenue balance on your legacy system's balance sheet.
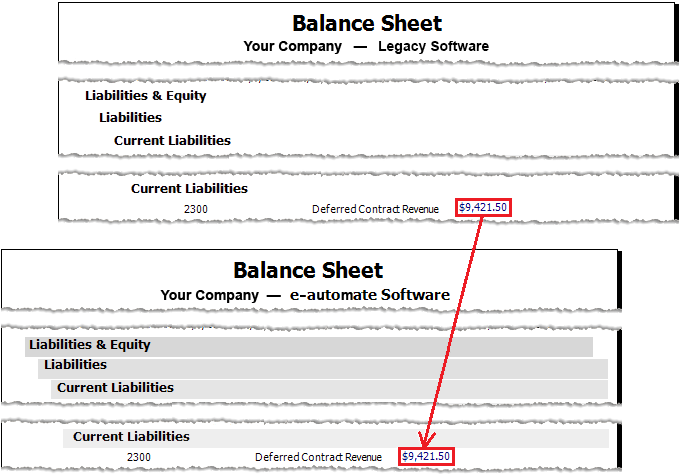
Importing Unearned Balances at the Equipment/Item LevelImporting Unearned Balances at the Equipment/Item Level
You use the OBUnearnedBalances-EquipItem worksheet to import unearned balances for contracts set up to track unearned balances at the equipment/item level. On this worksheet, only include contracts that are set up as accrual contracts and that have an unearned balance at the equipment/item level.
Exporting Equipment/Item-level Unearned Balance Data from e-automateExporting Equipment/Item-level Unearned Balance Data from e-automate
Click the OBUnearnedBalances-Contract tab to bring it forward.
Click the [Clear] button to remove any rows of data remaining from a previous export/import process that you no longer need.
Click [Export from e-automate] to export the equipment/item-level unearned balance data from your e-automate database.
The system displays the E-automate login window. Log in to e-automate.
The system displays the Confirm Database window. Do one of the following:
Click [Yes] to confirm the database selected for spreadsheet utility processing.
Click [No] to cancel and return to the spreadsheet utility.
Click [Change database] to select a different database. The system re-displays the e-automate login window.
If you clicked [Yes] in the previous step, the system populates the columns with the appropriate information from the records that meet your filter parameters.
Entering Equipment/Item-level Unearned Balance DataEntering Equipment/Item-level Unearned Balance Data
Using the following information, enter data as appropriate:
Status: Leave this field blank. The system updates this column during processing.
Error message: Leave this field blank. The system updates this column during processing.
Post Action: Leave this field blank. The system does not use this column on this tab.
ContractNumber: Contract number assigned to an accrual contract for which you are tracking an unearned balance at the equipment level. Deferred revenue is posted to the accounts identified on the Contract base distribution code assigned to the contract equipment, if any. If the equipment does not have a Contract base distribution code, e-automate uses the Contract base distribution code assigned to the Contract type on this contract at the header level. For acceptable values, log in to e-automate. From the e-automate toolbar, click [Contracts] to open the Service Contracts list window. Acceptable values appear in the Contract column.
EquipmentNumber: The equipment number assigned to the equipment for which you are tracking an unearned balance at the equipment/item level. This equipment must be identified on the contract referenced in the ContractNumber column. For acceptable values, log in to e-automate. From the toolbar, click [Equipment] to open the Equipment list window. Acceptable values are displayed in the Equipment Number column.
Item: The Item number assigned to the item for which you are tracking an unearned balance at the equipment/item level. This item must be identified on the contract referenced in the ContractNumber column and must be a valid item number in e-automate. For acceptable values, log in to e-automate. From the toolbar, click [Items] to open the Items list window. Acceptable values are displayed in the Item column.
Location: The customer location associated with the item referenced in the Item column for this row. This location must be identified on the contract referenced in the ContractNumber column and must be a valid location number in e-automate. For acceptable values, log in to e-automate. From the toolbar, click [Customers] to open the Items list window. Acceptable values are displayed in the Number column.
Unearned Balance Adjustment: The monetary amount of the unearned balance on this equipment/item. Together with the unearned balance(s) for any other equipment and/or items on this contract, this amount is inserted into the e-automate database as the unearned balance on the specified contract.
Verifying the Total Amount of the Unearned Balances Matches the Deferred Contract Revenue Total Amount on the Balance Sheet from Your Legacy SoftwareVerifying the Total Amount of the Unearned Balances Matches the Deferred Contract Revenue Total Amount on the Balance Sheet from Your Legacy Software
Verify the total amount of the Unearned Balances (contract level + equipment level + meter-group level) you are importing into e-automate matches the Deferred Contract Revenue total amount listed on the balance sheet for the legacy system from which you are importing this data. You can accomplish this by doing the following:
Click in the first empty cell below the data in the Unearned Balance Adjustment column, Column H (Cell H24 in the example image).
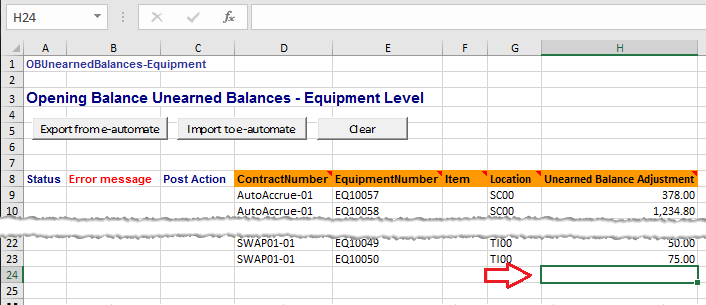
With this cell selected, click the Home tab (or the Formulas tab) and select AutoSum to have Excel enter in that cell the formula for adding all the values in the column.
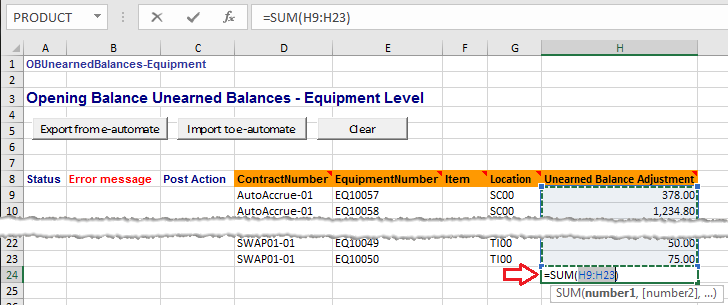
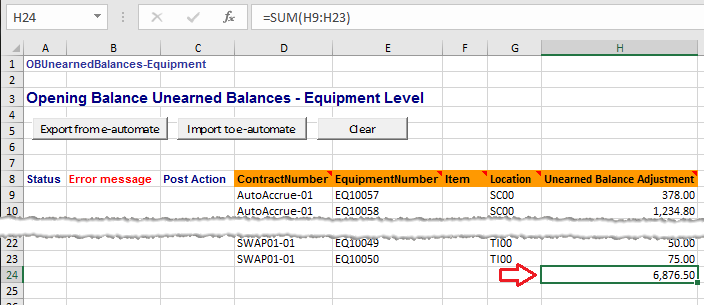
Add the total amount of the Unearned Balances for each level (Contract, Equipment, and/or Meter Group) at which you are deferring revenue.
The remainder of this section is based on copying the Equipment/Item Level balance calculated above ($6,876.50 in the example images) to the OBUnearnedBalances-Contract tab.
Verify the total amount of the Unearned Balances you are preparing to import, if applicable, on the OBUnearnedBalances-Contract, OBUnearnedBalances-EquipItem, and OBUnearnedBalances-MeterGroup tabs matches the Deferred Contract Revenue amount on the balance sheet from your legacy system.
Once you have verified the amounts match, delete any formulas and text you may have added to Columns E and F on the OBUnearnedBalances-Contract tab and to Column H on the OBUnearnedBalances-EquipItem tab for the purpose of verifying balance totals.
Completing the ImportCompleting the Import
To import the data, do the following:
Verify you have entered on the Settings tab the filter settings you want to use for importing data. For more information, see the "Using the Settings Worksheet" section of this topic.
Click the [Import to e-automate] button.
The system displays the E-automate login window. Log in to e-automate.
The system displays the Confirm Database window. Do one of the following:
Click [Yes] to confirm the database selected for spreadsheet utility processing.
Click [No] to cancel and return to the spreadsheet utility.
Click [Change database] to select a different database. The system re-displays the e-automate login window.
If you clicked [Yes] in the previous step, the system begins the import validation process. When the import process completes, view the information in the following columns of the spreadsheet utility:
Status column:
Inserted: All rows of data were validated, and the data was inserted. If you see this status for all rows, the process is complete.
Not inserted: The system did not have sufficient, valid data to insert this row of data. See the Error message column for more information.
Error message column: Check to see if any errors are present. Use the information provided to make any corrections that may be necessary before attempting to re-import the data. See below for example messages:
[Blank]: The system did not detect any errors with inserting the data on this row.
***Contract does not accrue: The value listed in the ContractNumber column identifies a contract that is not set up as an accrual contract (and so there should be no unearned balance to accrue). Remove the row from this tab, or review the contract to see if it should have been set up as an accrual contract.
***Contract uses contract level accruals: The value listed in the ContractNumber column identifies a contract that is set up to accrue at the contract level, not at the equipment level. As a result, the unearned balance adjustment for this contract should be entered using the OBUnearnedBalances-Contract tab instead of the OBUnearnedBalances-EquipItem tab.
***Invalid contract: The value listed in the ContractNumber column is not a valid contract in e-automate. For acceptable values, log in to e-automate. From the e-automate toolbar, click [Contracts] to open the Service Contracts list window. Acceptable values are displayed in the Contract column.
***Invalid contract/equipment: The equipment identified in the EquipmentNumber column is not on the contract identified in the ContractNumber column for this row in e-automate. You can only enter an unearned balance for equipment if the specified equipment is on the specified contract in e-automate.
***Invalid equipment: The value listed in the EquipmentNumber column is not a valid equipment number in e-automate. For acceptable values, log in to e-automate. From the e-automate toolbar, click [Equipment] to open the Equipment list window. Acceptable values are displayed in the Equipment number column.
***Invalid item: The value listed in the Item column is not a valid item number in e-automate and/or is not listed as an item on the contract specified for this row. For acceptable values, log in to e-automate. From the e-automate toolbar, click [Items] to open the Items list window. Acceptable values are displayed in the Item column.
***Invalid location customer: The value listed in the Location column is not a valid customer in e-automate and/or is not listed as the location customer in the contract specified for this row. For acceptable values, log in to e-automate. From the e-automate toolbar, click [Customers] to open the Customers list window. Acceptable values are displayed in the Number column.
***Invalid Unearned Balance Adjustment value. Not numeric: The value listed in the Unearned Balance Adjustment column must contain only digits; it cannot contain non-numeric data, and it cannot be blank. Review the information for the column, and enter the appropriate value using only numeric data.
***You must specify either an Equipment or an Item And Location: You must enter a value in the EquipmentNumber column to associate an unearned balance with the equipment on a contract, or you must enter values in both the Item and Location columns to associate an unearned balance with an item on a contract in e-automate. These three columns cannot all be left blank.
Post Action column: The system does not use this column on this tab.
Running the Balance Sheet in e-automate to Verify Your Deferred Contract Revenue Opening BalanceRunning the Balance Sheet in e-automate to Verify Your Deferred Contract Revenue Opening Balance
To verify your Deferred Contract Revenue opening balance in e-automate, do the following:
Log in to e-automate with appropriate permissions.
Click [Reports] to open the Report Console window.
In the left pane, click Standard reports.
In the right pane, double-click Balance Sheet to open the Balance Sheet window.
In the left pane of the Balance Sheet window, select Date/Period to display the Date/Period region in the right pane.
In the right pane, in the Date/Period region, select the Dates radio button.
In the Dates area, use the drop-down menu to select <All Dates>.
Click [OK] to run the report.
Verify the Deferred Contract Revenue opening balance in e-automate matches the Deferred Contract Revenue balance on your legacy system's balance sheet.
Importing Unearned Balances at the Meter Group LevelImporting Unearned Balances at the Meter Group Level
You use the OBUnearnedBalances-MeterGroup worksheet to import unearned balances for contracts set up to track unearned balances at the meter group level. On this worksheet, only include contracts that are set up as accrual contracts and that have an unearned balance at the meter group level.
Exporting Meter Group Level Unearned Balance Data from e-automateExporting Meter Group Level Unearned Balance Data from e-automate
Click the OBUnearnedBalances-Contract tab to bring it forward.
Click the [Clear] button to remove any rows of data remaining from a previous export/import process that you no longer need.
Click [Export from e-automate] to export the meter group level unearned balance data from your e-automate database.
The system displays the E-automate login window. Log in to e-automate.
The system displays the Confirm Database window. Do one of the following:
Click [Yes] to confirm the database selected for spreadsheet utility processing.
Click [No] to cancel and return to the spreadsheet utility.
Click [Change database] to select a different database. The system re-displays the e-automate login window.
If you clicked [Yes] in the previous step, the system populates the columns with the appropriate information from the records that meet your filter parameters.
Entering Meter Group Level Unearned Balance DataEntering Meter Group Level Unearned Balance Data
Using the following information, enter data as appropriate:
Status: Leave this field blank. The system updates this column during processing.
Error message: Leave this field blank. The system updates this column during processing.
Post Action: Leave this field blank. The system does not use this column on this tab.
ContractNumber: Contract number assigned to a contract for which you are tracking an unearned balance. You should only identify contracts that have contract types that are flagged as accrual contracts and have an unearned balance at the meter group level. For acceptable values, log in to e-automate. From the e-automate toolbar, click [Contracts] to open the Service Contracts list window. Acceptable values appear in the Contract column.
MeterGroup: Meter group associated with a specific unearned amount. This meter group must be identified on the contract referenced in the ContractNumber column. For acceptable values, log in to e-automate. From the toolbar, click [Contracts] to open the Service Contracts list window. Locate the contract identified in the ContractNumber cell for this row. Click [Edit] to open the Edit Service Contract window for this contract. Select the Meter groups tab to bring it forward. Acceptable values are displayed in the Meter group column.
Unearned Balance Adjustment: Monetary amount of the unearned balance for the meter group identified in the MeterGroup column for this row.
Verifying the Total Amount of the Unearned Balances Matches the Deferred Contract Revenue Total Amount on the Balance Sheet from Your Legacy SoftwareVerifying the Total Amount of the Unearned Balances Matches the Deferred Contract Revenue Total Amount on the Balance Sheet from Your Legacy Software
Verify the total amount of the Unearned Balances (contract level + equipment level + meter-group level) you are importing into e-automate matches the Deferred Contract Revenue total amount listed on the balance sheet for the legacy system from which you are importing this data. You can accomplish this by doing the following:
Click in the first empty cell below the data in the Unearned Balance Adjustment column, Column F (Cell F11 in the example image).
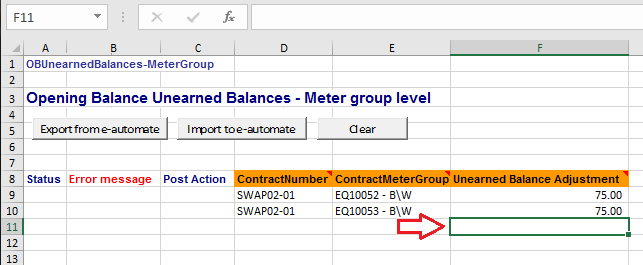
With this cell selected, click the Home tab (or the Formulas tab) and select AutoSum to have Excel enter in that cell the formula for adding all the values in the column.
Add the total amount of the Unearned Balances for each level (Contract, Equipment, and/or Meter Group) at which you are deferring revenue.
The remainder of this section is based on copying the Meter Group Level balance calculated above (150.00 in the example images) to the OBUnearnedBalances-Contract tab.
Verify the total amount of the Unearned Balances you are preparing to import, if applicable, on the OBUnearnedBalances-Contract, OBUnearnedBalances-EquipItem, and OBUnearnedBalances-MeterGroup tabs matches the Deferred Contract Revenue amount on the balance sheet from your legacy system.
Once you have verified the amounts match, delete any formulas and text you may have added to Columns E and F on the OBUnearnedBalances-Contract tab and to Column F on the OBUnearnedBalances-MeterGroup tab for the purpose of verifying balance totals.
Completing the ImportCompleting the Import
To import the data, do the following:
Verify you have entered on the Settings tab the filter settings you want to use for importing data. For more information, see the "Using the Settings Worksheet" section of this topic.
Click the [Import to e-automate] button.
The system displays the E-automate login window. Log in to e-automate.
The system displays the Confirm Database window. Do one of the following:
Click [Yes] to confirm the database selected for spreadsheet utility processing.
Click [No] to cancel and return to the spreadsheet utility.
Click [Change database] to select a different database. The system re-displays the e-automate login window.
If you clicked [Yes] in the previous step, the system begins the import validation process. When the import process completes, view the information in the following columns of the spreadsheet utility:
Status column:
Inserted: All rows of data were validated, and the data was inserted. If you see this status for all rows, the process is complete.
Not inserted: The system did not have sufficient, valid data to insert this row of data. See the Error message column for more information.
Error message column: Check to see if any errors are present. Use the information provided to make any corrections that may be necessary before attempting to re-import the data. See below for example messages:
[Blank]: The system did not detect any errors with inserting the data on this row.
***Invalid contract code: The value listed in the ContractNumber column is not a valid contract in e-automate. For acceptable values, log in to e-automate. From the e-automate toolbar, click [Contracts] to open the Service Contracts list window. Acceptable values are displayed in the Contract column.
***Invalid meter group: The meter group identified in the MeterGroup column is not on the contract identified in the ContractNumber column for this row in e-automate. You can only enter an unearned balance for a meter group if the specified meter group is on the specified contract in e-automate. For acceptable values, log in to e-automate. From the toolbar, click [Contracts] to open the Service Contracts list window. Locate the contract identified in the ContractNumber cell for this row. Click [Edit] to open the Edit Service Contract window for this contract. Select the Meter groups tab to bring it forward. Acceptable values are displayed in the Meter group column.
***Invalid Unearned Balance Adjustment value. Not numeric: The value listed in the Unearned Balance Adjustment column must contain only digits; it cannot contain non-numeric data, and it cannot be blank. Review the information for the column, and enter the appropriate value using only numeric data.
Post Action column: The system does not use this column on this tab.
Running the Balance Sheet in e-automate to Verify Your Deferred Contract Revenue Opening BalanceRunning the Balance Sheet in e-automate to Verify Your Deferred Contract Revenue Opening Balance
To verify your Deferred Contract Revenue opening balance in e-automate, do the following:
Log in to e-automate with appropriate permissions.
Click [Reports] to open the Report Console window.
In the left pane, click Standard reports.
In the right pane, double-click Balance Sheet to open the Balance Sheet window.
In the left pane of the Balance Sheet window, select Date/Period to display the Date/Period region in the right pane.
In the right pane, in the Date/Period region, select the Dates radio button.
In the Dates area, use the drop-down menu to select <All Dates>.
Click [OK] to run the report.
Verify the Deferred Contract Revenue opening balance in e-automate matches the Deferred Contract Revenue balance on your legacy system's balance sheet.
Importing Fixed AssetsImporting Fixed Assets
If you plan to use e-automate to perform depreciation calculations on Fixed Assets, you need to transfer your depreciation information when you transfer your Fixed Assets balance from your prior software system to e-automate. Use the information provided in this topic to import your fixed asset detail into e-automate. If you do not plan to use e-automate to perform depreciation calculations, you do not need to import fixed asset detail; you only need to do a balance sheet general ledger entry. If you have been using e-automate multiple months and your fixed asset depreciation calculations have been external to e-automate and then recorded in e-automate via a general journal entry, see the Importing Fixed Assets topic.
Fixed assets are traditionally carried on a company’s balance sheet and incrementally depreciated over the recovery period. Depreciation allows a company to post a credit to an accumulated depreciation account, thus reducing the value of fixed assets on the balance sheet and offsetting the depreciation against an expense account on the income statement. Depreciation occurs until the asset is fully depreciated or the asset is disposed of.
While you can enter your beginning fixed asset detail manually, using this utility's bulk import functionality will save you time. During this process, the system performs various checks to validate the data. If the system is not able to validate the data, the system lets you know which lines were inserted and which lines contain errors. If any errors are present, the Error Message column displays information to assist you with resolving the errors. The system does not import the rows with errors until you resolve the detected errors. When you resolve the errors, you can reprocess the import until you have imported the necessary data. Once the data is imported, you can run a balance sheet in e-automate to verify the Fixed Assets balance in e-automate matches the Fixed Assets balance in your legacy system.
Exporting Opening Balance Fixed Asset Data from e-automateExporting Opening Balance Fixed Asset Data from e-automate
Click the GLAssets tab to bring it forward.
Click the [Clear] button to remove any rows of data remaining from a previous export/import process that you no longer need.
Click [Export from e-automate] to export the opening balance fixed asset record data from your e-automate database.
The system displays the E-automate login window. Log in to e-automate.
The system displays the Confirm Database window. Do one of the following:
Click [Yes] to confirm the database selected for spreadsheet utility processing.
Click [No] to cancel and return to the spreadsheet utility.
Click [Change database] to select a different database. The system re-displays the e-automate login window.
If you clicked [Yes] in the previous step, the system populates the columns with the appropriate information from the records that meet your filter parameters.
Entering Opening Balance Fixed Asset DataEntering Opening Balance Fixed Asset Data
Using the following information, enter data as appropriate:
Status: Leave this field blank. The system updates this column during processing.
Error message: Leave this field blank. The system updates this column during processing.
Post Action: Leave this field blank. The system does not use this column on this tab.
AssetNumber: Number assigned to this fixed asset. You can enter (Next) in the AssetNumber column to have e-automate assign the next sequential asset number. Each fixed asset is required by e-automate to have a unique number, and the system will validate the number you enter against the asset numbers, if any, that currently exist in your e-automate database. For a list of existing values, log in to e-automate. Go to Accounting > Fixed assets > Fixed assets to open the Fixed Assets list window. Existing values are displayed in the Asset number column.
Description: Alphanumeric text (up to 128 characters) that further identifies this fixed asset. This field is required.
AssetCode: The asset code associated with this fixed asset. This code identifies the method for depreciating this asset. For acceptable values, log in to e-automate. Go to Tools > Lists and Codes to open the Lists and Codes window. In the Select a list or code type field, use the drop-down menu to select Fixed asset codes. Acceptable values are displayed in the Asset code column.
AssetDeprCode: Fixed asset depreciation code for this asset. For acceptable values, log in to e-automate. Go to Tools > Lists and Codes to open the Lists and Codes window. In the Select a list or code type field, use the drop-down menu to select Fixed asset depreciation codes. Acceptable values are displayed in the Asset depreciation code column.
Item: Item number, if any, assigned to the fixed asset you are identifying. The value you enter is validated against item numbers that currently exist in your e-automate database. For acceptable values, log in to e-automate. Click [Items] to open the Items list window. Acceptable values are listed in the Item column where the Active column contains a value of Yes (the Item record is active).
SerialNumber: Serial number associated with the fixed asset. This number should be the serial number associated with the item. If the item is on the equipment list, e-automate identifies the serial number when the equipment record is identified. For non-equipment or non-e-automate items, enter your serial number for the fixed asset.
EquipmentNumber: Equipment number associated with this asset. This is only for equipment that is in stock and has a current inventory value. The value you enter is validated against equipment numbers that currently exist in your e-automate database. For existing values, log in to e-automate. Click [Equipment] to open the Equipment list window. Acceptable values are displayed in the Equipment number column.
AcquiredDate: Date you acquired the fixed asset. The spreadsheet validates the value you enter is a date. This field is required.
ActivatedDate: Date the fixed asset began depreciating. The spreadsheet validates the value you enter is a date. This field is required.
DisposalDate: Disposal date for the fixed asset you want to track but not depreciate. Typically, this column will be blank. Once a fixed asset is disposed of, it is no longer depreciated. The spreadsheet validates the value you enter is a date.
DeprCycle: The frequency with which you depreciate this fixed asset. Typically, depreciation is cycled monthly. The value you enter is validated against depreciation cycles that currently exist in your e-automate database. For acceptable values, log in to e-automate. Go to Tools > Lists and Codes to open the Lists and Codes window. In the Select a list or code type field, use the drop-down menu to select Billing cycles. Acceptable values are displayed in the Billing cycle column. This field is required.
NextDeprDate: Start date of the next cycle during which you want to depreciate the fixed asset. The spreadsheet validates the value you enter is a date. This field is required.
CostOrBasis: Original monetary value of the fixed asset when purchased. For in-stock equipment, leave this field blank. When you transfer the equipment to a fixed asset warehouse, the value associated with the inventory will move to the fixed asset.
PriorYearAccumDeprBook: When using an accelerated depreciation method, 200% declining balance method or 150% declining balance method, the monetary amount by which this fixed asset has already been depreciated in the fiscal years prior to the DeprCycle date. Not populated if you are using the straight-line depreciation method. This field is not exported from e-automate; it is for import purposes only.
Current Year Accum Depr Book: When using an accelerated depreciation method, 200% declining balance method or 150% declining balance method, the monetary amount by which this fixed asset has been depreciated this year. Not populated if you are using the straight-line depreciation method. You should enter a positive amount here. The amount is entered by e-automate with the appropriate sign.
Accum Depr Tax: The monetary amount of accumulated depreciation that you have recorded for tax purposes. Doing so is optional for e-automate. You can track, book, and tax separately due to separate methods that allow different jurisdictions. Some jurisdictions allow more rapid depreciation for tax purposes than does Generally Accepted Accounting Principles (GAAP).
Salvage Value: The monetary value remaining in the asset once you have fully depreciated the asset.
Market Value: The market value of this fixed asset. The spreadsheet validates this value is a monetary amount.
Recovery Period Book: The number of periods over which you depreciate this fixed asset. The spreadsheet validates this value is an integer.
Recovery Period Tax: The number of periods you depreciate this fixed asset for tax purposes. This is optional for e-automate. The spreadsheet validates this value is an integer.
Location: Notes regarding the location of this fixed asset (e.g., Second floor, Reception desk). Leave this field blank if you enter an equipment number in the EquipmentNumber field for this row.
Active: Enter TRUE if this fixed asset is actively being depreciating. Enter FALSE if this fixed asset is actively being depreciating. TRUE and FALSE are the only acceptable values.
Quantity: Quantity of the fixed asset you have on hand. For non-serialized assets, enter the full quantity of the assets in one row. If you have multiple serial numbers for one fixed asset, you must add multiple lines with the same asset number and enter the unique serial number and a quantity of 1 for each row. This field is required.
Warehouse: The warehouse where the item is currently located. For acceptable values, log in to e-automate. Go to Inventory > Warehouses to open the Warehouse list window. Acceptable values are displayed in the Warehouse column where the Type column contains Fixed Asset. This field is required.
Bin: The bin where the item is currently stored. For acceptable values, log in to e-automate. Go to Inventory > Bins to open the Bins list window. Sort the Bin list by warehouse by clicking on the Warehouse column. Scroll through the list of bins to locate the warehouse you identified in the Warehouse cell. Acceptable values are displayed in the Bin column where the Stock type column contains Standard and matches the value identified in the Warehouse column. This field is required.
Branch: The company branch with which to associate this fixed asset. If your company does not use branches, enter Main in this cell. If you use branching, enter the number for the branch to which you want to import or export the equipment. For acceptable values if your company does use branches, log in to e-automate. Go to Accounting > Branches to open the Branches list window. Acceptable values are displayed in the Branch number column. This field is required.
Verifying the Opening Balance Fixed Asset Detail Total Amount Matches the Balance Sheet Total Amount from Your Legacy SystemVerifying the Opening Balance Fixed Asset Detail Total Amount Matches the Balance Sheet Total Amount from Your Legacy System
Verify the total amount of the opening balance detail you are importing into e-automate matches the opening balance listed on the balance sheet for the legacy system from which you are importing this detail. You can accomplish this by doing the following:
Sum the values in the CostOrBasis column. In the example image, this is done by positioning the cursor two cells below the last value in the CostOrBasis column and then, with this cell selected, clicking the Home tab (or the Formulas tab) and selecting AutoSum to have Excel enter in that cell the formula for adding all the values in the column.
Sum the values in the PriorYearAccumDeprBook and CurrentYearDeprBook columns. In the example image, this is done by positioning the cursor in Cell Q9 (the first cell with a value in the PriorYearAccumDeprBook column), dragging the cursor to the cell three cells below the last value in the CurrentYearDeprBook column, clicking the Home tab (or the Formulas tab), and then selecting AutoSum to have Excel display in the last selected cell of both columns the total amount for that column.
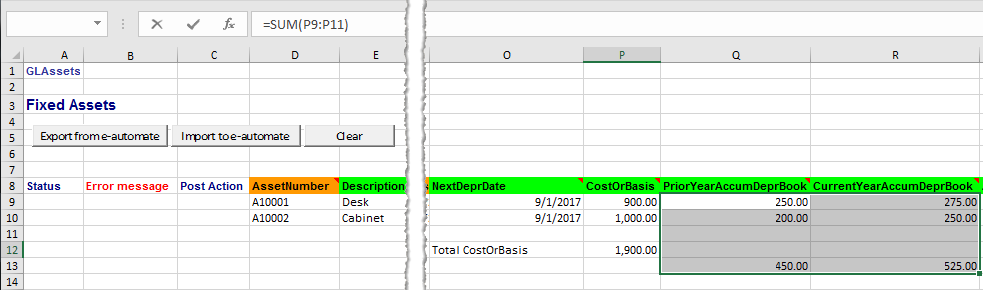
Then sum the total amounts in the PriorYearAccumDeprBook and CurrentYearDeprBook columns. In the example image, this is done by positioning the cursor in the cell in Column P directly below the cell displaying your Total CostOrBasis amount (Cell P13 in the sample image) and then entering a formula to sum the values in the PriorYearAccumDeprBook and CurrentYearDeprBook columns. In the example image, the formula is =(Q13+R13), where Q13 is the cell containing your PriorYearAccumDeprBook column's total and R13 is the cell containing your CurrentYearDeprBook column's total.
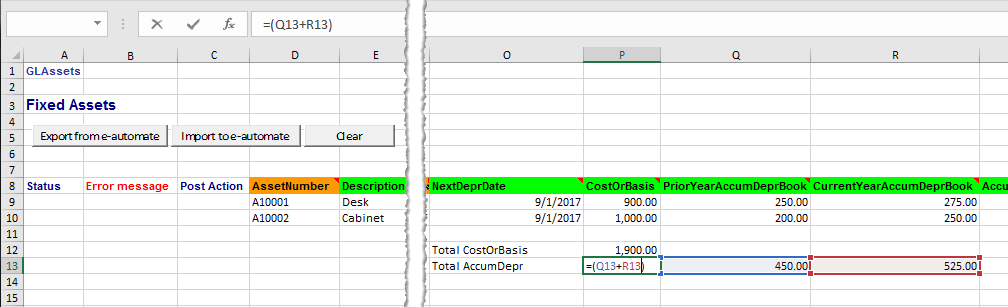
Then subtract the Total Accumulated Depreciation (Total AccumDepr) amount from the Total CostOrBasis amount to arrive at the Total Fixed Asset Balance. In the example image, this is done by positioning the cursor in the cell in Column P directly below the cell displaying your Total AccumDepr amount (Cell P14 in the sample image) and then entering a formula to subtract the Total AccumDepr amount from the Total CostOrBasis amount. In the example image, the formula is =(P12-P13), where P12 is the cell containing your Total CostOrBasis amount and P13 is the cell containing your Total AccumDepr amount.
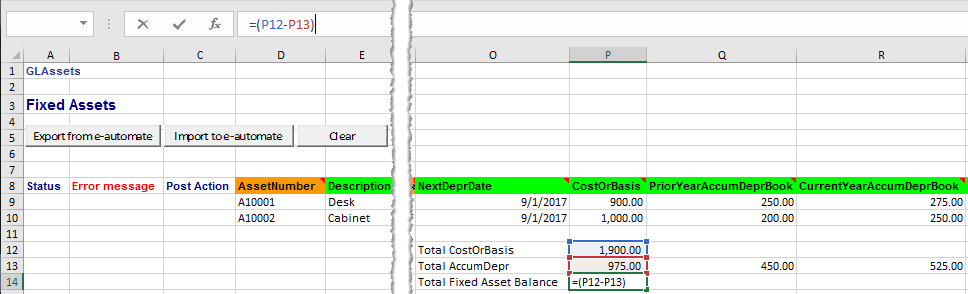
Using these values, verify the Total CostOrBasis, Total AccumDepr, and Total Fixed Asset Balance amounts for the detail you are preparing to import match the corresponding Fixed Asset amounts on the balance sheet from your legacy system.
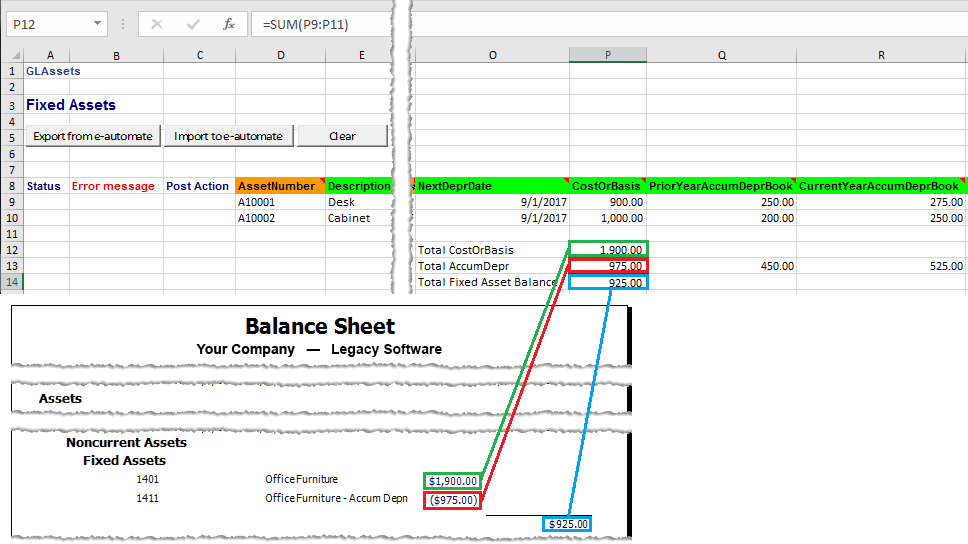
Once you have verified the amounts match, delete any formulas and text you added to Columns O through R.
Completing the ImportCompleting the Import
To import the data, do the following:
Verify you have entered on the Settings tab the filter settings you want to use for importing data. For more information, see the "Using the Settings Worksheet" section of this topic.
Click the [Import to e-automate] button.
The system displays the E-automate login window. Log in to e-automate.
The system displays the Confirm Database window. Do one of the following:
Click [Yes] to confirm the database selected for spreadsheet utility processing.
Click [No] to cancel and return to the spreadsheet utility.
Click [Change database] to select a different database. The system re-displays the e-automate login window.
If you clicked [Yes] in the previous step, the system begins the import validation process. When the import process completes, view the information in the following columns of the spreadsheet utility:
Status column:
Inserted: The system validated and inserted the row of data. If you see this status for all rows, the process is complete.
Not inserted: The system did not have sufficient, valid data to insert this row of data. See the Error message column for more information.
Error message column: Check to see if any errors are present. Use the information provided to make any corrections that may be necessary before attempting to re-import the data. See below for example messages:
[Blank]: The system did not detect any errors with inserting the data on this row.
***A fixed asset warehouse is required: The value listed in the Warehouse column is not identified as a fixed asset warehouse in e-automate, or the column is blank. For acceptable values, log in to e-automate. Go to Inventory > Warehouses. In the Inventory Warehouses list, acceptable values are displayed in the Warehouse column where the Type column displays Fixed Asset.
***Branch number is blank: The Branch column must contain a valid value. Enter Main if you do not use branching. If you use branching, enter the number for the branch to which you want to import or export the equipment. This field is required. For acceptable values (if you use branching), log in to e-automate. Go to Accounting > Branches to open the Branches list window. Acceptable values are displayed in the Branch number column.
***Invalid [AccumDeprTax / CostOrBasis / MarketValue / Quantity / RecoveryPeriodBook / RecoveryPeriodTax / SalvageValue] value. Not numeric: The value listed in the specified column must contain only digits; it cannot contain non-numeric data. Review the information for the column, and enter the appropriate value using only numeric data.
***Invalid [AcquiredDate/ActivatedDate/DisposalDate/NextDeprDate] value. Not a date: The value listed in the specified column does not represent a valid date. Correct the value in the date field as necessary.
***Invalid AcquiredDate: The AcquiredDate column cannot be left blank. Enter a valid date in this column to indicate when the fixed asset was acquired.
***Invalid ActivatedDate: The ActivatedDate column cannot be left blank. Enter a valid date in this column to indicate when the fixed asset was activated.
***Invalid Active value. Not true or false: The Active column contains an invalid value. TRUE and FALSE are the only acceptable values.
***Invalid asset code: The value listed in the AssetCode column is not a valid asset code in e-automate. For acceptable values, log in to e-automate. Go to Tools > Lists and Codes to open the Lists and Codes window. In the Select a list or code type field, use the drop-down menu to select Fixed asset codes. Acceptable values are displayed in the Asset code column.
***Invalid bin: The value listed in the Bin column is not a valid inventory bin in e-automate, or the column is blank. For acceptable values, log in to e-automate. Go to Inventory > Bins. On the Inventory Bins list window, sort the bins by Warehouse by clicking the Warehouse column. Scroll through the list of bins to locate the warehouse you plan to list in the Warehouse cell for this row. Where the Warehouse column matches the warehouse you plan to list in the Warehouse cell, the Bin column displays the acceptable values.
***Invalid depreciation code: The value listed in the AssetDeprCode column is not a valid asset depreciation code in e-automate. For acceptable values, log in to e-automate. Go to Tools > Lists and Codes to open the Lists and Codes window. In the Select a list or code type field, use the drop-down menu to select Fixed asset depreciation codes. Acceptable values are displayed in the Asset depreciation code column.
***Invalid description: The Description column cannot be left blank. Enter a description of this fixed asset in the Description column.
***Invalid recovery period book: The RecoveryPeriodBook column cannot be left blank. Review the information for this column, and enter an appropriate value in the RecoveryPeriodBook column.
***Invalid recovery period tax: The RecoveryPeriodTax column cannot be left blank. Review the information for this column, and enter an appropriate value in the RecoveryPeriodTax column.
***Invalid item: The value listed in the Item column is not a valid Item in e-automate, or the column is blank. For acceptable values, log in to e-automate. Go to Inventory > Items to open the Items list window. Acceptable values are displayed in the Item column.
***Invalid warehouse code: The value listed in the Warehouse column is not a valid fixed asset warehouse in e-automate, or the column is blank. For acceptable values, log in to e-automate. Go to Inventory > Warehouses. In the Inventory Warehouses list, acceptable values are displayed in the Warehouse column where the Type column displays Fixed Asset.
***Serialized item quantity must be 1: You can only list one serialized item per row so that you can specify the serial number for each item (one per row). Change the value in the Quantity column to 1, and list a separate row for each serialized item.
***Serial numbers not allowed for non-serialized items: The item number listed in the Item column for this row identifies a non-serialized item, but the spreadsheet contains a value in the SerialNumber column for this row. To correct this error, remove the value from the SerialNumber column for this row. You cannot specify a serial number for a non-serialized item.
***This item and serial number is already associated with an asset: The item-and-serial-number combination you have listed on this row already exists as a fixed asset in e-automate database and cannot be re-imported.
Error while trying to insert: System.ApplicationException: The conversion of a varchar data type to a datetime data type resulted in an out-of-range value....: The NextDeprDate column cannot be left blank. Review the information for the column, and enter a valid date in this column.
Error while trying to insert: System.ApplicationException: The INSERT statement conflicted with the FOREIGN KEY constraint "FK_GLAssets_DeprCycleID_SCBillingCycles"....: The value listed in the DeprCycle column is not a valid asset depreciation cycle in e-automate, or the column is blank. For acceptable values, log in to e-automate. Go to Tools > Lists and Codes to open the Lists and Codes window. In the Select a list or code type field, use the drop-down menu to select Fixed asset depreciation codes. Acceptable values are displayed in the Asset depreciation code column.
Post Action column: The system does not use this column on this tab.
Running the Balance Sheet in e-automate to Verify Your Beginning Fixed Asset BalanceRunning the Balance Sheet in e-automate to Verify Your Beginning Fixed Asset Balance
To verify your beginning inventory balance in e-automate, do the following:
Log in to e-automate with appropriate permissions.
Click [Reports] to open the Report Console window.
In the left pane, click Standard reports.
In the right pane, double-click Balance Sheet to open the Balance Sheet window.
In the left pane of the Balance Sheet window, select Date/Period to display the Date/Period region in the right pane.
In the right pane, in the Date/Period region, select the Dates radio button.
In the Dates area, use the drop-down menu to select This Month to Date. This option will populate the From field with the first day of the month and the To field with the current date.
Click [OK] to run the report.
Verify the beginning inventory balance in e-automate matches the inventory balance on your legacy system's balance sheet.
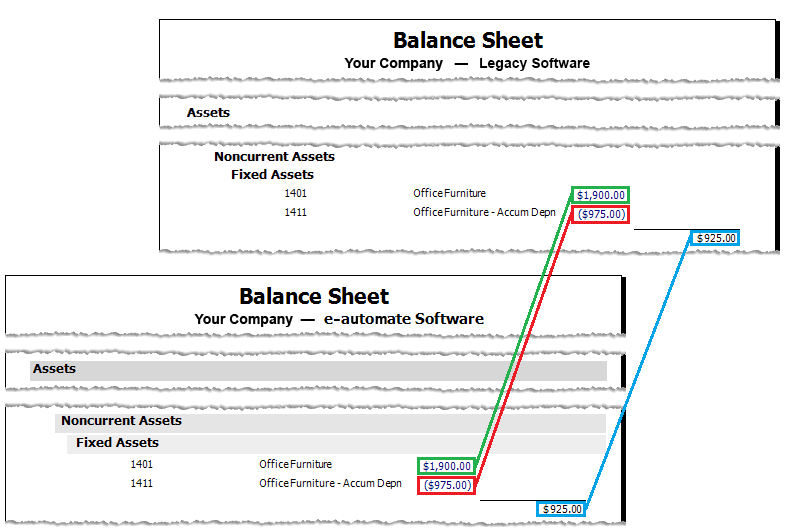
Importing Contract Detail LeasesImporting Contract Detail Leases
You use the Contract Detail Leases worksheet to import equipment and item sublease detail for accrual contracts that have an unearned balance at the contract level. Prior to importing this detail, you must have the following information set up in e-automate:
The contract record must be set up in e-automate.
The contract record's Billing method must be set to Installment.
The contract record must be set up as an accrual contract.
The contract record's Lease mode must be set to Equipment Lease Amortization.
The equipment or item covered by the sublease must be added to the table on the Contract record's Equipment/Item tab.
The contract record's Billed through date must be set.
For more information on setting up the items listed above, see the Creating Installment-based Billing Contracts topic.
Exporting Contract Sublease Detail from e-automateExporting Contract Sublease Detail from e-automate
Click the SCContractDetailLeases tab to bring it forward.
Click the [Clear] button to remove any rows of data remaining from a previous export/import process that you no longer need.
Click [Export from e-automate] to export the Contract Sub Lease Detail data from your e-automate database.
The system displays the E-automate login window. Log in to e-automate.
The system displays the Confirm Database window. Do one of the following:
Click [Yes] to confirm the database selected for spreadsheet utility processing.
Click [No] to cancel and return to the spreadsheet utility.
Click [Change database] to select a different database. The system re-displays the e-automate login window.
If you clicked [Yes] in the previous step, the system populates the columns with the appropriate information from the records that meet your filter parameters.
Entering Contract Sublease DetailEntering Contract Sublease Detail
Using the following information, enter data as appropriate:
Status: Leave this field blank. The system updates this column during processing.
Error message: Leave this field blank. The system updates this column during processing.
Post Action: Leave this field blank. The system does not use this column on this tab.
Lease Number: The number of a lease, assigned by a leasing company, to which you want to import an equipment sublease. This lease number must already exist for the contract on the Lease tab of the Edit Service Contract window in Contracts. For acceptable values, log in to e-automate. From the e-automate toolbar, click Service > Leases to open the Leases list window. Acceptable values appear in the Lease number column.
LeaseCode: Lease code associated with this contract. This lease code must already exist for the contract on the Lease tab of the Edit Service Contract window in Contracts. For acceptable values, log in to e-automate. Go to Tools > Lists and Codes to open the Lists and Codes window. In the Select a list or code type field, use the drop-down menu to select Contract lease code. The Contract code column displays the acceptable values.
SubLeaseNumber: The number you want to assign to this equipment sublease. Do not include in this field the Rev [revision] number of the sublease. You can enter (Next) to have e-automate assign the next available sublease number.
SubLeaseRevision: The revision number you want to assign to this sublease. Typically, this number would be 01 for first-time leases, but you can modify this number as necessary.
ContractNumber: The full number of the contract (e.g., CT10001-01, where CT10001 is the Contract number and 01 is the contract's Rev [revision] number) to which you want to add this equipment sublease. This contract must already exist in e-automate, and Lease mode must be set to Equipment Lease Amortization on the Billing/Contact tab of the Edit Service Contract window in Contracts. For acceptable values, log in to e-automate. On the e-automate main menu, click [Contracts] to open the Service Contracts window. The Contract column displays the acceptable values.
EquipmentNumber: The number identifying the equipment for which you want to add a sublease to an existing contract. The equipment must already be added to the Equipment/Item tab of the Edit Service Contract window in Contracts in e-automate. For acceptable values, log in to e-automate. On the e-automate main menu, click [Contracts] to open the Service Contracts window. Locate the contract identified in the ContractNumber cell for this row. Click [Edit] to open the Edit Service Contract window for this contract. Select the Equipment/Item tab to bring it forward. The Equipment/Item tab displays the acceptable values.
Make: The make that is associated with this model. For acceptable values, log in to e-automate. Go to Inventory > Makes to open the Makes list window. The Make column displays the acceptable values.
Model: A unique number identifying a particular model. For acceptable values, log in to e-automate. Go to Inventory > Models to open the Models list window. The Model column displays the acceptable values.
Serial Number: The unique serial number assigned to the equipment for which you want to add a sublease to an existing contract. For acceptable values, log in to e-automate. On the e-automate main toolbar, click [Equipment] to open the Equipment window. The Serial number column displays the acceptable values. If you are adding a sublease for an item that is not serialized, leave this cell blank.
Asset Number: The unique alphanumeric number, if any, that identifies this fixed asset. The import validation prevents duplicate fixed asset numbers.
Item: The number identifying the non-serialized item for which you want to add a sublease to an existing contract. The non-serialized item must already be added to the Equipment tab of the Edit Service Contract window in Contracts in e-automate. For acceptable values, log in to e-automate. On the e-automate main menu, click [Contracts] to open the Service Contracts window. Locate the contract identified in the ContractNumber cell for this row. Click [Edit] to open the Edit Service Contract window for this contract. Select the Equipment/Item tab to bring it forward. The Equipment/Item tab displays the acceptable values.
LocationCustomer: If this customer is a child customer (customer that has a separate location from its main office), enter the child customer's customer number in this field. For acceptable values, log in to e-automate. On the e-automate main toolbar, click [Customers] to open the Customers window. The Number column displays the acceptable values.
Lease Financed Amount: The total monetary amount financed by the customer.
Lease Payment Amount: The monetary amount due per billing period from the customer for this sublease.
Lease Rate Factor: The percentage used to calculate the lease payment amount and interest rate. Enter the percentage as a decimal amount. For example, for a lease rate factor of 4.5%, enter .045 in this cell.
Lease Interest Rate: The percentage of the loan amount you are charging as interest for the loan. Enter the percentage as a decimal amount. For example, for an interest rate of 7.5%, enter .075 in this cell.
Start Date: The Start date listed on the Edit Service Contract window in e-automate for the contract identified in the ContractNumber cell for this row. To verify the value in e-automate, log in to e-automate. On the e-automate main menu, click [Contracts] to open the Service Contracts window. Locate the contract identified in the ContractNumber cell for this row. Click [Edit] to open the Edit Service Contract window for this contract. The Start date field displays the date to enter in this cell for this row.
Lease Term Start Date: The date on which the sub lease begins for the equipment or item on the contract.
Lease Term: The number of sublease billing periods that have not yet been billed.
End Date: The date on which the sublease ends.
Unearned Lease/Preterm Balance: The unearned interim rent in the Revenue or Current Liability account associated with this lease for the pre-term lease prior to the principal/interest billings. This amount is required if the contract is an accrual contract (unless the contract is a monthly contract and no accrual is required).
Unearned Interest Balance: The unearned interest balance in the Current Liability account associated with this lease that has been billed using your prior software system but that has not been recognized (accrued/deferred) in e-automate as of your go-live date. This amount is required if the contract is an accrual contract (unless the contract is a monthly contract and no accrual is required).
Unearned Lease Post Term Balance: The unearned interim rent in the Revenue or Current Liability account associated with this lease for the post-term lease after the principal/interest billings. This amount is required if the contract is an accrual contract (unless the contract is a monthly contract and no accrual is required).
Lease Principal Balance: The lease principal balance that has not yet been billed through your previous software system. This amount should be the principal balance on the amortization schedule for the current billing cycle.
Base Billed Through Date: The last date the lease was billed using your previous software system.
Branch Number: The company branch with which to associate this sublease. If your company does not use branches, enter Main in this cell. For a list of acceptable values if your company does use branches, log in to e-automate. Go to Accounting > Branches to open the Branches list window. The Branch number column lists the acceptable values.
Lease Distribution Code: A code that determines how the amounts, if any, for pre-term, post term, principal, and interest are distributed to the general ledger. For acceptable values, log in to e-automate. Go to Tools > Lists and Codes to open the Lists and Codes window. In the Select a list or code type field, use the drop-down menu to select Contract distribution codes - lease. The Lease distribution code column displays the acceptable values.
Tax Code: The tax code assigned to the customer on the sublease. For acceptable values in the Tax Code column, log in to e-automate and go to Tools > Lists and Codes to open the List and Codes window. In the Select a List or Code Type field, use the drop-down menu to select Tax codes. Acceptable values are displayed in the Tax code column.
Combine With Parent Base Amount: Enter TRUE to indicate the sublease payment amount should be rolled together with the base amount on the invoice, or enter FALSE if the sublease payment amount should be listed separately from the base amount on the invoice. TRUE and FALSE are the only acceptable values.
Notes: Alphanumeric text containing additional notes about this equipment or item sublease. These notes are displayed on the Notes module for the Edit Lease for Equipment [Equipment Number] window in Contracts.
Lease Principal Balance Import Mode: Enter 1, 2, or 3 based on the following:
1 = Strict: Import this sublease ONLY if the LeasePrincipalBalance entry for this row matches exactly the lease principal balance e-automate calculates based on the information provided.
2 = Flexible: Import this sublease ONLY if the LeasePrincipalBalance entry for this row matches exactly the lease principal balance e-automate calculates or an expected lease principal balance or the next billing cycle based on the information provided.
3 = Override: Always import the lease principal balance e-automate calculates based on the information provided.
Inserted Principal Balance: When Lease Principal Balance Import Mode is set to option 3 (Override) and the principal balance e-automate calculated based on the information provided does not match exactly the amount entered in the Lease Principal Balance column for this row, this column lists the principal balance e-automate calculated and imported for this row.
Verifying the Total Amount of the Unearned Principal and Unearned Interest Balances Match the Total Amount of the Unearned Principal and Unearned Interest Balances on Any Applicable Contract Revenue Status Reports from Your Legacy SoftwareVerifying the Total Amount of the Unearned Principal and Unearned Interest Balances Match the Total Amount of the Unearned Principal and Unearned Interest Balances on Any Applicable Contract Revenue Status Reports from Your Legacy Software
If all your leases bill monthly and you have a report showing the sum of the lease principal balances from your legacy software as of the Go-live Transitional Transaction Date you list on the Settings tab of this utility when processing the report, you can verify the sum of the LeasePrincipalBalance column matches the sum of the lease principal balances from that report.
If any of your leases bill for a term other than monthly (e.g., quarterly), then—in addition to verifying the lease principal balance—you would also want to verify the sum of the UnearnedInterestBalance column matches the sum of the unearned interest balances from your legacy software as of the Go-live Transitional Transaction Date you list on the Settings tab of this utility when processing the report.
To verify one or both of these balances, do the following:
Click in the first empty cell below the data in the LeasePrincipalBalance column.
With this cell selected, click the Home tab (or the Formulas tab) and select AutoSum to have Excel enter in that cell the formula for adding all the values in the column. The calculated value should match the sum of the lease principal balances from your legacy software.
If applicable, click in the first empty cell below the data in the UnearnedInterestBalance column.
With this cell selected, click the Home tab (or the Formulas tab) and select AutoSum to have Excel enter in that cell the formula for adding all the values in the column. The calculated value should match the sum of the unearned interest balances from your legacy software.
Once you have verified the amounts match, delete any formulas and text you may have added to Columns AA (the LeasePrincipalBalance column) and Y (the UnearnedInterestBalance column) on the SCContractDetailLeases tab for the purpose of verifying balance totals.
Completing the ImportCompleting the Import
To import the data, do the following:
Verify you have entered on the Settings tab the filter settings you want to use for importing data. For more information, see the "Using the Settings Worksheet" section of this topic.
Click the [Import to e-automate] button.
The system displays the E-automate login window. Log in to e-automate.
The system displays the Confirm Database window. Do one of the following:
Click [Yes] to confirm the database selected for spreadsheet utility processing.
Click [No] to cancel and return to the spreadsheet utility.
Click [Change database] to select a different database. The system re-displays the e-automate login window.
If you clicked [Yes] in the previous step, the system begins the import process. When the import process completes, view the information in the following columns of the spreadsheet utility:
Status column:
Inserted: The system inserted a new sublease detail record.
Not inserted: The system did not have sufficient, valid data to insert a new sublease detail record. See the Error message column for more information.
Error message column: Check to see if any errors are present. Use the information provided to make any corrections that may be necessary before attempting to re-import the data. See below for example messages:
[Blank]: The system did not detect any errors with inserting the data on this row.
***[InvalidLeasePrincipalBalanceImportMode...: If you enter a monetary amount other than zero (0) in the LeaseFinancedAmount and/or LeasePrincipalBalance cells for this row, you must enter a selection in the Lease Principal Balance Import Mode cell for this row. See the help for the Lease Principal Balance Import Mode field, and enter an appropriate selection.
***Invalid [BaseBilledThroughDate / EndDate / LeaseTermStartDate / StartDate / WarrantyDate] value: Not a date: The value listed in the specified column must be in date format. Review the information for the column, and enter the appropriate value.
***Invalid [LeaseFinancedAmount / LeaseInterestRate / LeasePaymentAmount / LeasePrincipalBalance / LeaseRateFactor / UnearnedInterestBalance / UnearnedLease/PreTermBalance / UnearnedLeasePostTermBalance / WarrantyMeter] value. Not numeric: The value listed in the specified column must contain only digits; it cannot contain non-numeric data. Review the information for the column, and enter the appropriate value using only numeric data.
***Invalid branch: The value listed in the Branch column is not a valid Branch in e-automate. If you are not using branching, enter Main in this column for each row. If you use branching, enter the number identifying the branch associated with this equipment. For acceptable values (if you use branching), log in to e-automate. Go to Accounting > Branches to open the Branches window. Acceptable values are displayed in the Branch column.
***Invalid CombineWithParentBaseAmount value: Not true or false: The value listed in the CombineWithParentBaseAmount cell can only be TRUE or FALSE. Review the information for the column, and enter the appropriate value.
***Invalid contract number: The value listed in the ContractNumber cell is not a valid Contract Number in e-automate, or the cell is blank. For acceptable values, log in to e-automate. On the e-automate main menu, click [Contracts] to open the Service Contracts window. The Contract column displays the acceptable values.
***Invalid Equipment/Item or Contract Number -- Could not find a Contract with the Equipment/Item: The equipment or item for which you want to import sublease detail must already exist on a contract in e-automate. This message indicates the equipment or item you identified on this row does not exist on the contract you identified for this row. For equipment, verify the values in the EquipmentNumber cell (or Make, Model, and Serial cells) identify equipment that already exists on the contract identified by the ContractNumber listed for this row. For an item, verify the values in the Item and LocationCustomer cells identify an item that already exists on the contract identified by the ContractNumber listed for this row.
***Invalid item: The value listed in the Item column is not a valid Item in e-automate. For acceptable values, log in to e-automate. Go to Inventory > Items to open the Items list window. Acceptable values are displayed in the Item column.
***Invalid lease code: The value specified in the LeaseCode column is not a valid Lease Code in e-automate. For acceptable values, log in to e-automate. Go to Tools > Lists and Codes to open the Lists and Codes window. In the Select a list or code type field, use the drop-down menu to select Contract lease code. The Contract code column displays the acceptable values.
***Invalid lease distribution code: The value specified in the LeaseCode column is not a valid Lease Distribution Code in e-automate. For acceptable values, log in to e-automate. Go to Tools > Lists and Codes to open the Lists and Codes window. In the Select a list or code type field, use the drop-down menu to select Contract distribution codes - lease. The Lease distribution code column displays the acceptable values.
***Invalid Location Customer Number: The value listed in the LocationCustomer column is not a valid Customer in e-automate. For acceptable values, log in to e-automate: Go to People > Customers to open the Customers window. Acceptable values are displayed in the Number column.
***Invalid Make, Model, or Serial Number: The values in the Make, Model, and SerialNumber cells do not identify a valid piece of equipment in e-automate. For acceptable values in the Make cell, log in to e-automate. Go to Inventory > Makes to open the Makes list window. The Make column displays the acceptable values. For acceptable values in the Model cell, log in to e-automate. Go to Inventory > Models to open the Models list window. The Model column displays the acceptable values. For acceptable values in the SerialNumber cell, log in to e-automate. On the e-automate main toolbar, click [Equipment] to open the Equipment window. The Serial number column displays the acceptable values. If you are adding a sublease for an item that is not serialized, leave this cell blank.
***Invalid Master Lease or Contract -- Master Lease Does not match the Lease on the Contract: The value listed in the LeaseNumber column must match the value listed on the Lease tab of the Edit Service Contract window in e-automate for the contract identified by the ContractNumber listed for this row. Verify you have listed the correct values in the LeaseNumber and ContractNumber cells for this row.
***Principal balance must be zero if there is no term: Verify you have entered in the LeaseTerm cell the appropriate number of billings remaining in the sublease. If the value in the LeaseTerm field is zero or the cell is blank, you cannot have a value other than zero in the LeasePrincipalBalance cell.
***This Sub-Lease Number is already in use -- Updates are not currently supported: The values listed in the LeaseNumber, SubLeaseNumber, and SubLeaseRevision cells for this row match the values in an existing equipment/item sublease in e-automate for the contract identified in the ContractNumber cell for this row. This utility is not designed to allow you to identify an existing sublease to update; it used only for importing new records. Since the record already appears to exist in e-automate, this utility does not import data to create a record that already appears to exist. To view existing subleases for this contract in e-automate, log in to e-automate. On the e-automate main menu, click [Contracts] to open the Service Contracts window. Locate the contract identified in the ContractNumber cell for this row. Click [Edit] to open the Edit Service Contract window for this contract. Select the Equipment/Item tab to bring it forward. For each equipment/item listed, click the [Edit] to open the Edit Contract Equipment/Item window. Select the Leases tab to bring it forward. The Lease number column displays the existing lease numbers.
***You must specify either an Equipment or an Item And Location: To identify the equipment for which you want to import sublease detail, you must enter values in the EquipmentNumber field or the Make, Model, and Serial cells. To identify the item for which you want to import sublease detail, you must enter values in the Item and LocationCustomer cells.
Post Action column: The system does not use this column on this tab.
Clearing Data from the SpreadsheetClearing Data from the Spreadsheet
All tabs except for the Settings tab have a [Clear] button. When you click the [Clear] button on any tab, the system clears the entered data from that tab only; it does not clear data on other tabs, including the default values entered on the Settings tab. Before using this feature, make sure you want to clear the data from a selected tab. You do not want to lose information you have spent time entering and have not imported. When ready, do the following:
Click the tab of the worksheet from which you want to clear data.
Click [Clear] to clear data from the selected worksheet.
©2025 ECI and the ECI logo are registered trademarks of ECI Software Solutions, Inc. All rights reserved.