Using the Inventory Item Utility Spreadsheet
The Inventory Item utility spreadsheet (InventoryItemUtil.xls) is a tool that allows you to easily and quickly edit or modify inventory information that currently exists in your e-automate database. The Inventory Item Utility Spreadsheet allows you to export your existing inventory data, make changes to the data, validate that the data complies with e-automate rules and import the changes back into e-automate with the modifications you have made.
Using the Inventory Item Utility Spreadsheet, you can edit and update select fields for the following information:
Inventory Items
Inventory Item Prices
Inventory Item Vendors
Bin Defaults
Related Inventory Items
Inventory Items Min and Max
Customer Pricing for Inventory Items
Each worksheet in the spreadsheet has four buttons, [Export from e-automate], [Validate], [Insert and Update] and [Clear Data]. You use [Export from e-automate] to export data from the respective data fields in your e-automate database to the spreadsheet. You use [Validate] to make sure the data complies with e-automate rules and can be imported back into your e-automate database. When you click [Validate], the Post Action column displays if the entry will be inserted or updated upon import. The Error Message column displays errors if any occur. You use [Insert and Update] to insert the inventory data with the changes you made from the spreadsheet back into the respective data fields in your e-automate database. You use [Clear Data] to clear the worksheet of all entered data.
Each worksheet is pre-configured to work in conjunction with e-automate. You can only use the spreadsheet on a computer in which e-automate is installed and which can access the e-automate server through the network. You cannot change the spreadsheet column names, re-arrange the column order, insert columns, remove columns or change the spelling of the columns. When making changes to data you have exported into the Inventory Item Utility Spreadsheet, heed field lengths, and validated field requirements. You can use the copy, paste, auto-fill or any other Excel feature necessary to modify inventory information on the worksheets. If you choose to hide columns you should unhide them before attempting the insert. You do not have to populate fields that are not required.
Each worksheet, except the Settings worksheet, contains three columns on the left (A, B and C) labeled Status, Error Message and Post Action. Do not enter any information into these columns. The rows in these columns are automatically populated by e-automate when the import or export is completed or attempted. The Status column tells you if your import was successful or unsuccessful. If an import was unsuccessful the Error Message column displays an error explaining the problem. The Error Message column also displays errors, if any, after you click [Validate]. You must resolve the errors reported in the Error Message column to import the information in those rows into e-automate. When you are ready to import the new or edited information, click [Validate] and the Post Action column displays whether action taken on this entry is an update or insert. The Error Message column displays error messages, if any. If the item number currently exists in your e-automate database the spreadsheet performs an update. If the item number does not currently exist in your e-automate database the spreadsheet will perform an insert. You may need to log in to e-automate and determine acceptable values for some of the fields. You can sort your spreadsheet by the Status column if it is more convenient for you to see the rows with errors. Be sure to select all the rows and columns of data when you sort. Once you have made your changes to the rows with errors you are ready to try inserting the failed records into the e-automate database again by clicking [Insert and Update]. The Inventory Item Utility Spreadsheet skips all rows that were previously imported successfully and re-validates the rows that previously produced errors. If the records now meet the e-automate database requirements they are imported. Repeat the above process, reviewing the Error Messages column and making appropriate changes, until you have imported all of your edited inventory information.
To begin modifying inventory information currently existing in your e-automate database with the spreadsheet, you must first complete the Settings tab. On the Settings tab there are filters you can use to limit items you want to export from your e-automate database for editing. The Inventory Item Utility Spreadsheet does not require a password so you can consider placing a password on your Excel file using Excel functionality.
Remember to continually save your spreadsheet as you are entering data. Saving frequently reduces the risk of losing data due to circumstances beyond your control such as your system freezing or a power outage.
Getting to the TransactionGetting to the Transaction
If you installed e-automate on the server or on a per-machine basis in the default location, the InventoryItemUtil.xls file should be located at: C:\Program Files (x86)\ECi\e-automate\Utilities.
If you installed e-automate on a per-user basis in the default location, the InventoryItemUtil.xls file should be located at: C:\Users\UserName\AppData\Local\ECi\e-automate\Utilities.
If you did not install e-automate in the default location, locate the e-automate directory. The InventoryItemUtil.xls file should be located in the Utilities directory found within the e-automate directory.
Using Excel, open the InventoryItemUtil.xls spreadsheet.
Enabling MacrosEnabling Macros
To process data using this spreadsheet utility, you must enable the spreadsheet utility's macros in Excel.
If you have macros disabled in Excel, a security warning appears below the Excel ribbon (or below the menu bar if the ribbon is hidden), indicating active content/macros have been disabled.
ECI has digitally signed the spreadsheet utilities on this release, and you can mark ECI as a trusted publisher of Excel files. If you mark ECI as a trusted publisher of Excel files, you will no longer see the macro security warning. For more information, see the Trusting Excel File Macros from ECI topic.
Use a process similar to the following (based on your version of Excel) to enable active content/macros for this spreadsheet utility:
In Excel, click [Enable Content] to allow the active content/macros to run when you process this spreadsheet utility.
If the system displays a security warning,...
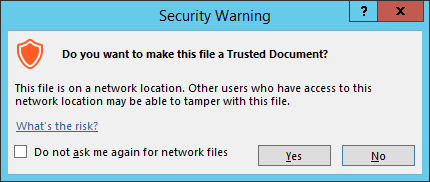
... click [Yes] to prevent the system from displaying the [Enable Content] message in the future when opening this document or click [No] to have the system redisplay the [Enable Content] message each time you open this document.
In Excel, active content/macros are typically disabled as a security precaution. If you do not see a security warning below the Excel ribbon (or below the menu bar if the ribbon is hidden), you can use the following process to set a "disable all macros with notification" option, allowing you to indicate when you want to allow active content/macros to run:
Open Excel.
Click File > Options to open the Excel Options window.
In the left pane of the Excel Options window, click [Trust Center] to reveal the appropriate options in the right pane.
In the right pane of the Excel Options window, click [Trust Center Settings] to open the Trust Center window.
In the left pane of the Trust Center window, click [Macro Settings] to display the Macro Settings options in the right pane.
In the Trust Center window, select the Disable all macros with notification radio button.
Click [OK] to close the Trust Center window.
Click [OK] to close the Excel Options window.
Close and reopen Excel in order for the new settings to take effect. A security dialog box should appear beneath the Office ribbon the next time you attempt to run a spreadsheet that contains macros.
Using the Settings WorksheetUsing the Settings Worksheet
To filter the list of items you want to export from e-automate, do the following:
Click the Settings worksheet tab to bring it forward.
In the Include All Sales Codes cell, enter Yes in cell B4 to include all sales codes or enter No in cell B4 to not include all sales codes in the list of items you are exporting to edit.
In the Included Sales Codes cell, if you entered No in cell B4 for Include All Sales Codes, enter the sales codes you want to include on the inventory item list for editing in the cells in column B below Included Sales Codes. When entering the sales codes from e-automate use the sales code, not the sales code description.
In the Include All Service Codes cell, enter Yes in cell C4 to include all sales codes or enter No in cell C4 to not include all service codes in the list of items you are exporting to edit.
In the Included Service Codes cell, if you entered No in cell C4 for Include All Service Codes, enter the service codes you want to include on the inventory item list for editing in the cells in column C below Included Service Codes. When entering the service codes from e-automate use the service code, not the service code description.
In the Include All Inventory Codes cell, enter Yes in cell D4 to include all inventory codes, or enter No in cell D4 to not include all inventory codes in the list of inventory items you are exporting to edit.
In the Included Inventory Codes cell, if you entered No in cell D4 for Include All Inventory Codes, enter the inventory codes you want to include on the list for editing in the cells in column D below Included Inventory Codes.
In the Include All Equipment Codes cell, enter Yes in cell E4 to include all sales codes, or enter No in cell E4 to not include all equipment codes in the list of inventory items you are exporting to edit.
In the Included Equipment Codes cell, if you entered No in cell E4 for Include All Equipment Codes, enter the equipment codes you want to include on the list for editing in the cells in column E below Included Equipment Codes.
In the Include All Categories cell, enter Yes in cell F4 to include all item categories, or enter No in cell F4 to not include all item categories codes in the list of inventory items you are exporting to edit.
In the Included Categories cell, if you entered No in cell F4 for Include All Categories, enter the item categories you want to include on the list for editing in the cells in column F below Included Categories.
In the Item cell, C27, enter any part of an item number. Only items with item numbers containing the value you enter export into the spreadsheet.
In the Description cell, C28, enter any part of an item description. Only items with descriptions containing the value you enter export into the spreadsheet.
In the Average Cost cells, enter an average cost range for items you want to export to edit. In the From column, cell C 31, enter the beginning dollar amount for the average cost range. In the To column, cell D 31, enter the ending dollar amount for the average cost range.
In the On Hand Qty cells, enter an on-hand quantity range for items you want to export to edit. In the From column, cell C32, enter the beginning amount for the On Hand Quantity range. In the To column, cell D32, enter the ending amount for the On Hand Quantity range
In the Serialized cell, C35, enter Yes to include only serialized items, enter No to include only non-serialized items, or leave blank to include both serialized and non-serialized items on your list of inventory items to edit.
In the Active cell, C36, enter Yes to include active inventory items or No to include non-active inventory items on your list of inventory items to edit.
Inserting and Updating Inventory ItemsInserting and Updating Inventory Items
When you insert new records using the Insert and Update Items tab, the system uses the values you specify in all columns for each row. When you update existing records using the Insert and Update Items tab, the system only uses the values you specify in the following columns for each row to modify existing records:
Description
Category
Default_Price
UPC
Active (When none of the items are allocated and in stock)
Standard_Cost
OutCostGroup
Use_Specific_Base_Outcost
Specific_Base_OutCost
Exporting Item Data from e-automateExporting Item Data from e-automate
Verify you have entered on the Settings tab the filter settings you want to use for exporting data. For more information, see the "Using the Settings Worksheet" section of this topic.
Click the Insert and Update Items tab to bring it forward.
Click the [Clear] button to clear any rows of item record data that may have been left from a previous export.
Click [Export from e-automate] to export the item record data from your e-automate database.
The system displays the E-automate login window. Log in to e-automate.
The system displays the Confirm Database window. Do one of the following:
Click [Yes] to confirm the database selected for spreadsheet utility processing.
Click [No] to cancel and return to the spreadsheet utility.
Click [Change database] to select a different database. The system re-displays the e-automate login window.
If you clicked [Yes] in the previous step, the system populates the columns with the appropriate information from the item records that meet your filter parameters.
Entering and Updating Item DataEntering and Updating Item Data
Using the following information, enter and/or update data as appropriate:
Status: Leave this field blank. The system updates this column during processing.
Error message: Leave this field blank. The system updates this column during processing.
Post Action: Leave this field blank. The system updates this column during processing.
Item: The number (up to 255 characters) assigned to the specific item. This value is validated against item numbers that currently exist in your e-automate database and other item numbers you enter on the worksheet. If this item number does not exist in e-automate, the system will attempt to use the data on this row to create a new item record in e-automate. If this item number does exist in e-automate, the system will attempt to use the data on this row to update the existing record in e-automate. For acceptable values in the Item column when updating existing item records, log in to e-automate and go to Inventory > Items. In the Items list, acceptable values are displayed in the Item column. This field is required.
Description: Alphanumeric text (up to 255 characters) that further identifies this item.
Serialized: Enter TRUE if you use serial numbers with this item number to track each specific item, or enter FALSE if you do not use serial numbers to track this item.
StockingUnit: Code for the unit of measure in which you generally sell this item. For acceptable values, log in to e-automate. Go to Tools > Lists and Codes to open the List and Codes window. In the Select a list or code type field, use the drop-down menu to select Inventory Units of Measure. Acceptable values are displayed in the Unit column.
Category: Item category code associated with this item, up to 15 characters. For acceptable values, log in to e-automate. Go to Tools > Lists and Codes to open the List and Codes window. In the Select a list or code type field, use the drop-down menu to select Item Category. Acceptable values are displayed in the Category column.
InventoryCode: Inventory code associated with this item. Any item you intend to value as an inventory asset must have an inventory code. Items need inventory codes to be counted, transferred, stocked, or purchased. For acceptable values, log in to e-automate. Go to Tools > Lists and Codes to open the List and Codes window. In the Select a list or code type field, use the drop-down menu to select Inventory Code. Acceptable values are displayed in the Inventory Code column.
SalesCode: Sales code associated with this item. Sales codes define which revenue, cost of goods sold and unearned revenue accounts to associate with an inventory item. For acceptable values, log in to e-automate. Go to Tools > Lists and Codes to open the List and Codes window. In the Select a list or code type field, use the drop-down menu to select Sales Code. Acceptable values are displayed in the Sales Code column.
ServiceCode: Service code associated with this item. Service codes link the revenue and cost of goods sold accounts to an inventory item when items are sold using the service process. Service codes are also used to classify groups of items that are categorically included or excluded on a contract. For acceptable values, log in to e-automate. Go to Tools > Lists and Codes to open the List and Codes window. In the Select a list or code type field, use the drop-down menu to select Service Code. Acceptable values are displayed in the Service Code column.
EquipmentCode: Equipment code associated with this item. An equipment code must be assigned to an item if the item is a piece of equipment for which you intend to service and track service history. Items do not usually have a service code and an equipment code. For acceptable values, log in to e-automate. Go to Tools > Lists and Codes to open the List and Codes window. In the Select a list or code type field, use the drop-down menu to select Equipment Code. Acceptable values are displayed in the Equipment Code column.
TaxFlag: Tells how you tax this inventory item. The following are acceptable values:
Enter NONE to not tax this item.
Enter ITEM to tax this item as an Item.
Enter MISC to tax this item as Miscellaneous.
Enter LABOR to tax this item as Labor.
Enter TRAVEL to tax this item as Travel.
Enter FREIGHT to tax this item as Freight.
DefaultPrice: Monetary amount assigned to this item as the default price. When you insert/update a row with a value in this field, the system automatically checks the Use default price checkbox in e-automate.
OEMNumber: The original equipment manufacturer number (up to 33 characters).
UPC: If you are using bar coding, enter the barcode number for this item (up to 255 characters). When imported, the UPC field in e-automate is updated with the barcode number you enter here.
Active: Enter TRUE if you want this item record to be active in e-automate, or enter FALSE if you do not want this item record to be active in e-automate.
StandardCost: Monetary amount identifying the standard cost of this item.
OutCostGroup: Out cost group to which this item is assigned. Using out cost allows dealers to create a burden cost on items by adding a certain percentage to their actual cost, thus enabling them to protect their margin. For acceptable values, log in to e-automate. Go to Tools > Lists and Codes to open the List and Codes window. In the Select a list or code type field, use the drop-down menu to select Out Cost Groups. Acceptable values are displayed in the Out Cost Group column.
UseSpecificBaseOutCost: Enter TRUE to use the specific base out cost assigned to this item, or enter FALSE to not use the specific base out cost assigned to this item.
SpecificBaseOutCost: Monetary amount for base out cost assigned to this item.
Model: Specific model number for a machine, up to 32 characters. Each model is required by e-automate to have a unique model identifier.
Make: Specific make or manufacturer of an equipment item. Makes can only be assigned to inventory items with equipment codes. For acceptable values, log in to e-automate. Go to Inventory > Makes to open the Makes window. Acceptable values are displayed in the Makes column.
ModelDescription: Alphanumeric text (up to 64 characters) that further identifies this model.
ModelIsMetered: Enter TRUE if the model is metered, or enter FALSE if the model is not metered.
ModelIsHost: Enter TRUE if the model is designated as a host that can have accessories, or enter FALSE if the model is not a host.
ModelIsAccessory: Enter TRUE if the model is an accessory to other items or equipment, or enter FALSE if the model is not an accessory.
ModelCategory: The category of the model. For acceptable values, log in to e-automate. Go to Tools > Lists and Codes to open the List and Codes window. In the Select a list or code type field, use the drop-down menu to select Model categories. Acceptable values are displayed in the Category column.
TrackingConfiguration: The equipment history tracking configuration associated with the item. If the item has an equipment code associated with it, the tracking configuration field is required. If the item does not have an equipment code associated with it, you are not required or allowed to enter a tracking configuration for the item. For acceptable values, log in to e-automate. Go to Tools > Lists and Codes to open the List and Codes window. In the Select a list or code type field, use the drop-down menu to select Configurations (Equipment history tracking). Acceptable values are displayed in the Configuration column.
ServiceableAsItem: Enter TRUE if the item can be listed as a serviceable item on a service ticket, or enter FALSE if the item cannot be listed as a serviceable item on a service ticket.
ContractBaseDistributionCode: The code used to default deferred and contract revenue distribution to the contract item. For acceptable values, log in to e-automate. Go to Tools > Lists and Codes to open the List and Codes window. In the Select a list or code type field, use the drop-down menu to select Contract distribution codes - base. Acceptable values are displayed in the Base Distribution Code column.
Completing the ImportCompleting the Import
To validate the data prior to import, do the following:
Click the [Validate] button.
The system displays the E-automate login window. Log in to e-automate.
The system displays the Confirm Database window. Do one of the following:
Click [Yes] to confirm the database selected for spreadsheet utility processing.
Click [No] to cancel and return to the spreadsheet utility.
Click [Change database] to select a different database. The system re-displays the e-automate login window.
If you clicked [Yes] in the previous step, the system begins the validation process. When the validation process completes, view the information in the following columns of the spreadsheet utility:
Status column:
Validated: The system has sufficient, valid data to insert a new item record or update an existing item record.
Not validated: The system does not have sufficient, valid data to insert a new item record or update an existing item record. See the Error message column for more information.
Error message column: Check to see if any errors are present. Use the information provided to make any corrections that may be necessary before posting the updates. See below for example messages:
[Blank]: The system did not detect any errors with inserting/updating the data on this row.
***Invalid equipment code: All items with models must have equipment codes: The value listed in the EquipmentCode column is not a valid inventory category code in e-automate, or the column is blank. If you list a value in the Model column, you must enter a valid equipment code in this column. For acceptable values, log in to e-automate. Go to Tools > Lists and Codes to open the List and Codes window. In the Select a list or code type field, use the drop-down menu to select Equipment Code. Acceptable values are displayed in the Equipment Code column.
***Invalid inventory category: required: The value listed in the Category column is not a valid inventory category code in e-automate. For acceptable values, log in to e-automate. Go to Tools > Lists and Codes to open the List and Codes window. In the Select a list or code type field, use the drop-down menu to select Item Category. Acceptable values are displayed in the Category column.
***Invalid inventory code: required: The value listed in the InventoryCode column is not a valid inventory code in e-automate. For acceptable values, log in to e-automate. Go to Tools > Lists and Codes to open the List and Codes window. In the Select a list or code type field, use the drop-down menu to select Inventory Code. Acceptable values are displayed in the Inventory Code column.
***Invalid make: The value listed in the Make column is not a valid Make in e-automate, or the column is blank. For acceptable values, log in to e-automate. Go to Inventory > Makes to open the Makes window. Acceptable values are displayed in the Makes column.
***Invalid model category code: The value listed in the ModelCategory column is not a valid model category in e-automate, or the column is blank. For acceptable values, log in to e-automate. Go to Tools > Lists and Codes to open the List and Codes window. In the Select a list or code type field, use the drop-down menu to select Model categories>. Acceptable values are displayed in the Category column.
***Invalid out cost group: required: The value listed in the OutCostGroup column is not a valid out cost group in e-automate. For acceptable values, log in to e-automate. Go to Tools > Lists and Codes to open the List and Codes window. In the Select a list or code type field, use the drop-down menu to select Out Cost Groups. Acceptable values are displayed in the Out Cost Group column.
***Invalid sales code: required: The value listed in the SalesCode column is not a valid inventory code in e-automate. For acceptable values, log in to e-automate. Go to Tools > Lists and Codes to open the List and Codes window. In the Select a list or code type field, use the drop-down menu to select Sales Code. Acceptable values are displayed in the Sales Code column.
***Invalid tracking configuration: The value listed in the TrackingConfiguration column is not a tracking configuration in e-automate. For acceptable values, log in to e-automate. Go to Tools > Lists and Codes to open the List and Codes window. In the Select a list or code type field, use the drop-down menu to select Configurations (Equipment history tracking). Acceptable values are displayed in the Configuration column.
***Invalid unit of measure: The value listed in the StockingUnit column is not a valid unit of measure in e-automate. For acceptable values, log in to e-automate. Go to Tools > Lists and Codes to open the List and Codes window. In the Select a list or code type field, use the drop-down menu to select Inventory Units of Measure. Acceptable values are displayed in the Unit column.
***Invalid tax flag: The value listed in the TaxFlag column is not a valid tax flag in e-automate. Enter one of the following values in this field:
Enter NONE to not tax this item.
Enter ITEM to tax this item as an Item.
Enter MISC to tax this item as Miscellaneous.
Enter LABOR to tax this item as Labor.
Enter TRAVEL to tax this item as Travel.
Enter FREIGHT to tax this item as Freight.
Post Action column:
Deactivate: Upon import, the system will attempt to use the data on this row to deactivate an existing item record in e-automate.
Insert: Upon import, the system will attempt to use the data on this row to create a new item record in e-automate.
Update: Upon import, the system will attempt to use the data on this row to update an existing item record in e-automate.
To insert and update item records in e-automate, do the following:
Click the [Insert and update] button.
If the system displays the e-automate login window, log in to e-automate.
The system displays the Confirm Database window. Do one of the following:
Click [Yes] to confirm the database selected for spreadsheet utility processing.
Click [No] to cancel and return to the spreadsheet utility.
Click [Change database] to select a different database. The system re-displays the e-automate login window.
If you clicked [Yes] in the previous step, the system begins the insert and update process. When the insert and update process completes, view the information in the following columns of the spreadsheet utility and verify the information that posted in e-automate.
Status column:
Posted: The system successfully created a new item record or updated an existing item record.
Not posted: The system did not have sufficient, valid data to successfully create a new item record or update an existing item record.
Error Message column:
[Blank]: The system was able to post the update.
*** [Error message]: The system did not have sufficient, valid data to successfully create a new item record or update an existing item record. For error message details, see Step 1.d above.
Post Action column:
Deactivate: The system used the data on this row to deactivate an existing item record in e-automate.
Insert: The system used the data on this row to create a new item record in e-automate.
Update: The system used the data on this row to update an existing item record in e-automate.
Inserting and Updating Inventory Item PricesInserting and Updating Inventory Item Prices
You use the Insert and Update Item Prices tab to add, edit, and/or delete item pricing information displayed on the Prices tab of the Item records in your e-automate database.
Exporting Item Price Data from e-automateExporting Item Price Data from e-automate
Verify you have entered on the Settings tab the filter settings you want to use for exporting data. For more information, see the "Using the Settings Worksheet" section of this topic.
Click the Insert and Update Item Prices tab to bring it forward.
In the Price Level cell, B3, enter the price level assigned to the inventory items for which you want to add, edit, and/or remove pricing information. For acceptable values, log in to e-automate. Go to Tools > Lists and Codes to open the List and Codes window. In the Select a list or code type field, use the drop-down menu to select Price Levels. Acceptable values are displayed in the Price Levels column.
Click the [Clear] button to clear any rows of item pricing data that may have been left from a previous export.
Click [Export from e-automate] to export the item pricing data for the specified price level from your e-automate database.
The system displays the E-automate login window. Log in to e-automate.
The system displays the Confirm Database window. Do one of the following:
Click [Yes] to confirm the database selected for spreadsheet utility processing.
Click [No] to cancel and return to the spreadsheet utility.
Click [Change database] to select a different database. The system re-displays the e-automate login window.
If you clicked [Yes] in the previous step, the system populates the columns with the information from e-automate that meets your filter parameters.
Entering and Updating Item Price DataEntering and Updating Item Price Data
Using the following information, enter and/or update data as appropriate:
Status: Leave this field blank. The system updates this column during processing.
Error message: Leave this field blank. The system updates this column during processing.
Post Action: Leave this field blank. The system updates this column during processing.
Item: The specific item number for which you want to configure price level pricing. For acceptable values, log in to e-automate. Go to Inventory > Items. In the Items list, acceptable values are displayed in the Item column.
Method: Code for the pricing level method used to calculate the total price of the item according to the price level and quantity. The following are acceptable values and explanations:
Enter A for absolute pricing. This is the price you specify. No calculation is performed by e-automate.
Enter MG for margin pricing. This is a formula based price. The formula uses your system average cost for non-serialized and actual cost for serialized. Price = System Average cost / (1-margin %).
Enter MGS for margin pricing using the inventory item field Standard cost value instead of actual system average cost. The formula is Price = Standard cost / (1-margin %).
Enter MK for markup pricing. This is a formula-based price. The formula uses your system average cost for non-serialized and actual cost for serialized. Price = System Average cost * (1 + markup %).
Enter MKS for markup pricing using the inventory item field Standard cost value instead of actual system average cost. The formula is Price = Standard cost * (1 + markup %).
Enter PD to use percent of default price. The percent of default price is calculated from an already configured price. It is designed to be calculated off the default price level in your database if configured. If not configured it calculates off double your cost. If your default price level calculated a price of $100, you could configure a percent of default to use 90% of the default price level and generate a price of $90, thus giving the customer a 10% discount.
Quantity: Lowest quantity of the item that must be purchased to obtain the price.
Example: If you want to sell an item for $40 each if the customer buys 1-9, $38 each if the customer buys 10-19, and $36 each if the customer buys 20 or more, then enter three rows of data. In the Quantity column, list 1 for the first row, 10 for the second row, and 20 for the third row. In the Method column, enter A (absolute price) for each row. In the Price Rate column, enter 40.00 for the first row, 38.00 for the second row, and 36.00 for the third row.
Price Rate: Dollar amount or percent assigned to the price level specified in the Method column and quantity specified in the Quantity column. For absolute, enter the dollar amount. For MG and MGS, enter the percent in decimal format, .8 for 80%. For MK or MKS, enter the percent in decimal format (e.g., 1.5 for 150%).
Start Date: The starting date of the price rate.
End Date: The ending date of the price rate.
Delete Me: Enter TRUE to completely delete the price level on the item, or enter FALSE to not delete this price level for this inventory item.
Record ID: When you click the [Export from e-automate] button, the system populates this column. When you click the [Insert and update] button, the system uses the value in this column to identify the specific item price record in the database to update or delete. This field is required for update and delete operations.
Completing the ImportCompleting the Import
To validate the data prior to import, do the following:
Click the [Validate] button.
The system displays the E-automate login window. Log in to e-automate.
The system displays the Confirm Database window. Do one of the following:
Click [Yes] to confirm the database selected for spreadsheet utility processing.
Click [No] to cancel and return to the spreadsheet utility.
Click [Change database] to select a different database. The system re-displays the e-automate login window.
If you clicked [Yes] in the previous step, the system begins the validation process. When the validation process completes, view the information in the following columns of the spreadsheet utility:
Status column:
Validated: The system has sufficient, valid data to insert a new price level pricing record or update an existing price level pricing record.
Not validated: The system does not have sufficient, valid data to insert a new price level pricing record or update an existing price level pricing record. See the Error message column for more information.
Error message column: Check to see if any errors are present. Use the information provided to make any corrections that may be necessary before posting the updates. See below for example messages:
[Blank]: The system did not detect any errors with inserting/updating the data on this row.
***Error while trying to validate [Delete_Me]...: The Delete_Me column does not contain a valid value. Enter either TRUE or FALSE as appropriate.
***Error while trying to validate String was not recognized as a valid DateTime: The value listed in the StartDate and/or the EndDate column does not represent a valid date. Correct the values in the date fields as necessary.
***Invalid item: The value listed in the Item column is not a valid inventory item in e-automate, or the column is blank. For acceptable values, log in to e-automate. Go to Inventory > Items. In the Items list, acceptable values are displayed in the Item column.
***Invalid method. Must be 'A', 'MK', 'MKS', 'MG', 'MGS', OR 'PD': The value listed in the Method must be A, MK, MKS, MG, MGS, or PD. See the "Entering and Updating Item Price Date" section of this topic for more information.
***Invalid price level: The value listed in the Price Level cell, B3,is not a valid price level in e-automate. For acceptable values, log in to e-automate. Go to Tools > Lists and Codes to open the List and Codes window. In the Select a list or code type field, use the drop-down menu to select Price Levels. Acceptable values are displayed in the Price Levels column.
***Invalid Price_Rate...: The value listed in the Price_Rate column is no valid (e.g., if you enter a price rate that is not in a numeric format). Correct the value in the Price_Rate column.
***There is already an item price with this quantity during this date range in e-automate: The data on this row matches an existing price level pricing record's data. If you are trying to add a new price level pricing record, verify the row's data does not match an existing record's data (e.g., specify a Price_Rate that applies only during a specified StartDate and EndDate range that does not match an existing price level pricing record for this item). If you are trying to update an existing price level pricing record, the RecordID field must contain the appropriate record ID. The system populates this field when you click the [Export from e-automate] button. If this field is blank, re-export the data so that the system can populate this field with the record ID necessary to update the existing price level pricing record.
Post Action column:
[Blank]: The system does not have sufficient, valid data to insert a new price level pricing record or update an existing price level pricing record. See the Error message column for more information.
Delete: Upon import, the system will attempt to use the data on this row to delete an existing price level pricing record in e-automate.
Insert: Upon import, the system will attempt to use the data on this row to create a new price level pricing record in e-automate.
Update: Upon import, the system will attempt to use the data on this row to update an existing price level pricing record in e-automate.
To insert and update price level pricing records in e-automate, do the following:
Click the [Insert and update] button.
If the system displays the e-automate login window, log in to e-automate.
The system displays the Confirm Database window. Do one of the following:
Click [Yes] to confirm the database selected for spreadsheet utility processing.
Click [No] to cancel and return to the spreadsheet utility.
Click [Change database] to select a different database. The system re-displays the e-automate login window.
If you clicked [Yes] in the previous step, the system begins the insert and update process. When the insert and update process completes, view the information in the following columns of the spreadsheet utility and verify the information that posted in e-automate.
Status column:
Deleted: The system used the data on this row to delete an existing price level pricing record in e-automate.
Inserted: The system used the data on this row to create a new price level pricing record in e-automate.
Updated: The system used the data on this row to update an existing price level pricing record in e-automate.
Not posted: The system did not have sufficient, valid data to successfully create a new price level pricing record or update an existing price level pricing record.
Error Message column:
[Blank]: The system was able to post the update.
*** [Error message]: The system did not have sufficient, valid data to successfully create a new item record or update an existing item record. For error message details, see Step 1.d above.
Post Action column:
Posted: The system used the data on this row to create a new price level pricing record or update an existing price level pricing record in e-automate.
[Blank]: The system did not have sufficient, valid data to successfully create a new price level pricing record or update an existing price level pricing record.
Inserting and Updating Inventory Item VendorsInserting and Updating Inventory Item Vendors
You use the Insert and Update Item Vendors tab to add, edit, and/or delete item vendor information displayed on the Vendors tab of the Item records in your e-automate database. You can use this worksheet to update vendor costs associated with your inventory items. You may consider using Excel functionality and formulas to update your cost settings from other spreadsheets. When you export vendor item information from e-automate, the exported information is sequenced first by item number and then by vendor number.
Exporting Item Vendor Data from e-automateExporting Item Vendor Data from e-automate
Verify you have entered on the Settings tab the filter settings you want to use for exporting data. For more information, see the "Using the Settings Worksheet" section of this topic.
Click the Insert and Update Item Vendors tab to bring it forward.
In the Include All Vendors cell, B3, enter Yes to export all your vendors or No to not export all your vendors into this worksheet.
In the Included Vendor cell, B4, enter the vendor number of the vendor for which you want to export item vendor settings. This is only applicable if you entered No in the Include All Vendors cell, B3.
Click the [Clear] button to clear any rows of item vendor data that may have been left from a previous export.
Click [Export from e-automate] to export the item vendor data from your e-automate database.
The system displays the E-automate login window. Log in to e-automate.
The system displays the Confirm Database window. Do one of the following:
Click [Yes] to confirm the database selected for spreadsheet utility processing.
Click [No] to cancel and return to the spreadsheet utility.
Click [Change database] to select a different database. The system re-displays the e-automate login window.
If you clicked [Yes] in the previous step, the system populates the columns with the information from e-automate that meets your filter parameters.
Entering and Updating Item Vendor DataEntering and Updating Item Vendor Data
Using the following information, enter and/or update data as appropriate:
Status: Leave this field blank. The system updates this column during processing.
Error message: Leave this field blank. The system updates this column during processing.
Post Action: Leave this field blank. The system updates this column during processing.
Item: The specific item number with which you want to associate item vendor information. For acceptable values, log in to e-automate. Go to Inventory > Items. In the Items list, acceptable values are displayed in the Item column.
Vendor Number: Vendor number associated with the inventory item. For acceptable values in the Vendor Number column, log in to e-automate and go to People > Vendors. Acceptable values are displayed in the Number column.
Vendor Item Number: Vendor’s manufacturer number, up to 30 characters. Number the vendor uses to identify this item. This number is printed on the purchase order created for this vendor.
Vendor Cost: Monetary amount representing the cost of the item at the vendor's unit of measure.
Vendor Purchase Unit: Unit of measure in which you purchase the item from the vendor (e.g., each, case), up to 4 characters.
Vendor Conv Factor: The number the system should use to convert the vendor's unit of measure for selling the item to your unit of measure for selling the item.
Examples: If you and the vendor both use the same unit of measure for selling the item on this row (e.g., Each), enter 1. If the vendor sells the item by the case, and a case contains 10 each of the item, while you sell the item using each as the unit of measure, enter 10. If you then order one case of this item from the vendor, the purchase order will show 1 case. When the item is received, e-automate will increment your inventory by multiplying the quantity received by this conversion factor (e.g., 1 case multiplied by a conversion factor of 10 becomes 10 each).
Min Order: Minimum order amount allowed by vendor.
Lead Time: Amount of days between placement and receipt of the item when ordered.
Preferred: Enter TRUE to identify this vendor as the preferred vendor for this item, or enter FALSE if you do not want to identify this vendor as the preferred vendor for this item.
Delete Me: Enter TRUE if you want to remove from e-automate the item vendor information associated with this row, or enter FALSE if you do not want to remove from e-automate the item vendor information associated with this row.
Completing the ImportCompleting the Import
To validate the data prior to import, do the following:
Click the [Validate] button.
The system displays the E-automate login window. Log in to e-automate.
The system displays the Confirm Database window. Do one of the following:
Click [Yes] to confirm the database selected for spreadsheet utility processing.
Click [No] to cancel and return to the spreadsheet utility.
Click [Change database] to select a different database. The system re-displays the e-automate login window.
If you clicked [Yes] in the previous step, the system begins the validation process. When the validation process completes, view the information in the following columns of the spreadsheet utility:
Status column:
Validated: The system has sufficient, valid data on this row to be able to insert, update, or delete an item vendor record.
Not validated: The system does not have sufficient, valid data on this row to be able to insert, update, or delete an item vendor record. See the Error message column for more information.
Error message column: Check to see if any errors are present. Use the information provided to make any corrections that may be necessary before posting the updates. See below for example messages:
[Blank]: The system did not detect any errors with inserting/updating the data on this row.
***Invalid Delete_Me value. Not true or false: The Delete_Me column does not contain a valid value. Enter either TRUE or FALSE as appropriate.
***Invalid item: The value listed in the Item column is not a valid inventory item in e-automate, or the column is blank. For acceptable values, log in to e-automate. Go to Inventory > Items. In the Items list, acceptable values are displayed in the Item column.
***Invalid Preferred value. Not true or false: The Preferred column does not contain a valid value. Enter either TRUE or FALSE as appropriate.
***Invalid vendor: The value listed in the Vendor_Number column is not a valid vendor in e-automate, or the column is blank. For acceptable values, log in to e-automate. Go to People > Vendors. In the Vendors list, acceptable values are displayed in the Number column.
Post Action column:
[Blank]: The system does not have sufficient, valid data on this row to be able to insert, update, or delete an item vendor record. See the Error message column for more information.
Delete: Upon import, the system will attempt to use the data on this row to delete an existing item vendor record in e-automate.
Insert: Upon import, the system will attempt to use the data on this row to create a new item vendor record in e-automate.
Update: Upon import, the system will attempt to use the data on this row to update an existing item vendor record in e-automate.
To insert and update item vendor records in e-automate, do the following:
Click the [Insert and update] button.
If the system displays the e-automate login window, log in to e-automate.
The system displays the Confirm Database window. Do one of the following:
Click [Yes] to confirm the database selected for spreadsheet utility processing.
Click [No] to cancel and return to the spreadsheet utility.
Click [Change database] to select a different database. The system re-displays the e-automate login window.
If you clicked [Yes] in the previous step, the system begins the insert and update process. When the insert and update process completes, view the information in the following columns of the spreadsheet utility and verify the information that posted in e-automate.
Status column:
Posted: The system used the data on this row to create a new item vendor record or update an existing item vendor record in e-automate.
Not posted: The system did not have sufficient, valid data to successfully create a new item vendor record or update an existing item vendor record.
Error Message column:
[Blank]: The system was able to post the update.
*** [Error message]: The system did not have sufficient, valid data to successfully create a new item vendor record or update an existing item vendor record. For error message details, see Step 1.d above.
Post Action column:
Delete: The system used the data on this row to delete an existing item vendor record in e-automate.
Insert: The system used the data on this row to create a new item vendor record in e-automate.
Update: The system used the data on this row to update an existing item vendor record in e-automate.
[Blank]: The system did not have sufficient, valid data on this row to be able to insert, update, or delete an item vendor record.
Inserting and Updating Bin DefaultsInserting and Updating Bin Defaults
You use the Insert and Update Bin Defaults tab to add and/or edit bin default information displayed on the Bin defaults tab of the Item records in your e-automate database. In e-automate, the Bin defaults tab may list up to eight rows—one row for each of the following transaction types: Inventory Adjustment - Increase, Inventory Adjustment - Decrease, Purchase Order Receipt, Sales Order Fulfillment, Inventory Assembly - Destination, Inventory Assembly - Source, Inventory Transfer - Destination, Inventory Transfer - Source—and you have the option to specify a different default warehouse-and-bin combination for each row.
When you use the Inventory Item Utility spreadsheet to insert bin default information, you specify only one default warehouse-and-bin combination per Item record and the system lists this combination on a separate row for each of the eight transaction types (as if you had checked the Set all transaction types to the warehouse and bin selected above checkbox when adding the information via e-automate).
When you use the Inventory Item Utility spreadsheet to update bin default information, you specify only one default warehouse-and-bin combination per Item record and the system applies this combination only to the transaction type row(s) currently listed on the Bin defaults tab for that item (e.g., if only three rows are listed on the Bin defaults tab, the system updates the bin default information for those three rows; the system does not add additional rows). If no rows are currently listed on the Bin defaults tab for an item, the system treats the update as an insert and lists the bin default combination on a separate row for each of the eight transaction types.
If you need to specify different default warehouse-and-bin combinations on a per transaction type basis for an item, you will need to make those changes to the Item record via e-automate.
Exporting Item Bin Default Data from e-automateExporting Item Bin Default Data from e-automate
Verify you have entered on the Settings tab the filter settings you want to use for exporting data. For more information, see the "Using the Settings Worksheet" section of this topic
Click the Insert and Update Bin Defaults tab to bring it forward.
Click the [Clear] button to clear any rows of item bin default data that may have been left from a previous export.
Click [Export from e-automate] to export the item bin default data from your e-automate database.
The system displays the E-automate login window. Log in to e-automate.
The system displays the Confirm Database window. Do one of the following:
Click [Yes] to confirm the database selected for spreadsheet utility processing.
Click [No] to cancel and return to the spreadsheet utility.
Click [Change database] to select a different database. The system re-displays the e-automate login window.
If you clicked [Yes] in the previous step, the system populates the columns with the information from e-automate that meets your filter parameters.
Entering and Updating Item Bin Default DataEntering and Updating Item Bin Default Data
Using the following information, enter and/or update data as appropriate:
Status: Leave this field blank. The system updates this column during processing.
Error message: Leave this field blank. The system updates this column during processing.
Post Action: Leave this field blank. The system updates this column during processing.
Item: The specific item number with which you want to associate bin default information. For acceptable values, log in to e-automate. Go to Inventory > Items. In the Items list, acceptable values are displayed in the Item column.
Bin: Bin name or number for the bin where this item is located for the specified warehouse. For acceptable values, log in to e-automate. Go to Inventory > Bins. On the Inventory Bins list window, sort the bins by Warehouse by clicking the Warehouse column. Scroll through the list of bins to locate the warehouse you plan to list in the Warehouse cell for this row. Where the Warehouse column matches the warehouse you plan to list in the Warehouse cell, the Bin column displays the acceptable values.
Warehouse: Warehouse name or number for the warehouse where this bin is located. For acceptable values in the Warehouse column, log in to e-automate and go to Inventory > Warehouses. In the Warehouse list, acceptable values are displayed in the Warehouse column.
Completing the ImportCompleting the Import
To validate the data prior to import, do the following:
Click the [Validate] button.
The system displays the E-automate login window. Log in to e-automate.
The system displays the Confirm Database window. Do one of the following:
Click [Yes] to confirm the database selected for spreadsheet utility processing.
Click [No] to cancel and return to the spreadsheet utility.
Click [Change database] to select a different database. The system re-displays the e-automate login window.
If you clicked [Yes] in the previous step, the system begins the validation process. When the validation process completes, view the information in the following columns of the spreadsheet utility:
Status column:
Validated: The system has sufficient, valid data on this row to be able to insert or update a bin default record.
Not validated: The system does not have sufficient, valid data on this row to be able to insert or update a bin default record. See the Error message column for more information.
Error message column: Check to see if any errors are present. Use the information provided to make any corrections that may be necessary before posting the updates. See below for example messages:
[Blank]: The system did not detect any errors with inserting/updating the data on this row.
***Invalid bin: The value listed in the Bin column is not a valid inventory bin in e-automate, or the column is blank. For acceptable values, log in to e-automate. Go to Inventory > Bins. On the Inventory Bins list window, sort the bins by Warehouse by clicking the Warehouse column. Scroll through the list of bins to locate the warehouse you plan to list in the Warehouse cell for this row. Where the Warehouse column matches the warehouse you plan to list in the Warehouse cell, the Bin column displays the acceptable values.
***Invalid item: The value listed in the Item column is not a valid inventory item in e-automate, or the column is blank. For acceptable values, log in to e-automate. Go to Inventory > Items. In the Items list, acceptable values are displayed in the Item column.
***Invalid warehouse: The value listed in the Warehouse column is not a valid inventory warehouse in e-automate, or the column is blank. For acceptable values, log in to e-automate. Go to Inventory > Warehouses. In the Inventory Warehouses list, acceptable values are displayed in the Warehouse column.
Post Action column:
Insert: Upon import, the system will attempt to use the data on this row to create a new bin default record in e-automate.
Update: Upon import, the system will attempt to use the data on this row to update an existing bin default record in e-automate.
To insert and update item bin default records in e-automate, do the following:
Click the [Insert and update] button.
If the system displays the e-automate login window, log in to e-automate.
The system displays the Confirm Database window. Do one of the following:
Click [Yes] to confirm the database selected for spreadsheet utility processing.
Click [No] to cancel and return to the spreadsheet utility.
Click [Change database] to select a different database. The system re-displays the e-automate login window.
If you clicked [Yes] in the previous step, the system begins the insert and update process. When the insert and update process completes, view the information in the following columns of the spreadsheet utility and verify the information that posted in e-automate.
Status column:
Posted: The system used the data on this row to create a new bin default record or update an existing bin default record in e-automate.
Not posted: The system did not have sufficient, valid data to successfully create a new bin default record or update an existing bin default record.
Error Message column:
[Blank]: The system was able to post the update.
*** [Error message]: The system did not have sufficient, valid data to successfully create a new bin default record or update an existing bin default record. For error message details, see Step 1.d above.
Post Action column:
Insert: The system used the data on this row to try to create a new bin default record in e-automate.
Update: The system used the data on this row to try to update an existing bin default record in e-automate.
Inserting and Updating Related ItemsInserting and Updating Related Items
You use the Insert and Update Related Items tab to add and/or edit information displayed on the Related Items tab of the Item records in your e-automate database. Typically, these items are supplies that are used in machines and accessories. For example, if a finisher uses a certain kind of staples, you can list on the finisher’s Related Items tab a record for that kind of staples.
Exporting Related Items Data from e-automateExporting Related Items Data from e-automate
Verify you have entered on the Settings tab the filter settings you want to use for exporting data. For more information, see the "Using the Settings Worksheet" section of this topic.
Click the Insert and Update Related Items tab to bring it forward.
Click the [Clear] button to clear any rows of related item data that may have been left from a previous export.
Click [Export from e-automate] to export the related item data from your e-automate database.
The system displays the E-automate login window. Log in to e-automate.
The system displays the Confirm Database window. Do one of the following:
Click [Yes] to confirm the database selected for spreadsheet utility processing.
Click [No] to cancel and return to the spreadsheet utility.
Click [Change database] to select a different database. The system re-displays the e-automate login window.
If you clicked [Yes] in the previous step, the system populates the columns with the information from e-automate that meets your filter parameters.
Entering and Updating Related Items DataEntering and Updating Related Items Data
Using the following information, enter and/or update data as appropriate:
Status: Leave this field blank. The system updates this column during processing.
Error message: Leave this field blank. The system updates this column during processing.
Post Action: Leave this field blank. The system updates this column during processing.
Item: The specific item number with which you want to associate item related item information. For acceptable values, log in to e-automate. Go to Inventory > Items. In the Items list, acceptable values are displayed in the Item column.
Old Related Item: Item number for the related item you are replacing with another related item.
New Related Item: Item number for the related item with which you are replacing the old related item.
Completing the ImportCompleting the Import
To validate the data prior to import, do the following:
Click the [Validate] button.
The system displays the E-automate login window. Log in to e-automate.
The system displays the Confirm Database window. Do one of the following:
Click [Yes] to confirm the database selected for spreadsheet utility processing.
Click [No] to cancel and return to the spreadsheet utility.
Click [Change database] to select a different database. The system re-displays the e-automate login window.
If you clicked [Yes] in the previous step, the system begins the validation process. When the validation process completes, view the information in the following columns of the spreadsheet utility:
Status column:
Validated: The system has sufficient, valid data on this row to be able to insert or update a related item record.
Not validated: The system does not have sufficient, valid data on this row to be able to insert or update a related item record. See the Error message column for more information.
Error message column: Check to see if any errors are present. Use the information provided to make any corrections that may be necessary before posting the updates. See below for example messages:
[Blank]: The system did not detect any errors with inserting/updating the data on this row.
***Invalid item: The value listed in the Item column is not a valid inventory item in e-automate, or the column is blank. For acceptable values, log in to e-automate. Go to Inventory > Items. In the Items list, acceptable values are displayed in the Item column.
***Invalid new related item: The value listed in the NewRelatedItem column is not a valid inventory item in e-automate, or the column is blank. For acceptable values, log in to e-automate. Go to Inventory > Items. In the Items list, acceptable values are displayed in the Item column.
***Invalid old related item: The value listed in the OldRelatedItem column is not a valid inventory item in e-automate. For acceptable values, log in to e-automate. Go to Inventory > Items. In the Items list, acceptable values are displayed in the Item column. Leave this column blank if you are adding a new related item record instead of updating an existing related item record.
***New related item already exists: A related item record for the item listed in the NewRelatedItem column is already recorded in e-automate. Importing the data on this row would not create or update a related item record because the record already exists.
Post Action column:
Insert: Upon import, the system will attempt to use the data on this row to create a new related item record in e-automate.
Update: Upon import, the system will attempt to use the data on this row to update an existing related item record in e-automate.
To insert and update item bin default records in e-automate, do the following:
Click the [Insert and update] button.
If the system displays the e-automate login window, log in to e-automate.
The system displays the Confirm Database window. Do one of the following:
Click [Yes] to confirm the database selected for spreadsheet utility processing.
Click [No] to cancel and return to the spreadsheet utility.
Click [Change database] to select a different database. The system re-displays the e-automate login window.
If you clicked [Yes] in the previous step, the system begins the insert and update process. When the insert and update process completes, view the information in the following columns of the spreadsheet utility and verify the information that posted in e-automate.
Status column:
Posted: The system used the data on this row to create a new related item record or update an existing related item record in e-automate.
Not posted: The system did not have sufficient, valid data to successfully create a new related item record or update an existing related item record.
Error Message column:
[Blank]: The system was able to post the update.
*** [Error message]: The system did not have sufficient, valid data to successfully create a new related item record or update an existing related item record. For error message details, see Step 1.d above.
Post Action column:
Insert: The system used the data on this row to try to create a new related item record in e-automate.
Update: The system used the data on this row to try to update an existing related item record in e-automate.
Inserting and Updating Inventory Item Min/MaxInserting and Updating Inventory Item Min/Max
You use the Insert and Update Item MinMax worksheet to add new—or update existing—minimum or maximum stocking levels for your inventory items, updating information displayed on the Warehouse tab of the Item records in your e-automate database. In addition to creating or modifying stocking levels for inventory items by warehouse, you can also use this tab to set the Auto update flag on the warehouse stocking level you create or modify. When e-agent updates warehouse levels based on historical usage of the items, the Auto update flag tells e-agent whether or not the item’s stocking levels are eligible to be changed. If the flag is set to "Yes", then e-agent can change your stocking levels. If the flag is set to "No", e-agent cannot make modifications to the stocking level for that warehouse and item.
Exporting Item Min/Max Data from e-automateExporting Item Min/Max Data from e-automate
Verify you have entered on the Settings tab the filter settings you want to use for exporting data. For more information, see the "Using the Settings Worksheet" section of this topic.
Click the Insert and Update Item MinMax tab to bring it forward.
Click the [Clear] button to clear any rows of related item data that may have been left from a previous export.
Click [Export from e-automate] to export the related item data from your e-automate database.
The system displays the E-automate login window. Log in to e-automate.
The system displays the Confirm Database window. Do one of the following:
Click [Yes] to confirm the database selected for spreadsheet utility processing.
Click [No] to cancel and return to the spreadsheet utility.
Click [Change database] to select a different database. The system re-displays the e-automate login window.
If you clicked [Yes] in the previous step, the system populates the columns with the information from e-automate that meets your filter parameters.
Entering and Updating Item Min/Max DataEntering and Updating Item Min/Max Data
Using the following information, enter and/or update data as appropriate:
Status: Leave this field blank. The system updates this column during processing.
Error message: Leave this field blank. The system updates this column during processing.
Post Action: Leave this field blank. The system updates this column during processing.
Item: The specific item number for which you want to set or modify min/max stocking level information. For acceptable values, log in to e-automate. Go to Inventory > Items. In the Items list, acceptable values are displayed in the Item column.
Warehouse: The warehouse for which you want to set or modify the minimum and/or maximum stocking levels for this item. For acceptable values, log in to e-automate. Go to Inventory > Warehouses. On the Inventory Warehouses window, the Warehouse column lists the acceptable values.
Min: Quantity of this item you do not want the stock amount to drop below for the specified warehouse.
Max: Quantity of this item you want in stock at any given time for the specified warehouse.
AutoUpdate: Enter TRUE to allow e-agent to modify the stocking levels for the item and warehouse combination listed on this row, or enter FALSE to prevent e-agent from modifying the stocking levels for the item and warehouse combination listed on this row. During successful processing of the data on this row, the system checks the Auto update checkbox on the Warehouses tab of the Item record if this column is set to TRUE or unchecks it if this column is set to FALSE.
DB_KEY: This field is a display-only field that the system populates when you export data from e-automate.
Remove Stocking Code: Enter TRUE to remove the Stocking code listed for this warehouse on the Warehouses tab of the Item record, or enter FALSE (or leave blank) to leave the Stocking code unchanged for this warehouse.
Completing the ImportCompleting the Import
To validate the data prior to import, do the following:
Click the [Validate] button.
The system displays the E-automate login window. Log in to e-automate.
The system displays the Confirm Database window. Do one of the following:
Click [Yes] to confirm the database selected for spreadsheet utility processing.
Click [No] to cancel and return to the spreadsheet utility.
Click [Change database] to select a different database. The system re-displays the e-automate login window.
If you clicked [Yes] in the previous step, the system begins the validation process. When the validation process completes, view the information in the following columns of the spreadsheet utility:
Status column:
Validated: The system has sufficient, valid data on this row to be able to insert or update a record.
Not validated: The system does not have sufficient, valid data on this row to be able to insert or update a record. See the Error message column for more information.
Error message column: Check to see if any errors are present. Use the information provided to make any corrections that may be necessary before posting the updates. See below for example messages:
[Blank]: The system did not detect any errors with inserting/updating the data on this row.
***DB_KEY is too long. Max length is 21: The value listed in the DB_KEY field, which is hidden by default between the AutoUpdate and Remove Stocking Code fields, exceeds the maximum length of 21 characters. To resolve this error, unhide this column of the spreadsheet, and delete the column's value.
***Invalid AutoUpdate value. Not true or false: The value listed in the AutoUpdate column must be set to TRUE or FALSE (or be left blank, which is the same as FALSE).
***Invalid item: The value listed in the Item column is not a valid inventory item in e-automate, or the column is blank. For acceptable values, log in to e-automate. Go to Inventory > Items. In the Items list, acceptable values are displayed in the Item column.
***Invalid [Min/Max] value. Not numeric: The value listed in the Min and/or Max column is not numeric. The value must be numeric (e.g., 5 instead of Five).
***Invalid warehouse: The value listed in the Warehouse column is not a valid inventory item in e-automate, or the column is blank. For acceptable values, log in to e-automate. Go to Inventory > Warehouses. In the Inventory Warehouses list, acceptable values are displayed in the Warehouse column.
***Min cannot be greater than max: To form a valid range, the value in the Min field must be lower than or equal to the value in the Max field.
Error while trying to validate: [Remove Stocking Code]: The value listed in the Remove Stocking Code column must be set to TRUE or FALSE (or be left blank, which is the same as FALSE).
Post Action column:
Inserted: Upon import, the system will attempt to use the data on this row to create a new record in e-automate.
Update: Upon import, the system will attempt to use the data on this row to update an existing record in e-automate.
To insert and update item bin default records in e-automate, do the following:
Click the [Insert and update] button.
If the system displays the e-automate login window, log in to e-automate.
The system displays the Confirm Database window. Do one of the following:
Click [Yes] to confirm the database selected for spreadsheet utility processing.
Click [No] to cancel and return to the spreadsheet utility.
Click [Change database] to select a different database. The system re-displays the e-automate login window.
If you clicked [Yes] in the previous step, the system begins the insert and update process. When the insert and update process completes, view the information in the following columns of the spreadsheet utility and verify the information that posted in e-automate.
Status column:
Posted: The system used the data on this row to create a new record or update an existing record on the Warehouse tab of the Item record in e-automate.
Not posted: The system did not have sufficient, valid data to successfully create a new record or update an existing record.
Error Message column:
[Blank]: The system was able to post the update.
*** [Error message]: The system did not have sufficient, valid data to successfully create a new record or update an existing record. For error message details, see Step 1.d above.
Post Action column:
Inserted: The system used the data on this row to try to create a new record on the Warehouse tab of the Item record in e-automate.
Update: The system used the data on this row to try to update an existing record on the Warehouse tab of the Item record in e-automate.
[Blank]: The system was not able to create a new record or update an existing record on the Warehouse tab of the Item record in e-automate.
Inserting and Updating Customer PricesInserting and Updating Customer Prices
You use the Insert and Update Cust Prices worksheet to add, edit, and/or delete customer prices. A customer price in e-automate is a specific price for a specific item for a specific customer.
Exporting Customer Price Data from e-automateExporting Customer Price Data from e-automate
Verify you have entered on the Settings tab the filter settings you want to use for exporting data. For more information, see the "Using the Settings Worksheet" section of this topic.
Click the Insert and Update Cust Prices tab to bring it forward.
Click the [Clear] button to clear any rows of customer pricing data that may have been left from a previous export.
Click [Export from e-automate] to export customer pricing data from your e-automate database.
The system displays the E-automate login window. Log in to e-automate.
The system displays the Confirm Database window. Do one of the following:
Click [Yes] to confirm the database selected for spreadsheet utility processing.
Click [No] to cancel and return to the spreadsheet utility.
Click [Change database] to select a different database. The system re-displays the e-automate login window.
If you clicked [Yes] in the previous step, the system populates the columns with the information from e-automate that meets your filter parameters.
Entering and Updating Customer Price DataEntering and Updating Customer Price Data
Using the following information, enter and/or update data as appropriate:
Status: Leave this field blank. The system updates this column during processing.
Error message: Leave this field blank. The system updates this column during processing.
Post Action: Leave this field blank. The system updates this column during processing.
CustomerNumber: Number identifying the customer to whom this item price is assigned. For acceptable values, log in to e-automate. Click [Customers] on the e-automate toolbar to open the Customers list window. Acceptable values are displayed in the Number column.
Item: The item number for which you are specifying or modifying a customer price. For acceptable values, log in to e-automate. Click [Items] on the e-automate toolbar to open the Items list window. Acceptable values are displayed in the Item column.
Quantity: Lowest quantity of the item that must be purchased to obtain the price. You must enter multiple rows for each separate range in the price level. For example, if you want to offer the customer volume pricing and the customer purchases a quantity between 1 and 9 at a price of 40.00, in the first row enter a quantity of 1 in the Quantity column. In the second row, if the customer purchases a quantity between 10 and 19 at a price of 38.00, enter a quantity of 10 in the Quantity column. In the third row, if the customer purchases a quantity over 30 at a price of 36.00 enter a quantity of 30 in the Quantity column. If you do not offer volume pricing as a component of customer pricing, filling in one row is sufficient.
Price: Price assigned to this customer for the quantity specified in the Quantity column.
StartDate: The date on which this price takes effect. Leave this field blank if the pricing on this row is not limited by start date.
EndDate: The date on which this price expires. Leave this field blank if the pricing on this row is not limited by end date.
Delete_Me: Enter TRUE to completely delete the price level on the item, or enter FALSE to not delete this price level for this inventory item.
RecordID: When you click the [Export from e-automate] button, the system populates this column. When you click the [Insert and update] button, the system uses the value in this column to identify the specific item price record in the database to update or delete. This field is required for update and delete operations.
Completing the ImportCompleting the Import
To validate the data prior to import, do the following:
Click the [Validate] button.
The system displays the E-automate login window. Log in to e-automate.
The system displays the Confirm Database window. Do one of the following:
Click [Yes] to confirm the database selected for spreadsheet utility processing.
Click [No] to cancel and return to the spreadsheet utility.
Click [Change database] to select a different database. The system re-displays the e-automate login window.
If you clicked [Yes] in the previous step, the system begins the validation process. When the validation process completes, view the information in the following columns of the spreadsheet utility:
Status column:
Validated: The system has sufficient, valid data to insert a new customer pricing record or update an existing customer pricing record.
Not validated: The system does not have sufficient, valid data to insert a new customer pricing record or update an existing customer pricing record. See the Error message column for more information.
Error message column: Check to see if any errors are present. Use the information provided to make any corrections that may be necessary before posting the updates. See below for example messages:
[Blank]: The system did not detect any errors with inserting/updating the data on this row.
***Error while trying to validate [Delete_Me]...: The Delete_Me column does not contain a valid value. Enter either TRUE or FALSE as appropriate.
***String was not recognized as a valid DateTime: The value listed in the StartDate and/or the EndDate column does not represent a valid date. Correct the values in the date fields as necessary.
***Invalid customer: The value listed in the CustomerNumber column is not a valid customer in e-automate, or the column is blank. For acceptable values, log in to e-automate. Go to People > Customers. In the Customers list, acceptable values are displayed in the Number column.
***Invalid item: The value listed in the Item column is not a valid inventory item in e-automate, or the column is blank. For acceptable values, log in to e-automate. Go to Inventory > Items. In the Items list, acceptable values are displayed in the Item column.
***Invalid Price value. Not numeric: The value listed in the Price column is not valid (i.e., you entered a price that is not in a numeric format). Correct the value in the Price column.
***Invalid Quantity value. Not numeric: The value listed in the Quantity column is not valid (i.e., you entered a quantity that is not in a numeric format). Correct the value in the Quantity column.
***Invalid RecordID value. Not numeric: The value listed in the RecordID column is not valid. Typically the system populates this field during data export. To correct, you may need to re-export the data. You can also check the RecordID column to see if a non-numeric character was inadvertently entered into the field.
***The start date must be before the end date.: To form a valid range, the value in the StartDate field must chronologically precede or be equal to the value in the EndDate field.
***There is already an item price with this quantity during this date range in e-automate: The data on this row matches an existing customer pricing record's data. If you are trying to add a new customer pricing record, verify the row's data does not match an existing record's data (e.g., specify a Price that applies only during a specified StartDate and EndDate range that does not match an existing customer pricing record for this item). If you are trying to update an existing customer pricing record, the RecordID field must contain the appropriate record ID. The system populates this field when you click the [Export from e-automate] button. If this field is blank, re-export the data so that the system can populate this field with the record ID necessary to update the existing customer pricing record.
Post Action column:
[Blank]: The system does not have sufficient, valid data to insert a new customer pricing record or update an existing customer pricing record. See the Error message column for more information.
Delete: Upon import, the system will attempt to use the data on this row to delete an existing customer pricing record in e-automate.
Insert: Upon import, the system will attempt to use the data on this row to create a new customer pricing record in e-automate.
Update: Upon import, the system will attempt to use the data on this row to update an existing customer pricing record in e-automate.
To insert and update customer pricing records in e-automate, do the following:
Click the [Insert and update] button.
If the system displays the e-automate login window, log in to e-automate.
The system displays the Confirm Database window. Do one of the following:
Click [Yes] to confirm the database selected for spreadsheet utility processing.
Click [No] to cancel and return to the spreadsheet utility.
Click [Change database] to select a different database. The system re-displays the e-automate login window.
If you clicked [Yes] in the previous step, the system begins the insert and update process. When the insert and update process completes, view the information in the following columns of the spreadsheet utility and verify the information that posted in e-automate.
Status column:
[Blank]: The system did not have sufficient, valid data to successfully create a new item record or update an existing item record.
Deleted: The system used the data on this row to delete an existing customer pricing record in e-automate.
Inserted: The system used the data on this row to create a new customer pricing record in e-automate.
Updated: The system used the data on this row to update an existing customer pricing record in e-automate.
Error Message column:
[Blank]: The system was able to post the update.
*** [Error message]: The system did not have sufficient, valid data to successfully create a new customer pricing record or update an existing customer pricing record. For error message details, see Step 1.d above.
Post Action column:
Posted: The system used the data on this row to create a new customer pricing record or update an existing customer pricing record in e-automate.
[Blank]: The system did not have sufficient, valid data to successfully create a new customer pricing record or update an existing customer pricing record.
Clearing Data from the SpreadsheetClearing Data from the Spreadsheet
To clear data from the spreadsheet, do any of the following:
To clear rows of data on any tab (including any system-generated data in the Status, Message, and Post Action columns), click the [Clear Data] button on that tab.
To clear settings on the Settings tab, or filter options on the Insert And Update Item Prices or Insert And Update Item Vendors tab, do the following:
Select the appropriate tab to bring it forward.
Position the cursor in the first cell from which you want to delete data.
Hold down the keyboard [Ctrl] key.
While holding down the [Ctrl] key, select each additional cell from which you want to delete data.
Release the cursor. The cells should remain selected.
Click the keyboard [Delete] key. The system clears the contents of the cells.
©2025 ECI and the ECI logo are registered trademarks of ECI Software Solutions, Inc. All rights reserved.