Security
You use e-admin's security functionality to determine what a specific user—or group of users—can and cannot do in e-automate.
Security permissions—each of which may include view, edit, create, and/or delete rights to that permission—are stored within each company database.
Because user and group permissions are specific to a company, those permissions only apply to the company a user is logged in to. Using this functionality, you can grant a user all permissions with full rights to use for training purposes when logged in to one company (e.g., a 'test' company), and grant the same user the limited permissions and applicable rights you want the user to have to perform work when logged in to another company (e.g., a 'live' company) on the server.
E-automate's security permissions are sometimes defined based on access to the table(s) with which the transaction interacts and sometimes based on access to the feature—or portion of the feature—through which the transaction's functionality was added to e-automate. While granting the appropriate level of access to some transactions, particularly with permissions based on features, may be fairly straightforward, granting the appropriate level of access to other transactions, particularly with permissions based on multiple tables, may be more difficult. To help you make a more informed decision about how to customize permissions to meet your needs, ECI recommends copying an existing group or system template with the security already established so you can see exactly what table permissions and permission rights the group or template use, respectively.
Additionally, if a user attempts to perform a transaction in e-automate to which the user does not have the necessary permission(s) and applicable permission right(s), the system displays an "insufficient rights" message identifying the permission(s) and applicable permission right(s) the user needs to perform the transaction. If you have permission to edit the user's permissions, you can then make any necessary adjustments.
To create, modify, delete, import, and/or copy users, groups, and/or system templates, use the following information.
Getting to the TransactionGetting to the Transaction
To access the Security window for a specific company via e-admin, do the following:
Log in to e-admin. For more info, see the Logging In topic.
From the main E-admin window, select from the list the company for which you want to manage users, groups, and/or system templates.
Click the [Security] button. The system opens the Enter Admin Password window.
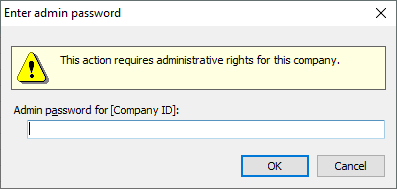
In the Admin password for [Company ID] field, enter your admin password.
Click [OK] button. If the system verifies your admin password for the company you selected, the system displays the Security window.
Managing E-automate User SecurityManaging E-automate User Security
For each employee who logs in to e-automate, you create an e-automate user. You assign permissions to the e-automate user to give the employee access to the areas of e-automate pertinent to the employee's area of responsibility.
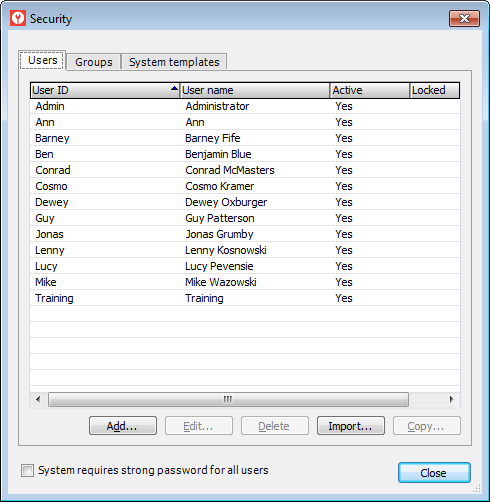
In e-admin, you use the Security window's Users tab to add a new user, edit the settings for an existing user, delete a user, import users from another company, and copy an existing user to use as a template for creating a new user.
Creating an E-automate User via E-adminCreating an E-automate User via E-admin
To create an e-automate user via e-admin, do the following:
From the Security window, verify the Users tab is forward. If it is not, click the Users tab to bring it forward.
Click the [Add...] button. The system opens the User Properties window.

In the User ID field, enter the user ID you want the user to use when logging in to e-automate.
In the User name field, enter the name of the person to whom you are assigning this user ID.
In the Password field, enter the password for this user ID. Together with the user ID, the employee must enter this password on the e-automate login window to access e-automate.
In the Confirm password field, reenter the password you just entered.
In the Employee/Contractor field, use the down arrow to select an employee from you e-automate database list of employees.
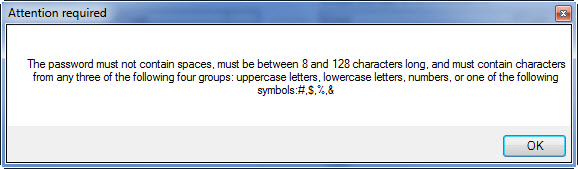
To require a strong password for this user, check the Require strong password for this user checkbox.
To force the user to change the password the next time the user logs in to e-automate, check the Require password change at next login checkbox.
To force the user to change the password on an interval, do the following:
Check the Require a password change after the following number of days box.
Specify the number of days to use for the interval.
To make this user a member of a group, do the following:
Verify the Groups tab is forward.
In the Groups this user is not a member of region, select a group to add this user to.
Click the green left arrow button. E-admin adds the group you selected to the Groups this user is a member of region.
To remove a user from a group, do the following:
Select the group in the Groups this user is a member of region.
Click the green right arrow button. E-admin removes the user's group membership.
Click the Permissions tab to bring it forward.
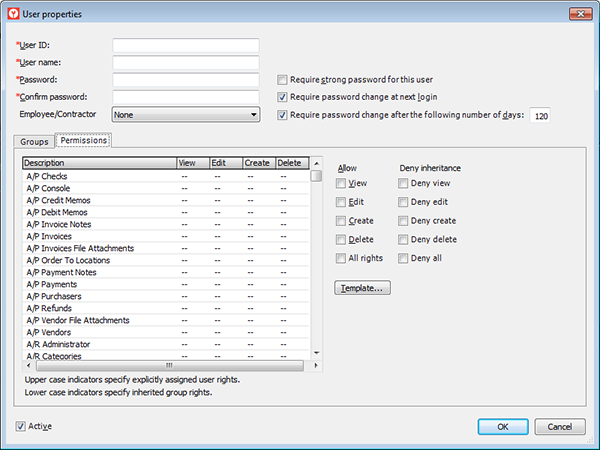
E-admin displays the table security and feature rights assigned to the user.
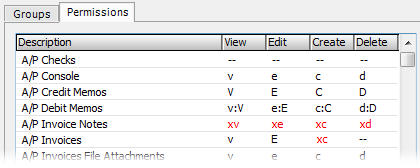
--: The permission is not attributed based on a group the user is in and is not explicitly assigned to the user (see the A/P Checks row in the sample image).
Lower case letter: The permission is attributed to the user based on a group of which the user is a member (see the A/P Console row in the sample image, which shows how the letters would appear if members of the AcctsPay group were allowed all rights to the A/P Console, this user was a member of that group, and none of the permissions were explicitly changed for this user).
Upper case letter: The permission is explicitly assigned to this user (see the A/P Credit Memos row in the sample image, which shows how the letters would appear if none of the rights were attributed based on a group the user is in, but all rights were explicitly assigned to this user.
Lower case and upper case letter: The permission is both attributed to the user based on a group of which the user is a member and has been explicitly assigned to this user (see the A/P Debit Memos row in the sample image). This situation can occur when an attributed right is also explicitly assigned by checking an action box and/or by using a template to overwrite a value attributed by group membership.
Red font: The permission is explicitly denied to the current user (see the A/P Invoice Notes row in the sample image, which shows how the letters would appear if this user was explicitly denied all rights to A/P Invoice Notes).
The permissions do not have to be the same for each column in a given row. The A/P invoices row in the sample image shows a group membership attributed View right, an explicitly assigned Edit right, a denied Create right, and a Delete right that has not been attributed by group membership or explicitly assigned to this user.
To change the user's security rights using the Allow and/or Deny inheritance action boxes, do the following:
Select the row for which you want to change the user's rights.
Use the action box(es) to the right of the list to update the permissions for the rows selected in the grid. The action boxes do the following:
View: When checked, the user can view information associated with the selected row(s). This box does not give permission to edit, create, or delete information associated with the selected row(s).
Edit: When checked, the user can edit information associated with the selected row(s). This box does not give permission to create or delete information associated with the selected row(s).
Create: When checked, the user can add information associated with the selected row(s). This box does not give permission to delete information associated with the selected row(s).
Delete: When checked, the user can delete information associated with the selected row(s).
All rights: When checked, the user can view, edit, create, and/or delete information associated with the selected row(s).
Deny view: When checked, the user cannot view information associated with the selected row(s)—even if the user is a member of a group that has this right.
Edit: When checked, the user cannot edit information associated with the selected row(s)—even if the user is a member of a group that has this right.
Create: When checked, the user cannot add information associated with the selected row(s)—even if the user is a member of a group that has this right.
Delete: When checked, the user cannot delete information associated with the selected row(s)—even if the user is a member of a group that has this right.
Deny all: When checked, the user cannot view, edit, create, or delete information associated with the selected row(s)—even if the user is a member of a group that has one or more of these rights.
To assign rights based on a template, do the following:
Click [Template...] to display the Copy from Template window.
To view the permissions associated with a template, do the following:
Select the template for which you want to view permissions.
Click [View] button. E-admin displays the Template Properties window.
When finished viewing the template's properties, click the [Cancel] button or the [Close] (red X) button on the title bar.
To overwrite the permissions assigned to this user, do the following:
Select the template you want to use to overwrite permissions for this user.
Click [Overwrite] to have the system overwrite user rights (including explicitly assigned user rights and group membership inheritance denied rights) using the selected template.
To add rights associated with a template to a user's existing rights while retaining any group membership rights, group membership inheritance denied rights, and explicitly assigned rights, do the following:
Select the template from which you want to merge permissions with this user's permissions.
Click [Merge] button.
Once you have specified the rights for the user, click [OK] button.
E-admin creates the user you defined with the security settings defined on the permissions tab. If the user is logged into e-automate, they must log out and log back in for the rights to take effect.
Editing an E-automate User via E-adminEditing an E-automate User via E-admin
To edit an e-automate user via e-admin, do the following:
From the Security window, verify the Users tab is forward. If it is not, click the Users tab to bring it forward.
Select the user you want to edit.
Click the [Edit...] button. The system opens the User Properties window.
In the User name field, enter the name of the person to whom you are assigning this user ID or make no change to keep the value displayed.
In the Password field, enter the password for this user ID or make no change to keep the value displayed.
In the Confirm password field, re-enter the password you just entered or make no change to keep the value displayed.
In the Employee/Contractor field, use the down arrow to select an employee from your e-automate database list of employees.
To require a strong password for this user, check the Require strong password for this user checkbox.
To force the user to change the password the next time the user logs in to e-automate, check the Require password change at next login checkbox.
To force the user to change the password on an interval, do the following:
Check the Require a password change after the following number of days box.
Specify the number of days to use for the interval.
To make this user a member of a group, do the following:
Verify the Groups tab is forward. If it is not, click the Groups tab to bring it forward.
In the Groups this user is not a member of region, select a group to add this user to.
Click the  button. The system adds the group you selected to the Groups this user is a member of region.
To remove a user from a group, do the following:
Select the group in the Groups this user is a member of region.
Click the  button. The system removes the user's group membership.
Click the Permissions tab to bring it forward.
The system displays the table security and feature rights assigned to the user.
--: The permission is not attributed based on a group the user is in and is not explicitly assigned to the user (see the A/P Checks row in the sample image).
Lower case letter: The permission is attributed to the user based on a group of which the user is a member (see the A/P Console row in the sample image, which shows how the letters would appear if members of the AcctsPay group were allowed all rights to the A/P Console, this user was a member of that group, and none of the permissions were explicitly changed for this user).
Upper case letter: The permission is explicitly assigned to this user (see the A/P Credit Memos row in the sample image, which shows how the letters would appear if none of the rights were attributed based on a group the user is in, but all rights were explicitly assigned to this user.
Lower case and upper case letter: The permission is both attributed to the user based on a group of which the user is a member and has been explicitly assigned to this user (see the A/P Debit Memos row in the sample image). This situation can occur when an attributed right is also explicitly assigned by checking an action box and/or by using a template to overwrite a value attributed by group membership.
Red font: The permission is explicitly denied to the current user (see the A/P Invoice Notes row in the sample image, which shows how the letters would appear if this user was explicitly denied all rights to A/P Invoice Notes).
The permissions do not have to be the same for each column in a given row. The A/P invoices row in the sample image shows a group membership attributed View right, an explicitly assigned Edit right, a denied Create right, and a Delete right that has not been attributed by group membership or explicitly assigned to this user.
To change the user's security rights using the Allow and/or Deny inheritance action boxes, do the following:
Select the row for which you want to change the user's rights.
Use the action box(es) to the right of the list to update the permissions for the rows selected in the grid. The action boxes do the following:
View: When checked, the user can view information associated with the selected row(s). This box does not give permission to edit, create, or delete information associated with the selected row(s).
Edit: When checked, the user can edit information associated with the selected row(s). This box does not give permission to create or delete information associated with the selected row(s).
Create: When checked, the user can add information associated with the selected row(s). This box does not give permission to delete information associated with the selected row(s).
Delete: When checked, the user can delete information associated with the selected row(s).
All rights: When checked, the user can view, edit, create, and/or delete information associated with the selected row(s).
Deny view: When checked, the user cannot view information associated with the selected row(s)—even if the user is a member of a group that has this right.
Edit: When checked, the user cannot edit information associated with the selected row(s)—even if the user is a member of a group that has this right.
Create: When checked, the user cannot add information associated with the selected row(s)—even if the user is a member of a group that has this right.
Delete: When checked, the user cannot delete information associated with the selected row(s)—even if the user is a member of a group that has this right.
Deny all: When checked, the user cannot view, edit, create, or delete information associated with the selected row(s)—even if the user is a member of a group that has one or more of these rights.
To assign rights based on a template, do the following:
Click the [Template...] button to display the Copy from Template window.
To view the permissions associated with a template, do the following:
Select the template for which you want to view permissions.
Click the [View] button. The system displays the Template Properties window.
When finished viewing the template's properties, click the [Cancel] button or the [Close] (red X) button on the title bar.
To overwrite the permissions assigned to this user, do the following:
Select the template you want to use to overwrite permissions for this user.
Click the [Overwrite] button to have the system overwrite user rights (including explicitly assigned user rights and group membership inheritance denied rights) using the selected template.
To add rights associated with a template to a user's existing rights while retaining any group membership rights, group membership inheritance denied rights, and explicitly assigned rights, do the following:
Select the template from which you want to merge permissions with this user's permissions.
Click the [Merge] button.
Once you have specified the rights for the user, click the [OK] button to save your changes.
Deleting an E-automate User via E-adminDeleting an E-automate User via E-admin
To delete an e-automate user via e-admin, do the following:
From the Security window, verify the Users tab is forward. If it is not, click the Users tab to bring it forward.
Select the user you want to delete.
Click [Delete] button.
The system displays the message, "Do you want to delete the selected user? - [User ID] - [User name]" Do one of the following:
Click the [Yes] button to confirm deleting the user. The system closes the message and deletes the user from the Security window's Users tab.
Click the [No] button to keep the user. The system closes the message and does not delete the user from the Security window's Users tab.
Importing an E-automate User via E-adminImporting an E-automate User via E-admin
To import an e-automate user via e-admin, do the following:
From the Security window, verify the Users tab is forward. If it is not, click the Users tab to bring it forward.
Click the [Import...] button. The system opens the Import Users window.
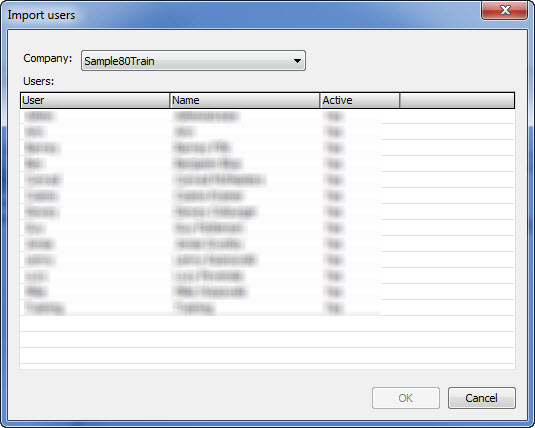
In the Company field, use the drop-down menu to select the company containing the user you want to import (e.g., Sample). Users belonging to the selected company are displayed.
Select the user you want to import.
Check the [Include group assignments that match by name] box if you want the system to listed on the Groups tab of the destination record any security groups listed on the Groups tab of the source record where the security group has the same name in both the source and destination company databases. The system will then assign on the Permissions tab of the destination record the rights associated with the security group(s) in the destination company database (which may be different from the rights associated with the security group(s) in the source company database. The system will also include on the Permissions tab of the destination record any rights explicitly granted/denied for the user on the Permissions tab of the source record. Do not check the [Include group assignments that match by name] box if you do not want the system to listed on the Groups tab of the destination record any security groups listed on the Groups tab of the source record, regardless of whether the security group has the same name in both the source and destination company databases. When this box is not checked, the system only includes on the Permissions tab of the destination record any rights explicitly granted/denied for the user on the Permissions tab of the source record. Any rights assigned to the user in the source record based on security groups will not be assigned to the user in the destination record.
Click the [OK] button. A copy of the user and permissions is imported and displayed on the Security window's Users tab.
Creating an E-automate User Based on a Copy of Another User via E-adminCreating an E-automate User Based on a Copy of Another User via E-admin
To create an e-automate user based on a copy of another user via e-admin, do the following:
From the Security window, verify the Users tab is forward. If it is not, click the Users tab to bring it forward.
Verify the Users tab is forward and select the user you want to copy.
Click the [Copy...] button. The system opens the Copy User window with a copy of the selected user including all the previously assigned permissions.
In the User ID field, enter the user ID for the copied user.
This is what the new user enters into the User ID field at the e-automate login screen.
In the User Name field, enter the name of the person assigned to the user ID.
You use this information to connect a real person with a user ID in case you need to know who it was that was logged in under a particular ID at any given time.
In the Password field, enter the password for this user ID.
This is the password that the user is be required to enter at the e-automate login screen.
In the Confirm password field, reenter the password you just entered.
In the Employee/Contractor field, use the down arrow to select an employee from you e-automate database list of employees.
To require a strong password for this user, check the Require strong password for this user checkbox.
To force the user to change the password the next time the user logs in to e-automate, check the Require password change at next login checkbox.
To force the user to change the password on an interval, do the following:
Check the Require a password change after the following number of days box.
Specify the number of days to use for the interval.
To make this user a member of a group, do the following:
Verify the Group tab is forward. If it is not, click the Group tab to bring it forward.
In the Groups this user is not a member of region, select a group to add this user to.
Click the button. The system adds the group you selected to the Groups this user is a member of region.
To remove a user from a group, do the following:
Select the group in the Groups this user is a member of region.
Click the button. The system removes the user's group membership.
Click the Permissions tab to bring it forward. The system displays the table security and feature rights assigned to the user.
--: The permission is not attributed based on a group the user is in and is not explicitly assigned to the user (see the A/P Checks row in the sample image).
Lower case letter: The permission is attributed to the user based on a group of which the user is a member (see the A/P Console row in the sample image, which shows how the letters would appear if members of the AcctsPay group were allowed all rights to the A/P Console, this user was a member of that group, and none of the permissions were explicitly changed for this user).
Upper case letter: The permission is explicitly assigned to this user (see the A/P Credit Memos row in the sample image, which shows how the letters would appear if none of the rights were attributed based on a group the user is in, but all rights were explicitly assigned to this user.
Lower case and upper case letter: The permission is both attributed to the user based on a group of which the user is a member and has been explicitly assigned to this user (see the A/P Debit Memos row in the sample image). This situation can occur when an attributed right is also explicitly assigned by checking an action box and/or by using a template to overwrite a value attributed by group membership.
Red font: The permission is explicitly denied to the current user (see the A/P Invoice Notes row in the sample image, which shows how the letters would appear if this user was explicitly denied all rights to A/P Invoice Notes).
The permissions do not have to be the same for each column in a given row. The A/P invoices row in the sample image shows a group membership attributed View right, an explicitly assigned Edit right, a denied Create right, and a Delete right that has not been attributed by group membership or explicitly assigned to this user.
To change the user's security rights using the Allow and/or Deny inheritance action boxes, do the following:
Select the row for which you want to change the user's rights.
Use the action box(es) to the right of the list to update the permissions for the rows selected in the grid. The action boxes do the following:
View: When checked, the user can view information associated with the selected row(s). This box does not give permission to edit, create, or delete information associated with the selected row(s).
Edit: When checked, the user can edit information associated with the selected row(s). This box does not give permission to create or delete information associated with the selected row(s).
Create: When checked, the user can add information associated with the selected row(s). This box does not give permission to delete information associated with the selected row(s).
Delete: When checked, the user can delete information associated with the selected row(s).
All rights: When checked, the user can view, edit, create, and/or delete information associated with the selected row(s).
Deny view: When checked, the user cannot view information associated with the selected row(s)—even if the user is a member of a group that has this right.
Edit: When checked, the user cannot edit information associated with the selected row(s)—even if the user is a member of a group that has this right.
Create: When checked, the user cannot add information associated with the selected row(s)—even if the user is a member of a group that has this right.
Delete: When checked, the user cannot delete information associated with the selected row(s)—even if the user is a member of a group that has this right.
Deny all: When checked, the user cannot view, edit, create, or delete information associated with the selected row(s)—even if the user is a member of a group that has one or more of these rights.
To assign rights based on a template, do the following:
Click the [Template...] button to display the Copy from Template window.
To view the permissions associated with a template, do the following:
Select the template for which you want to view permissions.
Click the [View] button. The system displays the Template Properties window.
When finished viewing the template's properties, click the [Cancel] button or the [Close] (red X) button on the title bar.
To overwrite the permissions assigned to this user, do the following:
Select the template you want to use to overwrite permissions for this user.
Click the [Overwrite] button to have the system overwrite user rights (including explicitly assigned user rights and group membership inheritance denied rights) using the selected template.
To add rights associated with a template to a user's existing rights while retaining any group membership rights, group membership inheritance denied rights, and explicitly assigned rights, do the following:
Select the template from which you want to merge permissions with this user's permissions.
Click the [Merge] button.
Once you have specified the rights for the user, click the [OK] button. The system creates the user you defined with the security settings defined on the Permissions tab.
Using Security GroupsUsing Security Groups
You use groups in e-admin as a way of giving multiple users identical access in e-automate. Users can be members of multiple groups. When a user is a member of a group, the user inherits the rights defined for the group unless specifically denied inheritance as noted in the "Managing E-automate User Security" section.
In e-admin, you use the Security window's Groups tab to add a new group, edit the settings for an existing group, delete a group, import a group from another company, and copy an existing group to use as a template for creating a new group.
Creating a Security GroupCreating a Security Group
To create a security group via e-admin, do the following:
From the Security window, click the Groups tab to bring it forward.
Click the [Add...] button. The system opens the Group Properties window.
In the Group ID field, enter the ID of the group you want to create.
In the Description field, enter a description so other administrators know the purpose of the group.
Verify the Users tab is forward. If it is not, click the Users tab to bring it forward.
To add a user to this group, do the following:
In the Users not in this group region, select one or more users to add this group.
Click the button. The system adds the user(s) you selected to the Users in this group region.
To remove a user from a group, do the following:
Select one or more users in the Users in this group region.
Click the button. The system removes the user(s) from the group.
Click the Permissions tab to bring it forward.
The system displays the table security and feature rights assigned to the group.
--: The permission is not attributed to users in this group based on the users' being in this group.
Lower case letter: The permission is attributed to users in this group based on the users' being in this group.
The permissions do not have to be the same for each column in a given row. The A/P invoices row, for example, may attribute the View right to the group, but may not attribute the Edit, Create, and Delete rights to the group.
To change the group's security rights, do the following:
Select the permission row(s) for which you want to change the group's rights.
Using the Allow box(es) to the right of the list, do any of the following:
Check the View box to allow users in this group, by default, to view information associated with the selected row(s). The system places a v in the View column for the selected row(s). Checking this box does not give permission to edit, create, or delete information associated with the selected row(s). Uncheck the View box if users in this group, by default, do not have the right to view information associated with the selected row(s). The system places -- in the View column for the selected row(s).
Check the Edit box to allow users in this group, by default, to edit information associated with the selected row(s). The system places an e in the Edit column for the selected row(s). Checking this box does not give permission to create or delete information associated with the selected row(s). Uncheck the Edit box if users in this group, by default, do not have the right to edit information associated with the selected row(s). The system places -- in the Edit column for the selected row(s).
Check the Create box to allow users in this group, by default, to add information associated with the selected row(s). The system places a c in the Create column for the selected row(s). Checking this box does not give permission to delete information associated with the selected row(s). Uncheck the Create box if users in this group, by default, do not have the right to add information associated with the selected row(s). The system places -- in the Create column for the selected row(s).
Check the Delete box to allow users in this group, by default, can delete information associated with the selected row(s). The system places a d in the Delete column for the selected row(s). Uncheck the Delete box if users in this group, by default, cannot delete information associated with the selected row(s). The system places -- in the Delete column for the selected row(s).
Check the All rights box to allow users in this group, by default, to view, edit, create, and delete information associated with the selected row(s). The system places a v in the View, column, an e in the Edit, column, a c in the Create, column, and a d in the Delete column for the selected row(s). Uncheck the View box if users in this group, by default, do not have the right to view, edit, create, or delete information associated with the selected row(s). The system places -- in the View, Edit, Create, and Delete column for the selected row(s).
To assign rights based on a template, do the following:
Click the [Template...] button to display the Copy from Template window.
To view the permissions associated with a template, do the following:
Select the template for which you want to view permissions.
Click the [View] button. The system displays the Template Properties window.
When finished viewing the template's properties, click the [Cancel] button or the [Close] (red X) button on the title bar.
To overwrite the permissions attributed to users in this group based on the users' being in this group, do the following:
Select the template you want to use to overwrite permissions for this group.
Click the [Overwrite] button to have the system overwrite the rights attributed to the group using the rights defined for the selected template.
To add rights associated with a template to a group's existing rights while retaining any existing group rights, do the following:
Select the template from which you want to merge permissions with this group's existing permissions.
Click the [Merge] button.
If you want to define field-level security for this group, do the following:
Click the Dialogs tab.
Follow the steps in the Field-level Security topic.
Once you have specified the permission rights for the group, click the [OK] button. The system creates the security group and assigns applicable permission rights to any users you assigned to the security group. Any subsequent users you add to the group are given the same permissions defined for the group unless inheritance is denied.
Editing a Security GroupEditing a Security Group
To edit a security group via e-admin, do the following:
From the Security window, click the Groups tab to bring it forward.
Select the group you want to edit.
Click the [Edit] button. The system opens the Group Properties window.
In the Description field, enter a description so other administrators know the purpose of the group or make no change to keep the value displayed.
Verify the Users tab is forward. If it is not, click the Users tab to bring it forward.
To add a user to this group, do the following:
In the Users not in this group region, select one or more users to add this group.
Click the button. The system adds the user(s) you selected to the Users in this group region.
To remove a user from this group, do the following:
Select one or more users in the Users in this group region.
Click the button. The system removes the user(s) from the group.
Click the Permissions tab to bring it forward.
The system displays the table security and feature rights assigned to the group.
--: The permission is not attributed to users in this group based on the users' being in this group.
Lower case letter: The permission is attributed to users in this group based on the users' being in this group.
The permissions do not have to be the same for each column in a given row. The A/P invoices row, for example, may attribute the View right to the group, but may not attribute the Edit, Create, and Delete rights to the group.
To change the group's security rights, do the following:
Select the permission row(s) for which you want to change the group's rights.
Using the Allow box(es) to the right of the list, do any of the following:
Check the View box to allow users in this group, by default, to view information associated with the selected row(s). The system places a v in the View column for the selected row(s). Checking this box does not give permission to edit, create, or delete information associated with the selected row(s). Uncheck the View box if users in this group, by default, do not have the right to view information associated with the selected row(s). The system places -- in the View column for the selected row(s).
Check the Edit box to allow users in this group, by default, to edit information associated with the selected row(s). The system places an e in the Edit column for the selected row(s). Checking this box does not give permission to create or delete information associated with the selected row(s). Uncheck the Edit box if users in this group, by default, do not have the right to edit information associated with the selected row(s). The system places -- in the Edit column for the selected row(s).
Check the Create box to allow users in this group, by default, to add information associated with the selected row(s). The system places a c in the Create column for the selected row(s). Checking this box does not give permission to delete information associated with the selected row(s). Uncheck the Create box if users in this group, by default, do not have the right to add information associated with the selected row(s). The system places -- in the Create column for the selected row(s).
Check the Delete box to allow users in this group, by default, can delete information associated with the selected row(s). The system places a d in the Delete column for the selected row(s). Uncheck the Delete box if users in this group, by default, cannot delete information associated with the selected row(s). The system places -- in the Delete column for the selected row(s).
Check the All rights box to allow users in this group, by default, to view, edit, create, and delete information associated with the selected row(s). The system places a v in the View, column, an e in the Edit, column, a c in the Create, column, and a d in the Delete column for the selected row(s). Uncheck the View box if users in this group, by default, do not have the right to view, edit, create, or delete information associated with the selected row(s). The system places -- in the View, Edit, Create, and Delete column for the selected row(s).
To assign rights based on a template, do the following:
Click the [Template...] button to display the Copy from Template window.
To view the permissions associated with a template, do the following:
Select the template for which you want to view permissions.
Click the [View] button. The system displays the Template Properties window.
When finished viewing the template's properties, click the [Cancel] button or the [Close] (red X) button on the title bar.
To overwrite the permissions attributed to users in this group based on the users' being in this group, do the following:
Select the template you want to use to overwrite permissions for this group.
Click the [Overwrite] button to have the system overwrite the rights attributed to the group using the rights defined for the selected template.
To add rights associated with a template to a group's existing rights while retaining any existing group rights, do the following:
Select the template from which you want to merge permissions with this group's existing permissions.
Click the [Merge] button.
If you want to change field-level security for this group, do the following:
Click the Dialogs tab.
Follow the steps in the Field-level Security topic.
Once you have finished making any changes, click the [OK] button. The system updates the security group and assigns applicable permission rights to any users you assigned to the security group. Any subsequent users you add to the group are given the same permissions defined for the group unless inheritance is denied.
Deleting a Security GroupDeleting a Security Group
To delete a security group via e-admin, do the following:
From the Security window, click the Groups tab to bring it forward.
Select the group you want to delete.
Click the [Delete] button.
The system displays the message, "Do you want to delete the selected group? - [Group] - [Description]" Do one of the following:
Click the [Yes] button to confirm deleting the group. The system closes the message and deletes the group from the Security window's Groups tab.
Click the [No] button to keep the group. The system closes the message and does not delete the group from the Security window's Groups tab.
Importing a Security GroupImporting a Security Group
To import a security group via e-admin, do the following:
From the Security window, click the Groups tab to bring it forward.
Click the [Import...] button to open the Import Groups window.
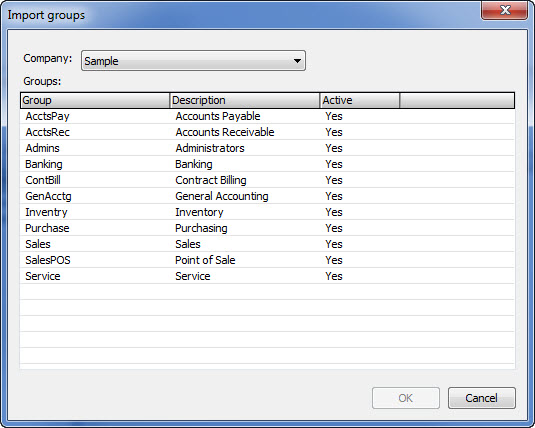
In the Company field, use the drop-down menu to select the company containing the group you want to import. E-admin displays groups in the selected company.
Select the group you want to import.
Click the [Import] button. A copy of the group and the group's permissions are imported, and the group is displayed on the Security window's Groups tab.
Creating a Security Group Based on a Copy of Another Security GroupCreating a Security Group Based on a Copy of Another Security Group
To create a security group based on a copy of an existing security group via e-admin, do the following:
From the Security window, click the Groups tab to bring it forward.
Select the group you want to copy.
Click the [Copy...] button. The system opens the Copy of [Group] window with a copy of the selected group, including all the previously assigned permissions.
In the Group ID field,
enter an identifier for this copied group.
In the Description field, enter a description of the group.
Verify the Users tab is forward. If it is not, click the Users tab to bring it forward.
To add a user to this group, do the following:
In the Users not in this group region, select one or more users to add this group.
Click the button. The system adds the user(s) you selected to the Users in this group region.
To remove a user from this group, do the following:
Select one or more users in the Users in this group region.
Click the button. The system removes the user(s) from the group.
Click the Permissions tab to bring it forward.
The system displays the table security and feature rights assigned to the group.
--: The permission is not attributed to users in this group based on the users' being in this group.
Lower case letter: The permission is attributed to users in this group based on the users' being in this group.
The permissions do not have to be the same for each column in a given row. The A/P invoices row, for example, may attribute the View right to the group, but may not attribute the Edit, Create, and Delete rights to the group.
To change the group's security rights, do the following:
Select the permission row(s) for which you want to change the group's rights.
Using the Allow box(es) to the right of the list, do any of the following:
Check the View box to allow users in this group, by default, to view information associated with the selected row(s). The system places a v in the View column for the selected row(s). Checking this box does not give permission to edit, create, or delete information associated with the selected row(s). Uncheck the View box if users in this group, by default, do not have the right to view information associated with the selected row(s). The system places -- in the View column for the selected row(s).
Check the Edit box to allow users in this group, by default, to edit information associated with the selected row(s). The system places an e in the Edit column for the selected row(s). Checking this box does not give permission to create or delete information associated with the selected row(s). Uncheck the Edit box if users in this group, by default, do not have the right to edit information associated with the selected row(s). The system places -- in the Edit column for the selected row(s).
Check the Create box to allow users in this group, by default, to add information associated with the selected row(s). The system places a c in the Create column for the selected row(s). Checking this box does not give permission to delete information associated with the selected row(s). Uncheck the Create box if users in this group, by default, do not have the right to add information associated with the selected row(s). The system places -- in the Create column for the selected row(s).
Check the Delete box to allow users in this group, by default, can delete information associated with the selected row(s). The system places a d in the Delete column for the selected row(s). Uncheck the Delete box if users in this group, by default, cannot delete information associated with the selected row(s). The system places -- in the Delete column for the selected row(s).
Check the All rights box to allow users in this group, by default, to view, edit, create, and delete information associated with the selected row(s). The system places a v in the View, column, an e in the Edit, column, a c in the Create, column, and a d in the Delete column for the selected row(s). Uncheck the View box if users in this group, by default, do not have the right to view, edit, create, or delete information associated with the selected row(s). The system places -- in the View, Edit, Create, and Delete column for the selected row(s).
To assign rights based on a template, do the following:
Click the [Template...] button to display the Copy from Template window.
To view the permissions associated with a template, do the following:
Select the template for which you want to view permissions.
Click the [View] button. The system displays the Template Properties window.
When finished viewing the template's properties, click the [Cancel] button or the [Close] (red X) button on the title bar.
To overwrite the permissions attributed to users in this group based on the users' being in this group, do the following:
Select the template you want to use to overwrite permissions for this group.
Click the [Overwrite] button to have the system overwrite the rights attributed to the group using the rights defined for the selected template.
To add rights associated with a template to a group's existing rights while retaining any existing group rights, do the following:
Select the template from which you want to merge permissions with this group's existing permissions.
Click the [Merge] button.
If you want to define field-level security for this group, do the following:
Click the Dialogs tab.
Follow the steps in the Field-level Security topic.
Once you have finished making any changes, click the [OK] button. The system adds the security group to the Security window's Groups tab and assigns applicable permission rights to any users you assigned to the security group. Any subsequent users you add to the group are given the same permissions defined for the group unless inheritance is denied.
Using System TemplatesUsing System Templates
System templates are sets of e-automate permissions that you can assign to a user without making the user a part of a group. Once you use a system template to assign permissions to a user or to a group, no association remains between the system template and the user or between the system template and the group; subsequent modifications made to the system template do not change the user's or the group's permissions, and subsequent changes made to the user or to the group do not change the system template's permissions.
E-automate includes pre-defined system templates, which contain collections of permissions already organized by business function. You can view pre-defined system templates and create user-defined system templates based on copies of the pre-defined system templates. You cannot edit or delete pre-defined system templates. You can add, edit, and delete user-defined system templates.
You can use both pre-defined and user-defined system templates to assign permissions to users and to groups as noted in the "Managing E-automate User Security" and "Using Security Groups" sections of this topic, respectively.
Creating a User-defined System TemplateCreating a User-defined System Template
To create a user-defined system template via e-admin, do the following:
From the Security window, click the System templates tab to bring it forward.
Click the [Add...] button. The system opens the Template Properties window displaying permissions that can be assigned to the template.
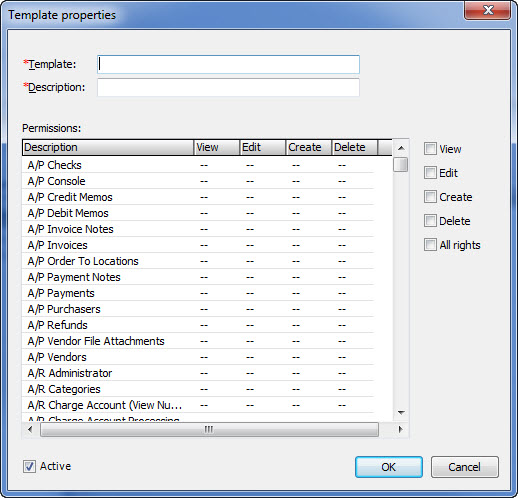
In the Template field, enter a name for this template.
In the Description field, enter a description for this template. The system displays the permissions and rights associated with the template.
--: The permission will not be assigned to a user or to a group when this template is assigned to the user or to the group, respectively.
Lower case letter: The permission will be assigned to a user or to a group when this template is assigned to the user or to the group, respectively.
The permissions do not have to be the same for each column in a given row. The A/P invoices row, for example, may attribute the View right, but may not attribute the Edit, Create, and Delete rights.
To define the security rights that will be applied to a user or to a group when using this template, do the following:
Select the permission row(s) for which you want to specify rights to associate with this template.
Using the Allow box(es) to the right of the list, do any of the following:
Check the View box to allow users, whose rights you will assign using this template, by default, to view information associated with the selected row(s). The system places a v in the View column for the selected row(s). Checking this box does not give permission to edit, create, or delete information associated with the selected row(s). Uncheck the View box if users whose rights you will assign using this template, by default, will not have the right to view information associated with the selected row(s). The system places -- in the View column for the selected row(s).
Check the Edit box to allow, users whose rights you will assign using this template, by default, to edit information associated with the selected row(s). The system places an e in the Edit column for the selected row(s). Checking this box does not give permission to create or delete information associated with the selected row(s). Uncheck the Edit box if users whose rights you will assign using this template, by default, will not have the right to edit information associated with the selected row(s). The system places -- in the Edit column for the selected row(s).
Check the Create box to allow users, whose rights you will assign using this template, by default, to add information associated with the selected row(s). The system places a c in the Create column for the selected row(s). Checking this box does not give permission to delete information associated with the selected row(s). Uncheck the Create box if users whose rights you will assign using this template, by default, will not have the right to add information associated with the selected row(s). The system places -- in the Create column for the selected row(s).
Check the Delete box to allow users, whose rights you will assign using this template, can delete information associated with the selected row(s). The system places a d in the Delete column for the selected row(s). Uncheck the Delete box if users whose rights you will assign using this template, by default, will not be allowed to delete information associated with the selected row(s). The system places -- in the Delete column for the selected row(s).
Check the All rights box to allow users, whose rights you will assign using this template, by default, to view, edit, create, and delete information associated with the selected row(s). The system places a v in the View, column, an e in the Edit, column, a c in the Create, column, and a d in the Delete column for the selected row(s). Uncheck the View box if users whose rights you will assign using this template, by default, will not have the right to view, edit, create, or delete information associated with the selected row(s). The system places -- in the View, Edit, Create, and Delete column for the selected row(s).
After you finish defining the system template, click the [OK] button. The system creates the system template and lists the system template on the Security window's System templates tab.
Editing a User-defined System TemplateEditing a User-defined System Template
To edit a user-defined system template via e-admin, do the following:
From the Security window, click the System templates tab to bring it forward.
Select the user-defined template you want to edit.
Click the [Edit...] button. The system opens the Template Properties window displaying permissions that can be assigned to the template.
In the Template field, enter a name for this template or make no change to keep the value displayed.
In the Description field, enter a description for this template or make no change to keep the value displayed.
The system displays the table security and feature rights assigned to the group.
--: The permission will not be assigned to a user or to a group when this template is assigned to the user or to the group, respectively.
Lower case letter: The permission will be assigned to a user or to a group when this template is assigned to the user or to the group, respectively.
The permissions do not have to be the same for each column in a given row. The A/P invoices row, for example, may attribute the View right, but may not attribute the Edit, Create, and Delete rights.
To edit the security rights that will be applied to a user or to a group when using this template, do the following:
Select the permission row(s) for which you want to specify rights to associate with this template.
Using the Allow box(es) to the right of the list, do any of the following:
Check the View box to allow users, whose rights you will assign using this template, by default, to view information associated with the selected row(s). The system places a v in the View column for the selected row(s). Checking this box does not give permission to edit, create, or delete information associated with the selected row(s). Uncheck the View box if users whose rights you will assign using this template, by default, will not have the right to view information associated with the selected row(s). The system places -- in the View column for the selected row(s).
Check the Edit box to allow, users whose rights you will assign using this template, by default, to edit information associated with the selected row(s). The system places an e in the Edit column for the selected row(s). Checking this box does not give permission to create or delete information associated with the selected row(s). Uncheck the Edit box if users whose rights you will assign using this template, by default, will not have the right to edit information associated with the selected row(s). The system places -- in the Edit column for the selected row(s).
Check the Create box to allow users, whose rights you will assign using this template, by default, to add information associated with the selected row(s). The system places a c in the Create column for the selected row(s). Checking this box does not give permission to delete information associated with the selected row(s). Uncheck the Create box if users whose rights you will assign using this template, by default, will not have the right to add information associated with the selected row(s). The system places -- in the Create column for the selected row(s).
Check the Delete box to allow users, whose rights you will assign using this template, can delete information associated with the selected row(s). The system places a d in the Delete column for the selected row(s). Uncheck the Delete box if users whose rights you will assign using this template, by default, will not be allowed to delete information associated with the selected row(s). The system places -- in the Delete column for the selected row(s).
Check the All rights box to allow users, whose rights you will assign using this template, by default, to view, edit, create, and delete information associated with the selected row(s). The system places a v in the View, column, an e in the Edit, column, a c in the Create, column, and a d in the Delete column for the selected row(s). Uncheck the View box if users whose rights you will assign using this template, by default, will not have the right to view, edit, create, or delete information associated with the selected row(s). The system places -- in the View, Edit, Create, and Delete column for the selected row(s).
After you finish editing the user-defined system template, click the [OK] button. The system updates the user-defined system template and lists the updated user-defined system template on the Security window's System templates tab.
Viewing a Pre-defined System TemplateViewing a Pre-defined System Template
To view a pre-defined system template via e-admin, do the following:
From the Security window, click the System templates tab to bring it forward.
Select the system template you want to view. The system displays the [View] button in place of the [Edit] button.
Click the [View] button. The system opens the Template Properties window and displays the selected template's information.
When finished viewing the system template, click the [Cancel] button to close the Template Properties window.
Deleting a User-defined System TemplateDeleting a User-defined System Template
To delete a user-defined system template via e-admin, do the following:
From the Security window, click the System templates tab to bring it forward.
Select the user-defined system template you want to delete.
Click the [Delete] button.
The system displays the message, "Do you want to delete the selected template? - [Template Name] - [Description]" Do one of the following:
Click the [Yes] button to confirm deleting the template. The system closes the message and deletes the template from the Security window's System templates tab.
Click the [No] button to keep the system template. The system closes the message and does not delete the system templates from the Security window's System templates tab.
Creating a System Template Based on a Copy of Another System TemplateCreating a System Template Based on a Copy of Another System Template
To create a user-defined system template based on a copy of another system template via e-admin, do the following:
From the Security window, click the System templates tab to bring it forward.
Select the system template you want to copy.
Click the [Copy...] button. The system opens the Copy of [System Template] window.

In the Template field, enter a name for this template.
In the Description field, enter a description for this template. The system displays the permissions and rights associated with the template.
--: The permission will not be assigned to a user or to a group when this template is assigned to the user or to the group, respectively.
Lower case letter: The permission will be assigned to a user or to a group when this template is assigned to the user or to the group, respectively.
The permissions do not have to be the same for each column in a given row. The A/P invoices row, for example, may attribute the View right, but may not attribute the Edit, Create, and Delete rights.
To define the security rights that will be applied to a user or to a group when using this template, do the following:
Select the permission row(s) for which you want to specify rights to associate with this template.
Using the Allow box(es) to the right of the list, do any of the following:
Check the View box to allow users, whose rights you will assign using this template, by default, to view information associated with the selected row(s). The system places a v in the View column for the selected row(s). Checking this box does not give permission to edit, create, or delete information associated with the selected row(s). Uncheck the View box if users whose rights you will assign using this template, by default, will not have the right to view information associated with the selected row(s). The system places -- in the View column for the selected row(s).
Check the Edit box to allow, users whose rights you will assign using this template, by default, to edit information associated with the selected row(s). The system places an e in the Edit column for the selected row(s). Checking this box does not give permission to create or delete information associated with the selected row(s). Uncheck the Edit box if users whose rights you will assign using this template, by default, will not have the right to edit information associated with the selected row(s). The system places -- in the Edit column for the selected row(s).
Check the Create box to allow users, whose rights you will assign using this template, by default, to add information associated with the selected row(s). The system places a c in the Create column for the selected row(s). Checking this box does not give permission to delete information associated with the selected row(s). Uncheck the Create box if users whose rights you will assign using this template, by default, will not have the right to add information associated with the selected row(s). The system places -- in the Create column for the selected row(s).
Check the Delete box to allow users, whose rights you will assign using this template, can delete information associated with the selected row(s). The system places a d in the Delete column for the selected row(s). Uncheck the Delete box if users whose rights you will assign using this template, by default, will not be allowed to delete information associated with the selected row(s). The system places -- in the Delete column for the selected row(s).
Check the All rights box to allow users, whose rights you will assign using this template, by default, to view, edit, create, and delete information associated with the selected row(s). The system places a v in the View, column, an e in the Edit, column, a c in the Create, column, and a d in the Delete column for the selected row(s). Uncheck the View box if users whose rights you will assign using this template, by default, will not have the right to view, edit, create, or delete information associated with the selected row(s). The system places -- in the View, Edit, Create, and Delete column for the selected row(s).
After you finish defining the system template, click the [OK] button. The system creates the system template and lists the system template on the Security window's System templates tab.
Release Support Ends July 31, 2026Release Support Ends July 31, 2026
©2026 ECI and the ECI logo are registered trademarks of ECI Software Solutions, Inc. All rights reserved.