VendorConnector
VendorConnector accompanies PO Processor and provides users with the following functions:
Receive Shipping Receipts from VendorConnector Vendors
Create PO Receipts in e-automate from the VendorConnector Vendor Shipping Receipts
Receive Invoices from VendorConnector Vendors
Create PO Invoices in e-automate from the VendorConnector Vendor Invoices
|
Table of Participating Vendors |
|
|
ACM Technologies, Inc. |
Impression Solutions, Inc. |
|
Arlington Industries |
Kyocera Document Solutions America, Inc. |
|
Cartridge Warehouse International (CWI) |
Laser Pros |
|
Clover Environmental Solutions |
LD Products |
|
Clover Environmental Solutions Canada |
NA Trading & Technology |
|
Copylite |
Polek |
|
Data Direct Thames Valley Limited |
Static Control Components (SCC) |
|
Distribution Management |
Supplies Wholesalers – Arlington |
|
Diversified Computer Supplies (DCS) |
TonerCycle/InkCycle |
|
Imaging Solutions Direct |
UFP UK Ltd |
|
Konica Minolta |
Westcoast Ltd |
For a list of POP vendor-supported functions, see the PO Processor Vendor Supported Functions topic.
Installing the VendorConnector Export Module Database ComponentInstalling the VendorConnector Export Module Database Component
Use the following instructions to copy the database component files and install the database component updates.
Copying Database Component FilesCopying Database Component Files
Download a copy of the VendorConnector Export Module database component updates file (e.g., _components.zip) from the Customer Support Center web site. When you have this file, do the following:
Extract the _components.zip file's contents into your ECI\e-automate\SQL\CompanyDb\_components folder.
Based on the image below, you would use the following process:
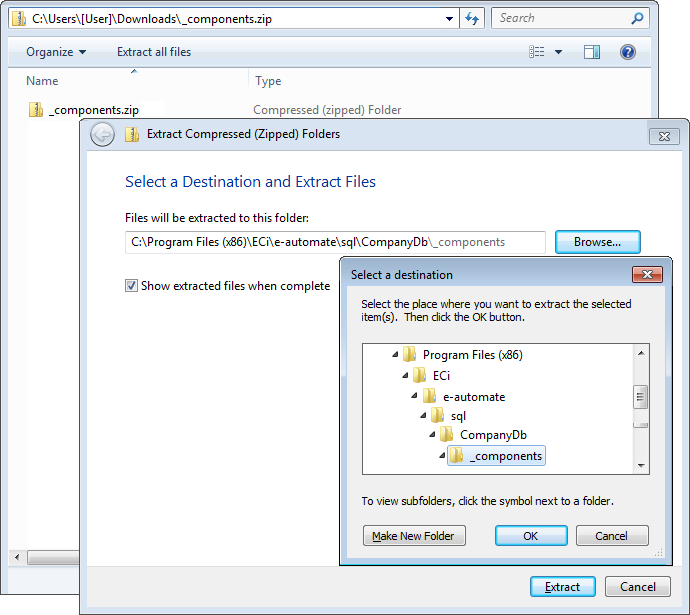
From the download folder location, click the [Extract all files] button.
Use the [Browse...] button to navigate to the location where you want to extract the files (e.g., C:\Program Files (x86)\ECI\e-automate\SQL\CompanyDb\_components).
Click [OK] to accept the specified folder location.
Click the [Extract] button to extract the files to that location.
When the system finishes extracting the files to this location, proceed to the Installing the Database Component Updates section of this topic.
Installing the Database Component UpdatesInstalling the Database Component Updates
Install the VendorConnector Export Module database component as follows:
Log in to e-admin.
From the list of companies, select the company for which you want to install this database component.
From the Company menu, select Maintenance > Database Components.... If you have your e-admin toolbar visible, you can use the drop-down menu on [Maintenance] and select Database Components.... You can also use the right-click menu and select Maintenance > Database Components....
The system displays the Enter Admin Password window.
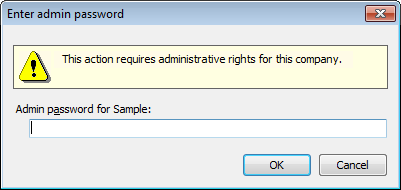
In the Admin password for [Company ID] field, enter your admin password.
Click [OK]. If the system verifies your admin password for the company you selected, the system displays the Database Components window.
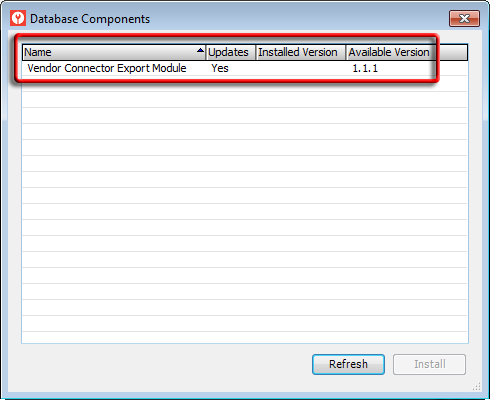
Select the Vendor Connector Export Module row.
Click the [Install] button. The system displays the Backup Database Location window. Prior to installing a database component, e-admin requires a backup of the database so that you can restore the backup if the database component installation does not complete as expected.

Enter a name for this backup in the File name field.
E-admin always displays the last navigated path in the Backup location field. If you want to browse your network for a different backup location, click [(...)] to open the Browse for Backup File... window.
Select the backup location you want to use and click [OK] to return to the Backup database location window. The filename you selected displays in the File name field.
Click [OK]. If you opted to use a file name that has already been used in e-admin, e-admin notifies you that you cannot use the file name identified. Enter a different name.
After the database is backed up, the system attempts to install the database component.
If the installation is successful, the system displays the message, "Installation complete." Click [OK] to acknowledge the message. When you click [OK], the system removes the Yes from the Updates column, updates the Installed Version column to the new version (e.g., 1.1.1), and clears the Available Version column. If the Database Components window lists additional database components to install, return to Step 5 above if you want to install the additional components.
If the installation is not successful, the system displays an Unexpected Error Information window. Review the Description field.
If the Description field reports only that one or more exceptions occurred, then the system was able to restore the backup you created before trying to install the update; you do not need to manually restore your database.
If the Description field—in addition to reporting that one or more exceptions occurred—includes a NOTICE letting you know you need to manually restore your backup, then the system was not able to automatically restore your backup. You need to restore your backup manually, and the NOTICE lists the name of the backup you created prior to trying to install the update. For information on restoring a backup, see the Restoring a Database topic.
To have the system check for additional updates, click [Refresh].
Adding VendorConnector to the Tools MenuAdding VendorConnector to the Tools Menu
The VendorConnector Tool is automatically installed with e-automate. To access the VendorConnector Tool functionality from within e-automate, you can use the Add-in Manager to add a VendorConnector option to the main e-automate window's Tools menu. To add this option to the Tools menu, do the following:
Login to e-automate.
From the Tools menu in e-automate, select Add-in Manager... to open the Add-in Manager window.
In the Menu text field, enter VendorConnector to identify this menu option.
In the Command line or web URL field, do the following:
To populate the Command line or web URL field, click the Browse for program (folder) icon to the right of the field to open the Open window.
![]()
Using the Open window, populate the File name field by browsing to the location of the eAddins.exe file on your computer.
Click the Open window's [Open] button to close the Open window and to populate the Add-in Manager window's Command line or web URL field with the selected path and file name.
In the Command arguments field, type the following, exactly as it appears below. Be sure to match upper and lower case letters.
VendorConnectorImport
Check the Include user info checkbox.
Click [QuickAdd] to add the entry to the list.
Click [Close] to close the Add In Manager window. The e-automate Tools menu now displays the VendorConnector menu option. Use this option to access the VendorConnector Tool.
Configuring Vendors as VendorConnector VendorsConfiguring Vendors as VendorConnector Vendors
To set up an existing vendor as a VendorConnector Vendor, do the following:
On the e-automate tool bar, click [Vendors] to open the Vendors window.
From the list, select the vendor you want to identify as a VendorConnector vendor.
Click [Edit] to open the Edit Vendor window.
Click the Miscellaneous tab to bring it forward.
In the Order method field, use the drop-down menu to select Export.
In the PO export module field, use the lookup to select VendorConnector Export.
Click [OK] to save this change.
For information on creating a new vendor, see the Creating Vendors topic. When you enter information on the Miscellaneous tab, enter the selections listed in Steps 5 and 6 above.
Configuring the VendorConnector Export ModuleConfiguring the VendorConnector Export Module
To configure the VendorConnector Export Module, do the following:
From the Tools menu, select Options to open the Options window.
In the left pane of the window, double-click on Misc. options. The miscellaneous options are displayed in the right pane.
Click the [Export Modules] button to open the Export Modules window.
Select VendorConnector Export.
Click the [Configure] button to open the VendorConnector Import/Export Settings window. Do the following:
Click the [Dealer Credentials] button to open the VendorConnector Settings window. Do the following:
In the Dealer Auth Token field, enter the appropriate token.
In the Dealer Pass Key field, enter the appropriate pass key.
Click the [Test]button. If the system displays a "Success!" message, the system was able to verify your dealer credentials; if the system displays a "Test failed" message, view the details of the message and recheck the dealer credentials you entered.
Click the [OK] button to close the VendorConnector Settings window.
Click [Vendors] to open the Vendor Mapping window. Do the following:
In the e-automate vendors field, select a vendor for whom you created a Vendor record in e-automate to work with the VendorConnector Tool.
In the VendorConnector vendors field, select the vendor you want to map your e-automate vendor to.
Click the [Add] button to add the mapping to the list of mappings on this window.
Click the [OK] button to close the Vendor Mapping window.
Click the [Ship Methods] button to open the Shipping Method Mapping window. Do the following:
In the e-automate shipping methods field, use the drop-down menu to select an e-automate shipping method that you want to map to a VendorConnector shipping method.
In the VendorConnector shipping methods field, select the vendor method shipping method you want to map your e-automate shipping method to.
Click the [Add] button to add the mapping to the list of mappings on this window.
Click the [OK] button to close the Shipping Method Mapping window.
Click the [Close] button to close the VendorConnector Import/Export Settings window.
Click the [Close] button to close the Export Modules window.
Click the [OK] button to save your changes and to close the Options window.
Click the [OK] button to acknowledge the message.
Restart e-automate so that these changes will take effect.
If you are running e-agent, restart e-agent as well.
Configuring Items for VendorConnectorConfiguring Items for VendorConnector
For any item you want to add to a purchase order to be processed via VendorConnector for a VendorConnector vendor, the item's Item record should be updated to include the vendor's Vendor item number on the Edit Item Vendor window. If any item that does not include the vendor's Vendor item number is added to a purchase order to be processed via VendorConnector for a VendorConnector vendor, the VendorConnector vendor will reject the entire purchase order.
Additionally, if you plan to use the Inventory Logistics Console (ILC) to generate purchase orders and want to check the Auto assign preferred vendor checkbox on the Add to Queue window to have the system automatically assign the preferred vendor when multiple vendors are listed for an item, then checking the Preferred item vendor checkbox on the Edit Item Vendor window will facilitate the process of assigning the item to this vendor when generating purchase orders through the ILC.
For more information on creating and/or updating Item records, see the topics in the online help's E-automate > Inventory > Functional > Item Creation book. For information on using the Inventory Item utility's Insert and Update Item Vendors tab to update the Vendor item number field and the Preferred item vendor checkbox setting in the Item records, see the Using the Inventory Item Utility Spreadsheet topic.
Configuring Ship-to Locations to Include Country CodesConfiguring Ship-to Locations to Include Country Codes
The ship-to customer location must include the Country code. For information on updating Customer records, see the Creating Customers topic.
Using the VendorConnector Import ToolUsing the VendorConnector Import Tool
Use the VendorConnector Tool to do the following:
From the e-automate Tools menu, select VendorConnector to open the VendorConnector Import window.
To pull shipping receipts from VendorConnector vendors and create PO receipts in e-automate based on the pulled shipping receipts, do the following:
Select the Create PO Receipts radio button.
Pull shipping receipts from VendorConnector vendors by doing the following:
Click the Pull shipping receipts icon. The system displays the Import Shipping Receipts from VendorConnector window.
To specify the vendors from whom to import shipping receipts, do any of the following:
To pull receipts from all vendors, check the All VendorConnector vendors checkbox.
To pull receipts from one vendor, do the following:
Uncheck the All VendorConnector vendors checkbox.
In the Vendor field, use the lookup to select the vendor from whom to pull shipping receipts.
In the From date field, enter the beginning date from which to pull shipping receipts.
In the To date field, enter the ending date through which to pull shipping receipts.
Click [OK] to close this window and to pull the receipts. The system displays a message similar to the following: "Vendor [Vendor Number]: Retrieved [Number] new line item(s) to be received."
Click [OK] to acknowledge and close the message. The system updates the display with the pulled shipping receipts information. For each shipping receipt, the display lists the following information: VendorConnector vendor, Shipping receipt number, Shipping receipt date, PO number, Order date, Order req date, Vendor name, Description, Order Type, Purchaser, and Ship to name.
To create purchase receipts in e-automate from the shipping receipts pulled in Step 2.b, do the following:
For each row listed in the display on the VendorConnector Import window for which you want to create a purchase order receipt in e-automate, check the checkbox at the beginning of the row.
Click the Create receipts icon. The system creates the PO receipts and displays a message similar to the following: "Successfully created [Number] PO receipt(s)."
Click [OK] to close the message and to clear the selected row(s) from the display on the VendorConnector Import window.
To pull invoices from VendorConnector vendors and create PO invoices in e-automate based on the pulled invoices, do the following:
Select the Create PO Invoices radio button.
Pull invoices from VendorConnector vendors by doing the following:
Click the Pull invoices icon. The system displays the Import Invoices from VendorConnector window.
To specify the vendors from whom to import invoices, do any of the following:
To pull invoices from all vendors, check the All VendorConnector vendors checkbox.
To pull invoices from one vendor, do the following:
Uncheck the All VendorConnector vendors checkbox.
In the Vendor field, use the lookup to select the vendor from whom to pull invoices.
In the From date field, enter the beginning date from which to pull invoices.
In the To date field, enter the ending date through which to pull invoices.
Click [OK] to close this window and to pull the invoices. The system displays a message similar to the following: "Vendor [Vendor Number]: Retrieved [Number] new line item(s) to be invoiced."
Click [OK] to acknowledge and close the message. The system updates the display with the pulled invoice information. For each invoice, the display lists the following information: Invoice number, Invoice date, PO number, Vendor name, VendorConnector vendor, Description, Order Type, Purchaser, and Ship to name.
In the Price reconciliation region, do one of the following:
Select Use PO cost if the system should use the purchase order cost for any item where the monetary amount listed on the purchase order does not match the monetary amount listed on the invoice for the item.
Select Use invoice cost if the system should use the invoice cost for any item where the monetary amount listed on the purchase order does not match the monetary amount listed on the invoice for the item.
To create purchase invoices in e-automate from the invoices pulled in Step 3.b, do the following:
For each row listed in the display on the VendorConnector Import window for which you want to create a purchase order invoice in e-automate, check the checkbox at the beginning of the row.
Click the Create invoices icon. The system creates the PO invoices and displays a message similar to the following: "Successfully created [Number] PO invoice(s)."
Click [OK] to close the message and to clear the selected row(s) from the display on the VendorConnector Import window.
©2025 ECI and the ECI logo are registered trademarks of ECI Software Solutions, Inc. All rights reserved.