Installing and Enabling ECI Cognytics
To use the ECI Cognytics dashboards in place of the legacy Metrics consoles for your 'live' company database(s), your company needs to do the following:
Create an ECI Cognytics user in SQL. You grant this user the permission necessary to read data from the 'live' company database(s) with which you want to use the Cognytics dashboards.
Install the CognyticsDataConnector. This process installs the CognyticsDataCenter service and toolset on your system. During installation, you configure the connection using the credentials of the ECI Cognytics user you created in SQL.
Use the CognyticsDataConnector toolset as necessary to manage the connection between e-automate and ECI Cognytics.
Opt-in to using ECI Cognytics with the company database(s) with which you want to use the Cognytics dashboards.
Creating an ECI Cognytics User in SQLCreating an ECI Cognytics User in SQL
To create the ECI Cognytics user in SQL, do the following:
Open Microsoft SQL Server Management Studio.
In the Object Explorer pane, go to Security > Logins.
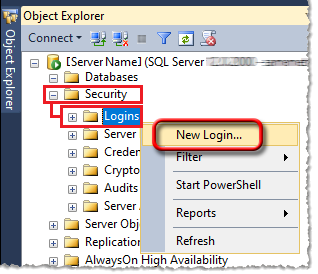
Right-click Logins, and select New Login... from the right-click menu. The system displays the Login - New window.
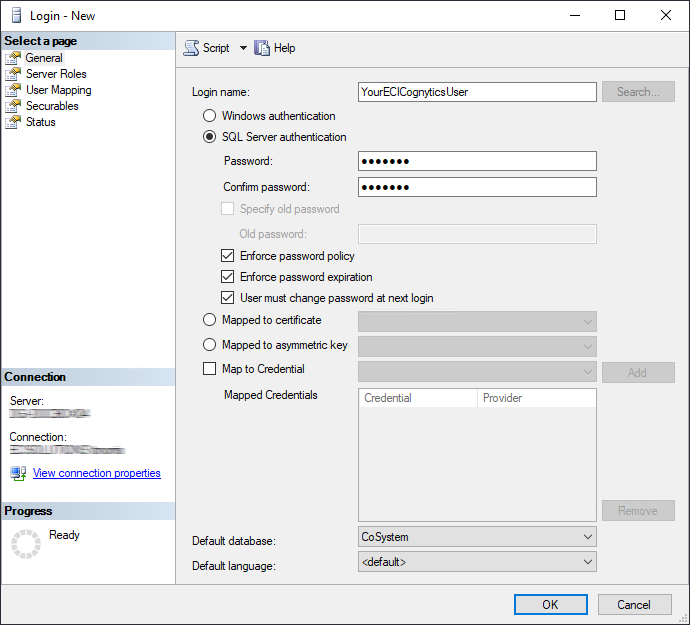
Using the Login - New window, do the following:
In the Login name field, enter a unique name for your company's ECICognytics user (e.g., YourECICognyticsUser).
Select the SQL Server authentication radio button.
In the Password field, enter a password for this login.
In the Confirm password field, re-enter the password for this login.
In the Default database field, use the drop-down menu to select CoSystem.
In the left pane, under Select a page, select User Mapping to display the User Mapping page.
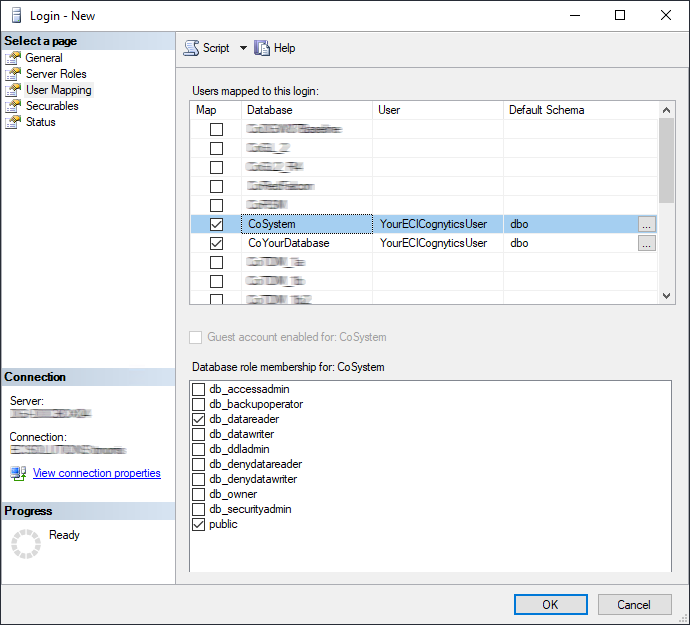
In the Users mapped to this login table, do the following:
In the Map column, check the checkbox to the left of the CoSystem database row.
In the Default Schema column for this row, enter dbo.
In the Database role membership for: CoSystem region, check the db_datareader checkbox.
For each 'live' company database with which you want to use the ECI Cognytics dashboards, do the following:
In the Users mapped to this login table, do the following:
In the Map column, check the checkbox to the left of the database row listing a company database with which you plan to use the ECI Cognytics user (in this example, CoYourDatabase).
In the Default Schema column for this row, enter dbo.
In the Database role membership for: [CoYourDatabase] region, check the db_datareader checkbox.
In the left pane, under Select a page, select Status to display the Status page.
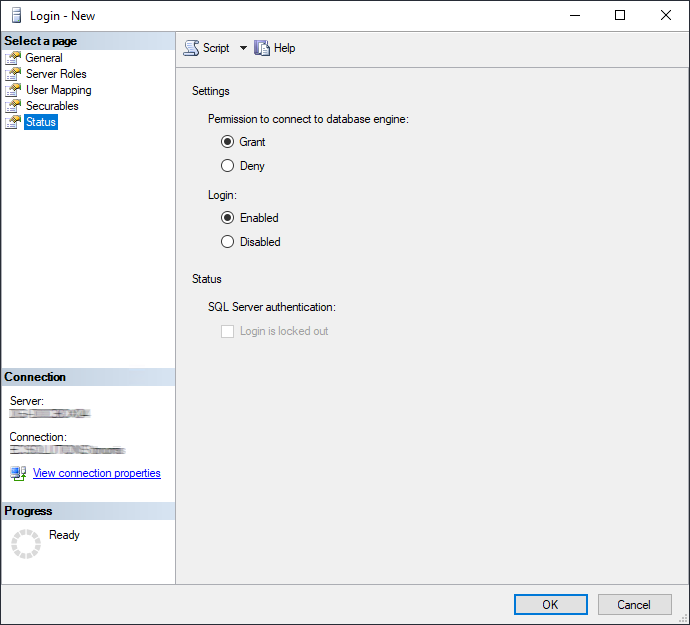
Under Settings, set Permission to connect to database engine to Grant.
Click the [OK] button to create the user and to close the Login - New window.
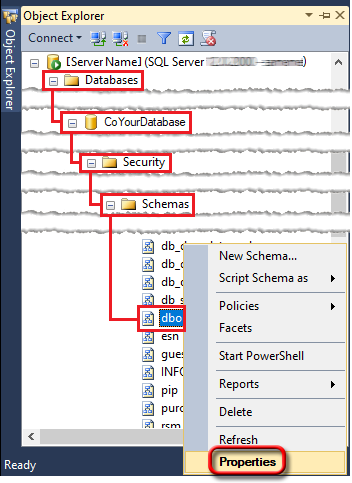
In the Object Explorer pane, go to Databases > CoSystem > Security > Schemas > dbo.

Right-click dbo, and select Properties from the right-click menu. The system displays the Schema Properties - dbo window.
Using the Schema Properties - dbo window, do the following:
In the left pane, under Select a page, select Permissions to display the Permissions page.
Click the [Search...] button to display the Select Users or Roles window.
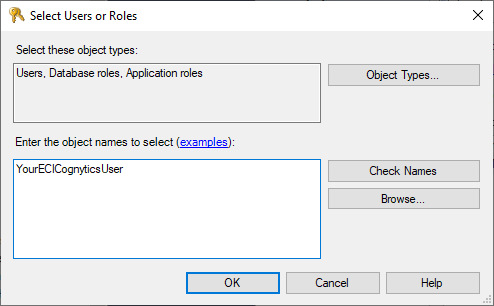
On the Select Users or Roles window, do the following:
In the Enter the object names to select (examples): region, enter the name of your ECI Cognytics user (e.g., YourECICognyticsUser).
Click the [Check Names] button. The system verifies the name by placing it within brackets (e.g., [YourECICognyticsUser]).
Click the [OK] button. The system closes the Select Users or Roles window and lists the user in the User or roles region of the Schema Properties - dbo window.
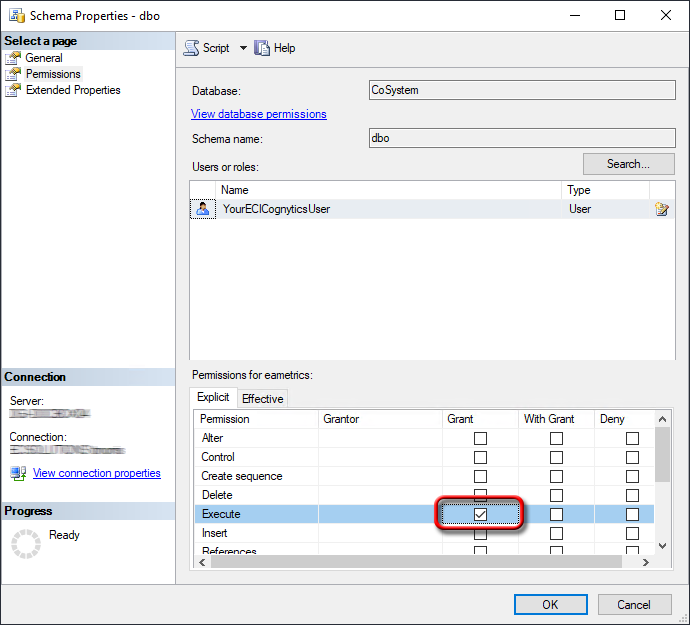
Select the ECI Cognytics user (e.g., YourECICognyticsUser) in the Users or roles region.
In the Permissions for [user] region, on the Explicit tab, for the Execute permissions row, check the Grant checkbox.
Click the [OK] button.
For each 'live' company database with which you want to use the ECI Cognytics dashboards (the company databases you included in Step 4.i. above), do the following:
In the Object Explorer pane, go to Databases > CoYourDatabase > Security > Schemas > dbo (where CoYourDatabase is your company database).
Right-click dbo, and select Properties from the right-click menu. The system displays the Schema Properties - dbo window.

Using the Schema Properties - dbo window, do the following:
In the left pane, under Select a page, select Permissions to display the Permissions page.
Click the [Search...] button to display the Select Users or Roles window.
On the Select Users or Roles window, do the following:
In the Enter the object names to select (examples): region, enter the name of your ECI Cognytics user (e.g., YourECICognyticsUser).
Click the [Check Names] button. The system verifies the name by placing it within brackets (e.g., [YourECICognyticsUser]).
Click the [OK] button. The system closes the Select Users or Roles window and lists the user in the User or roles region of the Schema Properties - dbo window.
Select the ECI Cognytics user (e.g., YourECICognyticsUser) in the Users or roles region.
In the Permissions for [user] region, on the Explicit tab, for the Execute permissions row, check the Grant checkbox.
Click the [OK] button.
Installing the CognyticsDataConnectorInstalling the CognyticsDataConnector
To integrate the ECI Cognytics dashboards with e-automate, you need run the CognyticsDataCenter installer on a computer on your network that has access (via the native SQL client or any ODBC compliant connector) to your 'live' e-automate company database(s). This process:
Installs CognyticsDataCenter as a service on the computer.
Adds a Notification Client icon to the computer's icon tray that the person who performed the installation can use to access the CognyticsDataCenter toolset.
Extracts data at scheduled times.
To install the CognyticsDataCenter service and toolset, do the following:
Verify you are running Microsoft .NET Framework 4.8+.
Verify Ports 80, 443, and 8080 are open for outbound communication (TCP).
Download the CognyticsDataCenter.msi file from https://connector.cognytics.com/Setup/CognyticsDataConnector.zip to the intended installation computer on your network.
The CognyticsDataCenter MSI installer must be run as an administrator. Microsoft does not provide a right-click option to run this installer as an administrator, so you must run the installer using a command prompt. To open the installer as an administrator from the command line, do the following (based on Windows 10):
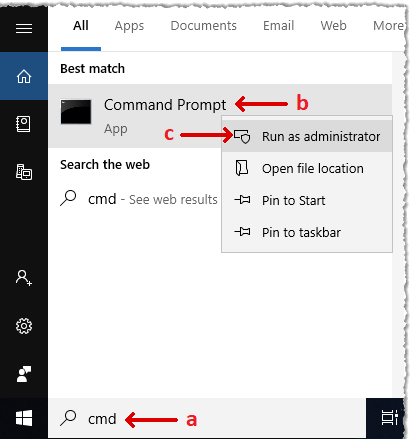
In the Windows Type here to search field, enter cmd to locate the cmd program.
Right-click the Command Prompt app.
From the right-click menu, select Run as administrator.
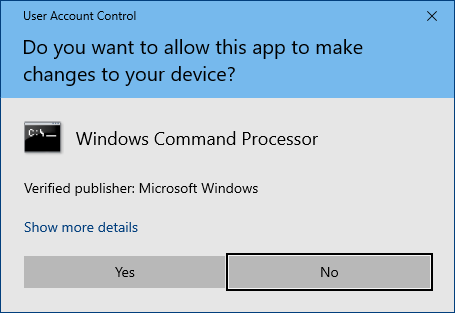
The system displays a User Account Control message, asking if you want to allow Windows Command Processor to make changes to this computer. Click [Yes].
The system displays the Administrator: C:\Windows\System32\cmd.exe command prompt window. At the command prompt, enter in quotation marks the full path to—and file name of—the installer file (e.g., "C:\Users\username\Downloads\FileName.msi" where username is the name of the currently logged in user and FileName.msi is the name of the CognyticsDataCenter.msi file).
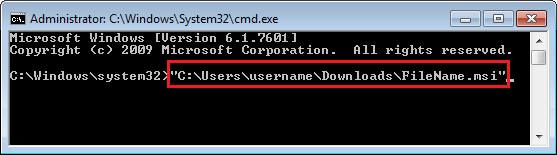
Click Enter to have the system open the CognyticsDataCenter window.
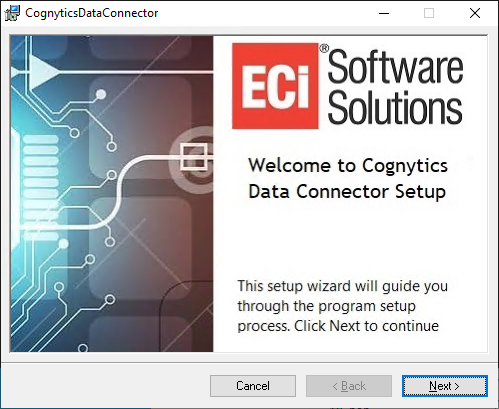
On the Welcome to Cognytics Data Connector Setup window, click the [Next] button to continue.
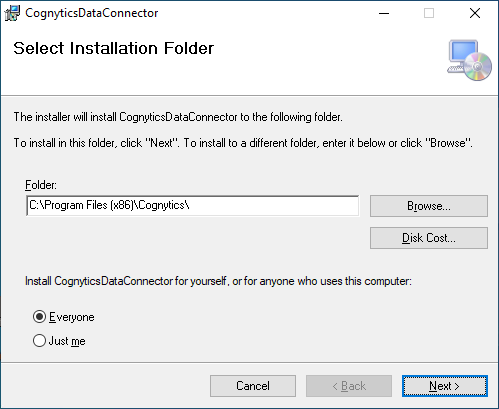
On the Select Installation Folder window, click the [Next] button to proceed with the installation using the default values.
On the Additional Information window, do the following:
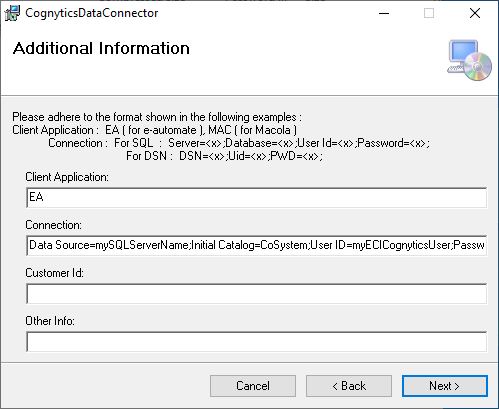
In the Client Application field, enter (case-sensitive):
EA
In the Connection field, enter:
Data Source=mySQLServerName\InstanceName;Initial Catalog=CoSystem;User ID=myECICognyticsUser;Password=myPassword;
In this connection string, replace mySQLServerName\InstanceName with your SQL Server Name (or SQL Server Name\Instance Name), myECICognyticsUser with your ECI Cognytics User, and myPassword with your ECI Cognytics User's password.
Click the [Next] button to continue.
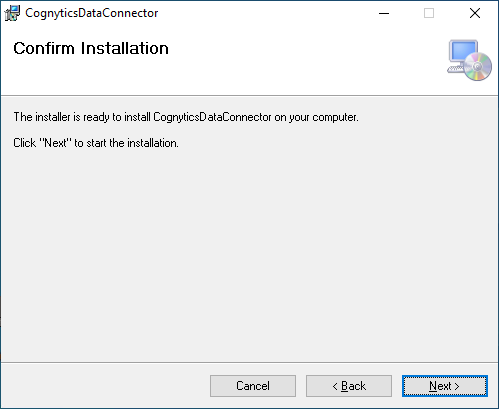
On the Confirm Installation window, click the [Next] button to continue.
The system begins the installation process.
During this process, the system displays a Client Unique Information window.
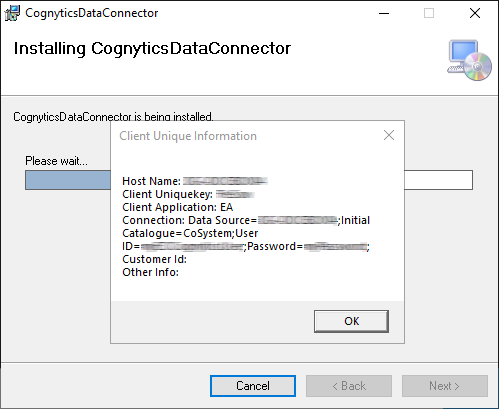
Click the [OK] button to close the Client Unique Information window.
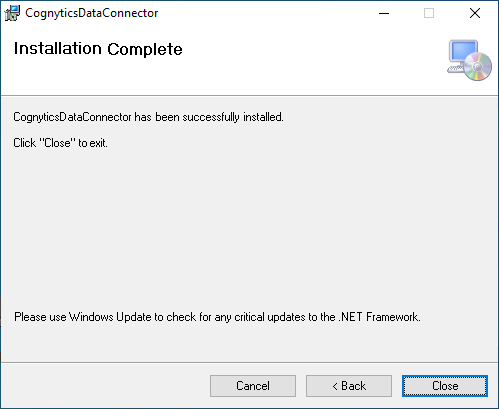
When the system displays the Installation Complete window, click the [Close] button to close the Installation Complete window.
msiexec /i CognyticsDataConnector.msi /quiet /qn CLIENTAPPLICATION="EA" CONNECTION="Data Source=<Server name\Instance name>;Initial Catalog=CoSystem;User ID=<user name>;Password=<password>"
In the above string, replace <Server name\Instance name> with your SQL Server Name (or SQL Server Name\Instance Name), <user name> with your ECI Cognytics User, and <password> with your ECI Cognytics User's password.
If you need assistance with group policy setup, contact a qualified computer professional.
If you are the individual who installed the CognyticsDataConnector, you should now see a Notification Client icon in the icon tray section of the taskbar.
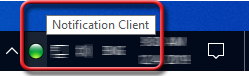
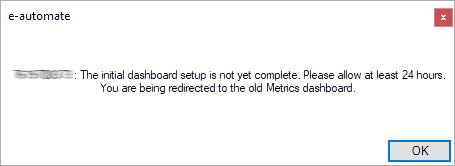
The icon may initially display red while the system is attempting to connect. When the system connects, the icon will turn green. If you click the Notification Client icon, the system will display a message similar to the following:
If the icon turns green, you are ready to proceed to the "Opting in to Using ECI Cognytics" section of this topic. If the icon remains red, see the "Using the CognyticsDataConnector Notification Manager" section of this topic for troubleshooting information.
Using the CognyticsDataConnector ToolsetUsing the CognyticsDataConnector Toolset
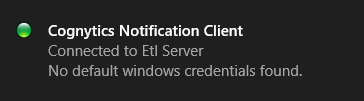
If you are the individual who installed the CognyticsDataConnector, you use the Notification Client icon on the system where you installed the CognyticsDataConnector to manage the service connection. When the icon is green, the system is connected.
When the service is not connecting (i.e., the icon is red) or when you need to change the service settings (e.g., if you want to move the service to a different PC on the network), you use the Notification Client icon's tools (accessible via the icon's right-click menu) to manage the CognyticsDataConnector.

Restarting Cognytics Data ConnectorRestarting Cognytics Data Connector
To restart the CognyticsDataConnector, do the following:
Right-click the Notification Client icon in the icon tray on the computer where you installed the CognyticsDataConnector.
Click Restart Cognytics Data Connector.
Managing Windows CredentialsManaging Windows Credentials
By default, CognyticsDataConnector runs under the local system account. If CognyticsDataConnector cannot run under the local system account (e.g., your system has domain settings that prevent the local system account from communicating on the network, or your SQL Server uses Windows authentication instead of SQL authentication) or if you want to specify a different account for CognyticsDataConnector to use, you can specify the Windows credentials you want CognyticsDataConnector to use.
To manage the Windows credentials, do the following:
Right-click the Notification Client icon in the icon tray on the computer where you installed the CognyticsDataConnector.
From the right-click menu, select Manage Windows Credentials to open the Manage Windows Credentials window.
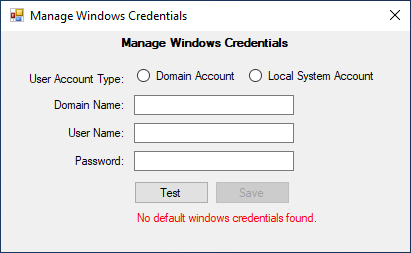
On the Manage Windows Credentials window, do the following:
Set User Account Type to Domain Account or to Local System Account.
In the Domain Name field, enter the domain associated with the domain account.
In the User Name field, enter the user name associated with the account you want CognyticsDataConnector to use.
In the Password field, enter the password associated with the specified user name's account.
Click the [Test] button. If the system is not able to connect, the system will display a message in red font below the [Test] button (e.g., Invalid windows credentials). If you change the connection string and the system is able to connect, the system will display a message in green font below the [Test] button (i.e., Credentials validated successfully. Click 'Save' to save the changes.) and will enable the [Save] button.
Click the [Save] button to save your changes.
Managing Datasource CredentialsManaging Datasource Credentials
If the service is not connecting (i.e., the icon is red) or if you need to change the connection settings (e.g., if you want to move the service to a different PC on the network), you can view and/or update the current connection settings. To manage the datasource credentials, do the following:
Right-click the Notification Client icon in the icon tray on the computer where you installed the CognyticsDataConnector.
From the right-click menu, select Manage Datasource Credentials to open the Manage Datasource Credentials window
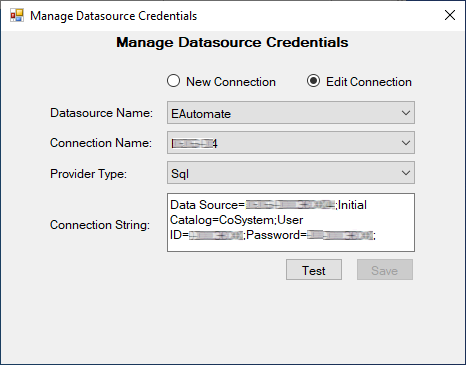
On the Manage Datasource Credentials window, do the following:
In the Name field, use the drop-down menu to select EA.
In the Connection field, enter:
Data Source=mySQLServerName;Initial Catalog=CoSystem;User ID=myECICognyticsUser;Password=myPassword;
(replacing mySQLServerName with your SQL Server Name or Instance Name, myECICognyticsUser with your ECI Cognytics User, and myPassword with your ECI Cognytics User's password)
Click the [Test] button. If the system is not able to connect, the system will display a message in red font below the [Test] button (e.g., Connection string is either null or empty). If you change the connection string and the system is able to connect, the system will display a message in green font below the [Test] button (i.e., Datasource credentials validated successfully. Click 'Save' to save the changes.) and will enable the [Save] button.
Click the [Save] button to save your changes.
If the system saves your changes, the system displays the message, "Datasource credentials saved successfully." Click [OK] to close the message.
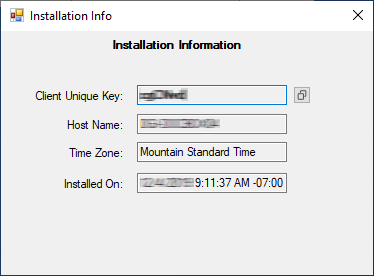
Showing Installation InfoShowing Installation Info
To view CognyticsDataConnector installation information (including the Client Unique Key value), do the following:
Right-click the Notification Client icon in the icon tray on the computer where you installed the CognyticsDataConnector.
From the right-click menu, select Show Installation info to open the Installation Info window.
Entering Your Dealer Number in E-automateEntering Your Dealer Number in E-automate
To enter your dealer number in e-automate, do the following:
From the Tools menu in e-automate, select Options to open the Options window.
In the left-hand pane of the window, double-click on Company.
In the right-hand pane, in the Dealer number field, enter any numeric value.
Click [OK] to save your changes and to close the Options window.
If you made any changes, e-automate displays an Attention window, indicating that all users must restart e-automate in order for these changes to take effect. Do the following:
Click [OK] to acknowledge the message.
Restart e-automate so that these changes will take effect.
If you are running e-agent, restart e-agent as well.
Opting in to Using ECI CognyticsOpting in to Using ECI Cognytics
ECI Cognytics is a SaaS solution. Before anyone at your company can begin using ECI Cognytics, an admin user will have to opt in to allow your company's data to be transmitted to the cloud. Two options are available for opting in to using ECI Cognytics.
Opting In When Accessing MetricsOpting In When Accessing Metrics
To opt in when accessing metrics, do the following:
Click the [Metrics] button on the e-automate toolbar. If the system verifies that you have admin rights (which are required to be able to opt in), the system displays the following options:
Accept the "terms and conditions" (link), enable the new dashboards for this Live company database, and stop showing this message.
Decline the new dashboards; use the legacy Metrics Console, and stop showing this message.
Continue using the legacy Metrics Console, but show these options before displaying the console.
Click the "terms and conditions" link, and review the terms and conditions.
If you agree to the terms and conditions, click the option to "Accept the "terms and conditions" (link), enable the new dashboards for this Live company database, and stop showing this message."
When you log back in to e-automate, the e-automate toolbar will display a [Dashboards] button instead of a [Metrics] button.
When you click the [OK] button, the system will display the legacy Metrics window.
Opting In via Miscellaneous OptionsOpting In via Miscellaneous Options
To opt in via Miscellaneous Options, do the following:
From the Tools menu, select Options to open the Options window.
In the left pane of the window, double-click on Misc. options. The miscellaneous options are displayed in the right pane.
Check the Enable Cognytics data access checkbox. the system prompts the admin user to accept terms and conditions associated with allowing your company's data to be transmitted to the cloud (equivalent to choosing Option 1 of the Metrics Options message above). If the system verifies that you have admin rights (which are required to be able to opt in), the system displays the following options:
Enable the new dashboards (which requires accepting terms and conditions, allowing your company's data to be transmitted to the cloud).
Decline the new dashboards; use the legacy Metrics Console, and stop showing this message. You will still have the option of enabling the new dashboards at a later time via Tools > Options > Misc. options.
Continue using the legacy Metrics Console, but show the Metrics Options message before displaying the console.
Click the option to "Enable the new dashboards (which requires accepting terms and conditions, allowing your company's data to be transmitted to the cloud)."
Review the terms and conditions.
Accept the terms and conditions.
Click [OK] to save the Miscellaneous Options settings and close the Options window.
When you log back in to e-automate, the e-automate toolbar will display a [Dashboards] button instead of a [Metrics] button.
When you click the [OK] button, the system will display the legacy Metrics window.
Non-supported ReleaseNon-supported Release
©2024 ECI and the ECI logo are registered trademarks of ECI Software Solutions, Inc. All rights reserved.