Import Autotask Invoices (On Premise)
*The Import Autotask Invoices e-agent task integration with e-automate requires separate licensing. Contact your Account Manager for purchasing and implementation information.
If you have been using Autotask for your helpdesk solution and want to transfer the service call information to e-automate, you use the Import Autotask Invoices task to bring the labor type service call information that you currently have in your Autotask system into e-automate. To bring the service call information into e-automate, this e-agent task pulls the Autotask service calls and enters them into your e-automate database as work orders. In order to be able to identify which work orders are those that were created from Autotask service calls, the system assigns a work order number with 'AT' at the beginning of the number.
The Import Autotask Invoices e-agent task processes information for only labor type service calls. If the service calls contain parts the technicians have left behind or anything of that nature, the system does not capture it in the work order. The system does, however, note the specifics in as much detail as appears in Autotask in the Remarks tab of the invoice that is created from the work order. If an invoice for the Autotask service call has already been processed in e-automate, the e-agent task will not process the Autotask invoice.
Before you can use the e-agent task, you must properly configure e-automate. You must verify that all technicians listed on the Autotask Invoices are set up as technicians in e-automate and have a valid email address listed. You must also configure e-automate to recognize and match the Autotask contracts and customers associated with the service calls to the contracts and customers you currently have in your e-automate database. When you have the contracts and customers from the two different systems tied together, the system can associate the work orders created from the service calls to the correct contracts and customers in your e-automate database. Additionally, you need to tie rate information associated with Autotask roles to e-automate service contracts via advanced contract billing codes used in combination with billing labor codes, activity codes associated with Autotask roles, and an activity code category for importing Autotask invoices. If there is a service call that is associated with a contract in Autotask and the system cannot find the associated e-automate contract, a work order is still created from the service call but that work order will not be associated with a contract in e-automate.
To create the Import Autotask Invoices task in e-agent, you select the customer or customers for whom you want to import service call information and specify how far back you want the system to look for service calls to bring into e-automate. You must also determine the call type, bill code, and exception on hold code you want assigned to the work orders that are created from the Autotask invoices. Only those service calls that match the customer(s) and date constraint specified by the task will be processed. All Autotask billing items must be approved and posted, and being billed to a customer or presented for information purposes only before the items can be imported into e-automate. In addition, you must provide your Autotask username and password in the e-agent task in order to be able to connect your Autotask system to your e-automate system.
After the task has run, details of any issues that arise will be noted in the Remarks tab of the e-automate work order that is created from the Autotask invoice. You will also receive a notification e-mail informing you of any issues.
Before You BeginBefore You Begin
Before you can run the Autotask e-agent task, you must do the following:
Verify all Autotask billing items are approved and posted and are being billed to a customer or presented for information purposes only.
Obtain your Autotask username and password.
Configure e-automate to run the task (see the "Configuring e-automate to Run the Task" section of this topic).
Add and/or update Autotask roles (see the "Adding and/or Updating Roles in Autotask" section of this topic).
Configuring e-automate to Run the TaskConfiguring e-automate to Run the Task
Before you can run the Import Autotask Invoices task, you must properly configure e-automate. You must verify that all technicians listed on the Autotask Invoices are set up as technicians in e-automate and have a valid email address listed. You must also configure e-automate to recognize and match the Autotask contracts and customers associated with the service calls to the contracts and customers you currently have in your e-automate database, respectively. The customers and contracts you match must be related to each other as well; you must make sure the e-automate contracts you tie with Autotask contracts are associated with customers that have service calls you want to bring in from Autotask. For example, if you want to process Autotask invoices for Bill's Print House, the e-automate contracts you tie to Autotask contracts must be contracts associated with Bill's Print House and not contracts associated with Joe's Service Center.
To match the contracts and customers between the two systems, you will use two custom properties in e-automate: one for contract records and one for customer records. You may already have these custom properties set up in your system. If you do not have these custom properties set up in your system, you will need to create them. You will add an attribute to the custom property for contracts that will let you to add the Autotask contract name to the corresponding e-automate contract record. You will add an attribute to the custom property for customers that will let you to add the Autotask customer number to the corresponding e-automate customer record. To use custom property functionality in e-automate, you must first enable custom properties. For more information, see the Enabling Custom Properties topic. For an overview of custom property configurations and how they work, see the Creating Custom Property Configurations topic.
To get the rate information from Autotask into e-automate when processing Import Autotask Invoices, an activity code category must be defined for Autotask activity codes. An activity code must then be created in the Autotask activity code category for each of your different billing labor rates. Billing labor codes must be created or modified to associate your billing labor rates with these activity codes. Each bill code that you will use with Import Autotask Invoices (the bill codes assigned in the Contract bill code field of the contract records and in the Bill code field of the e-agent task) must be set up as an advanced bill code to which one of these billing labor codes is assigned. For each distinct Autotask role and billing labor rate combination, an Autotask role must be defined with an activity code appended to the role name. When Import Autotask Invoices is processed with this information properly configured, the system will use the appropriate bill code (the bill code from the applicable contract or—if the Autotask invoice cannot be matched to an e-automate contract—the bill code specified with the e-agent task) to get the rate information specified for the e-automate activity code associated with the applicable Autotask role.
Verifying TechniciansVerifying Technicians
You must verify that all technicians listed on the Autotask Invoices are set up as technicians in e-automate and have a valid email address listed in the employee record. If the technician is not identified as a technician and does not have a valid email address, you will get an error when importing the Autotask invoices.
To verify the technician is setup properly in e-automate, do the following.
From the e-automate People menu, select Employees/Contractors.
Select the employee.
Click [Edit] to open the Edit Employee window.
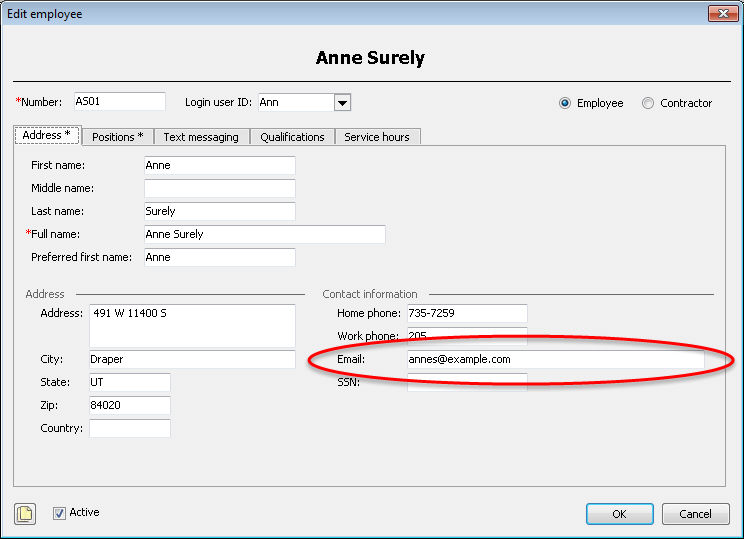
Verify the Address tab is forward.
In the Email field, enter a valid e-mail address if one is not already present.
Click the Positions tab to bring it forward.
Check the Technician checkbox.
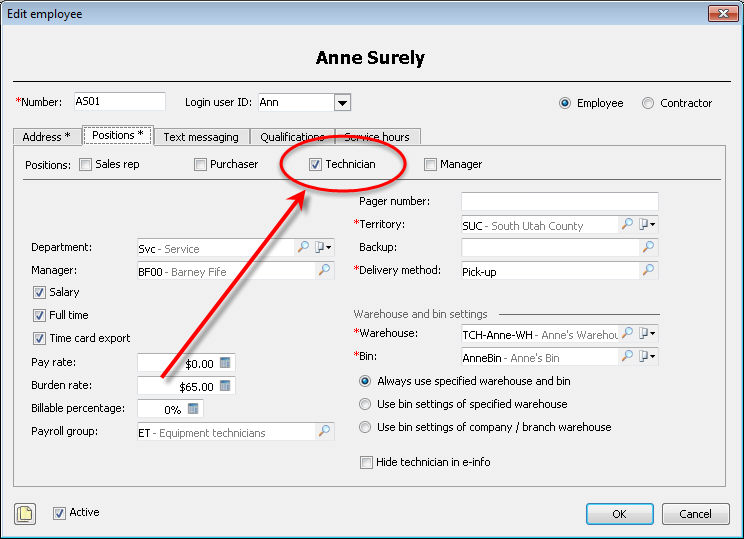
Click [OK] to save settings.
Creating and/or Configuring the Custom Property for ContractsCreating and/or Configuring the Custom Property for Contracts
To tie Autotask contracts associated with service calls to contracts you have in your e-automate database, you need to add a field to the contract record for entering the Autotask contract name. This process explains how to add the field to a configuration that can be selected and displayed on the Custom Properties tab of the contract record. After you add this field, you will need to enter the Autotask contract name in the newly created field for each e-automate contract that has a corresponding Autotask contract.
To add the field to a configuration that can be selected and displayed on the Custom Properties tab of the contract record, do the following:
Create an attribute by doing the following:
From the Tools menu, select Lists and Codes to open the Lists and Codes window.
In the Select a list or code type field, use the drop-down menu icon to select Attributes.
Click [New] to open the New Attribute window.
In the Attribute name field, enter ATContractName.
In the Data type field, use the drop-down menu to select Text Box.
Click [OK] to save the attribute.
Add the attribute to the custom contract configuration by doing the following:
From the Tools menu, select Lists and Codes to open the Lists and Codes window.
In the Select a list or code type field, use the drop-down menu icon to select Configurations (Custom properties).
Do one of the following:
If the Lists and Codes window displays a custom property configuration for contracts (e.g., CustomContract), do the following.
In the display, select the custom property configuration for contracts (e.g., CustomContract).
Click [Edit] to open the Edit Tracking Configuration (List) window.
In the Available attributes field, use the drop-down menu to select ATContractName.
Click [QuickAdd] to add the attribute to the custom property.
Click [OK] to save the custom property configuration for contracts.
If the Lists and Codes window does not display a custom property configuration for contracts (e.g., CustomContract), do the following:
Click [New] to open the New Tracking Configuration (List) window.
In the Name field, enter CustomContract.
In the Description field, enter a brief description of this custom property.
In the Group field, use the drop-down menu to select Contract Properties.
In the Available attributes field, use the drop-down menu to select ATContractName.
Click [QuickAdd] to add the attribute to the custom property.
Click [OK] to save the custom property configuration for contracts.
Assigning the Custom Property to ContractsAssigning the Custom Property to Contracts
To assign the custom property to the appropriate contracts in e-automate and use this property to add the Autotask contract name to the corresponding e-automate contract record, do the following:
In e-automate, from the e-automate toolbar, click Contracts to open the Service Contracts list window.
In the display, select the contract to which you want to assign the custom property.
Click [Edit] (or double-click on the contract in the display) to open the Edit Service Contract window.
Click the Custom properties tab to bring it forward.
In the Configuration field, use the lookup to select CustomContract. The system displays on this tab an entry field for each custom property associated with this configuration.
In the ATContractName field, enter the Autotask contract name you want to associate with this e-automate contract.
Click [OK] to save the contract record.
Repeat Steps 2 through 7 for each e-automate contract record with which you want to associate an Autotask contract name.
Creating and/or Configuring the Custom Property for CustomersCreating and/or Configuring the Custom Property for Customers
In order to tie the Autotask customers associated with the service calls to customers you have in your e-automate database, you will need to add a field to the customer record that allows you to enter the Autotask customer number. The field is added to the Custom Properties tab of the customer record by way of a custom property. Once you have added this field, you will then need to go into the e-automate customer record and enter that Autotask customer number in the newly created field on the Custom Properties tab.
To add the field to a configuration that can be selected and displayed on the Custom Properties tab of the customer record, do the following:
Create an attribute by doing the following:
From the Tools menu, select Lists and Codes to open the Lists and Codes window.
In the Select a list or code type field, use the drop-down menu icon to select Attributes.
Click [New] to open the New Attribute window.
In the Attribute name field, enter ATCustNum.
In the Data type field, use the drop-down menu to select Text Box.
Click [OK] to save the attribute.
Add the attribute to the custom contract configuration by doing the following:
From the Tools menu, select Lists and Codes to open the Lists and Codes window.
In the Select a list or code type field, use the drop-down menu icon to select Configurations (Custom properties).
Do one of the following:
If the Lists and Codes window displays a custom property configuration for customers (e.g., CustomerCustom), do the following.
In the display, select the custom property configuration for customers (e.g., CustomerCustom).
Click [Edit] to open the Edit Tracking Configuration (List) window.
In the Available attributes field, use the drop-down menu to select ATCustNum.
Click [QuickAdd] to add the attribute to the custom property.
Click [OK] to save the custom property configuration for customers.
If the Lists and Codes window does not display a custom property configuration for customers (e.g., CustomerCustom), do the following:
Click [New] to open the New Tracking Configuration (List) window.
In the Name field, enter CustomerCustom.
In the Description field, enter a brief description of this custom property.
In the Group field, use the drop-down menu to select Customer Properties.
In the Available attributes field, use the drop-down menu to select ATCustNum.
Click [QuickAdd] to add the attribute to the custom property.
Click [OK] to save the custom property configuration for customers.
Assigning the Custom Property to CustomersAssigning the Custom Property to Customers
To assign the custom property to the appropriate customers in e-automate and use this property to add the Autotask customer number to the corresponding e-automate customer record, do the following:
In e-automate, from the e-automate toolbar, click Customers to open the Customers list window.
In the display, select the contract to which you want to assign the custom property.
Click [Edit] (or double-click on the customer in the display) to open the Edit Customer window.
Click the Custom properties tab to bring it forward.
In the Configuration field, use the lookup to select CustomerCustom. The system displays on this tab an entry field for each custom property associated with this configuration.
In the ATCustNum field, enter the Autotask ID you want to associate with this e-automate customer.
Click [OK] to save the customer record.
Repeat Steps 2 through 7 for each e-automate customer record with which you want to associate an Autotask customer name.
Creating an Activity Code CategoryCreating an Activity Code Category
To create an activity code category for the activity codes you will use with Import Autotask Invoices, do the following:
From the Tools menu, select Lists and Codes to open the Lists and Codes window.
In the Select a list or code type field, use the drop-down menu to select Activity code categories.
Click [New] to open the Add Activity Code Category window.
In the Activity code category, enter a name for this activity code category (e.g., AT).
In the Description, enter a brief description of this activity code category (e.g., AutoTask).
Check the Service calls checkbox to indicate activity codes in this category can be associated with service calls.
Check the Billable checkbox to indicate activity codes associated with this category are billable to your customers.
Check the Active checkbox.
Click [OK] to save this activity code category.
For more information on creating activity code categories, see the Creating Activity Code Categories topic.
Creating Activity CodesCreating Activity Codes
To create an activity code for each of your different billing labor rates, do the following:
From the Tools menu, select Lists and Codes to open the Lists and Codes window.
In the Select a list or code type field, use the drop-down menu to select Activity Codes.
Click [New] to open the Add Activity Code window.
In the Activity code field, enter a name for this activity code (e.g., ATLR175).
In the Description field, enter a brief description to further identify this activity code (e.g., Autotask Labor Rate $175).
In the Category field, use the drop-down menu to select the activity code category you created in the "Creating an Activity Code Category" section of this topic. The activity code category defines rules for using the activity code in e-automate.
In the Tax as field, use the lookup icon to identify how this activity is taxed (e.g., Labor).
Check the Responded checkbox.
Check the Active checkbox.
Click [OK] to save the activity code.
For more information on creating activity codes, see the Creating Activity Codes topic.
Creating and/or Modifying Billing Labor CodesCreating and/or Modifying Billing Labor Codes
You use billing labor codes to associate your billing labor rates with the activity codes you created for importing Autotask invoices in the "Creating Activity Codes" section of this topic.
To create new (or modify your existing) billing labor codes so that they associate your billing labor rates with the activity codes you created for importing Autotask invoices, do the following:
From the Tools menu, select Lists and Codes to open the Lists and Codes window.
In the Select a list or code type field, use the drop-down menu to select Billing labor codes.
Click [New] to open the New Billing Labor Code window, or select an existing billing labor code and click [Edit] to open the Edit Billing Labor Code window.
Complete the following fields as appropriate:
Billing labor code: Name of the billing labor code being created.
Description: Brief description of the billing labor code being created.
Regular hourly rate:Type in the rate you want to charge customers on service call labor within your company defined regular hours. Contracts can be configured to alter the regular and overtime ranges for a service call.
Overtime hourly rate:Type in the rate you want to charge customers on service call labor outside your company defined regular hours. Contracts can be configured to alter the regular and overtime ranges for a service call.
In the Minimum period to bill field, use the down-down menu to select the minimum number of hours that can be billed when using advanced bill codes associated with this billing labor code.
If you want to combine regular and overtime hours when calculating minimum hours, check the Combine regular and overtime hours for minimum billing checkbox.
Define incremental billing rules by selecting one of the following:
If you want to bill actual minute amounts after the minimum period, select Bill actual amounts after minimum period.
If you want to combine regular and overtime hours in increments, do the following:
Select Bill combined regular and overtime hours in increments.
In the Regular increments of field, use the drop down arrow to select the time increment you want to use to bill regular time.
In the Round regular hours to field, use the drop down menu to select the rounding rule you want used.
Note: Additional information about the rounding rules can be found in the Overview for this topic.
If you want to aggregate labor records before applying billing increments, check the Aggregate labor records before applying billing increments checkbox and, using the down arrow in the Group labor records by field select Rate to group records by just rate or Rate and activity code to group records by both rate and activity code.
Note: This option is only available if you have enabled this functionality in Service Call Options. See Setting Service Call Options for more information.
If you want to bill regular and overtime hours in separate increments, do the following:
Select Bill regular and overtime hours in separate increments.
In the Regular increments of field, use the drop-down menu to select the time increment you want to use for regular time (inside the call company hours).
In the Round regular hours to field, use the drop down menu to select the rounding rule you want used for regular time calculations.
Note: Additional information about the rounding rules can be found above.
In the Overtime increments of field, use the drop-down menu to select the time increment you want to user for overtime (outside call company hours).
Note: Additional information about the rounding rules can be found above.
In the Round overtime hours to field, use the drop-down menu to select the rounding rule you want used for overtime calculations.
Note: Additional information about the rounding rules can be found above.
If you want to aggregate labor records before applying billing increments, check the Aggregate labor records before applying billing increments checkbox and, using the down arrow in the Group labor records by field select Rate to group records by just rate or Rate and activity code to group records by both rate and activity code.
Note: This option is only available if you have enabled this functionality in Service Call Options. See Setting Service Call Options for more information.
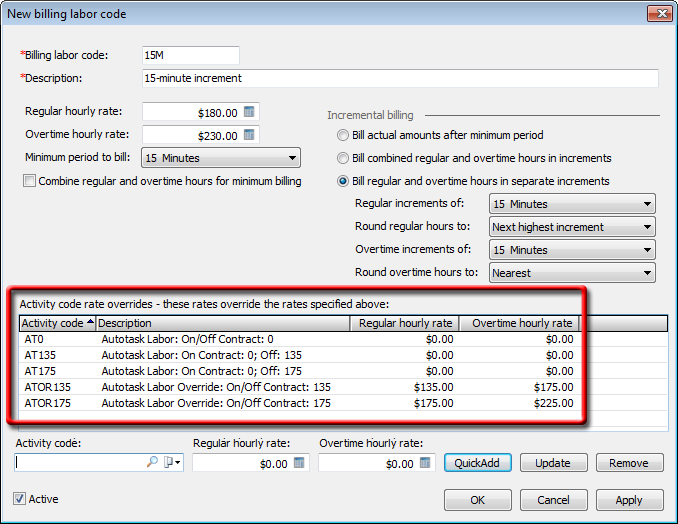
For each activity code you associated with an Autotask role for which you want to specify override rate information for this billing labor code, do the following:
In the Activity code field, use the lookup to select the activity code for which you want to identify an override rate (e.g., ATLR175).
In the Regular hourly rate field, type the regular rate you want used for this billing labor code and the specified activity code (e.g., $175.00).
In the Overtime hourly rate field, type the overtime rate you want used for this billing labor code for the specified activity code (e.g., $225.00).
Click [QuickAdd] to add your rates for the list for the specified activity code.
Repeat steps a – d to add additional activity codes and their associated regular and overtime rates.
To remove an activity code rate, select the activity code and associated rates and click [Remove].
To modify an activity code rate, select the activity code, make the necessary changes and click [Update].
Check the Active checkbox.
Click [OK] to save the billing labor code.
For more information on creating billing labor codes, see the Creating Billing Labor Codes topic.
Modifying Contract and E-agent Billing Codes to Include Advanced Billing Labor Code Rate InformationModifying Contract and E-agent Billing Codes to Include Advanced Billing Labor Code Rate Information
To import the appropriate rate information for an Autotask invoice, the Import Autotask Invoices process uses the bill codes you specify in:
The Contract bill code field of each Contract record associated with a customer you include in the import process
The Bill code field on the Options tab in the e-agent Import Autotask Invoice task for importing service call information that the system cannot associate with an e-automate contract
To associate the appropriate billing labor rate information with each of these bill codes, the bill code must have Type set to Advanced. When Type set to Advanced, the system displays the Billing labor code field and the Labor tab on the Bill Code window. You use this field to assign the applicable billing labor code you defined in the "Creating and/or Modifying Billing Labor Codes" section of this topic. When configured properly, you should see on the Bill Code window's Labor tab the rate information you specified for the billing labor code that you associated with the bill code.
To modify an existing bill code you are using in the Contract bill code field of a service contract and/or a bill code you plan to use in the Bill code field on the Options tab in e-agent for billing service calls not associated with a contract, do the following:
From the Tools menu, select Lists and Codes to open the Lists and Codes window.
In the Select a list or code type field, use the drop-down menu to select Bill codes.
Select the appropriate bill code from the list and click [Edit] to open the Edit Bill Code window.
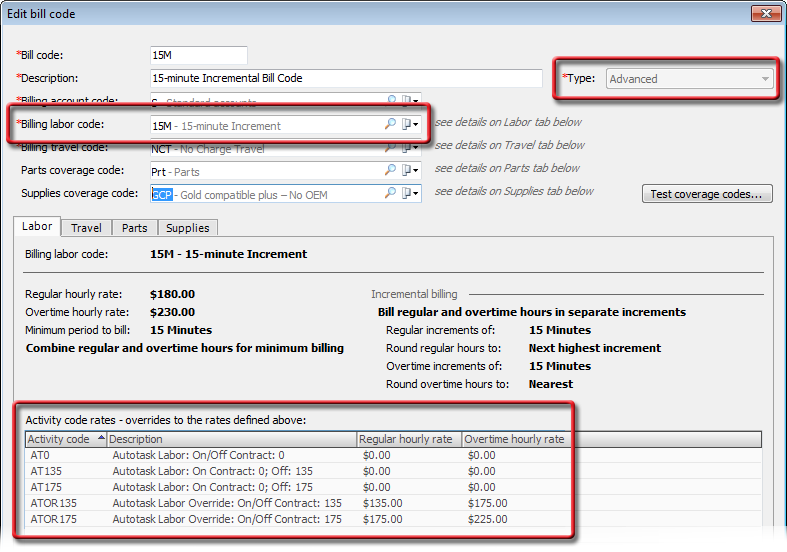
In the Type field, use the drop-down menu to select Advanced if it is not already selected.
In the Billing labor code field, use the lookup to select the appropriate billing code (e.g., 15M) that you created and/or updated using the "Creating and/or Modifying Billing Labor Codes" section of this topic. When you select a billing labor code, the system updates the information on the Labor tab.
Click [OK] to save the bill code.
For more information on bill codes, see the Creating Bill Codes topic.
With this bill code information in place when Import Autotask Invoices is processed, if the system can associate an Autotask invoice with a contract in e-automate, the system uses the contract's bill code to get the rate for the activity code that matches the activity code appended to the Autotask role. If the system cannot associate an Autotask invoice with a contract in e-automate, the system uses the bill code specified in the Bill code field on the Options tab in e-agent to get the rate for the activity code that matches the activity code appended to the Autotask role.
For information on appending activity codes to Autotask roles, see the "Adding and/or Updating Roles in Autotask" section of this topic.
Adding and/or Updating Roles in AutotaskAdding and/or Updating Roles in Autotask
The Import Autotask Invoices process uses distinct e-automate activity code and Autotask role combinations to import the appropriate Autotask invoice rate information. You append one activity code to one Autotask role. If you have more e-automate activity codes (each representing a different billing labor rate) than you have Autotask roles, you will need to create additional roles in Autotask.
In Autotask, you append to the end of each role the applicable e-automate activity code (representing the appropriate billing labor rate) as follows:
The e-automate activity code must be enclosed in parentheses
The activity code appended to the AutoTask role name must match exactly the activity code listed in e-automate (including spaces, if any).
Example:
Existing Role Name in Autotask: Solutions Engineer
E-automate Activity Code to Associate with this Role Name: ATLR175
Updated Role Name in Autotask: Solutions Engineer (ATLR175)
Setting Up an Import Autotask Invoices TaskSetting Up an Import Autotask Invoices Task
General Task InformationGeneral Task Information
From the e-automate Tools menu, select E-agent to open the E-agent - Tasks window.
From the e-agent toolbar, click [New]. E-agent opens the E-agent - New Task window.
From the list, select Import autotask invoices.
Click [OK]. E-agent displays the task setup window.
In the Task name field, leave the default name or enter a new name for the task.
Note: All tasks must have a unique name. If you are using multiple tasks for a variety of reasons, each task must have its own, unique name. You can schedule all tasks at different intervals.
In the Task engine field, use the drop-down menu to select the task engine on which you want to run the task.
In the Task user field, use the drop-down menu to select the user under which e-agent is to run this task.
To make this task operational, check the Enabled checkbox.
Options TabOptions Tab
In the Call type field, use the lookup to select the call type you want assigned to the work orders created from the imported Autotask service calls.
Note: The call type you select will also be assigned to the invoices created from the work orders.
In the Bill code field, use the lookup to select the bill code you want assigned to the work orders created from the imported Autotask service calls. If there is equipment on the service call that already exists in e-automate and is associated with a contract in e-automate, the system will assign the bill code that is assigned to that piece of equipment in e-automate and not the one you select in this Bill code field.
Note: For information on configuring the bill code you select for this field, see the "Modifying Contract and E-agent Billing Codes to Include Advanced Billing Labor Code Rate Information" section of this topic.
In the Exception on hold code field, use the Lookup to select the on hold code you want assigned to the work orders if the task finds an error when importing the Autotask service calls.
In the Autotask Username field, enter the username you use to login to Autotask.
In the Autotask Password field, enter the password you use to login to Autotask.
In the Last request date field, enter the date back to which you want e-agent to look for Autotask service calls.
Note: This field is automatically updated by the task to the current date each time the task is run as long as the task is not running in 'Test mode'.
By default invoices for all customers are included in the task. To change the customer filter, do the following:
Click the link to the right of Include all customers. The link will be "Include all (no filter)" if no filter is currently being applied or "Filtered" if a filter is currently being applied. When you click the link, the system displays the Customers list window. If no filter is currently being applied, the system displays all the records. If a filter is currently being applied, the system displays the filter criteria and lists the records that meet the filter criteria.
Use the QuickSearch features on this window to add, modify, or clear the filter that determines which customers to include when this e-agent task is processed. For information on using QuickSearch functionality, see the Using the E-agent QuickSearch (On Premise) topic.
When finished adding, modifying, or clearing the filter, click the [OK] button on the Customers list window.
Note: If you added a filter, verify that the system now displays the "Filtered" link to the right of Include all customers. If you cleared the filter, verify that the system now displays the "Include all (no filter)" link to the right of Include all customers.
If you want e-agent to run an import test to ensure the task will run properly, check the Test mode checkbox. Test mode processes the Autotask service calls as the task normally would without saving the service calls to work orders and sends you an email with any errors that would occur if you ran the task normally. The Last request date field is not modified when the task is run in test mode.
Schedule TabSchedule Tab
You can choose to schedule the e-agent task so that it runs on an interval and/or you can run the task manually whenever you choose.
To manually run the task, see the "Manually Running Tasks" section of the Task Functionality topic.
To schedule the task to run on a defined schedule, do the following:
Click the Schedule tab to bring it forward.
In the Recurrence pattern region, select Hourly, Daily, Weekly, Monthly, Last day of month, or No recurrence to indicate the frequency with which you want e-agent to process this task.
If you selected Weekly in the previous step, e-agent displays a Run on region with a checkbox for each day of the week. Check the box for each weekday on which you want e-agent to process this task.
In the Start recurrence field, enter (or use the drop-down calendar to select) the date and time you want this schedule to begin.
Note: This field is not available if you set Recurrence pattern to No recurrence.
In the End recurrence region, do one of the following:
Note: The options in this region are not available if you set Recurrence pattern to No recurrence.
To have e-agent process the task indefinitely using the specified Recurrence pattern, select No end date.
To have e-agent process the task only a specified number of times using the specified Recurrence pattern, do the following:
Select End after __ occurrences.
In the End after __ occurrences field, enter the number of occurrences.
To have e-agent process the task through a specified end date and time using the specified Recurrence pattern, do the following:
Select End by __.
In the End by __ field, enter the date and time by which processing of this task is to end.
Completing the TaskCompleting the Task
In the Notification e-mail field, enter the e-mail address(es) of the person or persons to be notified that the contracts have been automatically billed. To notify multiple recipients, separate each e-mail address by a semi-colon or a comma. Use the delimiter associated with your e-mail program.
For example: janedoe@company.com; johndoe@company.com; joe@company.com.
Click [OK] to save the task settings.
Non-supported ReleaseNon-supported Release
©2022 ECI and the ECI logo are registered trademarks of ECI Software Solutions, Inc. All rights reserved.