Account Settings Tile
Depending upon your company's business needs and the rights associated with your e-info login, your e-info home page may display an Account settings tile with up to two links: Payment methods and Users.
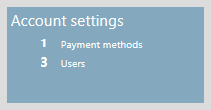
With the appropriate e-info rights, you can use this tile to:
Manage payment methods
Manager e-info users
Using the first link on this tile, you can add new payment methods, change existing payment methods, and delete payment methods.
Note: You can also manage payment methods via the Invoices tile.
Using the second link on this tile, you can add and/or change user accounts. In each user account, you specify contact information, mailing address information, the customer location(s) to which the user has access, the area(s) of e-info the user may access when logged into e-info, and the password that the user will use—together with the email address you include in the contact information—to log into the e-info web site.
Note: You cannot delete a user account, but you can change a user account to make it inactive. Inactive user accounts are not counted in the total displayed on the Account setting tile.
Adding Payment MethodsAdding Payment Methods
To add a payment method through the Account Settings tile, do the following:
From the Account Settings tile on the e-info home page, click the Payment methods link. The system displays the Payment Method Management page. This page lists any payment methods you currently have on file.

Click the Add icon. The system opens the New Payment Method window.
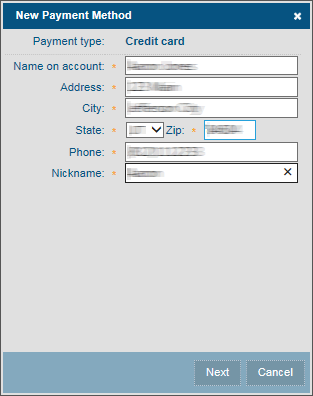
In the Payment type field, on https sites, use the drop-down menu to select Credit card, Checking, or Savings. On http sites, Payment type defaults to Credit card and cannot be changed.
Note: If your e-info site needs the Payment type options associated with an https site, contact your IT administrator.
Complete the following steps as appropriate based on the Payment type you selected:
In the Name on account field, enter the name associated with this account (e.g., the name of the card holder as it appears on the credit card).
In the Address field, enter the street address associated with this account.
In the City field, enter the city portion of the address associated with this account.
In the State field, enter (or use the drop-down menu to select) the state or province portion of the address associated with this account.
Note: Depending upon your browser's language setting, the system may display this field as a drop-down menu from which you can select an option or as an entry field where you can enter a state or province code.
In the Zip field, enter the zip/postal code portion of the address associated with this account.
In the Phone field, enter the phone number associated with this account.
In the Nickname field, assign a nickname to this payment method to help you remember its use.
If Payment type is set to Credit card, click [Next]. The system will direct you to our third-party credit card vault provider’s web site. Follow the directions on the third-party credit card vault provider’s web site to enter the credit card information. If the system displays the [Save] button, click [Save] to save this payment method and close the Payment Method window.
Editing Payment MethodsEditing Payment Methods
To edit an existing payment method through the Account Settings tile, do the following:
From the Account Settings tile, click the Payment methods link. The system displays the Payment Method Management page. This page lists any payment methods you currently have on file.
In the Account Number column of the Payment methods table, locate and click the account number of the existing account you want to edit. The system displays the Payment Method window.
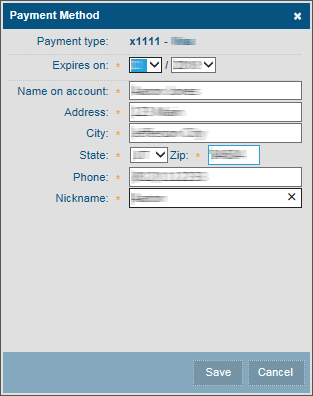
Make the necessary changes in the following fields as appropriate for the Payment type you are editing:
In the Expires on fields, use the drop-down arrows to select the appropriate credit card expiration month and year, respectively, or make no change to use the date displayed.
In the Name on account field, enter the name associated with this account (e.g., the name of the card holder as it appears on the credit card), or make no change to use the name displayed.
In the Address field, enter the street address associated with this account, or make no change to use the street address displayed.
In the City field, enter the city portion of the address associated with this account, or make no change to use the city displayed.
In the State field, enter (or use the drop-down menu to select) the state or province portion of the address associated with this account.
Note: Depending upon your browser's language setting, the system may display this field as a drop-down menu from which you can select an option or as an entry field where you can enter a state or province code.
In the Zip field, enter the zip/postal code portion of the address associated with this account, or make no change to use the zip/postal code displayed.
In the Phone field, enter the phone number associated with this account, or make no change to use the phone number displayed.
In the Nickname field, assign a nickname to this payment method to help you remember its use, or make no change to use the nickname displayed.
Click [Save] to save your changes and close the Payment Method window.
Deleting Payment MethodsDeleting Payment Methods
To add a payment method through the Account Settings tile, do the following:
From the Account Settings tile, click the
Payment methods link. The
system displays the Payment Method Management page. This page
lists any payment methods you currently have on file.
In the Payment methods table, click the
red X in the far right column
of the account you want to delete. The system displays a Delete
Payment Method verification window opens.

Click [OK] to delete the payment method.
Adding New e-info UsersAdding New e-info Users
To add a new e-info user, do the following:
From the Account Settings tile on the e-info home page, click the Users link. The system displays the User Management page.

Click the Add icon. The system displays the New User Profile page.

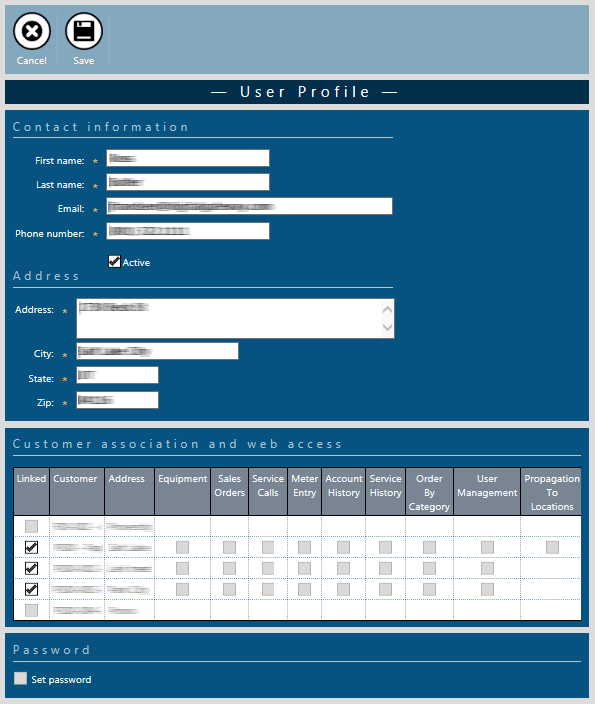
In the Contact information region, enter the following information:
First name: The first name of the user you want to associate with this e-info account.
Larst name: The last name of the user you want to associate with this e-info account.
Email: The email address you want to associate with this account.
Note: This email address is the value this user will enter in the User name field of the e-info Log In page to log into e-info using this account.
Phone number: The phone number you want to associate with this account.
In the Address region, enter the following information:
Address: The street address portion of the mailing address of the user you want to associate with this account.
City: The city portion of the mailing address of the user you want to associate with this account.
State: The state or province portion of the mailing address of the user you want to associate with this account.
Zip: The postal code or zip code portion of the mailing address of the user you want to associate with this account.
In the Customer association and web access table, check the box in the Linked column for each location to which you want to give this user access.
Note: When you check a box in this column, the system displays additional check boxes in other columns on the same row.
For each location (row) for which you checked the Linked box, check any of the following boxes on that row to give this user access to the corresponding area of e-info:
Equipment/Item: Gives the user the rights to view equipment/item information.
Sales Orders: Gives the user the rights to create and view sales order information.
Service Calls: Gives the user the rights to create and view service call information.
Meter entry: Gives the user the rights to view and enter meter reading information.
Account History: Gives the user the rights to pay invoices using a credit card or ACH account, and view the account history.
Note: If the ability to pay invoices using a credit card or ACH account is not available, we do not have the means to process payments online.
Service History: Gives the user the rights to view the service history.
Order by Category: Gives the user the ability to locate items they want to order by item category.
User Management: Gives the user the ability to manage e-info users.
Propagate To Locations: This option is only available for parent locations. When checked, all contacts associated with the parent customer inherit the rights that the parent location has for all locations.
In the Password region, do the following:
In the New password field, enter the password you want to assign to this user to log into e-info.
In the Confirm password field, re-enter the password you want to assign to this user to log into e-info.
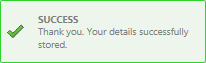
Click the Save icon to save the user profile information. If the system successfully saves the new user profile, the system re-displays the User Management page and displays a "Success" message in the upper left corner of the page.
If the system is not able to save the user profile, the system displays one or more warning messages similar to the following:

Review the message(s) on the page to determine if you need to correct and/or complete any data. When finished, click the Save icon again to attempt to save the new user profile with your changes.
Editing Existing E-info UsersEditing Existing E-info Users
To edit an existing e-info user, do the following:
From the Account Settings tile on the e-info home page, click the Users link. The system displays the User Management page.
Note: By default, the Show inactive users box is not checked. If you want to activate an existing user account that is not currently active, check the Show inactive users box to include inactive user accounts in the Users table.
In the Users table, click the row identifying the user whose information you want to edit. The system displays the User Profile page for that user.
In the Contact information region, edit any of the following information as appropriate:
First name: The first name of the user you want to associate with this e-info account.
Larst name: The last name of the user you want to associate with this e-info account.
Email: The email address you want to associate with this account.
Note: If you change the email address, be sure to inform the user; this email address is the value this user will enter in the User name field of the e-info Log In page to log into e-info using this account.
Phone number: The phone number you want to associate with this account.
To activate an inactive user account, check the Active box; to inactivate an active user account, uncheck the Active box.
In the Address region, enter the following information:
Address: The street address portion of the mailing address of the user you want to associate with this account.
City: The city portion of the mailing address of the user you want to associate with this account.
State: The state or province portion of the mailing address of the user you want to associate with this account.
Zip: The postal code or zip code portion of the mailing address of the user you want to associate with this account.
In the Customer association and web access table, check the box in the Linked column for each location to which you want to give this user access and uncheck all other boxes in this column.
Note: For each box checked in this column, the system displays additional check boxes in other columns on the same row.
For each location (row) for which the Linked box is checked, check any of the following boxes on that row to give this user access to the corresponding area of e-info:
Equipment/Item: Gives the user the rights to view equipment/item information.
Sales Orders: Gives the user the rights to create and view sales order information.
Service Calls: Gives the user the rights to create and view service call information.
Meter entry: Gives the user the rights to view and enter meter reading information.
Account History: Gives the user the rights to pay invoices using a credit card or ACH account, and view the account history.
Note: If the ability to pay invoices using a credit card or ACH account is not available, we do not have the means to process payments online.
Service History: Gives the user the rights to view the service history.
Order by Category: Gives the user the ability to locate items they want to order by item category.
User Management: Gives the user the ability to manage e-info users.
Propagate To Locations: This option is only available for parent locations. When checked, all contacts associated with the parent customer inherit the rights that the parent location has for all locations.
In the Password region, the Set password box is unchecked by default. If you do not need to change the user's password, leave this box unchecked. If you want to edit the user's password, do the following:
Check the Set password box. The system displays two new fields for setting a new password.
In the New password field, enter the password you want to assign to this user to log into e-info.
In the Confirm password field, re-enter the password you want to assign to this user to log into e-info.
Click the Save icon to have the system save your changes to the user profile. If the system successfully saves your changes, the system re-displays the User Management page and displays a "Success" message in the upper left corner of the page.
If the system is not able to save your changes, the system displays one or more warning messages similar to the following:
Review the message(s) on the page to determine if you need to correct and/or complete any data. When finished, click the Save icon again to attempt to save your changes.
©2022 ECI and the ECI logo are registered trademarks of ECI Software Solutions, Inc. All rights reserved.