Logging In to Digital Quote Manager
Use the following processes to access and then log in to Digital Quote Manager.
Accessing Digital Quote ManagerAccessing Digital Quote Manager
Using an ECI Hosted Installation of Digital Quote MangerUsing an ECI Hosted Installation of Digital Quote Manger
To access Digital Quote Manager in the hosted environment, do the following:
Using your browser, enter the URL: https://eautomate.ecihosted.com/RDWeb/Pages/en-US/default.aspx.
The system displays the ECI Cloud – e-automate RemoteApp and Desktop Connection page.
Using this page, do the following:
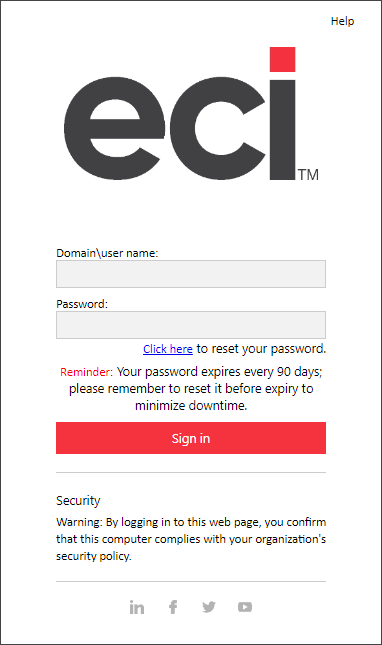
In the Domain\user name field, enter the domain and user name (e.g., ecihosted\myusername) you were supplied for accessing the hosted environment.
In the Password field, enter the password you were supplied for accessing the hosted environment.
Click [Sign in]. The system displays the Current folder.
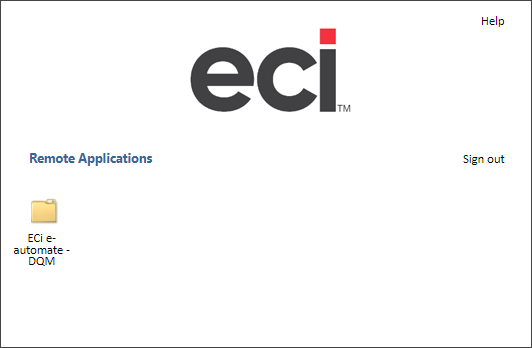
Click the ECI e-automate - DQM folder to open the folder.
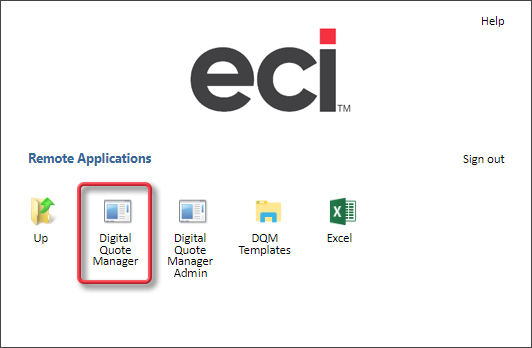
In the ECI e-automate - DQM folder, click the Digital Quote Manager icon.
Chrome creates a cpub-DGISalesQuoteManager...CmsRdsh.rdp download file in the downloads folder and displays a message similar to the following on the screen:
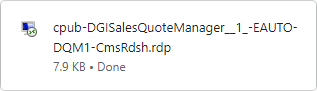
When the download message displays the word Done, click the download message or open the cpub-DGISalesQuoteManager...CmsRdsh.rdp file from the downloads folder.
The system displays a RemoteApp window, similar to the following, asking if you trust the publisher of the RemoteApp program.
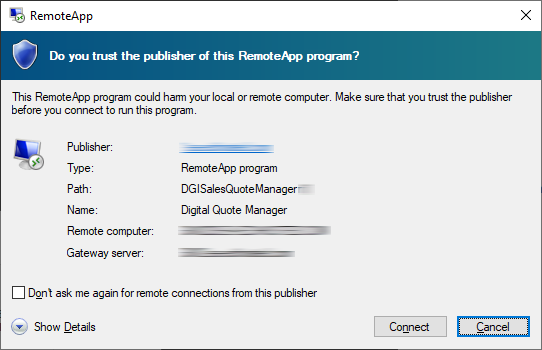
Click the [Connect] button.
The system displays a Windows Security window similar to the following:
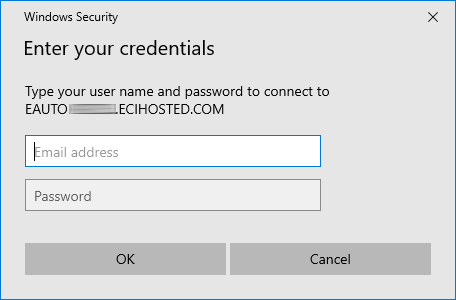
Using this window, do the following:
In the Email address field, enter the domain and user name (e.g., ecihosted\myusername) you were supplied for accessing the hosted environment.
In the Password field, enter the password you were supplied for accessing the hosted environment.
Click the [OK] button.
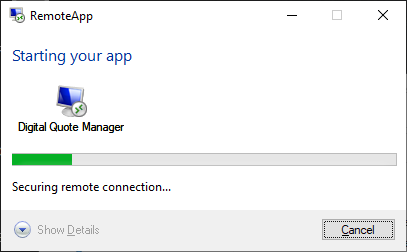
When you click the [OK] button, the system displays a RemoteApp window and starts the app.
When the system establishes the connection to the RemoteApp and Desktop Connections, the system displays a message similar to the following:
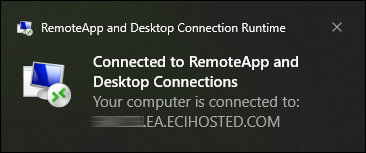
The system then displays the Digital Quote Manager login window.
Using an On Premise Installation of Digital Quote ManagerUsing an On Premise Installation of Digital Quote Manager
If you have already created a Digital Quote Manager shortcut, pinned Digital Quote Manager to your Windows Start menu, and/or pinned Digital Quote Manager to your taskbar, click any one of these options to open the Digital Quote Manager login window.
If you have not already created a Digital Quote Manager shortcut, pinned Digital Quote Manager to your Windows Start menu, and/or pinned Digital Quote Manager to your taskbar, do the following:
Navigate to the path where Digital Quote Manager is installed.
If Digital Quote Manager is installed per user, the default location is:
C:\Users\UserName\AppData\Local\ECi\Digital Quote Manager\DGI.SalesQuoteManager.exe
If Digital Quote Manager is installed per machine, the default location is:
C:\Program Files (x86)\ECi\Digital Quote Manager\DGI.SalesQuoteManager.exe
Right-click DGI.SalesQuoteManager.exe.
Do any of the following:
To create a Windows shortcut, do the following:
From the right-click menu, select Create shortcut.
Click [OK] to the message asking if you want the system to place the icon on the desktop. The system creates the shortcut on the desktop using the name of the executable file.


To pin the program to the Windows Start menu, select Pin to Start Menu from the right-click menu. The system adds the program to the Windows Start menu.
To pin the program to the Windows taskbar, select Pin to Taskbar from the right-click menu. The system adds the program to the Windows taskbar.
Using any one of the options you created in Step 3, click the option to open the Digital Quote Manager login window.
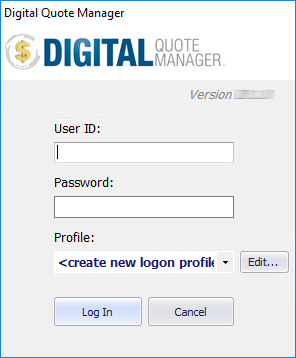
Logging in to Digital Quote ManagerLogging in to Digital Quote Manager
From the Digital Quote Manager login window, do the following:
In the User ID field, enter the user ID assigned to you by your system administrator.
In the Password field, enter your password.
In the Profile field, make no change to use the profile displayed, or do any of the following:
To use an existing profile, in the Profile field, use the drop-down menu to select the profile you want to use to log in.
To manage (add, edit, or delete) login profiles, do the following:
Click the [Edit...] button to open the Manage Logon Profiles window.
Using the Manage Logon Profiles window, do any of the following:
To add a new logon profile, do the following:
Click the [Add...] button to open the Edit Logon Profile window.
Using the Edit Logon Profile window, do the following:
In the SQL server field, enter the exact name of your SQL Server. If you do not know the name, ask your system administrator.
In the DGServer field, enter your DGServer name.
Click [Next > >].
In the Company field, use the down arrow to select from a list of e-automate companies that are on your designated SQL server.
Click [Next > >].
If you have branching enabled on the database, then—in the Branch field—use the down arrow to select the branch to which you want to log in.
Click [Next > >] to continue.
In the Profile name field, accept the pre-defined name or enter a name for your profile.
Click [Finish] to complete the profile and to close the Edit Logon Profile window.
Click the [OK] button to close the Manage Logon Profiles window and to return to the Digital Quote Manager Login window.
To edit an existing logon profile, do the following:
Select from the Edit Logon Profile window the logon profile you want to edit.
Click the [Edit...] button to open the Edit Logon Profile window.
Using the Edit Logon Profile window, do the following:
In the SQL server field, make no change to keep the value displayed, or enter the exact name of your SQL Server. If you do not know the name, ask your system administrator.
In the DGServer field, make no change to keep the value displayed, or enter your DG Server name.
Click [Next > >].
In the Company field, make no change to keep the value displayed, or use the down arrow to select from a list of e-automate companies that are on your designated SQL server.
Click [Next > >].
If you have branching enabled on the database, then—in the Branch field—make no change to keep the value displayed, or use the down arrow to select the branch to which you want to log in.
Click [Next > >] to continue.
In the Profile name field, accept the pre-defined name or enter a name for your profile.
Click [Finish] to complete the profile.
Click the [OK] button to close the Manage Logon Profiles window and to return to the Digital Quote Manager Login window.
To delete an existing logon profile, do the following:
Select from the Edit Logon Profile window the logon profile you want to delete.
Click the [Delete...] button to delete the profile.
Click [OK] to validate your credentials and to log in to Digital Quote Manager. If the system is able to verify your credentials, the system displays the main Digital Quote Manager window. If the system is not able to verify your credentials, the system displays a message in red font below the version number (e.g., The user is not associated with a Sales Agent). Use the information displayed to resolve the issue, and then attempt to log in again.
©2025 ECI and the ECI logo are registered trademarks of ECI Software Solutions, Inc. All rights reserved.