Importing Devices using the RMS Sync
If you have Remote Management Software (RMS), you can import your device data using the RMS Sync. The system will pull device manufacturer, model, serial number, IP address, and volume data which will be used to generate the TCO off the device, its usage, and costing assigned to it.
If you do not have Remote Management Software (RMS), you can upload your non-reporting device data using a CSV file.
Importing Reporting Devices Using RMSImporting Reporting Devices Using RMS
To import reporting device data using the RMS Sync, do the following:
Click the Settings icon on the toolbar.

The system displays the Settings page with the RMS Sync tab selected by default.
Click the [FMAudit], [eAutomate], [PrintFleet], or [Print Audit] button to identify the type of sync you want to perform. The system displays an RMS Accounts region (e.g., FMAudit Accounts) on the left side and a QuickDeal Accounts region on the right side of the page.
In the RMS Accounts region, select the account you want to sync with a QuickDeal account.
In the QuickDeal Accounts region, select the account you want to sync with the account selected in the RMS Accounts region.
Click the [Import] button. The system displays a page similar to the following (based on FMAudit Sync):
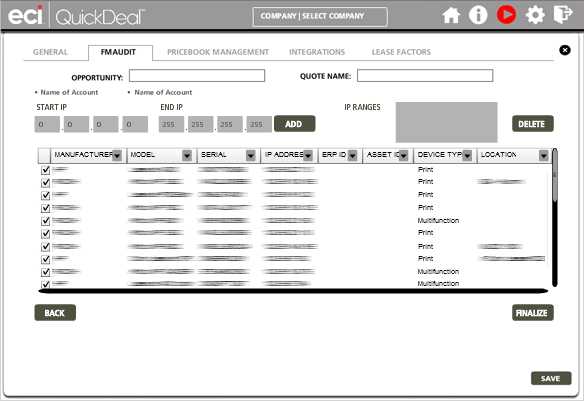
Verify the information displayed in the Opportunity field, Quote Name field, and the bullet point Name of Account listings represent the opportunity, quote name, RMS account, and QuickDeal TCO account, respectively, that you want to use for the import. If they do, proceed to the next step. If they do not, click the [Back] button.
To limit the devices you want to sync, do any of the following:
To limit the devices based on IP address range, do the following:
In the Start IP fields, enter the beginning of the range of devices to include based on IP address.
In the End IP fields, enter the end of the range of devices to include based on IP address.
Click the [Add] button. The system adds the range to the IP Ranges region and lists only the devices with IP addresses in the specified range.
To remove an IP address range filter, do the following:
In the IP Ranges region, select the IP address range you want to remove.
Click the [Delete] button. The system removes the IP address range from the IP Ranges region and removes from the list any devices with IP addresses in the selected range. If you delete all IP address ranges from the IP Ranges region, the system will not exclude any device based on IP address.
To remove an individual device, uncheck the checkbox at the beginning of the row for that device.
When you are finished selecting the devices you want to include in the integration, click the [Finalize] button. When you click the [Finalize] button, the system syncs the two accounts. When the process completes, the system displays the Current State page for the QuickDeal (Company) account that you synced with the RMS account.
Uploading Non-reporting Device Data Using a CSV FileUploading Non-reporting Device Data Using a CSV File
If you do not have Remote Management Software (RMS), you can use a CSV file to upload non-reporting device data for the current state only.
The CSV file may contain a header row. Each row may contain the following fields in this order: Manufacturer, Model, Serial Number, IP Address, Mono Pages Average Monthly Volume, Color Pages Average Monthly Volume, ERP ID, Asset ID, Mono CPC, Color CPC, Cost, Contact, Department, Phone, Location, Comments, Start Meter Date, Initial BW Meter, Initial Color Meter, Last Meter Date, Last BW Meter, Last Color Meter
The minimum fields necessary to save an import record are: Manufacturer, Model, Serial Number, Mono Pages Average Monthly Volume, and Color Pages Average Monthly Volume. The other fields are optional.
The CSV file must include a carriage return after the last line for the system to import the last record.
To upload your non-reporting device data using a CSV file, do the following:
Click the Settings icon on the toolbar.
The system displays the Settings page with the RMS Sync tab selected by default.
Click the [CSV] button to identify the type of sync you want to perform. The system displays a CSV Upload region on the left side and a QuickDeal TCO Accounts region on the right side of the page.
In the QuickDeal TCO Accounts region, select the account for which you want to upload data.
When you select an account, the system populates the Opportunity and Quote Name fields using the values listed in the corresponding fields on the Current State page for the account you select. Use the drop-down menus to update these fields if appropriate, or make no change to use the values displayed.
To download a DOCassess_upload_file.csv template that you can use for importing the data, click the [Template .CSV] button at the bottom of the QuickDeal TCO Accounts region. Use your browser's option to save and/or open the file. This file contains a header row listing the following columns: Manufacturer, Model, Serial Number, IP Address, Mono Pages, Average Monthly Volume, Color Pages, Average Monthly Volume, ERP ID, Asset ID, Mono CPC, Color CPC, Cost, Contact, Department, Phone, Location, Comments, Start Meter Date, Initial BW Meter, Initial Color Meter, Last Meter Date, Last BW Meter, Last Color Meter.
Populate the .CSV file with the data representing the printers you want to import into the selected account's current state.
Save the .CSV file, noting the location where you save the file.
Click the [Import] button at the bottom of the QuickDeal TCO Accounts region. The system displays an Open window and sets Files of type to Comma Separated (*.csv).
In the File name field, enter the name of your .csv file.
Click [Open] to open the .csv file. If your data is formatted properly, the system displays a "Finished Loading Data" message and redisplays the Settings page. If it does, proceed to step 11.
If your data is not formatted in the manner the system expects, the system will display a window similar to the following to assist you with correctly formatting the data file.

Using this window, do the following:
To see a sample input file, click the Example checkbox. The system displays a sample input table above this window and lists the minimum required configuration for uploading data.
If your CSV file contains a header row, check the My CSV has headers checkbox.
The Upload Header column displays data from the first record in your CSV file. If your CSV file includes a header, the system displays the header row’s data in this column.
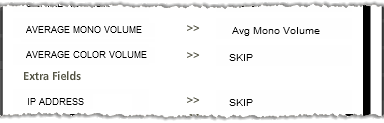
Under Core Fields, verify that the Manufacturer, Model, and Serial Number rows contain the correct information.
For each row on this window that lists SKIP in the Upload Header column, do the following to map data for the row:
Click the word SKIP to display a drop-down list of columns from the first record in your CSV file from which to select.
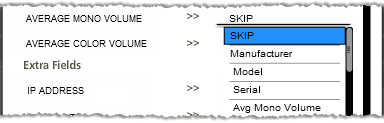
Click the appropriate column for the row.
When you are ready to perform the import, click the [Upload] button.
When you click the [Upload] button, if your data is correctly formatted, the system imports the data and re-displays the Settings page. If it does, proceed to step 11. If the data is not correctly formatted, repeat the preceding steps as necessary.
When the system finishes importing your data and redisplays the Settings page, do any of the following:
To import additional .csv file data for additional accounts, return to step 3 above.
To import additional .csv file data for additional Opportunity and Quote Name combinations for the same account, return to step 4 above.
Click the [Save] button to save your changes and close the Settings page.
To view the imported data on the Current State page, you will need to refresh the page.
©2025 ECI and the ECI logo are registered trademarks of ECI Software Solutions, Inc. All rights reserved.