Configuring and Using Equipment Supply Order Entry
You use the supply order entry functionality of e-automate to automate the entry of supply orders from customers by adding equipment and contracts to the supply order. Supply orders can include any items you sell to a customer, as well as items you provide to the customer under their service maintenance contracts.
Supply order entry allows you to add the equipment for which the supplies are destined. e-automate can assist you in the order entry and determine whether the supplies are covered under a contract, provide a list of supplies available for the equipment, provide a list of supplies for the attached accessories, and determine the contract on which the equipment is covered.
When you sell supplies that are covered under contract, it is important to identify the contract so that when you calculate the contract profitability, your system can account for all items that are provided to the customer and covered under the contract.
In order to configure equipment supply order entry you must first identify the items that are supply items for your inventory items, both equipment and accessories. For example, if you have a copier, you can define the toner supplies for the copier. You can also identify the accessory finisher, as well as the staples that serve as supplies for the finisher. Once you know the supplies for both the equipment and the accessory, you then link the supplies for each to the inventory item in e-automate. On the inventory item that is linked to the equipment you would associate the toner supplies, and on the inventory item that is the accessory finisher, you would associate the staples. You identify these supply items on the inventory item's Related Items tab. If you want e-automate to display related items for accessories on equipment, you must also associate accessories to equipment records. Associating the accessories allows e-automate to determine which accessories are associated with an equipment record at a given time.
When attaching accessories to equipment you can enable e-automate to consume in-stock accessories. When e-automate consumes in-stock accessories, it removes the item that was in inventory and transfers the cost associated with the inventory item attached to the equipment host that does the consuming. e-automate makes a distinction between serialized and non-serialized accessories. You enable either or both serialized or non-serialized accessories. You can also default your system to assume you are consuming either serialized or non-serialized. Finally, you can also remove accessories from hosts and put accessories back into inventory with their full cost.
Enabling Accessory ConsumptionEnabling Accessory Consumption
From the Tools menu, select Options to open the Options window.
In the Options window, in the left-hand pane, click on Equipment to display equipment options on the right.
When the equipment options display, you can enable accessory consumption under accessories.
Configure the following options for your company as appropriate:
Allow accessory consumption of serialized items: When checked, e-automate allows you to associate accessories to equipment and consume the cost of the accessory into the host equipment item. This removes the accessory item from inventory and transfers the cost to the host. Without this checkbox checked, when adding accessories, you cannot consume.
Default serialized items to consumed: When checked and you add accessories, e-automate assumes you always want to consume the accessories. The checkbox in the Add Accessories window is always checked based on this field. During accessory configuration, you can uncheck it as necessary.
Allow accessory consumption of non-serialized items: When checked, e-automate allows you to consume items that are not serialized. This transfers the cost of the item to the host item and removes the quantity on hand for the consumed non-serialized accessory. Without this checkbox checked, you cannot consume non-serialized accessories.
Default non-serialized items to consumed: When checked and you add non-serialized accessories, e-automate assumes you always want to consume, so the checkbox in the Add Accessories window is always checked for non-serialized items. You can uncheck it, but this checkbox configuration assumes you are consuming.
Click the [OK] button to save your changes and to close the Options window.
Click the [OK] button to acknowledge the message.
Restart e-automate so that these changes will take effect.
If you are running e-agent, restart e-agent as well.
Defining Related ItemsDefining Related Items
From the Inventory menu, select Items to open the Items list window.
From your e-automate inventory item list, identify inventory items that can consume supplies. Typically, this is a list of your equipment-coded items. You could also have supply consumers in accessory items that may not be equipment-coded. You may want to start with your highest supply consumer items.
Select an inventory item from the list and click [Edit].
In the Edit Inventory Item window, click the Related Items tab to bring it forward.
In the Item field, use the lookup icon to select a supply item used by this inventory item.
In the Yield Override field, enter the expected yield for this supply—but only if this supply's yield, when consumed by the equipment coded item, is different than the yield identified on the supply item.
Click [QuickAdd] to add the item.
Repeat Steps b through d until you have added all supply items used by this inventory item.
Repeat Step 3 for each item that consumes supplies.
Configuring, Accumulating History for, and Understanding Item Yield WarningsConfiguring, Accumulating History for, and Understanding Item Yield Warnings
You can configure e-automate to display item yield warning messages on sales transactions. To display these messages, the system requires product yield information, a prior sales transaction association between the product being consumed and the equipment consuming the product, meter history on which to base usage, and an expected yield percentage below which to display the warnings. When sufficient information is available for the system to detect a consumable product's actual usage is below expected usage at the time the item is placed on a sales transaction and if the item is not billable, the system will display the following information on the sales transaction:
On the Add/Edit Sales Order window, on the Items tab, the system will display a ![]() warning icon on each non-billable line where the item's actual usage is below the expected usage. If you hover over the icon, the system will display the message: "Usage is [shortage amount] less than the minimum expected value."
warning icon on each non-billable line where the item's actual usage is below the expected usage. If you hover over the icon, the system will display the message: "Usage is [shortage amount] less than the minimum expected value."
On the Add/Edit Sales Order Item window for the selected non-billable line item, in the Item Invoice Details region, the system will display the ![]() warning icon with the message: Usage is [shortage amount] less than the minimum expected value."
warning icon with the message: Usage is [shortage amount] less than the minimum expected value."
Configuring Item Yield WarningsConfiguring Item Yield Warnings
To configure item yield warnings, do the following:
Verify a copy yield quantity and usage limit meter type are specified for each consumable product for which you want to receive an item yield warning message when applicable. To verify a copy yield quantity and usage limit meter type are specified for a consumable item, do the following:
On the e-automate toolbar, click [Items] to open the Items list window.
Filter the inventory item list for consumable items. For example, you may want to use the QuickSearch filter to locate items where Category begins with your designation for supplies. For more information on using QuickSearch functionality, see the Using the QuickSearch topic.
Select a consumable item from the list for which to verify a copy yield is present.
Click [Edit] to open the Edit Inventory item window.
In the Usage limit meter type field, use the lookup icon to select the meter type on which you want the system to base the usage (e.g., B\W for a toner cartridge that is only used for black-and-white copies; Color for a toner cartridge that is only used for color copies; Total Count for a toner cartridge that is used for creating all copies, both black-and-white copies and color copies).
On the Codes and Settings tab, verify the Copy yield field lists the number of copies or other units the item is expected to produce before the item must be replaced. If this field is not populated, add the appropriate number of copies/units.
Click [OK] to save the information.
For products that consume consumable items at a rate other than the item's Copy yield rate, specify a copy yield override quantity that applies when the consumable item is used with that product. To specify a copy yield override quantity for a consumable item when the item is used with a specific product, do the following:
From the Inventory menu, select Items to open the Items list window.
From your e-automate inventory item list, identify inventory items that can consume supplies. Typically, this is a list of your equipment-coded items. You could also have supply consumers in accessory items that may not be equipment-coded. You may want to start with your highest supply consumer items.
Select an inventory item from the list for which you want to verify a copy yield override is present.
Click [Edit] to open the Edit Inventory item window.
Click the Related Items tab to bring it forward.
In the Item field, use the lookup to select a supply item used by this inventory item.
In the Yield Override field, enter the expected yield for this supply, if any.
Click [QuickAdd] to add the item.
Repeat Steps f through h until you have added all supply items used by this inventory item.
Click [OK] to save the information.
Repeat Steps c through j for each item that consumes supplies.
To specify a yield percentage, do the following:
From the Tools menu, select Options to open the Options window.
In the left pane of the window, double-click on Sales. The Sales options display in the right pane of the window.
In the Yield percentage field, enter the percentage of a consumable item's Copy yield value that must be reached to prevent the system from displaying an item yield warning when a user adds the item to a sales transaction.
Click [OK] to save the information.
If you are using e-info and want to display item yield information ![]() icons for your e-info users when applicable, you must also check the Item yield warning based on actual and expected usage box in e-info. For more information, see the Configuring E-info End User Options topic.
icons for your e-info users when applicable, you must also check the Item yield warning based on actual and expected usage box in e-info. For more information, see the Configuring E-info End User Options topic.
Accumulating History on Which to Base Item Yield WarningsAccumulating History on Which to Base Item Yield Warnings
Once you have the system configured to generate item yield warning messages for non-billable items, you need to make sure sales transaction, service call, meter, and contract entry processes provide the system with the information necessary to calculate usage information and associate that usage information with the items being consumed.
The system calculates consumption based on the combination of the following components: the item being consumed, the equipment consuming the consumable item, and the equipment's install date and installed location.
When you enter a sales transaction for a consumable item, you associate the item with a specific piece of equipment by checking the Add equipment and contract box and specifying the equipment that is consuming the consumable item. This equipment-to-supply association allows e-automate to determine if the supply item is billable based on the associated bill code. Typically, this bill code comes from a service contract, but—in less common situations—the bill code may also come from the equipment record.
E-automate uses only valid meter readings when calculating item yield warnings; invalid meter readings (readings for which the This is a valid reading box is not checked on the Add/Edit Meter Reading window) are not used. A meter reading does not have to be billed on contract for the system to use the meter to calculate usage for yield warnings.
To assure usage is associated with a distinct equipment item for a specified period of time, the system uses the equipment item's Install date and Installed location in the equipment record. If you change an equipment item's Installed location and you do not want to use meter history from the previous location for determining usage at the new location, you should also update the equipment item's Install date.
Understanding Item Yield Warning CalculationsUnderstanding Item Yield Warning Calculations
Following is a sample Item Invoice Details image involving a supply item included at no charge. The table below this image identifies the source of each item in this image and/or the calculations for arriving at the item's value.
Item Invoice Details Image
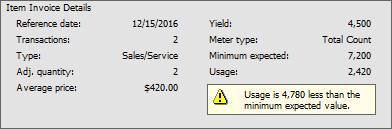
This image is based on the following information:
In Tools > Options > Sales, the Yield Percentage is set to 80%.
In the consumable item's Item record, Usage limit meter type is set to Total Count and Copy yield is set to 5,000.
In the equipment item's Item record, a Related Items record exists for the consumable item and has a Yield override of 4,500.
The equipment was installed on 12/05/2016 with the following meter readings:
B\W: 0
Color: 0
Total Count: 0
On 12/15/2016, a service call was entered and invoiced for this equipment. The materials used on the call included a quantity of 1 of this consumable item at a price of $450.00, and the following meter readings were entered:
B\W: 1,000
Color: 100
Total Count: 1,100
Also on 12/15/2016, a sales order was entered and invoiced that included a quantity of 2 of this consumable item linked to this equipment. The price of $450 per item was discounted 10% for a price of $405 per item.
On 12/22/2016, a sales order was entered and invoiced that included a quantity of -1 (negative one) of this consumable item linked to this equipment.
On 01/06/2017, when this consumable item was linked to this equipment on a sales order, the system displayed the Item Invoice Details shown in this image.
The following table identifies the source of each item in this image and/or the calculations for arriving at the item's value.
Identifying Models Capable of HostingIdentifying Models Capable of Hosting
From the Inventory menu, select Models to open the Models list window. If a model's Host column lists Yes, the model is capable of being a host.
To identify a model as capable of being a host, do the following:
Select the model in the list.
Click [Edit] to open the Edit Model window.
Check the Host check box.
Click [OK] to save the model changes.
Repeat Steps a through d for each model that is capable of being a host.
Identifying Models Capable of Being AccessoriesIdentifying Models Capable of Being Accessories
If you track accessories on your equipment list, complete these steps:
From the Inventory menu, select Models to open the Models list window. If a model's Accessory column lists Yes, the model is capable of being an accessory.
To identify a model as capable of being an accessory, do the following:
Select the model in the list.
Click [Edit] to open the Edit Model window.
Check the Accessory check box.
Click [OK] to save the model changes.
Repeat Steps a through d for each model that is capable of being an accessory.
Associating Accessories on EquipmentAssociating Accessories on Equipment
From the Service menu, select Equipment to open the Equipment list window.
From the Equipment list, identify equipment items that are hosting accessories.
Select the equipment with which you want to associate accessories and click [Accessories] to open the Edit Accessories window.
In the Number field, you can enter a number or allow e-automate to automatically number this accessory attachment or removal.
In the Date field, you can specify the date this equipment build occurred.
To add an accessory, do the following:
Click [Add] to open the Add Accessory window.
In the Type field, use the drop-down menu to identify if you are attaching another equipment as an accessory, or if you are linking an inventory item as an accessory.
In the Equipment/Item field, use the lookup to select the accessory attached to this equipment.
In the Serial number field, enter the appropriate serial number.
In the Quantity field, identify the quantity attached.
To flag the accessory as a permanent accessory, check the Permanent checkbox.
If your options enable consumption, you can consume the identified accessory if in inventory. To consume, check the Consume checkbox.
If consuming, check the Consume from checkbox, and in the appropriate fields identify the Warehouse and Bin.
Click [OK] to add the accessory and consume if applicable.
Repeat Steps a through i until you have added all the accessories for this equipment.
Click [OK] to save the accessory changes.
Entering a Supply OrderEntering a Supply Order
On the Sales menu, select Sales Order or Sales Invoices to open the Sales Orders or Sales Invoices list window, respectively.
Click [New] to open the New Sales Order or New Sales Invoice window.
In the bottom right of the New Sales Order or New Sales Invoice window, check the Add equipment and contract checkbox.
To view only those supply items associated with a piece of equipment, use the lookup icon in the Equipment field to select the equipment number.
If the equipment is on a current contract, e-automate adds the contract to the Contract field. You can change if necessary.
In the Item field, use the lookup icon to select inventory items.
Click [QuickAdd] to add the related item to the invoice.
Repeat Steps c through d to add items for the selected equipment.
Repeat Steps a through e to add items for different equipment.
Click [OK] to save the order or invoice.
For more information on the additional tabs on sales orders and invoices, see the Creating Equipment Sales Orders, Creating Supply Sales Orders, and Creating Sales Invoices topics.
Release Support Ends July 31, 2026Release Support Ends July 31, 2026
©2026 ECI and the ECI logo are registered trademarks of ECI Software Solutions, Inc. All rights reserved.