Using the E-views Side Panel
Using the Side Panel ToolbarUsing the Side Panel Toolbar
You use the Side Panel's toolbar to manage views (create, edit, and delete), to arrange views within the categories (alphabetize, categorize, and sort views), and to hide the Side Panel. When expanded, the Side Panel Toolbar lists these icons with these uses:
|
Icon |
Name |
Use |
Available From |
|
|
Collapse Side Panel |
Click to collapse the Side Panel, showing only the Collapsed Side Panel Toolbar. |
All Category Tabs |
|
|
View |
Click to open the view selected in the Side Panel. |
All Category Tabs |
|
|
Create View |
Click to create a new view based on the view selected in the Side Panel. |
All Category Tabs |
|
|
Edit View |
Click to edit the view selected in the Side Panel. |
Favorites, Shared, and Corporate Tabs |
|
|
Delete View/Remove View from Favorites |
Click to delete the view selected in the Side Panel. If the view selected is in the Shared or Corporate category, the system will also remove the view from the Favorites category. If the view selected is in the Favorites category, the system will only remove the view from the Favorites category. |
Favorites, Shared, and Corporate Tabs |
|
|
Add View to Favorites |
Click to add the view selected in the Side Panel to the Favorites category. |
Shared, Corporate, and System Tabs |
|
|
Sort Views Alphabetically |
Click to list the views displayed on each category tab in alphabetical order. |
All Category Tabs |
|
|
Sort Views By Category |
Click to list the views displayed on each category tab primarily by e-automate system area (e.g., within Accounts Payable, Accounts Receivable, etc.) and secondarily in alphabetical order within the e-automate system area. |
All Category Tabs |
|
|
Edit View Tags |
Click to open the Tags window, where you can add, edit, and/or delete tags associated with the view selected in the Side Panel. |
All Category Tabs |
Using the Collapsed Side Panel IconsUsing the Collapsed Side Panel Icons
When the Side Panel is collapsed, the system displays the following icons with these uses:
|
Icon |
Name |
Use |
|
|
Expand Side Panel and Open Favorites |
Click to expand the Side Panel and expand the Favorites tab. |
|
|
Expand Side Panel and Open Favorites |
Click to expand the Side Panel and expand the Shared tab. |
|
|
Expand Side Panel and Open Favorites |
Click to expand the Side Panel and expand the Corporate tab. |
|
|
Expand Side Panel and Open Favorites |
Click to expand the Side Panel and expand the System tab. |
Using the Category TabsUsing the Category Tabs
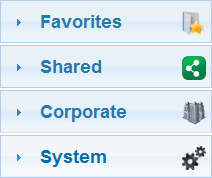
The Side Panel contains the following four tabs for categorizing views: Favorites, Shared, Corporate, and System.
When you first open e-views, the only tab that will list views is the System tab. The System tab lists the pre-defined, system views that are included with e-views. You use these views to access a wide range of database information and/or to create other customized views for accessing data. You cannot modify or delete any of the system views.
When you create a customized view, you can save the new view to your Favorites tab only, Shared tab only, Corporate tab only, Favorites and Shared tabs, or Favorites and Corporate tabs.
You use the Favorites tab to list the views you use most frequently. The views listed on this tab are specific to you, and each e-views user can have his or her own list of favorite views.
You use the Shared tab to list the customized views you want to make available for other individuals in your company to use and to view the customized views that other individuals in your company want to make available for you to use.
You use the Corporate tab to list the standard views your e-views administrator wants your company to use. These views may be system views or customized views tailored to meet your company's specific needs. You need to have the appropriate rights to view—and the administrative rights to edit—the views listed on this tab.
Using the Category FilterUsing the Category Filter
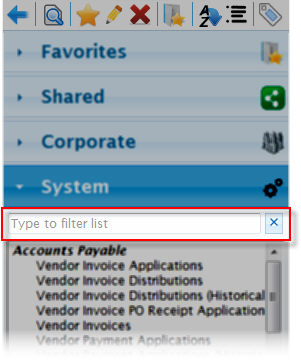
On each category tab, the system displays a Type to filter list field (see the image below showing this field for the System tab) that you can use to filter the list of views within the category.
To use the filter, do the following:
To view all views in the category, leave this field blank. You can also click the X icon to the right of the field to clear the field and display all views in the category.
To filter for specific views, enter the search string you want to use to filter the views. Observe these guidelines:
The search is not case sensitive.
The search is a "contains" search (e.g., a search for voice will find "Vendor Invoice Applications").
By default, the system considers a view a match if the search string is contained within the view name (not the SQL name) and/or within a tag assigned to the view. For information on assigning tags to views, see the "Tagging Views" section of this topic.
To filter views based on view name and/or tag, use search_string (e.g., a search for Receipt will find "Vendor Invoice PO Receipt Application" based on view name and "Vendor Invoices" if "Vendor Invoices" has a tag named receipt or a tag name that includes receipt).
To filter views based on view name only, use view:search_string (e.g., view:Receipt would find "Vendor Invoice PO Receipt Application" based on view name but would not find "Vendor Invoices", even if "Vendor Invoices" had a tag named receipt).
To filter views based on tag only, use tag:search_string (e.g., tag:Receipt will find "Vendor Invoices" if "Vendor Invoices" has a tag named receipt or a tag name that includes receipt but will not find "Vendor Invoice PO Receipt Application" unless "Vendor Invoice PO Receipt Application" also has a tag named receipt or a tag name that includes receipt).
Using the Category ListUsing the Category List
Each category tab lists the views available within the category. When the Type to filter list field is blank, the system lists all the view available within the category. When the Type to filter list field is not blank, the system displays the filtered list of views based on the value entered in the Type to filter list field. For more information about filtering the view, see the "Using the Category Filter" section of this topic.
Two options are available for sorting the views in the list: alphabetical by view name only, or alphabetical by e-automate system area (e.g., within Accounts Payable, Accounts Receivable, etc.) and secondarily in alphabetical order by view name within the e-automate system area. For more information about sorting the lists, see the "Using the Side Panel Toolbar" section of this topic.
With the category list filtered and/or sorted as desired, you use the category list to access the View window. To open a view in the View window, do either of the following:
With the view selected in the category list, click the ![]() View icon in the Side Panel's toolbar to open the view in the View window.
View icon in the Side Panel's toolbar to open the view in the View window.
With the view located in the category list, double-click the view name in the Side Panel to open the view in the View window.
Tagging ViewsTagging Views
The tagging feature in e-views provides you with a quick and easy way to create and locate groups of views. You create the tag, give the tag a name that identifies the group of views, and assign the tag to each desired view. With the tag assigned to all appropriate views, you can then locate those views by filtering the views list by the tag name. For example, if you generally need to cross reference all views that have any tax information, you can create a tag titled Tax and assign the Tax tag to all those views that contain tax data. With the tag assigned to all tax-related views, you can then enter Tax in the Type to filter list field on a category tab in the Side Panel to locate and display only those views with the Tax tag. For more information on filtering views using tags, see the "Using the Category Filter" section of this topic.
Tags are user specific. Any tags you create and assign will be available only in your own views.
When you create a tag, you must first select a view to which you want to assign the tag. When created, the tag is automatically assigned to the selected view. You can then go in to other views and assign the new tag to the appropriate views.
If you delete a tag, the tag will be deleted from all views to which you had assigned the tag.
Adding Tags to ViewsAdding Tags to Views
Locate and select the view to which you want to add a tag. To locate the view, expand the view category to which the view is assigned.

With the desired view selected, click the![]() Edit View Tags icon on the e-views toolbar to open the Tags window.
Edit View Tags icon on the e-views toolbar to open the Tags window.
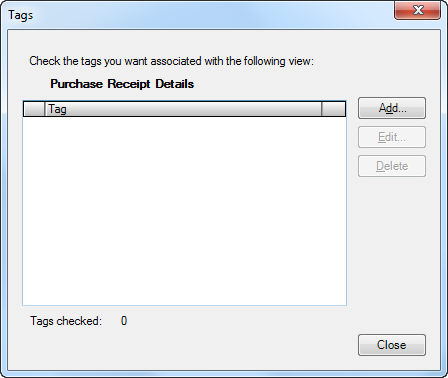
Click [Add...] to open the Create New Tag window.
In the Name field, enter a name for this tag.
Click [OK] to save the new tag. The system closes the Create New Tag window and displays the Tags window, displaying the tag in the list and checking the box next to the tag, assigning it to this e-view.
Click [Close] to close the Tags window.
Assigning Existing Tags to ViewsAssigning Existing Tags to Views
Locate and select the view to which you want to assign a tag. To locate the view, expand the view category to which the view is assigned.
With the desired view selected, click the![]() Edit View Tags icon on the e-views toolbar. The Tags window opens.
Edit View Tags icon on the e-views toolbar. The Tags window opens.
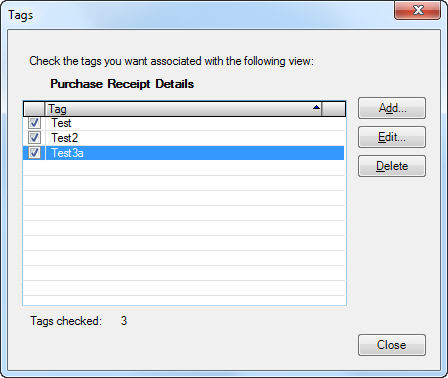
Check the box next to each existing tag you want to assign to the selected view.
Click [Close] to close the Tags window.
Editing TagsEditing Tags
Click the![]() Edit View Tags icon on the e-views toolbar. The Tags window opens.
Edit View Tags icon on the e-views toolbar. The Tags window opens.
Select the tag you want to edit.
Click [Edit...]. The Edit Tag window opens.
In the Name field of the Edit Tag window, make the appropriate changes.
Click [OK] to save the changes and close the Edit Tag window.
Click [Close] to close the Tags window.
Deleting TagsDeleting Tags
Click the![]() Edit View Tags icon on the e-views toolbar. The Tags window opens.
Edit View Tags icon on the e-views toolbar. The Tags window opens.
Select the tag you want to delete.
Click [Delete]. The Confirm Tag Delete window displays.
Click [Yes] to delete the tag from all views to which the tag is assigned.
Click [Close] to close the Tags window.
Finding Views by TagsFinding Views by Tags
Within each category of e-views, the system displays a Type to filter list field (see the image below showing this field for the System category) that you can use to filter the list of views within the category.
To use the filter to locate views based on a tag you assigned to one or more views, observe these guidelines:
The search is not case sensitive.
The search is a "contains" search (e.g., a search for voice will find "Vendor Invoice Applications").
By default, the system considers a view a match if the search string is contained within the view name (not the SQL name) and/or within a tag assigned to the view.
To filter views based on view name and/or tag, use search_string (e.g., a search for Receipt will find "Vendor Invoice PO Receipt Application" based on view name and "Vendor Invoices" if "Vendor Invoices" has a tag named receipt or a tag name that includes receipt).
To filter views based on tag only, use tag:search_string (e.g., tag:Receipt will find "Vendor Invoices" if "Vendor Invoices" has a tag named receipt or a tag name that includes receipt but will not find "Vendor Invoice PO Receipt Application" unless "Vendor Invoice PO Receipt Application" also has a tag named receipt or a tag name that includes receipt).
Release Support Ends July 31, 2026Release Support Ends July 31, 2026
©2026 ECI and the ECI logo are registered trademarks of ECI Software Solutions, Inc. All rights reserved.