Paying Vendors
This topic contains 2024-01-04+ release content.This topic contains 2024-01-04+ release content.
2024-01-04+ Releases2024-01-04+ Releases
You use the Pay Vendors list window to create a list of accounts payable invoices that are due (and these invoices can be purchase order invoices or other account payable invoices), to review and then check the invoice(s) you want to include for payment, and then to process the payment(s) using the payment method specified for each vendor in the vendor's profile.
You can create the list of vendors to pay automatically and/or manually. You use the Auto Create Vendor Payment List window to specify parameters for the system to use to generate the pay vendors list automatically. You use the Pay Vendors list window's [New], [Edit], and [Remove] buttons to manually populate and adjust the pay vendors list.
The grid on the Pay Vendors list window identifies the number and amount of unapplied payments if any unapplied payments exist for the vendors listed in the pay vendors list. You can then choose to apply these payments before proceeding.
The Pay Vendors list window also includes a column of checkboxes. You can check all the checkboxes for the vendor payments you want to process and then process all the payments at the same time. As an alternative, you can choose to check the checkbox for each vendor you want to include in one payment process, process the payment(s), and then repeat this process until you have processed all the vendor payments you want to process. Additionally, when you process payment(s), you have the option to process the payment(s) using each applicable vendor payment method (i.e., Bill Pay, Cash, Check, Credit Card, Direct Debit, and/or EFT).
For each payment method that you process, the system records a payment for each included vendor whose vendor profile specified that vendor payment method and applies the vendor's payment to the vendor invoice(s) that payment is to pay. When the system applies payments to invoices paid by Bill Pay, Cash, Credit Card, or Direct Debit, the system populates the Reference number field of the vendor payment with the payment method and date (e.g., Bill Pay:BPay 2023-09-18). For checks, the system populates the Reference number field of the vendor payment with the check number. For EFT, the system populates the Reference number field of the vendor payment with the path to the EFT file.
When you process the Bill Pay option, you need to use online banking systems Bill Pay functionality to make the actual payment. When you process the Cash option, you need to pay the vendor the cash payment. When you process the Credit Card option, the system processes the credit card payments. When you process the Checks option, the system prompts you to print the vendor checks and you need to send the generated checks. When you process the Direct Debit option, you need to go out to your banking web site and process the payment. When you process the EFT option, the system generates the EFT file and you need to send this file to your financial institution for processing.
Getting to the TransactionGetting to the Transaction
From the Accounting menu, select Accounts Payable > Pay Vendors. The system opens the Pay Vendors window.
Populating the Pay Vendors ListPopulating the Pay Vendors List
To populate the Pay Vendors list window, do any of the following:
Auto Creating the Pay Vendors ListAuto Creating the Pay Vendors List
To auto create the pay vendors list, do the following:
Click [Auto Create] to open the Auto Create Vendor Payment List window.
In the Next check run date field, make no change to use the date displayed or enter the date to use for the next check run and invoices due collection.
Do any of the following:
If you want to take advantage of any offers that may be available for paying an invoice early, check the Pay before terms discount date checkbox; otherwise, leave this checkbox unchecked.
Example: You specify a Next check run date of March 4. You have a Pay __ days before term discount date setting of 3 days. If you check this box, e-automate will include for payment any eligible invoice with a term discount date on or before March 7 (March 4 plus 3 days).
If you want to pay an invoice before the invoice's scheduled due date, check the Pay before scheduled due date checkbox; otherwise, leave this checkbox unchecked.
Example: You specify a Next check run date of March 4. You have a Pay __ days before due date setting of 3 days. If you check this box, e-automate will include for payment any eligible invoice with an unpaid installment with a payment schedule due date on or before March 7 (March 4 plus 3 days).
To includes for payment eligible invoices from vendors for whom an On hold code is specified on the Miscellaneous tab in the vendor record, check the Pay vendors that are on hold checkbox; otherwise, leave this checkbox unchecked.
Do one of the following:
To include for payment eligible invoices from all vendors regardless of the vendor payment method specified on the Payments tab of the vendor's vendor profile, leave the Payment method checkbox unchecked.
To include for payment eligible invoices from all vendors for whom the payment method you select is listed on the Payments tab of the vendor's vendor profile, do the following:
Check the Payment method checkbox.
In the Payment method field, use the drop-down menu to select the payment method a vendor must have for eligible invoices from that vendor to be included for payment.
If branching is enabled, do one of the following:
To include for payment eligible invoices from all vendors regardless of the Branch specified on the Miscellaneous tab of the vendor's vendor profile, leave the Pay invoices by branch checkbox unchecked.
To include for payment eligible invoices from all vendors for whom the branch you select is listed in the Branch field on the Miscellaneous tab of the vendor's vendor profile, do the following:
Check the Pay invoices by branch checkbox.
In the Pay invoices by branch field, use the drop-down menu to select the branch that must be listed in the Branch field on the Miscellaneous tab of the vendor's vendor profile for eligible invoices from that vendor to be included for payment.
Click the [OK] button.
Manually Adding a Payment to be Made to the ListManually Adding a Payment to be Made to the List
To manually add a payment to be made to the pay vendors list, do the following:
Click [New] to open the New Accounts Payable Check window.
In the Vendor field, use the lookup to select the vendor to pay.
Do any of the following:
To specify an amount to pay the vendor that is not associated with an invoice, do the following:
In the Additional payment field, enter the amount to be paid to this vendor.
If branching is enabled, do the following:
Click the Miscellaneous tab.
In the Additional payment settings section's Branch field, make no change to keep the branch displayed or use the drop-down menu to select the branch to associate with this vendor payment.
To add one or more invoices to pay, do the following:
In the Invoice field, use the lookup to select an invoice to pay.
Click the [QuickAdd] button to add the invoice to the payment.
Repeat Steps a. and b. to add more invoices to pay.
To partially pay an invoice and/or to change the amount of the discount to take on an invoice in the list, do one of the following:
If branching is not enabled or if branching is enabled and you do not need to see how the system is splitting payments between branches, do the following:
Select the invoice. The system populates the Discount and Amount to pay fields below the grid.
In the Discount field, make no change to keep the amount displayed or enter the amount of the discount to take.
In the Amount to pay field, make no change to keep the amount displayed or enter the amount to be paid on this invoice.
Click the [Update] button. The system updates the applicable columns of the grid as well as the Summary region to reflect any changes to the discount and the amount to pay on the selected invoice.
If branching is enabled and you want to see, and optionally adjust, how the system is splitting payments between branches, do the following:
Select the invoice.
Click the [Edit...] button to open the Edit Accounts Payable Payment Detail window.
In the Amount to pay field, make no change to keep the amount displayed or enter the sum of the amounts to be paid on this invoice by all applicable branches.
In the Discount field, make no change to keep the amount displayed or enter the sum of the discount amount to be taken on this invoice by all applicable branches.
To adjust a split, do the following:
In the Splits grid, select a branch. The system populates the Amount and Terms discount amount fields below the grid.
In the Amount field, enter the amount to pay for the selected branch.
In the Terms discount amount field, enter the discount amount to take for the selected branch.
Click the [Update] button. The system updates the amounts for that branch, selects the next branch, and populates the Amount and Terms discount amount fields below the grid for that branch.
Repeat Steps ii. to iv. for each branch.
Click the [OK] button. The system closes the Edit Accounts Payable Payment Detail window, and updates the applicable columns of the grid as well as the Summary region of the new Accounts Payable Check window to reflect any changes to the discount and the amount to pay on the selected invoice.
To pay an invoice in full that you have previously marked for partial payment, do the following:
Select the invoice.
Click the [Pay in full] button. The system updates the Payment amount, Balance, and Total payment amount columns of the grid as well as the Summary region to reflect the amount to pay the selected invoice in full.
To remove an invoice from the grid on the Invoices tab, do the following:
Select the invoice.
Click the [Remove] button. The system displays the message, "Do you want to remove the selected item? Vendor Invoice - [Vendor Invoice Number]"
Click the [Yes] button to confirm removing the invoice, or click the [No] button to keep the invoice.
Click the [OK] button to close the New Accounts Payable Check window and to add the payment to be made to the pay vendors list.
Editing a Payment to be Made in the ListEditing a Payment to be Made in the List
To edit a payment to be made to the pay vendors list, do the following:
Select the payment you want to edit.
Click [Edit] to open the Edit Accounts Payable Check window.
Do any of the following:
To specify an amount to pay the vendor that is not associated with an invoice, do the following:
In the Additional payment field, enter the amount to be paid to this vendor.
If branching is enabled, do the following:
Click the Miscellaneous tab.
In the Additional payment settings section's Branch field, make no change to keep the branch displayed or use the drop-down menu to select the branch to associate with this vendor payment.
To add one or more invoices to pay, do the following:
In the Invoice field, use the lookup to select an invoice to pay.
Click the [QuickAdd] button to add the invoice to the payment.
Repeat Steps a. and b. to add more invoices to pay.
To partially pay an invoice and/or to change the amount of the discount to take on an invoice in the list, do one of the following:
If branching is not enabled or if branching is enabled and you do not need to see how the system is splitting payments between branches, do the following:
Select the invoice. The system populates the Discount and Amount to pay fields below the grid.
In the Discount field, make no change to keep the amount displayed or enter the amount of the discount to take.
In the Amount to pay field, make no change to keep the amount displayed or enter the amount to be paid on this invoice.
Click the [Update] button. The system updates the applicable columns of the grid as well as the Summary region to reflect any changes to the discount and the amount to pay on the selected invoice.
If branching is enabled and you want to see, and optionally adjust, how the system is splitting payments between branches, do the following:
Select the invoice.
Click the [Edit...] button to open the Edit Accounts Payable Payment Detail window.
In the Amount to pay field, make no change to keep the amount displayed or enter the sum of the amounts to be paid on this invoice by all applicable branches.
In the Discount field, make no change to keep the amount displayed or enter the sum of the discount amount to be taken on this invoice by all applicable branches.
To adjust a split, do the following:
In the Splits grid, select a branch. The system populates the Amount and Terms discount amount fields below the grid.
In the Amount field, enter the amount to pay for the selected branch.
In the Terms discount amount field, enter the discount amount to take for the selected branch.
Click the [Update] button. The system updates the amounts for that branch, selects the next branch, and populates the Amount and Terms discount amount fields below the grid for that branch.
Repeat Steps ii. to iv. for each branch.
Click the [OK] button. The system closes the Edit Accounts Payable Payment Detail window, and updates the applicable columns of the grid as well as the Summary region of the Edit Accounts Payable Check window to reflect any changes to the discount and the amount to pay on the selected invoice.
To pay an invoice in full that you have previously marked for partial payment, do the following:
Select the invoice.
Click the [Pay in full] button. The system updates the Payment amount, Balance, and Total payment amount columns of the grid as well as the Summary region to reflect the amount to pay the selected invoice in full.
To remove an invoice from the grid on the Invoices tab, do the following:
Select the invoice.
Click the [Remove] button. The system displays the message, "Do you want to remove the selected item? Vendor Invoice - [Vendor Invoice Number]"
Click the [Yes] button to confirm removing the invoice, or click the [No] button to keep the invoice.
Click the [OK] button to close the Edit Accounts Payable Check window and to update the payment to be made in the pay vendors list.
Removing One or More Payments to be Made from the ListRemoving One or More Payments to be Made from the List
To indicate all invoices for one or more vendors should not be paid, do the following:
>Select the rows to be removed from the pay vendors list using any of the following methods:
To select all rows, press CTRL+A.
To select a range of consecutive rows, do the following:
Press and hold the keyboard SHIFT key.
Click a starting row.
Click an ending row.
Release the keyboard SHIFT key.
To select multiple non-consecutive rows, do the following:
Press and hold the keyboard CTRL key.
Click each row you want to select.
Release the keyboard CTRL key.
To select a single row, click the row.
Click the [Remove] button. The system displays the message, "Do you want to remove the selected items?"
Click the [Yes] button to confirm removing all invoices for the selected vendor(s) from the pay vendors list, or click the [No] button to keep all invoices for the selected vendor(s) from the pay vendors list.
Reviewing the Pay Vendors ListReviewing the Pay Vendors List
To assist you with reviewing the pay vendors list before processing payments, you can print the pay vendors list. If any unapplied payments exist, you can also view the number and amount of any unapplied payments. You can then choose to apply any applied payments before processing payment.
Printing the Pay Vendors ListPrinting the Pay Vendors List
To print the pay vendors list, do the following:
Click [Print list] to open the Vendor Payment List window.
Click [Print Report] to open the Select Printer window.
Click [OK] to print the pay vendors list on the default printer.
Close the Vendor Payment List window to display the Pay Vendors window.
Applying Unapplied PaymentsApplying Unapplied Payments
If any unapplied payments exist, you can view the number and amount of any unapplied payments on the Pay Vendors list window.
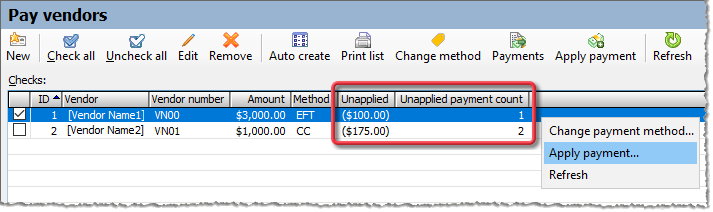
The Unapplied column lists the sum of any unapplied payments. The Unapplied payment count lists the number of unapplied payments.
To apply an unapplied payment, do the following:
Select the row containing one or more unapplied payments that you want to apply.
Click the [Apply payment] button on the toolbar, or right-click the row and select Apply payment... from the right-click menu. The system opens the Apply Payments window and populates the Vendor field. If only one unapplied payment is associated with the row you selected, the system also populates the Payment field.
Use the Apply Payments window to apply the payment. For more information on using this window, see the Applying Vendor Payments topic.
Checking the Payment(s) to PayChecking the Payment(s) to Pay
Once you have reviewed the pay vendors list, you can choose to pay all vendors in the list at one time, or you can choose a group of vendors to pay (e.g., all the vendors who have a vendor payment method of BPay - Bill Pay), pay that group, and then repeat this process until you have paid all the vendors in the pay vendors list that you want to pay. To check the vendors in the pay vendors list that you want to include for payment, do any of the following:
To check all rows, click the toolbar's [Check all] button.
To uncheck all rows, click the toolbar's [Uncheck all] button.
To check a single row, check the checkbox on that row.
To uncheck a single row, uncheck the checkbox on that row.
To use standard Windows shortcuts for selecting and checking one or more rows, do the following:
Select the row(s) to check by doing any of the following:
To select all rows, press CTRL+A.
To select a range of consecutive rows, do the following:
Press and hold the keyboard SHIFT key.
Click a starting row.
Click an ending row.
Release the keyboard SHIFT key.
To select multiple non-consecutive rows, do the following:
Press and hold the keyboard CTRL key.
Click each row you want to select.
Release the keyboard CTRL key.
To select a single row, click the row.
Check the selected rows by clicking the keyboard SPACE bar.
Releases Prior to 2024-01-04Releases Prior to 2024-01-04
You create a list of accounts payable invoices that are due so you can print checks or create EFT files for the due invoices. These obligations can be purchase order invoices or other account payable invoices. The pay vendors list can be generated automatically by e-automate or entries can be added one by one.
The pay vendors list is created based on the selected pay vendors date. All debts entered into the system as payables are tracked using accounts payable invoices. Debts can be entered using other methods, but the system does not track them as payables.
The pay vendors list is generated by searching your company database for accounts payable invoices that, according to the terms extended to you by your vendors, will be due BEFORE the next check run date.
Getting to the TransactionGetting to the Transaction
From the Accounting menu, select Accounts Payable > Pay Vendors to open the Pay Vendors window.
Click [Auto Create] to open the Auto Create Vendor Payment List window.
Basic InformationBasic Information
On the Auto Create Vendor Payment List window, complete the following fields as appropriate:
Next check run date: Date to use for the next check run and invoices due collection.
Pay before terms discount date: When checked, e-automate takes advantage of any discount offers available for early payment.
Example: You specify a Next check run date of March 4. You have a Pay __ days before term discount date setting of 3 days. If you check this box, e-automate will include for payment any eligible invoice with a term discount date on or before March 7 (March 4 plus 3 days).
Pay before due date: When checked, e-automate pays bills before they come due.
Pay before scheduled due date: When checked, e-automate selects for payment each invoice—or the installment portion of each invoice—that is due for payment.
Example: You specify a Next check run date of March 4. You have a Pay __ days before due date setting of 3 days. If you check this box, e-automate will include for payment any eligible invoice with an unpaid installment with a payment schedule due date on or before March 7 (March 4 plus 3 days).
Pay vendors that are on hold: When checked, e-automate includes for payment eligible invoices from vendors for whom an On hold code is specified on the Miscellaneous tab in the vendor record.
Pay Invoices by branch: When checked, e-automate pays only those vendors associated with the identified branch.
Click [OK]. e-automate searches the database, and creates a list of vendors and accompanying invoices to pay based on the invoice due dates and the options selected in the Auto Create Vendor Payment List window.
To print the pay vendors list, do the following:
Click [Print List] to open the Vendor Payment List window.
Click [Print Report] to open the Select Printer window.
Click [OK] to print the pay vendors list on the default printer.
Close the Vendor Payment List window to display the Pay Vendors window.
To indicate all invoices for one or more vendors should not be paid, do the following:
Select the vendor or vendors to be removed using any of the following methods:
To select all vendors, press CTRL+A.
To select a range of consecutive vendors, press and hold SHIFT, click a starting and an ending vendor, and then release the SHIFT key.
To select multiple non-consecutive vendors, press and hold CTRL, click each vendor you want to select, and then release the CTRL key.
To select a single vendor, click the vendor.
Click [Remove] to display a window asking if you are sure you want to remove the vendor (or selected items if you select multiple vendors).
Click [Yes].
To indicate individual invoices for a vendor should not be paid, do the following:
Select the vendor name.
Click [Edit] to open the Edit Accounts Payable Check window.
Select the invoice that should not be paid.
Click [Remove] to open a window asking if you are sure you want to remove the invoice.
Click [Yes].
Repeat steps c through e for each invoice that should not be paid.
Click [OK] to return to the Pay Vendors window.
To change the amount to pay to a vendor, do the following:
Select the vendor name.
Click [Edit] to open the Edit Accounts Payable Check window.
Do any of the following:
To add an additional payment to the vendor, do the following:
Enter in the Additional payment field the amount of the additional payment.
Click [Update] to update the Summary region.
To change the amount to pay on a specific invoice, do the following:
Select from the display the invoice for which to adjust the payment amount.
In the Discount field, enter the new amount of the discount or make no change to use the amount displayed.
In the Amount to pay field, enter the new amount to pay on this invoice or make no change to use the amount displayed.
Click [Update] to update the amounts in the invoice display.
To pay the remaining balance on a multiple-installment invoice (not just the amount currently due), do the following:
Select from the display the invoice for which to pay the full amount of the invoice.
Click [Pay in full] to update the invoice display with the payment amount necessary to pay the remaining balance on the invoice.
Click [OK] to return to the Pay Vendors window.
If you have EFT enabled, you can change how a vendor is paid, whether by check or EFT. To change how a vendor is paid, do the following:
Select the vendor for which you want to change the payment method.
Click [Edit] to open the Edit Accounts Payable Check [XX – XXX] window.
Select the appropriate method, either Pay by check or Pay by EFT.
Click [OK] to save your changes.
To manually add a check to the pay vendors list, do the following:
Click [New] to open the New Accounts Payable Check window.
In the Vendor field, use the lookup to select the vendor to whom the check is being written.
In the Additional payment field, enter the amount to be paid to this vendor.
In the Invoice field, use the lookup to select an invoice to pay.
Click [QuickAdd] to add the invoice to the check.
Repeat steps d and e to add more invoices to pay.
To indicate how much should be paid for each invoice, do the following:
Select the invoice.
To pay the invoice in full, click [Pay in Full]. e-automate updates the Pay field to reflect the amount to pay the selected invoice in full.
To partially pay an invoice, enter the amount to be paid on the invoice in the Amount to pay field and click [Update]. e-automate updates the pay and balance fields for the selected invoice.
To record a discount for an invoice, enter the amount of the discount in the Discount field. In the Amount to pay field, enter the remaining amount due on the invoice so there is no balance remaining on the invoice.
If you have EFT configured, select the method of payment, either Pay by check or Pay by EFT.
After the details of the check are complete, click [OK] to add the check to the pay vendors list.
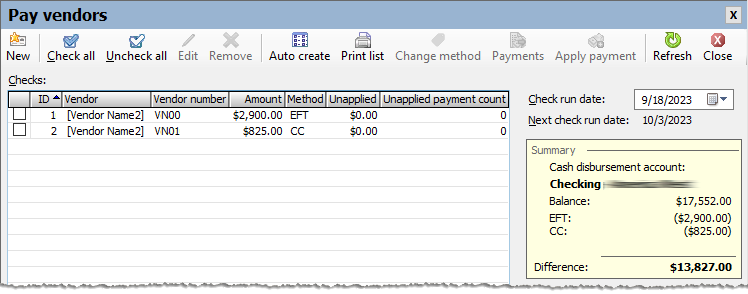
You can view the balance in your default cash disbursement account in the Summary window on the top right hand side of the Pay Vendors window.
Creating the EFT FileCreating the EFT File
This section is only applicable if you are using electronic funds transfers (EFT) to pay vendors.
After verifying the appropriate EFT invoices, click [Create EFT] to open the Create EFT file window.
Complete the following fields as appropriate:
Transaction date: The date on which this EFT posts to your general ledger.
Effective date: ACH rules state that this date must be at least one banking day after the transaction date. e-automate determines if there is a weekend or a United States Federal Holiday and moves the effective date accordingly to the following banking day from your transaction date. You can roll it forward as necessary. You cannot move it within one banking day of the transaction date.
Cashbook account: Your EFT cash account. You can select a different EFT account as necessary.
File output location: The location in which e-automate stores the EFT file created. You can click [Browse] to designate a different location on your computer or network.
Click [OK] to create the EFT file to the specified location.
Click [Yes] on the Attention window asking if you want to post the payments and send email notifications. Email notification is sent to the email address identified on the vendor, and to the BCC field on the vendor.
Deliver the created EFT file to your financial institution.
Printing the ChecksPrinting the Checks
After verifying the appropriate invoices are included, load the checks in the default printer and verify the starting check number.
To print the checks in a specific order, do one of the following:
To print the checks in order by the ID column, select ID (Original order).
To print the checks in order by vendor name, select Vendor name.
To print the checks in order by vendor number, select Vendor number.
Click [Print Checks] to open the Print Vendor Checks window.
Complete the following fields as appropriate.
Transaction date: Date on which the checks are to be posted.
Cashbook account: Account from which you want the checks to draw.
Starting check number: Starting check number for the batch.
To view a test print of the checks, click [Test Print]. e-automate prints a sample of the check so you can verify the fields align appropriately.
Click [OK] to print the checks. e-automate displays the Vendor Checks Printed window.
Do one of the following:
If the checks printed correctly, click [Done]. e-automate posts the checks to the general ledger and updates the accounts payable module.
If one or more checks did not print correctly, do the following:
Check the box next to the check(s) that did not print correctly.
Click [Done] to open the Next Check Number window.
To roll back to the last starting check number, click the Roll back to last starting check number radio button.
To utilize the next check number, click the Roll forward check number radio button.
To utilize a check number other than the last starting check number or the next check number, click the Enter next check number radio button and type the check number in the Next Check Number field.
Click [OK]. e-automate posts the checks that printed correctly to the General Ledger and updates the accounts payable module. Checks that did not print correctly are left on the pay vendors list and no General Ledger posting or accounts payable entries are made. You can then re-print the check(s).
Release Support Ends July 31, 2026Release Support Ends July 31, 2026
©2026 ECI and the ECI logo are registered trademarks of ECI Software Solutions, Inc. All rights reserved.