Using the Meter Reading Console
The Meter Reading Console is the central location for all meter readings in e-automate. Any time a meter reading is entered, from Contracts to Equipment History Tracking requests, e-automate stores all meters in the Meter Reading Console.
You use the Meter Reading Console to:
Enter new meter readings
Estimate meter readings
Send meter reading requests
Edit existing meter readings
View existing meter readings
View meter reading history
Delete meter readings
Invalidate meter readings
Validate invalidated meter readings
Reset meter readings
Mark meter readings eligible for billing
Export metered equipment data to Excel
The Meter Reading Console is composed of the following lists:
The Metered equipment list, which includes QuickSearch functionality for filtering the list of metered equipment.
The Meters list, which lists the meter(s) for the equipment selected in the Metered equipment list.
The Meter readings list, which lists the meter readings for the equipment selected in the Metered equipment list. You can filter this list to include all meter readings for the equipment's meters or to list only the meter readings for the meter you select from the Meters list.
You can enter meter readings in multiple locations in e-automate—including the Meter Reading Console. If you enter a meter reading for equipment with a single meter, you can edit, reset, delete, and/or invalidate individual meter readings. If you enter a set of meter readings for equipment with multiple meters, the system stores the meter readings as a group. While you can still edit individual meter readings within a group of meter readings, you can only delete and/or invalidate the meter readings by deleting and/or invalidating the group of meter readings, respectively.
When you invalidate a meter reading or group of meter readings, the system does not use the invalidated readings for contract billing.
Getting to the ConsoleGetting to the Console
From the e-automate Service menu, select Meter Reading Console to open the Meter Reading Console window.
Using the ToolbarUsing the Toolbar
You use the Meter Reading Console's toolbar icons to do the following:
New: Use to enter new meter readings for the equipment selected in the Metered equipment region (the top region). For more information, see the "Entering a New Meter Reading" section of this topic.
Export: Use to export the list currently displayed in the Metered equipment region to Microsoft Excel. If the list is filtered, e-automate exports the filtered list to Excel.
Refresh: Use to update the lists in the Metered equipment, Meters, and Meter readings sections with the data currently in the database that meets the filter criteria, if any, specified for each list.
Close: Use to close the Meter Reading Console.
You can show or hide the toolbar's text labels. To hide the text labels under the toolbar icons, right-click in the space to the right of the toolbar and select Hide text labels. To show the text labels under the toolbar icons, right-click in the space to the right of the toolbar and select Show text labels.
Entering a New Meter ReadingEntering a New Meter Reading
To enter a new meter reading, do the following:
In the Metered equipment region (the top region), locate and select the equipment for which you want to record a meter reading. Use the QuickSearch functionality if desired to locate the equipment. For more information on using QuickSearch functionality, see the Using the QuickSearch topic.
Click [New] to open the New Meter Reading window, or right-click the equipment and select New meter reading from the right-click menu.
In the Equipment field, verify you have the correct piece of equipment. If the equipment is not correct, use the lookup to select the correct equipment.
In the Date field, use the lookup to select the correct date for when the meter reading was taken.
In the Override billing date field, enter the date you want used for this meter in the contract billing process.
In the Meter source field, use the lookup to select the source of the meter.
In the Meter Type field, use the lookup to select the source of the meter you are entering (e.g., Phone).
In the Meter display field, enter the meter reading.
Click [Update] to add the meter reading.
Repeat steps 7 through 9 until you have entered each applicable meter reading.
To view meter history, click the [Show History] button; to hide meter history, click the [Hide History] button.
Click [OK] to save the meter reading(s).
Entering a New Estimated Meter ReadingEntering a New Estimated Meter Reading
To enter a new estimated meter reading, do the following:
In the Metered equipment region (the top region), locate and select the equipment for which you want to estimate a meter reading. Use the QuickSearch functionality if desired to locate the equipment. For more information on using QuickSearch functionality, see the Using the QuickSearch topic.
Click [New] to open the New Meter Reading window, or right-click the equipment and select New meter reading from the right-click menu.
In the Equipment field, verify you have the correct piece of equipment. If the equipment is not correct, use the lookup to select the correct equipment.
In the Date field, use the lookup to select the correct date for when the meter reading was taken.
In the Override billing date field, enter the date you want used for this meter in the contract billing process.
In the Meter source field, use the lookup to select Estimated.
In the Meter Type field, use the lookup to select the source of the meter you are entering (e.g., Phone).
Click the [Estimate] button. If sufficient history is available for estimating a meter reading and settings permit estimating the meter reading, the system populates the Meter display field with the estimated meter reading.
Click [Update] to add the meter reading.
Repeat steps 7 through 9 until you have estimated each applicable meter reading.
To view meter history, click the [Show History] button; to hide meter history, click the [Hide History] button.
Click [OK] to save the meter reading(s).
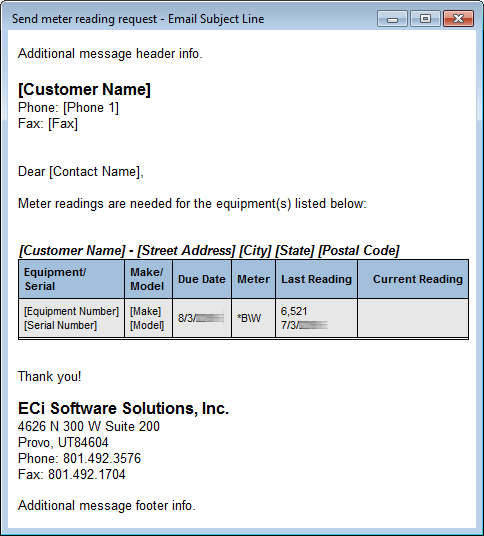
Sending a Meter Reading RequestSending a Meter Reading Request
To send a meter reading request, do the following:
In the Metered equipment region, (the top region), locate and select the equipment for which you want to request a meter reading. Use the QuickSearch functionality if desired to locate the equipment. For more information on using QuickSearch functionality, see the Using the QuickSearch topic.
Right-click the equipment and select Send meter reading request from the right-click menu. The system displays the Send meter reading request window.
In the Contact field, use the lookup to select the contact to receive this request.
Check the Show all checkbox to the right of this field to display a list of all available contacts in the Contact field, and then use the Contact field's lookup to select a contact.
Using the Contact field's drop-down menu, select New to add a new contact. For more information on creating contacts, see the Creating Contacts topic.
In the Email address field, enter the contact's email address or make no change to use the e-mail address displayed if this field is populated.
In the Subject field, enter the text to list on the Subject line of this meter reading request email.
In the Additional message header (html) field, enter—in html code—any optional additional information you want to include at the beginning of the meter reading request email.
In the Additional message footer (html) field, enter—in html code—any optional additional information you want to include at the end of the meter reading request email.
To preview the e-mail, click the [Preview...] button. The system displays the preview window.
Sample Send Meter Reading Request Window:

Sample Preview Window based on Info Listed Above:
Editing an Existing Meter ReadingEditing an Existing Meter Reading
To edit an existing estimated meter reading, do the following:
In the Metered equipment region (the top region), locate and select the equipment for which you want to edit a meter reading. Use the QuickSearch functionality if desired to locate the equipment. For more information on using QuickSearch functionality, see the Using the QuickSearch topic.
In the Meter readings region, locate the meter reading you want to edit.
Right-click the meter reading and select Edit meter reading from the right-click menu. The Edit Meter Reading window displays.
Do one of the following:
To update the meter reading only, do the following:
In the Meter display field, enter the correct meter reading.
Click [Update].
To edit other information in addition to the meter reading, do the following:
In the Date field, enter the date to use for this meter reading or make no change to keep the existing date.
In the Override billing date field, check the checkbox and enter an override billing date or make no change to keep the existing override billing date.
In the Meter source field, use the lookup to select a different meter source or make no change to keep the existing meter source.
Click the [Estimate] button. If the system can estimate the meter reading, the system populates the Meter display field with the estimated reading.
To use the estimated meter reading in the Meter display field, click the [Update] button.
Click the [Edit] button to open a second Edit Meter Reading window.
In the Display field, enter the correct meter reading.
In the Credits field, enter any copy credits if applicable that affect meter billing.
To indicate this reading is a valid reading, check the This is a valid reading checkbox; otherwise, uncheck this box.
To indicate this reading can be used for billing purposes, check the Use this reading for billing purposes checkbox; otherwise, uncheck this box.
To indicate this reading is an estimate, check the This reading is an estimate checkbox; otherwise, uncheck this box.
 .c above. If you changed the Meter source from Estimated to a different meter source in Step 4..c above, the This reading is an estimate checkbox is checked and enabled. You can uncheck this box to indicate the meter reading you are entering is not an estimated meter reading.
To indicate this reading is a rollover reading (i.e., a meter roll has occurred), check the This is a rollover reading checkbox; otherwise, uncheck this box.
To reset the display after this reading to a different value, do the following:
Check the Reset display after this reading to this checkbox.
In the Reset display after this reading to this field, enter the value to display after this reading.
In the Note field, enter any information if applicable to indicate why you are making these edits.
Click [OK] to close this second Edit Meter Reading window and to return to the first Edit Meter Reading window.
Repeat step 4 for all meter readings that require editing.
To view meter history, click the [Show History] button; to hide meter history, click the [Hide History] button.
Click [OK] to save your changes and to close the Edit Meter Reading window.
Viewing an Existing Meter ReadingViewing an Existing Meter Reading
To view an existing estimated meter reading, do the following:
In the Metered equipment (the top region), locate and select the equipment for which you want to view a meter reading. Use the QuickSearch functionality if desired to locate the equipment. For more information on using QuickSearch functionality, see the Using the QuickSearch topic.
Do one of the following:
To view meters for a specific meter type, do the following:
In the Meters region, select the type of meter for which you want to view meter readings.
Check the Filter by selected meter checkbox at the top right of the Meter readings region.
To view meters without specifying a meter type, uncheck the Filter by selected meter checkbox at the top right of the Meter readings region.
In the Meter readings region, locate the meter reading you want to view.
Right-click the meter reading you want to view and select View meter reading from the right-click menu. The system displays the View Meter Reading window.
To view detail for a specific meter reading, do the following:
In the Meters region, select the meter for which to view meter detail.
Click the [View] button to open a second View Meter Reading window.
Viewing Meter Reading HistoryViewing Meter Reading History
You can view meter reading history when entering new meter readings, editing existing meter readings, or viewing existing meter readings.
To view meter reading history when entering a new meter reading, do the following:
In the Metered equipment region (the top region), locate and select the equipment for which you want to record a meter reading. Use the QuickSearch functionality if desired to locate the equipment. For more information on using QuickSearch functionality, see the Using the QuickSearch topic.
Click [New] to open the New Meter Reading window, or right-click the equipment and select New meter reading from the right-click menu.
In the Equipment field, verify you have the correct piece of equipment. If the equipment is not correct, use the lookup to select the correct equipment.
In the Meters region, select the meter type for which you want to view meter reading history.
Do either of the following:
To view meter reading history in a separate Meter History window, right-click the meter in the Meters region and select Meter history from the right-click menu.
To view meter reading history, click the [Show history] button; to hide meter reading history, click the [Hide history] button.
To view meter reading history when editing an existing meter reading, do the following:
In the Metered equipment region (the top region), locate and select the equipment for which you want to edit a meter reading. Use the QuickSearch functionality if desired to locate the equipment. For more information on using QuickSearch functionality, see the Using the QuickSearch topic.
In the Meter readings region, locate the meter reading you want to edit.
Right-click the meter reading and select Edit meter reading from the right-click menu. The Edit Meter Reading window displays.
In the Meters region, select the meter type for which you want to view meter reading history.
Do either of the following:
To view meter reading history in a separate Meter History window, right-click the meter in the Meters region and select Meter history from the right-click menu.
To view meter reading history at the bottom of the Edit Meter Reading window, click the [Show history] button; to hide meter reading history, click the [Hide history] button.
To view meter reading history when editing an existing meter reading, do the following:
In the Equipment region, locate and select the equipment for which you want to view a meter reading. Use the QuickSearch functionality if desired to location the equipment. For more information on using QuickSearch functionality, see the Using the QuickSearch topic.
In the Meter readings region, locate the meter reading you want to view.
Right-click the meter reading and select View meter reading from the right-click menu. The View Meter Reading window displays.
In the Meters region, right-click the meter for which you want to view meter reading history and select Meter history from the right-click menu. The system displays the Meter History ([Equipment Number]: [Meter]) window.
Deleting a Meter ReadingDeleting a Meter Reading
To delete a meter reading, do the following:
In the Metered equipment region (the top region), locate and select the equipment for which you want to delete a meter reading. Use the QuickSearch functionality if desired to locate the equipment. For more information on using QuickSearch functionality, see the Using the QuickSearch topic.
In the Meters region, select the meter type for which you want to delete a meter reading.
In the Meter Readings region, right-click the meter reading row you want to delete and select Delete Meter Reading from the right-click men.
Do one of the following:
If the system displays the message, "Are you sure you want to delete the selected meter reading?", click [Yes] to delete the meter reading listed for this row and to close this window; click [No] to close this window without deleting the meter reading.
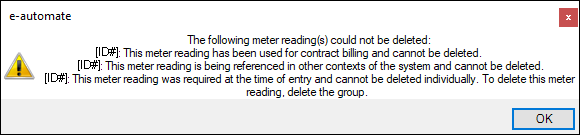
If the meter reading was entered as part of a meter reading group, the system displays the message, "This meter reading was required at the time of entry and cannot be deleted individually. To delete this meter reading, delete the group." Click [OK] to acknowledge this message and to close this window. To delete the meter reading group, see the "Deleting a Meter Reading Group" section of this topic.
If the system displays the message, "This meter reading has been used for contract billing and cannot be deleted.", then you cannot delete this meter reading. Click [OK] to acknowledge this message and to close this window.
If the system displays the message, "This meter reading is being referenced in other contexts of the system and cannot be deleted," then you cannot delete this meter reading. Click [OK] to acknowledge this message and to close this window.
If the system displays the message, "This cannot be deleted because it is being reference by other data in the system. Please remove all references first.
Bulk Deleting Meter ReadingsBulk Deleting Meter Readings
To bulk delete meter readings, do the following:
In the Metered equipment region (the top region), locate and select the equipment for which you want to bulk delete meter readings. Use the QuickSearch functionality if desired to locate the equipment. For more information on using QuickSearch functionality, see the Using the QuickSearch topic.
Do one of the following:
To bulk delete meter readings for only one meter type, do the following:
In the Meters region, select the meter type for which you want to bulk delete meter readings.
In the Meter Readings region, check the Filter by selected meter checkbox.
To bulk delete meter readings for all meter types, in the Meter Readings region, uncheck the Filter by selected meter checkbox.
In the Meter Readings region, use any of the standard Windows SHIFT+Click or CTRL+Click features to multi-select the rows you want to include in the bulk delete meter readings process (e.g., CTRL+A to select all the meter reading rows and then, while holding down the CTRL key, click each row you do not want to include in the bulk delete meter readings process).
With the rows selected that you want to bulk delete, right-click the grid and select the Delete meter reading option from the right-click menu.
The system displays the message, "Are you sure you want to delete the selected meter readings?" Click [Yes] to delete the selected meter readings and to close this window; click [No] to close this window without deleting the selected meter readings.
If the system cannot delete all the rows, the system displays one of two types of error messages. Do one of the following based upon the type of message displayed:
If the system cannot delete up to but not more than nine rows, the system displays a message similar to the following:
Do the following:
Review the message, noting the following:
If the system displays the message, "This meter reading has been used for contract billing and cannot be deleted.", then you cannot delete this meter reading.
If the system displays the message, "This meter reading is being referenced in other contexts of the system and cannot be deleted," then you cannot delete this meter reading.
If the meter reading was entered as part of a meter reading group, the system displays the message, "This meter reading was required at the time of entry and cannot be deleted individually. To delete this meter reading, delete the group." To delete the meter reading group, see the "Deleting a Meter Reading Group" section of this topic.
If the system displays the message, "This cannot be deleted because it is being reference by other data in the system. Please remove all references first.
When you are finished reviewing the message, click [OK] to acknowledge this message and to close this window.
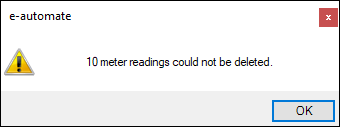
If the system cannot delete ten or more rows, the system displays a message similar to the following:
Do the following:
Review the message.
Click [OK] to acknowledge this message and to close this window.
Invalidating a Meter ReadingInvalidating a Meter Reading
To invalidate a meter reading, do the following:
In the Metered equipment region (the top region), locate and select the equipment for which you want to invalidate a meter reading. Use the QuickSearch functionality if desired to locate the equipment. For more information on using QuickSearch functionality, see the Using the QuickSearch topic.
In the Meters region, select the meter type containing the meter reading you want to invalidate.
In the Meter readings region, right-click the meter reading you want to invalidate and select Invalidate Meter Reading.
Do one of the following:
If the system displays the message, "Are you sure you want to invalidate the selected meter reading?", click [Yes] to invalidate the meter reading listed for this row and to close this window; click [No] if you want to close this window without invalidating the meter reading.
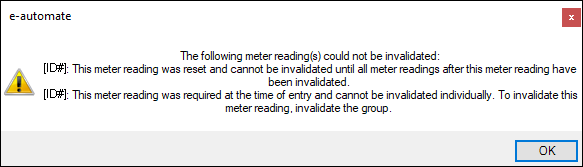
If the meter reading was entered as part of a meter reading group, the system displays the message, "This meter reading was required at the time of entry and cannot be invalidated individually. To invalidate this meter reading, invalidate the group." Click [OK] to acknowledge this message and close this window. To invalidate the meter reading group, see the "Invalidating a Meter Reading Group" section of this topic.
If the meter reading was reset, the system displays the message, "This meter reading was reset and cannot be invalidated until all meter readings after this meter reading have been invalidated." To invalidate the meter reading group, invalidate all meter readings after this meter reading.
Bulk Invalidating Meter ReadingsBulk Invalidating Meter Readings
To invalidate a meter reading, do the following:
In the Metered equipment region (the top region), locate and select the equipment for which you want to bulk invalidate meter readings. Use the QuickSearch functionality if desired to locate the equipment. For more information on using QuickSearch functionality, see the Using the QuickSearch topic.
Do one of the following:
To bulk invalidate meter readings for only one meter type, do the following:
In the Meters region, select the meter type for which you want to bulk invalidate meter readings.
In the Meter Readings region, check the Filter by selected meter checkbox.
To bulk invalidate meter readings for all meter types, in the Meter Readings region, uncheck the Filter by selected meter checkbox.
In the Meter Readings region, use any of the standard Windows SHIFT+Click or CTRL+Click features to multi-select the meter reading rows you want to include in the bulk invalidate meter readings process (e.g., CTRL+A to select all the meter reading rows and then, while holding down the CTRL key, click each row you do not want to include in the bulk invalidate meter readings process).
With the rows selected that you want to bulk invalidate, right-click the grid and select the Invalidate meter reading option from the right-click menu.
The system displays the message, "Are you sure you want to invalidate the selected meter readings?" Click [Yes] to invalidate the selected meter readings and to close this window; click [No] to close this window without invalidating the selected meter readings.
If the system cannot invalidate all the rows, the system displays one of two types of error messages. Do one of the following based upon the type of message displayed:
If the system cannot invalidate up to but not more than nine rows, the system displays a message similar to the following:
Do the following:
Review the message, noting the following:
If the meter reading was reset, the system displays the message, "This meter reading was reset and cannot be invalidated until all meter readings after this meter reading have been invalidated." To invalidate the meter reading group, invalidate all meter readings after this meter reading.
If the meter reading was entered as part of a meter reading group, the system displays the message, "This meter reading was required at the time of entry and cannot be invalidated individually. To invalidate this meter reading, invalidate the group." To invalidate the meter reading group, see the "Invalidating a Meter Reading Group" section of this topic.
When you are finished reviewing the message, click [OK] to acknowledge this message and to close this window.
If the system cannot invalidate ten or more rows, the system displays a message similar to the following:
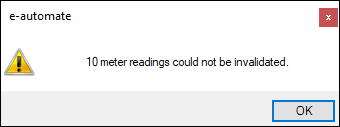
Do the following:
Review the message.
Click [OK] to acknowledge this message and to close this window.
Validating a Meter ReadingValidating a Meter Reading
To validate a meter reading, do the following:
In the Metered equipment region (the top region), locate and select the equipment for which you want to validate a meter reading. Use the QuickSearch functionality if desired to locate the equipment. For more information on using QuickSearch functionality, see the Using the QuickSearch topic.
In the Meters region, select the meter type containing the meter reading you want to validate.
In the Meter readings region, right-click the meter reading you want to validate and select Validate Meter Reading.
Click [Yes] to validate the meter reading listed for this row and to close this window; click [No] if you want to close this window without validating the meter reading.
Deleting a Meter Reading GroupDeleting a Meter Reading Group
To delete a meter reading group, do the following:
In the Metered equipment region (the top region), locate and select the equipment for which you want to delete a meter reading group. Use the QuickSearch functionality if desired to locate the equipment. For more information on using QuickSearch functionality, see the Using the QuickSearch topic.
In the Meter Readings region, right-click any row in the meter reading group you want to delete and select Delete Meter Reading Group from the right-click menu.
Do one of the following:
If the system displays the message, "Are you sure you want to delete the group [Group ID Number]?", click [Yes] to delete all meter readings that have the same Group ID number listed for this row and to close this window; click [No] if you want to close this window without deleting the meter reading group.
If the system displays the message, "This meter reading group has been used for billing and cannot be deleted.", then you cannot delete this meter reading group. Click [OK] to acknowledge this message and to close this window.
If the system displays the message, "This meter reading is being referenced in other contexts of the system and cannot be deleted. The meter reading group can not be invalidated", then you cannot delete the meter reading group at this time. Click [OK] to acknowledge this message and to close this window. To invalidate the meter reading group, see the "Invalidating a Meter Reading Group" section of this topic.
If the system displays the message, "This cannot be deleted because it is being reference by other data in the system. Please remove all references first.
Bulk Deleting Meter Reading GroupsBulk Deleting Meter Reading Groups
To bulk delete meter reading groups, do the following:
In the Metered equipment region (the top region), locate and select the equipment for which you want to bulk delete meter reading groups. Use the QuickSearch functionality if desired to locate the equipment. For more information on using QuickSearch functionality, see the Using the QuickSearch topic.
Do one of the following:
To display meter reading groups for only one meter type in the Meter Readings region, do the following:
In the Meters region, select the meter type for which you want to display meter readings in the Meter Readings region.
In the Meter Readings region, check the Filter by selected meter checkbox.
To display meter readings for all meter types in the Meter Readings region, uncheck the Filter by selected meter checkbox in the Meter Readings region.
In the Meter Readings region, use any of the standard Windows SHIFT+Click or CTRL+Click features to multi-select the rows you want to include in the bulk delete meter reading group process (e.g., CTRL+A to select all the meter reading rows and then, while holding down the CTRL key, click each row you do not want to include in the bulk delete meter reading group process).
With the rows selected that you want to bulk delete, right-click the grid and select the Delete meter reading group option from the right-click menu.
The system displays the message, "Are you sure you want to delete the selected meter reading groups?" Click [Yes] to delete the selected meter reading groups and to close this window; click [No] to close this window without deleting the selected meter reading groups.
If the system cannot delete all the rows, the system displays one of two types of error messages. Do one of the following based upon the type of message displayed:
If the system cannot delete up to but not more than nine meter reading groups, the system displays a message similar to the following:

Do the following:
Review the message, noting the following:
If the system displays the message, "This meter reading group has been used for billing and cannot be deleted.", then you cannot delete this meter reading group.
If the system displays the message, "This meter reading is being referenced in other contexts of the system and cannot be delete. The meter reading group can be invalidated.", then you cannot delete this meter reading group. To invalidate the meter reading group, see the "Invalidating a Meter Reading Group" section of this topic.
If the system displays the message, "A meter in this group was reset and cannot be deleted until all groups after this meter have been deleted.", then you cannot delete this meter reading group until you have deleted all meter reading groups after this meter reading group. To delete a meter reading group, see the "Deleting a Meter Reading Group" and "Bulk Deleting Meter Reading Groups" sections of this topic.
If the system displays the message, "This meter reading group cannot be deleted. It or readings within it are referenced elsewhere in the system.", then you cannot delete this meter reading group.
When you are finished reviewing the message, click [OK] to acknowledge this message and to close this window.
If the system cannot delete ten or more meter reading groups, the system displays a message similar to the following:
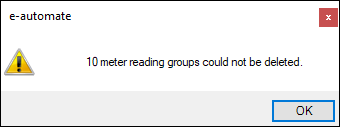
Do the following:
Review the message.
Click [OK] to acknowledge this message and to close this window.
Invalidating a Meter Reading GroupInvalidating a Meter Reading Group
To invalidate a meter reading group, do the following:
In the Metered equipment region (the top region), locate and select the equipment for which you want to invalidate a meter reading group. Use the QuickSearch functionality if desired to locate the equipment. For more information on using QuickSearch functionality, see the Using the QuickSearch topic.
In the Meter readings region, right-click the meter reading of any meter reading in the meter reading group you want to invalidate and select Invalidate Meter Reading.
The system displays the message, "Are you sure you want to invalidate the group [Group ID Number]?", click [Yes] to invalidate the meter reading group listed for this row and to close this window; click [No] if you want to close this window without invalidating the meter reading group.
Bulk Invalidating Meter Reading GroupsBulk Invalidating Meter Reading Groups
To bulk invalidate meter reading groups, do the following:
In the Metered equipment region (the top region), locate and select the equipment for which you want to bulk invalidate meter reading groups. Use the QuickSearch functionality if desired to locate the equipment. For more information on using QuickSearch functionality, see the Using the QuickSearch topic.
Do one of the following:
To display meter reading groups for only one meter type in the Meter Readings region, do the following:
In the Meters region, select the meter type for which you want to display meter readings in the Meter Readings region.
In the Meter Readings region, check the Filter by selected meter checkbox.
To display meter readings for all meter types in the Meter Readings region, uncheck the Filter by selected meter checkbox in the Meter Readings region.
In the Meter Readings region, use any of the standard Windows SHIFT+Click or CTRL+Click features to multi-select the rows you want to include in the bulk invalidate meter reading group process (e.g., CTRL+A to select all the meter reading rows and then, while holding down the CTRL key, click each row you do not want to include in the bulk invalidate meter reading group process).
With the rows selected that you want to bulk invalidate, right-click the grid and select the Invalidate meter reading group option from the right-click menu.
The system displays the message, "Are you sure you want to invalidate the selected meter reading groups?" Click [Yes] to invalidate the selected meter reading groups and to close this window; click [No] to close this window without invalidating the selected meter reading groups.
If the system cannot invalidate all the rows, the system displays one of two types of error messages. Do one of the following based upon the type of message displayed:
If the system cannot invalidate up to but not more than nine meter reading groups, the system displays a message similar to the following:
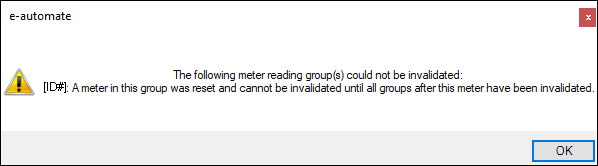
Do the following:
Review the message, noting the following:
If the system displays the message, "A meter in this group was reset and cannot be invalidated until all groups after this meter have been invalidated.", then you cannot invalidate this meter reading group until you have invalidated all meter reading groups after this meter reading group. To invalidate one or more meter reading groups, see the "Invalidating a Meter Reading Group" and "Bulk Invalidating Meter Reading Groups" sections of this topic.
When you are finished reviewing the message, click [OK] to acknowledge this message and to close this window.
If the system cannot delete ten or more meter reading groups, the system displays a message similar to the following:

Do the following:
Review the message.
Click [OK] to acknowledge this message and to close this window.
Resetting a Meter ReadingResetting a Meter Reading
To reset a meter reading, do the following:
In the Metered equipment region (the top region), locate and select the equipment for which you want to reset a meter reading. Use the QuickSearch functionality if desired to locate the equipment. For more information on using QuickSearch functionality, see the Using the QuickSearch topic.
Click [New] to open the New Meter Reading window.
In the Equipment field, verify you have the correct piece of equipment. If not correct, use the lookup to select the correct equipment.
In the Date field, use the lookup to select the correct date for the last known meter reading.
In the Override billing date field, enter the date you want used for this meter in the contract billing process.
In the Meter Source field, use the lookup to select the source of the meter reading.
In the Meter Type field, use the lookup to select the meter for which to enter a meter reading.
Click [Edit] to open the Edit Meter Reading window.
In the Display field, enter the last known reading.
Check the Reset display after this reading to this checkbox.
In the Reset display after this reading to this field, enter the meter reading to reset this meter to.
In the Note field, enter an optional note if desired to indicate why you reset this meter reading.
Click [OK] to save this information and to close the Edit Meter Reading window.
Click [OK] to save this information and to close the New Meter Reading window.
Marking a Meter Eligible for BillingMarking a Meter Eligible for Billing
When entering a meter reading during a service call, your system administrator can flag all meters entered during service call invoicing ineligible for use in contract billing. If you encounter a meter that could be used for contract billing and it meets the billing meter tolerance requirements, you may allow your contract personnel to use the meter for contract billing by overriding the reading and making it possible to use the reading for billing. To allow a meter reading to be used for billing, do the following:
In the Metered equipment region (the top region), locate and select the equipment for which you want to mark a meter reading eligible for contract billing. Use the QuickSearch functionality if desired to locate the equipment. For more information on using QuickSearch functionality, see the Using the QuickSearch topic.
In the Meter readings region, locate the meter you want to mark eligible for billing.
Right-click on the reading and select Edit Meter Reading. The system opens the Edit Meter Reading window.
Click [Edit...] to open the second Edit Meter Reading window.
Check the Use this reading for billing purposes checkbox.
Click [OK] to save the changes on the second Edit Meter Reading window.
Click [OK] to save the changes on the first Edit Meter Reading window.
Non-supported ReleaseNon-supported Release
©2024 ECI and the ECI logo are registered trademarks of ECI Software Solutions, Inc. All rights reserved.