Installing the Inventory Optimization Reports (On Premise)
* The Inventory Optimization Reports are made available now to anyone who attends the Inventory Optimization Class and are available for purchase through your Account Manager at eainsidesales@ecisolutions.com.
When your company receives access to the reports, you will be given 2021_08_InventoryOptimizationDBComp.zip and 2021_08_InventoryOptimizationReports.zip files. To use the reports, you need to extract the contents of the zip files to the appropriate folders and install the database component via e-admin.
Extracting the Contents of the 2021_08_InventoryOptimizationDBComp.zip FileExtracting the Contents of the 2021_08_InventoryOptimizationDBComp.zip File
To extract the 2021_08_InventoryOptimizationDBComp.zip file, do the following:
Copy the 2021_08_InventoryOptimizationDBComp.zip to your server.
Extract the 2021_08_InventoryOptimizationDBComp.zip file's contents into your ECi\e-automate\sql\CompanyDb\_components folder.
Note: The location of your ECi folder may vary. The default location is C:\Program Files (x86)\ECi\.
Note: This process will copy the extracted files into the _components sub folder within the CompanyDb folder. If the _components sub folder does not already exist in that location, create the folder in that location before extracting the files.
Note: The process of unzipping the 2021_08_InventoryOptimizationDBComp.zip file varies. You will use a process similar to the following:
From the location on your server where you copied the 2021_08_InventoryOptimizationDBComp.zip file, right-click the file and select the Extract All... option from the right-click menu. The system displays an Extract Compressed (Zipped) Folders window.

Click the [Browse...] button. The system display a Select a Destination window.
On the Select a Destination window, do the following:
Navigate to the location where you want to extract the files (e.g., ECi\e-automate\sql\CompanyDb\_components).
Note: If the _components sub folder does not already exist in this location, create the folder in this location before extracting the files.
Click the [Select Folder] button to accept the specified folder location and to close the Select a Destination window.
Click the [Extract] button to extract the files to that location and to close the Extract Compressed (Zipped) Folders window. This action copies an Inventory Logistics Reports folder into the _components folder.
Installing the Database ComponentInstalling the Database Component
After extracting the zip file's contents to the appropriate folder on your server, install the database component by doing the following:
Log in to e-admin.
From the list of companies, select the company with which you want to use the Fixed Asset Changes report.
From the Company menu, select Maintenance > Database Components.... If you have your e-admin toolbar visible, you can use the drop-down menu on [Maintenance] and select Database Components.... You can also use the right-click menu and select Maintenance > Database Components....
Note: This option is only enabled for company databases with a Version of 17.1 or greater. If you want to update database components for a company database with an earlier version number, you will need to update the database before updating its database components. For more information, see the Updating a Database topic.
The system displays the Enter Admin Password window.
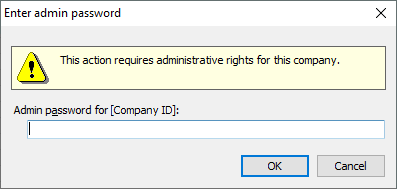
In the Admin password for [Company ID] field, enter your admin password.
Click [OK]. If the system verifies your admin password for the company you selected, the system displays the Database Components window.
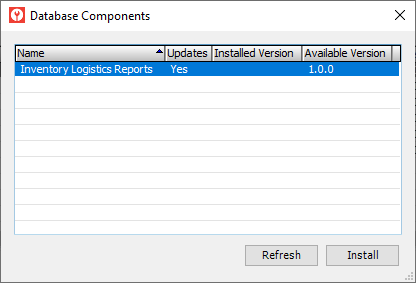
Select the Inventory Logistics Reports row.
Note: If you do not see an Inventory Logistics Reports row, review the "Extracting the Contents of the 2021_08_InventoryOptimizationDBComp.zip File" section of this topic and verify you have extracted the files to the correct location on the server.
Click the [Install] button. The system displays the Backup Database Location window. Prior to installing a database component, e-admin requires a backup of the database so that you can restore the backup if the database component installation does not complete as expected.
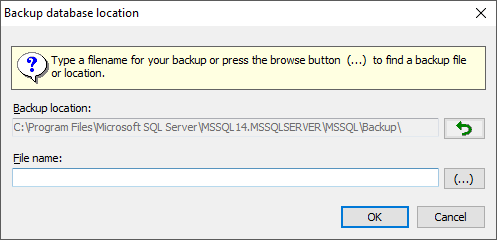
Enter a name for this backup in the File name field.
Note: Your backup name must be unique.
E-admin always displays the last navigated path in the Backup location field. If you want to browse your network for a different backup location, click [(...)] to open the Browse for Backup File... window.
Select the backup location you want to use and click [OK] to return to the Backup database location window. The filename you selected displays in the File name field.
Click [OK]. If you opted to use a file name that has already been used in e-admin, e-admin notifies you that you cannot use the file name identified. Enter a different name.
After the database is backed up, the system attempts to install the database component.
If the installation is successful, the system displays the message, "Installation complete." Click [OK] to acknowledge the message. When you click [OK], the system removes the Yes from the Updates column, updates the Installed Version to the new version, and clears the Available Version column.
Note: If the Database Components window lists additional database components to install, you can install them now. See the Updating Database Components topic's "Installing the Database Component Updates" section for more information.
If the installation is not successful, the system displays an Unexpected Error Information window. Review the Description field.
If the Description field reports only that one or more exceptions occurred, then the system was able to restore the backup you created before trying to install the update; you do not need to manually restore your database.
If the Description field—in addition to reporting that one or more exceptions occurred—includes a NOTICE letting you know you need to manually restore your backup, then the system was not able to automatically restore your backup. You need to restore your backup manually, and the NOTICE lists the name of the backup you created prior to trying to install the update. For information on restoring a backup, see the Restoring a Database topic.
Note: If an error occurs and a database backup is restored, automatically or manually, you will need to re-install any database components you installed after you created the backup.
Extracting the Contents of the 2021_08_InventoryOptimizationReports.zip FileExtracting the Contents of the 2021_08_InventoryOptimizationReports.zip File
To extract the 2021_08_InventoryOptimizationReports.zip file, do the following:
Copy the 2021_08_InventoryOptimizationReports.zip to your server.
Extract the 2021_08_InventoryOptimizationReports.zip file's contents into your ECi\e-automate\Reports folder.
Note: The location of your ECi folder may vary. The default location is C:\Program Files (x86)\ECi\.
Note: The process of unzipping the 2021_08_InventoryOptimizationReports.zip file varies. You will use a process similar to the following:
From the location on your server where you copied the 2021_08_InventoryOptimizationReports.zip file, right-click the file and select the Extract All... option from the right-click menu. The system displays an Extract Compressed (Zipped) Folders window.
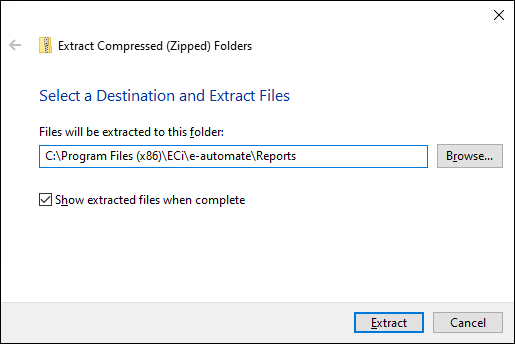
Click the [Browse...] button. The system display a Select a Destination window.
On the Select a Destination window, do the following:
Navigate to the location where you want to extract the files (e.g., ECi\e-automate\Reports).
Click the [Select Folder] button to accept the specified folder location and to close the Select a Destination window.
Click the [Extract] button to extract the files to that location and to close the Extract Compressed (Zipped) Folders window. This action extracts the following five Inventory Optimization report files into the specified folder location:
cuSAItemBinUsageSummary.rpt
ICIncompleteCallsItems.rpt
ICInventoryAging.rpt
ICPrematureItemReplacement.rpt
ICWhseStockAnalysis.rpt
Verifying the Installation Is CompleteVerifying the Installation Is Complete
To verify the installation is complete, do the following:
From the e-automate Reports menu, select Report Console to open the Report Console window.
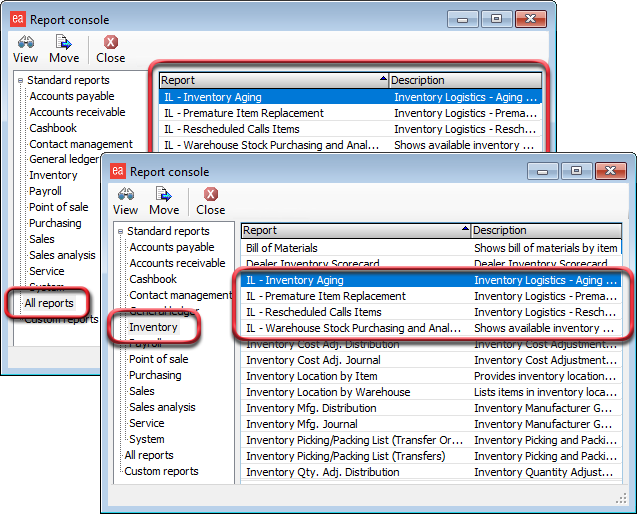
In the left pane, click All reports or Inventory. The system displays the report list in the right pane.
Note: You can click a column header such as the Report column header to sort the list by that column. Four of the Inventory Logistics reports begin with the prefix IL.
Double-click one of the Inventory Logistics reports in the right pane to open the report. If the system displays the selected Inventory Optimization Report window, the installation is complete. If the system does not open the selected Inventory Optimization Report window, review the previous steps.
Non-supported ReleaseNon-supported Release
©2022 ECI and the ECI logo are registered trademarks of ECI Software Solutions, Inc. All rights reserved.