Setting Up Avalara
A customized Avalara AvaTax connector, or integration, makes accurate, fast, easy, and reliable sales tax calculation a snap by giving you accurate rates and taxability right within e-automate.
The following steps will help you get started using Avalara AvaTax. After you have configured your integration, you send a test transaction to confirm that Avalara AvaTax is calculating tax the way you expect. After running a successful test, you'll be able to start using Avalara AvaTax.
To complete the setup on the Avalara side, see Avalara Help Center Article - E-Automate and Avalara Implementation Toolkit.
Branching is an organizational level of grouping in e-automate that is used in conjunction with balance sheet groups. To enable balance sheet groups, branching must be enabled. Although branching is enabled, you can use a single branch while using multiple balance sheet groups, or you can have multiple branches set up but only use a single balance sheet group for those branches. If you are using multiple balance sheet groups, each group MUST HAVE its own child-company entry within AvaTax—and the Balance Sheet Group Number in e-automate must match the Company Code in Avalara.
Note: Multiple balance sheet groups are NOT required when using AvaTax in e-automate. If you are not using balance sheet groups, ensure that the Avalara AvaTax Admin Console lists in the Company Code field your default Balance Sheet Group Number in e-automate (e.g., Main). If you are not using multiple balance sheet groups, skip to the Enabling Avalara Tax Calculation Integration section below.
Best practice recommendation before using AvaTax is to ensure that the address details, including country, are set correctly on every warehouse configured in e-automate. This is because taxes are calculate based on either the Origin or the Destination of the transaction. These locations are NOT the address of the parent company, but are the location of the goods being sold. Therefore, the warehouse information is what e-automate sends to AvaTax for calculating taxes.
Setting E-automate System OptionsSetting E-automate System Options
In order for remittance and reports to reflect the correct Avalara calculation when processing returns, you will need to set the e-automate system's void date to 'today's date'. If set to 'original transaction date' all credit memos will use the original date and not the date the credit is being issued, which will result in inaccuracies on your ledger. To adjust this setting, do the following:
From the Tools menu, select Options to open the Options window.
In the left pane, click on General Ledger to display the options.
In the right pane, in the Void Settings region, under Default date, click the Today's date radio button.
Click the [OK] button to save your changes and to close
the Options window.
Note: If you made any changes, e-automate displays
an Attention window, indicating that all users must restart e-automate
in order for these changes to take effect. Do the following:
Click the [OK] button to acknowledge the message.
Restart e-automate so that these changes will take effect.
If you are running e-agent, restart e-agent as well.
Enabling Branching and Balance Sheet GroupsEnabling Branching and Balance Sheet Groups
Note: This section only applies if you are using multiple balance sheet groups.
On the Tools menu, select Options to open the Options window.
In the left pane, double-click on Company.
In the left pane, select Departments & Branches.
In the right pane, check the Use branching checkbox. When checked, your company will be able to use branching. Branching is another organizational level for grouping within e-automate. Branching is only reportable on an Income Statement.
Check
the Show data from only user assigned branches checkbox
to prevent users from different branches within the company
from viewing each other’s information. They can only see information
that pertains to their branch. For example, if you have branch A with
users 1, 2 and 3 and branch B with users 4, 5 and 6, users 1, 2 and
3 cannot see branch B’s information and vice versa. When left unchecked,
all users will be able to see information pertaining to all branches.
Note: This field
and the field below will become active after the Use branching
checkbox is checked.
Check the Use multiple balance sheets checkbox to enable the use of balance sheet groups to which you can assign your branches. You can assign a single branch to a balance sheet group or multiple branches to a balance sheet group. A single balance sheet can be printed by e-automate for each group you create. The balance sheet reflects the account values for a branch or the sum of all branches assigned to the group.
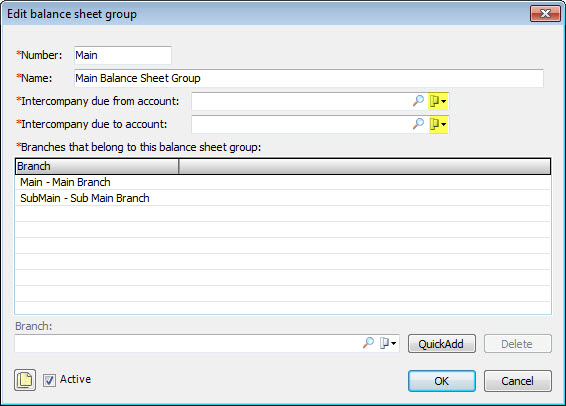
The first time you check the Use multiple balance sheets checkbox, the system displays the Edit Balance Sheet Group window. Using this window, do the following:
In the Number field, enter the name of the balance sheet group.
In the Name field, enter the name of the balance sheet group.
In
the Intercompany due from account
field, use the lookup to select the intercompany from account.
Note:
If you have not set up any intercompany accounts, you can do this
now. See the topic Enabling
and Configuring Balance Sheet Groups for instructions on how to
create intercompany accounts.
In the Intercompany due to account field, use the lookup to select the intercompany to account.
Click the [OK] button to close the Edit Balance Sheet Group window.
Click
the [OK] button to save your
changes and to close the Options window.
Note:
If you made any changes, e-automate displays an Attention window,
indicating that all users must restart e-automate in order for these
changes to take effect. Do the following:
Click the [OK] button to acknowledge the message.
Restart e-automate so that these changes will take effect.
If you are running e-agent, restart e-agent as well.
Note: When branching is enabled, e-automate displays the Branches choice on the Accounting menu as well as branch identifiers in several areas of the product. To identify your additional branches, see the Creating Branches topic.
Creating Additional Balance Sheet GroupsCreating Additional Balance Sheet Groups
Note: This section only applies if you have enabled branches.
To create additional balance sheet groups, do the following:
From the Accounting menu, select Balance sheet groups to display the Balance Sheet Groups window.
Click [New] to open the New Balance Sheet Group window.
In
the Number field, enter your Avalara Company
Code.
Note: This is the unique Company Code
value which was created in AvaTax and used here in e-automate.
This should be identical to the Company Code you created earlier; for single-entity
companies, it is Main. If
you have enabled balance sheet groups and changed the name of your
default balance sheet group from Main
to another value, you would not use Main;
you would use the value you assigned to your default balance sheet
group.
In the Name field, enter your desired Balance Sheet Group name.
In
the Intercompany due from account field, use the lookup icon
to select your created intercompany from account or the accounts you
created for this balance sheet group.
Note:
If you have not set up any intercompany accounts, you can do this
now. See the topic Enabling
and Configuring Balance Sheet Groups for instructions on how to
create intercompany accounts.
In the Intercompany due to account field use the lookup icon to select your intercompany to account.
In
the Branch field, use the lookup to select a branch(es) you
want to be a member of this balance sheet group.
Click [QuickAdd] to add the branch to the list of Branches that belong to this balance sheet group list.
Click [OK] to save your balance sheet group.
Enabling Avalara Tax Calculation FunctionalityEnabling Avalara Tax Calculation Functionality
E-automate sends Avalara a header-level ship-from address, the address of the Branch that is associated with the transaction, and both the ship-from and ship-to addresses for each line item on the sales/service transaction.
Because Avalara does the tax calculation for each line item, Avalara determines if the tax should be calculated based on the origin or the destination received frrom e-automate. For the Labor and Travel line items on the Service Invoice, e-automate provides the Branch address for the ship-from address.
From the Tools menu, select Options to open the Options window.
In the left-hand pane of the window, click on Tax Options.
In the Tax calculation engines region, select Avalara tax calculation engine.
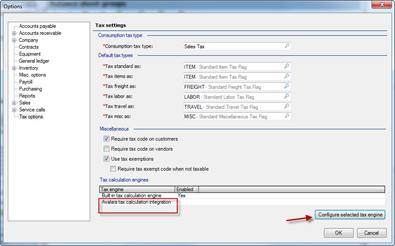
Click the [Configure selected tax engine] button.
In the Enabled field, use the drop-down menu to select True.
Note: To access the drop-down menu, click in the field to the right of the Enabled field.
In the Trace field, use the drop-down menu to select False.
Note: To access the drop-down menu, click in the field to the right of the Trace field.
Note: This field is only set to True when using the Logging options on your computer to determine if there are bugs in the system, which requires an administrator. See your administrator or IT personnel for more information.
In the TaxLiabilityGLAccount field, enter your sales tax payable account.
In the Url field, enter the URL you were given from Avalara.
Note: If you are using this database to test Avalara, be sure to use the URL for the AvaTax sandbox.
In the Account field, enter your Avalara account number.
Note: If you are using this database to test Avalara, be sure to use a test account number.
In the License field, enter your Avalara license number.
Note: If you are using this database to test Avalara, be sure to use a test license.
In the HideTaxResultWindow field, use the drop-down menu to select False.
Note: To access the drop-down menu, click in the field to the right of the HideTaxResultWindow field.
Note: If this field is set to True, users will not see the Avalara popup window that depicts how the taxes were calculated with Avalara’s tax engine. If this field is set to False, this popup window will appear with each transaction, confirming that Avalara is calculating taxes properly. Once the user is comfortable with the taxes charged by Avalara, the user can change this field to True to no longer see the popup window with each transaction.
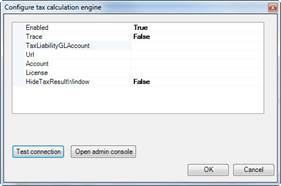
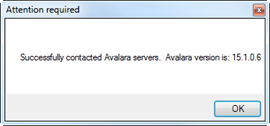
Click the [Test connection] button. If the connection is successful, you will see a window similar to the following:
To access the Avalara Administrative Console, click the [Open admin console] button.
Click the [OK] button to acknowledge and close the Attention Required message window.
Click the [OK] button to close the Configure Tax Calculation Engine window.
Click the [OK] button to save your changes and to close the Options window.
Note: If you made any changes, e-automate displays an Attention window, indicating that all users must restart e-automate in order for these changes to take effect. Do the following:
Click the [OK] button to acknowledge the message.
Restart e-automate so that these changes will take effect.
If you are running e-agent, restart e-agent as well.
Mapping Tax FlagsMapping Tax Flags
While testing the Tax Code mapping utility that is provided by AvaTax, we found that those mapped values do NOT provide correct taxation when mappings were created for the e-automate basic tax flags. This was especially evident when we mapped our LABOR tax flag to their Service type. Labor is charged differently in some states than others, but when using the AvaTax mapping, it was charged the same in all situations. Due to this inconsistency, e-automate has the following mappings “soft coded” under-the-hood.
|
E-automate Tax Flag |
AvaTax Tax Code |
|
FREIGHT |
FR000000 |
|
ITEM |
P0000000 |
|
LABOR |
S0000000 |
|
MISC |
O0000000 |
|
TRAVEL |
OT010300 |
|
NONE (represents Exempt) |
---not mapped--- |
The way this “soft coding” works is that e-automate will create new Sub Tax-flags when they are first used after Avalara is turned on and one of the Base Tax Flags gets used. These will be denoted within the Tax Flag table with their description having an asterisk in the descriptions as shown in the screenshot below. This soft-coding means that each of the BASE Tax Flags associated with the e-automate standard Tax Flags can be modified in the Tax Options settings of configuration as shown here:
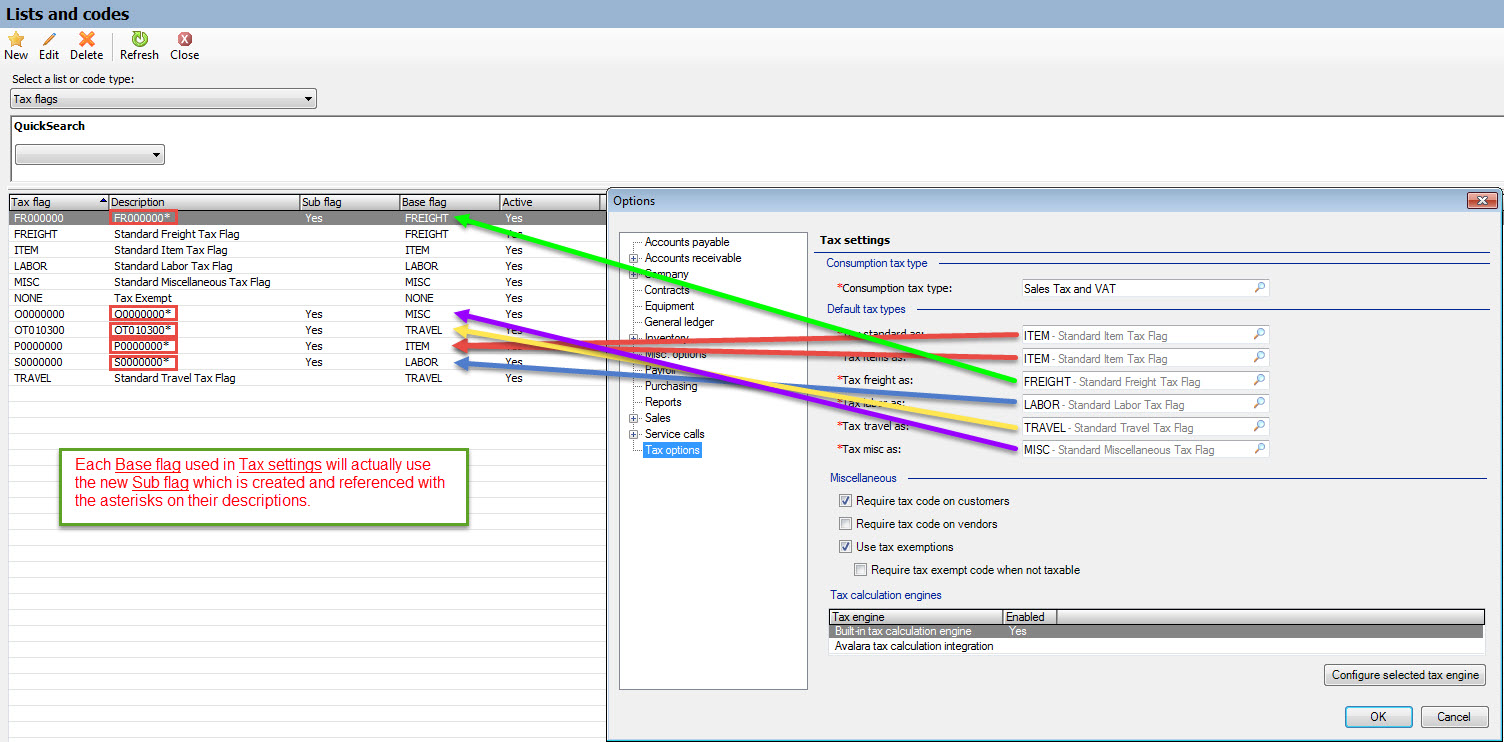
Each of the Default tax types can have its default value modified if the root mappings we have made are insufficient for the customer’s needs. Therefore, if a different ITEM mapping is appropriate as that customers default, they would simply create the new Sub Tax-flag and then choose that new AvaTax Tax Code value in the Default tax types fields in the Tax options area of e-automate Options.

The important take-away from this is that AvaTax uses the term Tax Code which correlates to the e-automate term Tax Flag. A Tax Code in e-automate means something completely different, so they should NOT be confused.
Conditional Tax Codes/Tax FlagsConditional Tax Codes/Tax Flags
When e-automate customers tax their accounts
using different types of AvaTax Tax Codes, they would be able to change
which AvaTax Tax Code is used for the line item element by using a
different e-automate Tax Flag on the Inventory Item. The
default value for the “Tax as” field is ITEM, but this field opens
up for edit when the “Sales code – GL” field gets populated.
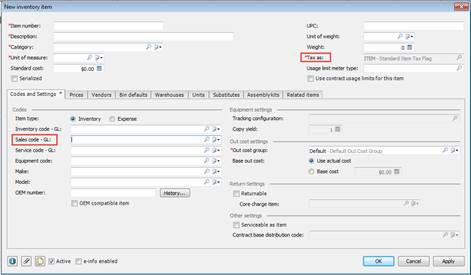
So, changing default values for specific Items can be accomplished in this way.
Tax Exempt conditions are normally managed by the checkbox on invoices and Customer or Vendor records where the “Taxable” checkbox is not checked. Additionally, if the NONE Tax Flag is used for a non-taxable condition, it is also recognized within e-automate as a tax free condition for line items which may be tax free while the entire order would otherwise be considered as taxable.
Non-supported ReleaseNon-supported Release
©2022 ECI and the ECI logo are registered trademarks of ECI Software Solutions, Inc. All rights reserved.