Field-level Security
You define field-level security for a security group. Each user you add to the security group has the field-level security you define for the group. If you need a security configuration to accommodate one user, you must create a security group, configure the security for that group, and then assign only that user to the group. You may assign users to one or more security groups. A user is subject to all field-level security settings defined for all security groups to which the user is assigned. For more information on security groups, see the Security Groups section of the Security topic.
You can configure field-level security for the following areas of e-automate: Accounts (C/B), Accounts (G/L), Branches (G/L), Customer (A/R), Equipment (S/C), Inventory (I/C), Note Types (S/H), and Vendor (A/P).
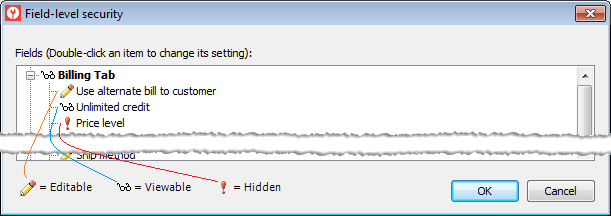
For the applicable fields within these areas, you determine if users assigned to a security group may edit a field's data, view but not edit a field's data, or not see a field. The option to edit a field's data is not available if the field is a display-only field that cannot be edited. On the Field-level Security window, an icon to the left of each field (or group of dependent fields) indicates for the security group if the field is editable, viewable, or hidden.
If fields in a group are dependent on each another, the system displays the fields within a group. For example, the Field-level Security window for the Customer record shows, on the Address tab, a Physical Address fields group, which contains the Attention field and the Address fields group (Address, City, County, State, Zip, and Country).

Depending upon the group of dependent fields, the system may give you one of two options for assigning field-level security to the group:
For some groups, such as the Physical Address fields group shown in the image above, you may assign the Viewable or Hidden security level to the entire group. If you assign the Viewable security level to the field group, you can then assign the Editable, Viewable, or Hidden security level individually to each field in the group as you deem appropriate. If you assign the Hidden security level to the field group, the system collapses the group and hides all fields within the field group from this security group.
For other groups, such as the Address fields group shown in the image above (which contains the customer's Address, City, County, State, Zip, and Country fields), you may assign only one field-level security setting to the entire group. This option saves you the time of having to manually assign a security setting to each field in the group when it is likely that you will want to assign the same security setting to all fields in the field group.
Accessing Field-level SecurityAccessing Field-level Security
Open e-admin.
Locate the company to which you want to apply field-level security.
Double-click on the desired company, or select the desired company and click [Security]. The Security window opens.
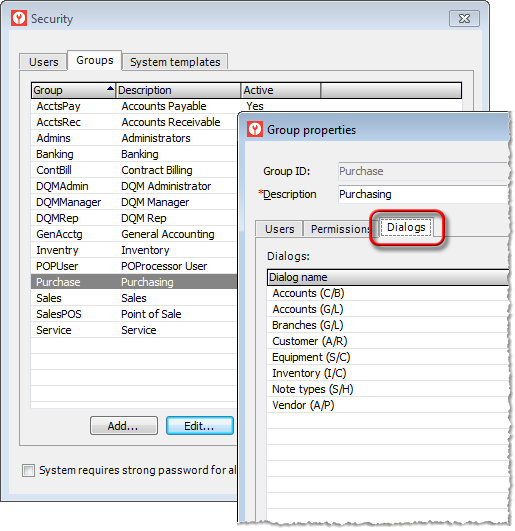
Click the Groups tab to bring it forward.
Locate the group for which you want to apply field-level security.
Double-click on the desired group, or select the group and click [Edit]. The Group Properties window opens.
Click the Dialogs tab to bring it forward.
In the Dialogs region, select the record type to which you want to assign field-level security and click [Edit], or double-click on the desired record type. The Field-level Security window opens.
Assigning Field-level SecurityAssigning Field-level Security
You assign field-level security through the Dialogs tab of the Group Properties window.
To assign field-level security, do the following:
From
the Dialogs region on the
Dialogs tab, select the record
type to which you want to assign field-level security (e.g., Customer (A/R) ). When you select
the record type, the Field-level Security window opens displaying
field-level security options specific to the selected record type.
To the left of each field or field group, the system displays one of
the following:
![]() An Editable
(pencil) icon, indicating the user can edit the field or field group.
An Editable
(pencil) icon, indicating the user can edit the field or field group.
![]() A Viewable (glasses)
icon, indicating the user can see but not edit the field or field
group.
A Viewable (glasses)
icon, indicating the user can see but not edit the field or field
group.
![]() A Hidden (exclamation
mark) icon, indicating the user cannot see the field or field group;
the system hides the field or field group from view.
A Hidden (exclamation
mark) icon, indicating the user cannot see the field or field group;
the system hides the field or field group from view.
Select a field or field group for which you want to change the field-level security.
Double-click
the field or field group to toggle the icon from Editable
to Viewable to Hidden
until the icon represents the field-level security you want to assign
to the field or field group for this security group.
Note: Depending upon the group
of dependent fields, the system may give you one of two options for
assigning field-level security to the group:
For some groups, such as the Physical Address fields group shown in the image above, you may assign the Viewable or Hidden security level to the entire group. If you assign the Viewable security level to the field group, you can then assign the Editable, Viewable, or Hidden security level individually to each field in the group as you deem appropriate. If you assign the Hidden security level to the field group, the system collapses the group and hides all fields within the field group from this security group.
For other groups, such as the Address fields group shown in the image above (which contains the customer's Address, City, County, State, Zip, and Country fields), you may assign only one field-level security setting to the entire group. This option saves you the time of having to manually assign a security setting to each field in the group when it is likely that you will want to assign the same security setting to all fields in the field group.
Repeat Steps 1-3 for each additional record type for which you want to set security for this security group.
Applying Field-level SecurityApplying Field-level Security
On the Field-level Security window, click [OK] to save your field-level security changes (or click [Cancel] to close this window without saving your changes).
On the Group Properties window, click [OK] to save your changes (or click [Cancel] to close this window without saving your changes).
The system displays the message, "All e-automate users and Task Engines (DGServer) must restart for the changes to take effect." Click [OK] to acknowledge that users must be disconnected from e-automate and the task engines restarted before the field-level security changes will take effect.
On the Security window, click [Close] to close the window and return to the main E-admin window.
Non-supported ReleaseNon-supported Release
©2022 ECI and the ECI logo are registered trademarks of ECI Software Solutions, Inc. All rights reserved.