Income Statement
You process an Income Statement report to show your net income/(loss) balances.
You can run the report for all dates or periods, a preset date and/or period range (e.g., Last Fiscal Quarter or This Period), or a custom date or period range. You can also filter the report by department, branch, job number, and/or balance sheet ranges. Additionally, you can specify a group-by option and a sort sequence (account number or account name). You can choose to exclude or include accounts with no activity, inactive accounts, and/or year-end closing entries. You can also choose to see one of three levels of detail in the main report.
If you check the Summarize Accounts box, the system lists on the main report only the following totals:
Revenues (The total from all general ledger accounts with an Account Type of Revenue)
Cost of Goods Sold (The total of all general ledger accounts with an Account Type of Cost of Goods Sold)
Gross Margin (Revenues minus Cost of Goods Sold)
Operating Expenses (The total of all general ledger accounts with an Account Type of Expense)
Operating Income (Gross Margin minus Cost of Goods Sold)
Non-Operating Items (The total of all general ledger accounts with an Account Type of Other Income or Other Expense)
Tax Expenses (The total of all general ledger accounts with an Account Type of Tax Expense)
Net Income/(Loss) (Operating Income minus Non-Operating Items minus Tax Expense)
Note: Revenues, Cost of Goods Sold, Operating Expenses, Non-Operating Items, and/or Tax Expenses sections are only present if the section contains at least one general ledger account; and a section can be omitted based on the report parameters if the section contains no activity and/or no active general ledger accounts.
If you leave the Summarize Accounts and Show Account Details boxes unchecked, the system lists on the main report the summary totals for each account within the Revenues, Cost of Goods Sold, Operating Expenses, Non-Operating Items, and Tax Expenses sections in addition to showing the summary totals for Revenues, Cost of Goods Sold, Gross Margin, Operating Expenses, Operating Income, Non-Operating Items, Tax Expenses, and Net Income/(Loss). For each account, the system lists the account number, account name, and summary balance.
If you leave the Summarize Accounts box unchecked and check the Show Account Details box, the system lists on the main report the summary totals for each group-by selection (branch, department, division, or balance sheet) within each account within the Revenues, Cost of Goods Sold, Operating Expenses, Non-Operating Items, and Tax Expenses sections in addition to showing the summary totals for each account within the Revenues, Cost of Goods Sold, Operating Expenses, Non-Operating Items, and Tax Expenses sections as well as the summary totals for Revenues, Cost of Goods Sold, Gross Margin, Operating Expenses, Operating Income, Non-Operating Items, Tax Expenses, and Net Income/(Loss). For the selected group-by option, the system displays the group's number, name, and summary balance (e.g., branch number, branch name, and summary balance).
This report offers drill-down capabilities. By clicking on any summary balance displayed in blue text, you can view the individual transactions on which the balance is based. The sub report opens in an additional window. The sub report contains the following information:
Header Info: Report Section (Revenues, Cost of Goods Sold, Operating Expenses, Non-Operating Items, Tax Expenses), Account Number, Account Name
Detail: Date, Period, Number, Transaction Type, Description, Balance Sheet, Branch, Division, Department, and Amount
Account Summary Info: Account Number and Total Amount for that Account Number
Sub Report Summary Info: Final total Amount for all accounts included in the sub report (the balance you clicked to access the sub report)
Getting to the ReportGetting to the Report
Log in to e-automate with the appropriate permissions.
Click [Reports] to open the Report Console window.
In the left pane, click Standard Reports.
In the right pane, double-click the Income Statement report to open the Income Statement window.
Setting Report ParametersSetting Report Parameters
When setting report parameters, each parameter you have selected displays in the upper portion of the right pane. The parameters do not reset. The report displays with the parameters that were set the last time you ran the report. You can use the following parameters:
Date or PeriodDate or Period
To filter by transaction date or period, do the following:
In the left pane of the Income Statement window, select Date or Period to display the Date or Period region in the right pane.
Do one of the following:
To filter based on date, do the following:
Select the Dates radio button.
Do one of the following:
To include all dates, in the Dates region, use the drop-down menu to select <All Dates>.
To use a pre-defined date range, in the Dates region, use the drop-down menu to select a pre-configured date option (e.g., Last Fiscal Quarter).
To specify a custom date range, do the following:
In the Dates region, use the drop-down menu to select <Custom>.
In the From field, enter the beginning date or use the drop-down calendar to select a date.
In the To field, enter the ending date or use the drop-down calendar icon to select a date.
To filter based on period, do one of the following:
Select the Periods radio button.
Do one of the following:
To include all periods, in the Periods region, use the drop-down menu to select <All Periods>.
To use a pre-defined date range, in the Periods region, use the drop-down menu to select a pre-configured period option (e.g., This Period).
To specify a custom period range, do the following:
In the Periods region, use the drop-down menu to select <Custom>.
In the From field, enter the month and year identifying the beginning period to include in the range.
In the To field, enter the month and year identifying the ending period to include in the range.
DepartmentsDepartments
To filter by department, do the following:
In the left pane of the Income Statement window, select Departments to display the Departments region in the right pane.
Do one of the following:
If you want to include all departments, in the Departments region, check the Include all Departments checkbox.
If you want to select a range of departments, do the following:
Uncheck the Include all Departments checkbox.
In the From field, enter the beginning department number or use the lookup icon to select a department.
In the To field, enter the ending department number or use the lookup icon to select a department.
If you want to select departments using the advanced filter, do the following:
Uncheck the Include all Departments checkbox.
Check the Use advanced filter box.
Click the [Advanced filter] button to open the Departments window.
Use the QuickSearch functionality to filter for the department(s) you want to include in the report. For information on using QuickSearch functionality, see the Using the QuickSearch topic.
When the Departments window displays the department(s) you want to include in the report, click [OK] to return to the Income Statement window.
BranchesBranches
To filter by branch, do the following:
In the left pane of the Income Statement window, select Branches to display the Branches region in the right pane.
Do one of the following:
If you want to include all branches, in the Branches region, check the Include all Branches checkbox.
If you want to select a range of branches, do the following:
Uncheck the Include all Branches checkbox.
In the From field, enter the beginning branch number or use the lookup icon to select a branch.
In the To field, enter the ending branch number or use the lookup icon to select a branch.
If you want to select branches using the advanced filter, do the following:
Uncheck the Include all Branches checkbox.
Check the Use advanced filter box.
Click the [Advanced filter] button to open the Branches window.
Use the QuickSearch functionality to filter for the branch(s) you want to include in the report. For information on using QuickSearch functionality, see the Using the QuickSearch topic.
When the Branches window displays the branch(s) you want to include in the report, click [OK] to return to the Income Statement window.
Job NumbersJob Numbers
To filter by job number, do the following:
In the left pane of the Income Statement window, select Job Numbers to display the Job Numbers region in the right pane.
Do one of the following:
If you want to include all job numbers, in the Job Numbers region, check the Include all Job Numbers checkbox.
If you want to select a range of jobs, do the following:
Uncheck the Include all Job Numbers checkbox.
In the From field, enter the beginning job number or use the lookup icon to select a job number.
In the To field, enter the ending job number or use the lookup to select a job number.
If you want to select job numbers using the advanced filter, do the following:
Uncheck the Include all Job Numbers checkbox.
Check the Use advanced filter box.
Click the [Advanced filter] button to open the Job Numbers window.
Use the QuickSearch functionality to filter for the job number(s) you want to include in the report. For information on using QuickSearch functionality, see the Using the QuickSearch topic.
When the Job Numbers window displays the job number(s) you want to include in the report, click [OK] to return to the Income Statement window.
Balance Sheet GroupsBalance Sheet Groups
To filter by balance sheet group, do the following:
In the left pane of the Income Statement window, select Balance Sheet Groups to display the Balance Sheet Groups region in the right pane.
Do one of the following:
If you want to include all balance sheet groups, in the Balance Sheet Groups region, check the Include all Balance Sheet Groups checkbox.
If you want to select a range of balance sheet groups, do the following:
Uncheck the Include all Balance Sheet Groups checkbox.
In the From field, enter the beginning balance sheet group number or use the lookup icon to select a balance sheet group.
In the To field, enter the ending balance sheet group number or use the lookup icon to select a balance sheet group.
If you want to select balance sheet groups using the advanced filter, do the following:
Uncheck the Include all Balance Sheet Groups checkbox.
Check the Use advanced filter box.
Click the [Advanced filter] button to open the Balance Sheet Groups window.
Use the QuickSearch functionality to filter for the balance sheet group number(s) you want to include in the report. For information on using QuickSearch functionality, see the Using the QuickSearch topic.
When the Balance Sheet Groups window displays the balance sheet group number(s) you want to include in the report, click [OK] to return to the Income Statement window.
Group ByGroup By
To set a group-by option, do the following:
In the left pane of the Income Statement window, select Group By to display the Group By region in the right pane.
In the Group By region, select one of the following radio buttons:
Account and Branch: When selected, the system presents summary data for each branch within each account when you process the report with the Show Account Details box checked and the Summarize Accounts box unchecked.
Account and Department: When selected, the system presents summary data for each department within each account when you process the report with the Show Account Details box checked and the Summarize Accounts box unchecked.
Account and Division: When selected, the system presents summary data for each division within each account when you process the report with the Show Account Details box checked and the Summarize Accounts box unchecked.
Account and Balance Sheet Group: When selected, the system presents summary data for each balance sheet within each account when you process the report with the Show Account Details box checked and the Summarize Accounts box unchecked.
Note: The system only displays the group-by summaries when you process the report with the Show Account Details box checked and the Summarize Accounts box unchecked.
Sort ColumnSort Column
To select a column by which to sort the data listed within each section, do the following:
In the left pane of the Income Statement window, select Sort Column to display the Sort Column region in the right pane.
In the Sort Column region, set Sort Column to Account Number or Account Name.
Misc. OptionsMisc. Options
To set Misc. Options, do the following:
In the left pane of the Income Statement window, select Misc. Options to display the Misc. Options region in the right pane.
In the Misc. Options region, check or uncheck the following boxes as appropriate:
Show Accounts with no Activity: When checked, the system does not exclude any account on the basis of the account's not having transaction activity that meets the report parameters. When unchecked, the system excludes accounts for which no transaction activity meets the report parameters. This selection excludes accounts that have a zero balance (e.g., $0.00) as a result of no activity, but does not exclude accounts that have a zero monetary balance as a result of offsetting transactions.
Note: If all the accounts within a section of the report are hidden as a result of the Show Accounts with no Activity and/or Show Inactive Accounts boxes being unchecked, then the report hides the section, too.
Show Inactive Accounts: When checked, the system does not exclude accounts on the basis of the Active box's setting on the General Ledger Account window. When unchecked, the system excludes accounts for which: 1) the Active box is not checked on the General Ledger Account window, and 2) no activity exists within the reporting period; if an account has activity within the reporting period, the system does not consider the account inactive—even if the account's Active box is not checked.
Note: If the Show Accounts with no Activity box is not checked, the system hides inactive accounts—even if the Show Inactive Accounts box is checked—because inactive accounts have a zero balance (e.g., $0.00).
Note: If all the accounts within a section of the report are hidden as a result of the Show Accounts with no Activity and/or Show Inactive Accounts boxes being unchecked, then the report hides the section, too.
Summarize Accounts: When checked, the system lists on the main report only the summary totals for Revenues, Cost of Goods Sold, Gross Margin, Operating Expenses, Operating Income, Non-Operating Items, Tax Expenses, and Net Income/(Loss). When the Summarize Accounts and Show Account Details boxes are not checked, the system lists on the main report the summary totals for each account within the Revenues, Cost of Goods Sold, Operating Expenses, Non-Operating Items, Tax Expenses sections in addition to showing the summary totals for Revenues, Cost of Goods Sold, Gross Margin, Operating Expenses, Operating Income, Non-Operating Items, Tax Expenses, and Net Income/(Loss). When the Summarize Accounts box is not checked and the Show Account Details box is checked, the system lists on the main report the summary totals for each group-by selection (branch, department, division, or balance sheet) within each account within the Revenues, Cost of Goods Sold, Operating Expenses, Non-Operating Items, and Tax Expenses sections in addition to showing the summary totals for each account within the Revenues, Cost of Goods Sold, Operating Expenses, Non-Operating Items, and Tax Expenses sections as well as the summary totals for Revenues, Cost of Goods Sold, Gross Margin, Operating Expenses, Operating Income, Non-Operating Items, Tax Expenses, and Net Income/(Loss). For the selected group-by option, the system displays the group's number, name, and summary balance (e.g., branch number, branch name, and summary balance).
Show Account Details: When the Show Account Details box is checked and the Summarize Accounts box is not checked, the system lists on the main report the summary totals for each group-by selection (branch, department, division, or balance sheet) within each account within the Revenues, Cost of Goods Sold, Operating Expenses, Non-Operating Items, and Tax Expenses sections in addition to showing the summary totals for each account within the Revenues, Cost of Goods Sold, Operating Expenses, Non-Operating Items, and Tax Expenses sections as well as the summary totals for Revenues, Cost of Goods Sold, Gross Margin, Operating Expenses, Operating Income, Non-Operating Items, Tax Expenses, and Net Income/(Loss). For the selected group-by option, the system displays the group's number, name, and summary balance (e.g., branch number, branch name, and summary balance). When this Show Account Details and Summarize Accounts boxes are not checked, the system lists on the main report the summary totals for each account within the Revenues, Cost of Goods Sold, Operating Expenses, Non-Operating Items, and Tax Expenses sections in addition to showing the summary totals for Revenues, Cost of Goods Sold, Gross Margin, Operating Expenses, Operating Income, Non-Operating Items, Tax Expenses, and Net Income/(Loss).
Note: If the Summarize Accounts box is checked, that selection overrides the Show Account Details selection; the system's main report lists only summary totals for Revenues, Cost of Goods Sold, Gross Margin, Operating Expenses, Operating Income, Non-Operating Items, Tax Expenses, and Net Income/(Loss).
Include Year End Closing Entries: When checked, the system includes year-end closing entries. When unchecked, the system does not include year-end closing entries.
Note: When you run an Income Statement report and a Balance Sheet report for all dates or all periods, the Net Income/(Loss) will not balance between the two reports if you do not process the report with this box checked because the Balance Sheet shows year-end closing entries. Additionally, if you run the report with this box checked and the Net Income/(Loss) still does not balance with the Balance Sheet, this is an indication you may have balances that have not been closed for prior years.
Misc. Options 2Misc. Options 2
To set Misc. Options 2, do the following:
In the left pane of the Income Statement window, select Misc. Options 2 to display the Misc. Options 2 region in the right pane.
In the Misc. Options 2 region, check or uncheck the following boxes as appropriate:
Include non-dept assigned transactions (If filtered by depts): When checked, if the Include all Departments box is not checked, the system includes transaction activity that is not associated with any department in addition to transaction activity associated with departments that meet the Departments filter parameters. When unchecked, if the Include all Departments box is not checked, the system only includes transaction activity that is associated with the department(s) that meet the Departments filter parameters.
Include non-branch assigned transactions (If filtered by branches): When checked, if the Include all Branches box is not checked, the system includes transaction activity that is not associated with any branch in addition to transaction activity associated with branches that meet the Branches filter parameters. When unchecked, if the Include all Branches box is not checked, the system only includes transaction activity that is associated with the branch(es) that meet the Branches filter parameters.
Processing the ReportProcessing the Report
On the Income Statement window, click [OK] to process the report.
Understanding Report CalculationsUnderstanding Report Calculations
Main ReportMain Report
The main Income Statement report can be generated to display one of three levels of information:
Summarize Accounts: Generated with the Summarize Accounts box checked under Misc. Options
Accounts: Generated with the Summarize Accounts and Show Account Details boxes unchecked under Misc. Options
Accounts Details: Generated with the Summarize Accounts box unchecked and the Show Account Details box unchecked under Misc. Options
This sample report image shows an Income Statement report with the accounts summarized:
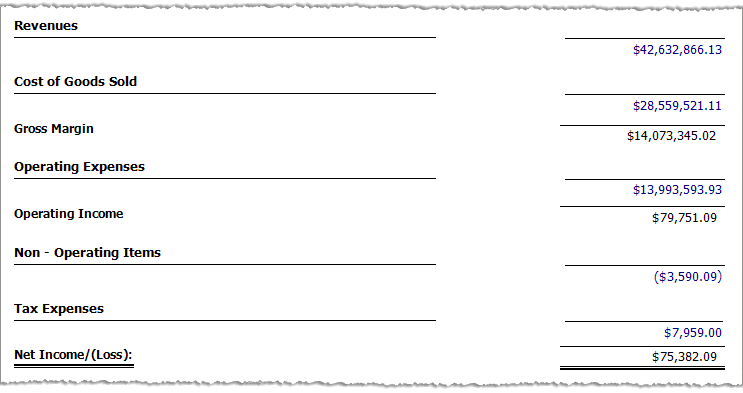
The table below this image identifies the source of each of the numbers in this image and/or the calculations for arriving at the numbers.
Note: To jump to a specific explanation or calculation, click a number in the sample report image. For the links within this topic to work, you must click the online help's [Expand All] button; the browser will not display a link in content that is hidden.
Note: This sample report and the related sub reports are designed for the sole purpose of illustrating report calculations; they are not intended to represent a realistic or best practices portrayal of income statement activity.
|
Report Label |
Calculations |
|
The sum of all revenue activity (activity tied to general ledger accounts with an Account Type of Revenue) that meets the report parameters.
To view detail for the Summarize Accounts view, click the Revenues balance to see the sub report.
For the Accounts view, in addition to clicking any balance in the Revenues section to view a sub report, you can add the balances for all the revenue accounts to arrive at the Revenues balance.
Example (based on this Accounts Image):
For the Account Details view, in addition to clicking any balance in the Revenues section to view a sub report or adding the balances for all the revenue accounts to arrive at the Revenues balance, you can add the detail balances to arrive at each Account balance that makes up the Revenues balance.
Example (based on this Account Details image generated using the Account and Branch group by option):
Note: In the actual report, you can click any balance displayed in blue font to see the transactions on which the account balance is based. Using this sample report, you can click the $3,985,329.00 balance in the Accounts and Account Details images shown above to view an excerpt of the sub report on which this balance is based. |
|
|
The sum of all cost of goods sold activity (activity tied to general ledger accounts with an Account Type of Cost of Goods Sold) that meets the report parameters.
To view detail for the Summarize Accounts view, click the Cost of Goods Sold balance to see the sub report.
For the Accounts view, in addition to clicking any balance in the Cost of Goods Sold section to view a sub report, you can add the balances for all the cost of goods sold accounts to arrive at the Cost of Goods Sold balance (see Revenues section of this table for an Accounts view example).
For the Account Details view, in addition to clicking any balance in the Cost of Goods Sold section to view a sub report or adding the balances for all the cost of goods sold accounts to arrive at the Cost of Goods Sold balance, you can add the detail balances to arrive at each Account balance that makes up the Cost of Goods Sold balance (see Revenues section of this table for an Accounts view example). |
|
|
The difference between the Revenues balance and the Cost of Goods Sold balance.
Calculation: Gross Margin = Revenues - Cost of Goods Sold
Example (based on Income Statement Summarize Accounts Image): Gross Margin = $42,632,866.13 Revenues - $28,559,521.11 Cost of Goods Sold = $14,073,345.02 |
|
|
The sum of all operating expense activity (activity tied to general ledger accounts with an Account Type of Operating Expense) that meets the report parameters.
To view detail for the Summarize Accounts view, click the Operating Expenses balance to see the sub report.
For the Accounts view, in addition to clicking any balance in the Operating Expenses section to view a sub report, you can add the balances for all the operating expense accounts to arrive at the Operating Expenses balance (see Revenues section of this table for an Accounts view example).
For the Account Details view, in addition to clicking any balance in the Operating Expenses section to view a sub report or adding the balances for all the operating expense accounts to arrive at the Operating Expenses balance, you can add the detail balances to arrive at each Account balance that makes up the Operating Expenses balance (see Revenues section of this table for an Accounts view example). |
|
|
The difference between the Gross Margin balance and the Operating Expenses balance.
Calculation: Operating Income = Gross Margin - Operating Expenses
Example (based on Income Statement Summarize Accounts Image): Operating Income = $14,073,345.02 Gross Margin - $13,993,593.93 Operating Expenses = $79,751.09 |
|
|
The sum of all non-operating items activity (activity tied to general ledger accounts with an Account Type of Other Income or Other Expense) that meets the report parameters.
To view detail for the Summarize Accounts view, click the Non-Operating Items balance to see the sub report.
For the Accounts view, in addition to clicking any balance in the Non-Operating Items section to view a sub report, you can add the balances for all the non-operating items accounts to arrive at the Non-Operating Items balance (see Revenues section of this table for an Accounts view example).
For the Account Details view, in addition to clicking any balance in the Non-Operating Items section to view a sub report or adding the balances for all the non-operating items accounts to arrive at the Non-Operating Items balance, you can add the detail balances to arrive at each Account balance that makes up the Non-Operating Items balance (see Revenues section of this table for an Accounts view example). |
|
|
The sum of all tax expense activity (activity tied to general ledger accounts with an Account Type of Tax Expense) that meets the report parameters.
To view detail for the Summarize Accounts view, click the Tax Expenses balance to see the sub report.
For the Accounts view, in addition to clicking any balance in the Tax Expenses section to view a sub report, you can add the balances for all the tax expense accounts to arrive at the Tax Expenses balance (see Revenues section of this table for an Accounts view example).
For the Account Details view, in addition to clicking any balance in the Tax Expenses section to view a sub report or adding the balances for all the tax expense accounts to arrive at the Tax Expenses balance, you can add the detail balances to arrive at each Account balance that makes up the Tax Expenses balance (see Revenues section of this table for an Accounts view example). |
|
|
The Operating Income balance minus the Non-Operating Items and Tax Expense balances.
Calculation: Net Income/(Loss) = Operating Income - Non-Operating Items - Tax Expenses
Example (based on Income Statement Summarize Accounts Image): Net Income/(Loss) = $79,751.09 Operating Income - ($3,590.09) Non-Operating Items - $7,959.00 Tax Expenses = $75,382.09 |

Sub ReportSub Report
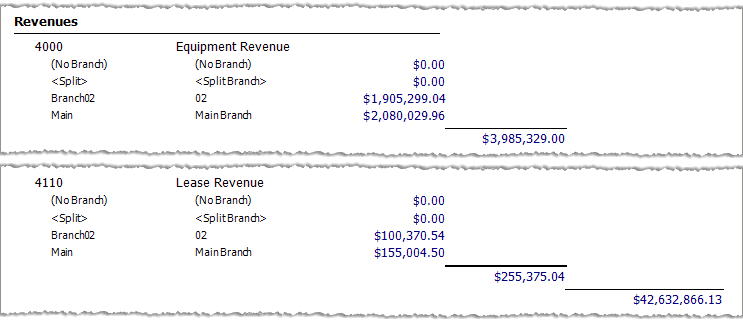
Following is an excerpt of an Income Statement's sub report.
Sub Report Image Showing $3,985,329.00 Revenue Balance for Account 4000 - Equipment Revenue

The sub report in this example can be accessed by clicking the $3,985,329.00 balance shown in the Revenues section of the Accounts and Account Details views of the main report. For any amount listed in blue font on the main report, the sub report displays the Date, Period, Number, Transaction Type, Description, Balance Sheet, Branch, Division, Department, and Amount for each transaction within the reporting period on which the balance is based. Negative values are listed within parentheses. The following table indicates when a sub report's value is a credit or a debit.
|
Account Type |
Positive |
Negative |
|
Revenue |
Credit |
Debit |
|
Cost of Goods Sold |
Debit |
Credit |
|
Expense |
Debit |
Credit |
|
Other Expense |
Debit |
Credit |
|
Tax Expense |
Debit |
Credit |
|
Other Income |
Credit |
Debit |
In the sample sub report image shown above, Account 4000 is a Revenue account so the positive values shown in the image represent credits.
Non-supported ReleaseNon-supported Release
©2022 ECI and the ECI logo are registered trademarks of ECI Software Solutions, Inc. All rights reserved.